Apache Kafka is an open source project that supports industrial-strength data streaming in real-time. Kafka can process more than one hundred thousand messages per second. Some companies report the ability to process millions of messages per second.
Kafka is well suited for applications that coordinate rideshare activity, stream videos, and provide real-time fintech. If your application requires a continuous stream of time-sensitive data, Kafka will meet your needs and then some.
As it is with any complex technology, there is a learning curve. This technology requires a general knowledge about building containers and configuring Kafka. In addition, it is essential to learn programming language specifics because you can use Kafka with a variety of languages.
The focus of this article is on building a Java client that can produce and consume data to and from an OpenShift Kafka stream.
This article is the third in a series that delves into the uses of Kafka. A developer's guide to using Kafka with Java, Part 1 covered basic Kafka concepts such as installing Kafka and using the command-line client. The second article, How to create Kafka consumers and producers in Java, describes how to create Java code that interacts directly with a Kafka broker hosted on your local machine.
Now let's go a bit deeper into programming Kafka at the enterprise level. We will adapt the code created in the second article to work with Red Hat OpenShift Streams for Apache Kafka. This technology enables enterprises to work productively with Kafka by avoiding the tedious, detailed labor that goes into supporting a Kafka broker running at web scale.
First, I will provide an overview of OpenShift Streams for Apache Kafka. Then I will describe the mechanics of setting up a stream and demonstrate Java/Maven code that binds to a Kafka instance. This Java code includes tests that produce and consume messages to and from a stream.
You can download this code from the GitHub repo to your local machine.
How OpenShift Streams for Apache Kafka simplifies the Kafka process
OpenShift Streams for Apache Kafka is a service provided by Red Hat that allows developers to create fully functional Kafka streams without the burden of configuring Kafka servers and binding them to named URLs. Instead, a developer can log into the OpenShift console, create an instance of Kafka, and a Kafka topic that produces and consumes messages.
The developer creates a service account that binds to a particular Kafka topic. Then the developer configures the Kafka instance to grant access permissions to the service account according to a particular topic or multiple topics. Developers can grant the service account permission to read from a topic as a consumer or write to a topic as a producer. These steps required to use OpenShift Streams for Apache Kafka are summarized in Figure 1.

Behind the scenes, OpenShift Streams for Apache Kafka acts as a go-between for a native cloud provider or an on-premises data center. OpenShift Streams for Apache Kafka provides configuration and access to servers and externally hosted storage. The cloud provider, such as AWS, stores the Kafka messages, and the Kafka servers manage those messages. (See Figure 2.)
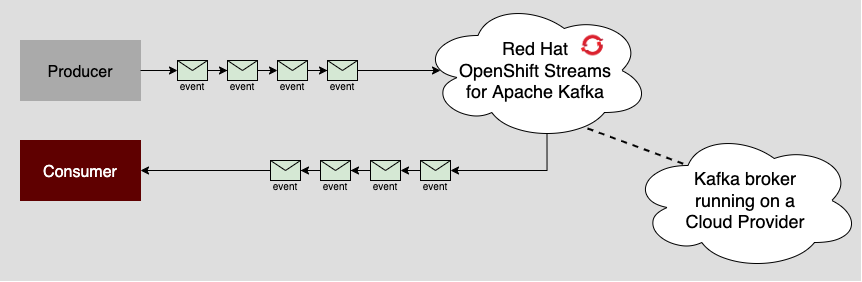
Developers gain access to the Kafka server through a URL published by OpenShift Streams for Apache Kafka. On the backend, OpenShift Streams for Apache Kafka works with the native cloud provider to save, store, and retrieve stream data. Ultimately, OpenShift Streams for Apache Kafka reduces the complex and mundane work of managing Kafka, allowing developers to focus on achieving their programming objectives.
Running a Kafka broker
You can get a stream up and running through the OpenShift web console or the OpenShift oc command-line interface (CLI). For the purpose of this article, we will work with the OpenShift web console.
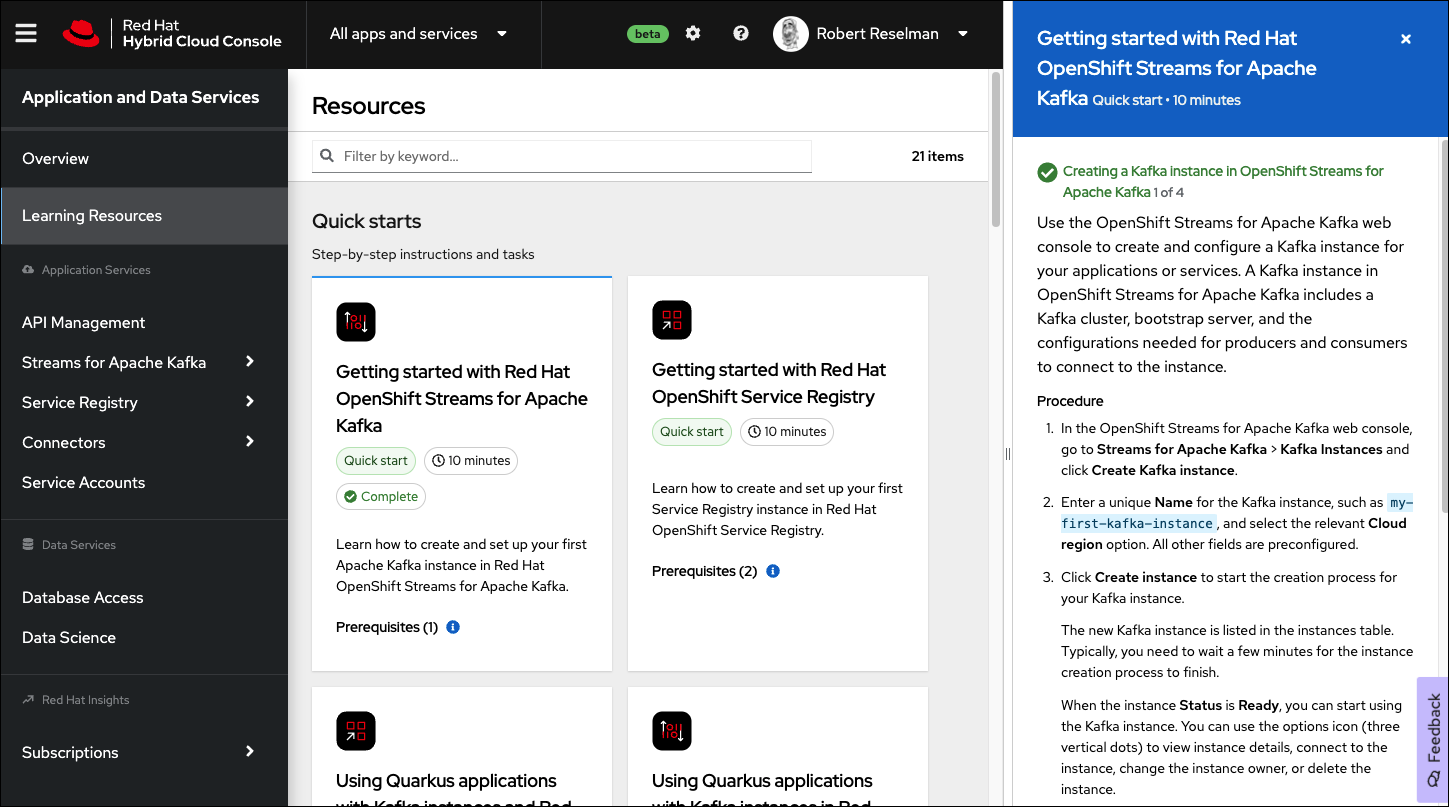
The best way to learn the basics of creating an OpenShift stream is to take the quickstart lesson: Getting started with OpenShift Streams for Apache Kafka.
One of the nice things about the quickstart lesson is that it is interactive. You can log into the OpenShift web console and create a Kafka server under OpenShift Streams for Apache Kafka. The web console provides step-by-step instructions as shown in Figure 3.
To run the demonstration application, complete the following steps from the quickstart instructions:
- Create the Kafka instance.
- Create the service account.
- Create the topic.
- Configure access to the topic according to the service topic.
Create four required pieces of information as you go through the quickstart. These key items are:
- The Kafka topic name that you created in OpenShift.
- The URL of the Kafka bootstrap server.
- The client ID associated with the service account you will bind to the Kafka instance you created in OpenShift.
- The client secret associated with the service account you will bind to the Kafka instance you created in OpenShift.
The quickstart instructions also explain when to create each item. Copy the fields into a text editor so that you can paste them into an environment variable .env file later on. The .env file (detailed in the next section) emulates environment variables and their values.
Once you complete the quickstart, you will have a fully functional instance of Kafka running under OpenShift Streams for Apache Kafka. The quickstart instance runs at no charge to you. The instance runs for 48 hours until destroyed. However, if you want to do more experimenting, you can spin up another Kafka stream to take its place.
Producing and consuming messages under OpenShift in 6 steps
As previously mentioned, the demonstration project stored on GitHub is a Java application that uses the Apache Kafka client to produce and consume messages from Kafka.
The Apache Kafka client is agnostic, meaning it can work with a local instance of Kafka as well as one run in the cloud. In the demonstration, the Kafka client binds to the instance of Kafka you created in the quickstart lesson.
1. Clone the code from GitHub
Download the code from GitHub by running the following command:
$ git clone https://github.com/redhat-developer-demos/kafka-openshift-streams-demo.git
To run the code locally, create environment variables to gain secure access to your Kafka instance. Use the Maven java-dotenv package to create these environment variables. The java-dotenv package enables you to create environment variables from settings in a text file.
2. Create environment variables with java-dotenv
The application needs to provide the specifics of your Kafka instance, including a username and password, to gain access. Putting username/password credentials directly into the code or even a configuration file is bad business. It would take only one nefarious hack into the source control management system for an attacker to gain access to those credentials and code. A better way to provide this login information is to inject security credentials into environment variables at runtime, and then the code verifies the availability of the required environment variable. This method does not store access data in the code, thus eliminating this type of vulnerability.
However, continuously provisioning environment variables is tedious. This is where java-dotenv comes into play.
When using java-dotenv, you put the username and password credentials in a .env file as a key-value pair. Then java-dotenv takes these credentials and injects them into memory as environment variables. If the credentials are already stored in environment variables in memory, java-dotenv ignores the data in the .env file and reports only the values of the in-memory environment variables.
Be advised. Although java-dotenv makes things easier, there is a risk. Never commit the local .env file into source control. You can prevent this mistake by adding the following line to the source code's .gitignore file as follows:
# add this line the .gitignore to prevent an accidental commit

.env
3. Install java-dotenv
Install java-dotenv by adding the following <dependency> configuration to the <dependencies> section of the Maven project's pom.xml file (the entry has already been added to the demonstration project's pom.xml file):
<dependency>
     <groupId>io.github.cdimascio</groupId>
     <artifactId>java-dotenv</artifactId>
     <version>5.2.2</version>
 </dependency>
4. Configure the .env file
Configure the .env file to declare the environment variables to inject into the demonstration project's memory.
NOTE: The demonstration project does not ship with the .env file. You must create one and put the file in the root of the demonstration project's working directory.
The structure of the .env file is as follows:
DOTENV_TEST_MESSAGE=PING
KAFKA_STREAM_TEST_TOPIC=<TOPIC_NAME_ON_KAFKA_STREAMS>
KAFKA_STREAM_USER_NAME=<SERVICE_ACCOUNT_CLIENT_ID>
KAFKA_STREAM_PWD=<SERVICE_ACCOUNT_CLIENT_SECRET>
KAFKA_STREAM_BOOTSTRAP_SERVER=<KAFKA_STREAMS_BOOTSTRAP_SERVER_URL>
The text in angle brackets should be filled in as follows:
<TOPIC_NAME_ON_KAFKA_STREAMS>is the name of the topic that will be producing and consuming messages. As explained earlier, you create the topic within OpenShift Streams for Apache Kafka.<SERVICE_ACCOUNT_CLIENT_ID>is the client ID created when you opened the OpenShift service account bound to the stream.<SERVICE_ACCOUNT_CLIENT_SECRET>is the client secret you created.<KAFKA_STREAMS_BOOTSTRAP_SERVER_URL>is the URL of the Kafka bootstrap server, produced when you created the instance of OpenShift Streams for Apache Kafka.
This is an example of a valid .env file:
DOTENV_TEST_MESSAGE=PING
KAFKA_STREAM_TEST_TOPIC=mytopic
KAFKA_STREAM_USER_NAME=srvc-acct-7a36b530-e8fe-471c-bb3d-aa005020d911
KAFKA_STREAM_PWD=6823f7bd-649b-4029-8a1c-8713a828918b
KAFKA_STREAM_BOOTSTRAP_SERVER=my-first-k-c-skrukt--m--nhc-fna.bf2.kafka.rhcloud.com:443
5. Configure a secure connection to OpenShift Streams for Apache Kafka
Getting the Java client to connect to OpenShift Streams for Apache Kafka requires special configuration settings for creating a secure connection. These configuration settings, which use the Simple Authentication and Security Layer (SASL) standard, are as follows (each setting is linked to a web page that provides details):
The demonstration application assigns values to the settings as follows:
security.protocol="SASL_SSL"sasl.mechanism="PLAIN"sasl.jaas.config='org.apache.kafka.common.security.plain.PlainLoginModule required username="<USERNAME>" password="<PASSWORD>"'
Essentially, the settings mean that the connection will use the SASL_SSL security protocol and the SASL security mechanism will be PLAIN. For the purposes of this demonstration, the PLAIN security mechanism simplifies the configuration by letting you submit the username and password credentials as plain text. However, the connection string is submitted confidentially by lower-level encryption specified in RFC4616.
Since this article's demonstration application is dedicated to connecting to an instance of Kafka running remotely under OpenShift Streams for Apache Kafka, the required configuration settings are put directly into the code in the addSecurityProperties method. The method is located in the src/main/java/com/demo/kafka/PropertiesHelper.java file of the demonstration application's source code.
Take a look at the code to see how to implement the configuration. Note that the values for the username and password are stored in the KAFKA_STREAM_USER_NAME and KAFKA_STREAM_PWD environment variables, respectively. Hence, the connection information is protected from intrusions into the server's file system:
static Properties addSecurityProperties(Properties props) throws
                                PropertiesConfigurationException {
  // use the private method that ensures the required environment variables are present
  testForSecurityProperties();

  // create an instance of java-dotenv to retrieve the environment variables
  Dotenv env = getDotEnv();

  //override the local Kafka instance settings with the Kafka Stream instance
  props.put("bootstrap.servers", env.get("KAFKA_STREAM_BOOTSTRAP_SERVER"));

  // add the security settings
  props.put("security.protocol", "SASL_SSL");
  props.put("sasl.mechanism", "PLAIN");
  // create the connection string, getting username and pwd from env vars
  props.put("sasl.jaas.config", PlainLoginModule.class.getName() + " required username=\"" + env.get("KAFKA_STREAM_USER_NAME") + "\" password=\"" + env.get("KAFKA_STREAM_PWD") + "\";");

  // return the amended properties collection
  return props;
}
Now that we have configured the Java client to use the Kafka instance running on OpenShift Streams for Apache Kafka, you can run the unit tests that produce and consume messages to and from OpenShift.
6. Run the tests
To run the unit tests that produce and consume messages, run the command from the top level of the directory in which you installed the demonstration code. But before you do, make sure that you have properly configured the .env file with the values of the username, password, bootstrap server URL, and topic specific to your Kafka instance and running under OpenShift Streams for Apache Kafka.
Assuming the .env file is created and configured, run the following command:
$ mvn test
Upon success, the output should look similar to the following:
Results :

Tests run: 4, Failures: 0, Errors: 0, Skipped: 0

[INFO] ------------------------------------------------------------------------
[INFO] BUILD SUCCESS
[INFO] ------------------------------------------------------------------------
[INFO] Total time: 19.510 s
[INFO] Finished at: 2022-05-09T19:08:02Z
[INFO] -----------------------------------------------------------------------
A successful test run creates numerous messages stored in the Kafka instance on OpenShift Streams for Apache Kafka. (Remember, Kafka retains all the messages it receives.)
You can verify that the messages are indeed stored on OpenShift Streams for Apache Kafka by going to your instance of Kafka running in OpenShift. Select the Kafka instance you created, then select the Messages tab on the Kafka Instance page as shown in Figure 4.
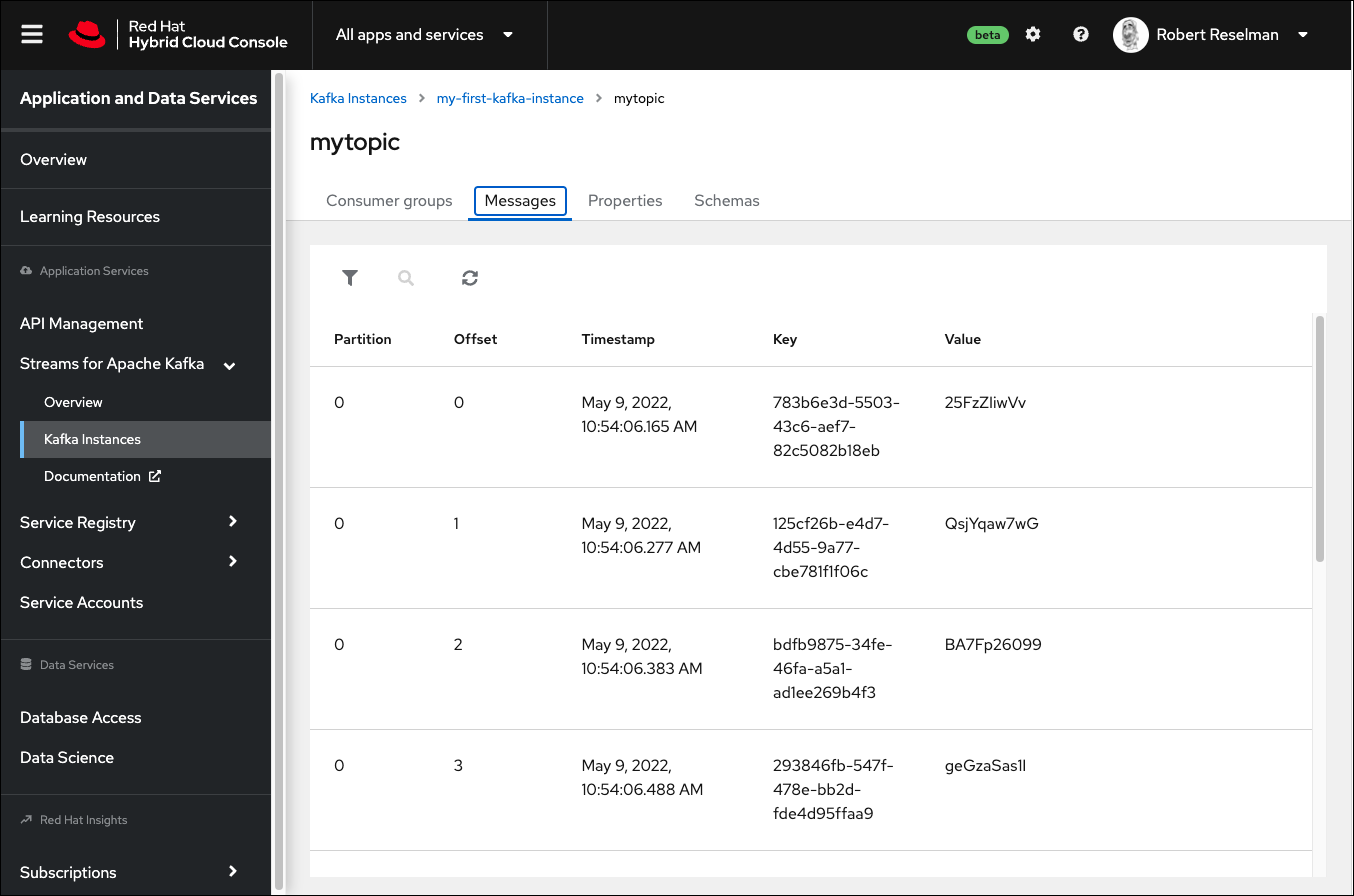
You will see the messages produced by the test on the topics page in the OpenShift web console.
We have completed the demonstration!
OpenShift Streams for Apache Kafka helps you focus on application development
In this article, you learned how to work with Red Hat OpenShift Streams for Apache Kafka to create and use a fully functional instance of Kafka. After we covered the concepts and benefits of OpenShift Streams for Apache Kafka, you were introduced to the process of creating a Kafka instance and a Kafka topic on that instance. You went through the quickstart in OpenShift to create a Kafka instance, a Kafka topic, and an OpenShift service account. You assigned access permissions to the service account for the topic you created.
Also, you downloaded the demonstration project from GitHub and configured an .env file within the demonstration project's working directory. The .env file defines environment variables that have the credentials to access the Kafka instance created under OpenShift Streams for Apache Kafka. You brought it all together by running the unit tests that ship with the demonstration code to produce and consume messages to and from OpenShift Streams for Apache Kafka.
Hopefully, the concepts and techniques you've learned in this article will inspire you to study Kafka further and try it on OpenShift Streams for Apache Kafka. This is a powerful and efficient technology that will make working with Kafka easier as you move forward in your journey to create message-driven programs using Java and OpenShift.
Last updated: October 4, 2023