Red Hat Data Grid is a middleware solution that has been developed for application cache data storage. It makes it possible to access and process in-memory data, improving the end-user experience.
This article offers guidance for Spring Boot and Red Hat Data Grid integration on version 4.9 of the Red Hat OpenShift Container Platform. You will set up a Red Hat Data Grid 8.2 cluster and deploy a Spring Boot application with separate namespaces to use Hot Rod communication between them.
Setting up the environment
The integration described in this article was made using the following technologies:
- Red Hat Data Grid 8.2
- OpenShift 4.9
- Spring Boot 2.5
- Java 11
Deploy the Data Grid cluster
Refer to the Data Grid Operator Guide for step-by-step instructions on deploying Red Hat Data Grid. For this integration, the Data Grid project's name is dgtest, and the Infinispan cluster's name is infinispan-test.
Create the dgtest project:
oc new-project dgtest
Then create a new Data Grid cluster using the Operator. For this integration, we created a custom resource YAML file using the Operator option Create Infinispan.
apiVersion: infinispan.org/v1
kind: Infinispan
metadata:
  name: infinispan-test
  namespace: dgtest
spec:
  expose:
    type: Route
  service:
    type: DataGrid
  replicas: 2
Gather relevant Data Grid cluster data
To integrate the Data Grid cluster for external use, you'll need to save some cluster data, such as the developer user credentials, the cluster CRT certificate, and the local SVC DNS hostname.
Begin by getting the developer user credentials.
oc get secret infinispan-test-generated-secret \
-o jsonpath="{.data.identities\.yaml}" | base64 --decode
The credentials will look something like this:
credentials:

- username: developer

password: SYtaUwZfPzNjHYeC

roles:

- admin
Now you need to get the data grid cluster certificate, tls.crt.
oc get secret infinispan-test-cert-secret \
-o jsonpath='{.data.tls\.crt}' | base64 --decode > tls.crt
Finally, get the service DNS hostname SVC for internal OpenShift routing.
oc get service infinispan-test -o go-template --template='{{.metadata.name}}.{{.metadata.namespace}}.svc.cluster.local{{println}}'
The result should be something like infinispan-test.dgtest.svc.cluster.local, which is what we'll use as the hostname for the purposes of this article.
Create a new cache
For this integration, the application must be able to store and read cache data from a cache named sessions. You can use multiple methods to create the cache, including the command-line interface (CLI) and the Web Management console. This article will use the Data Grid CLI method, connecting through the exposed route and the developer user credentials:
./opt/infinispan/bin/cli.sh
[disconnected]> connect https://infinispan-test-dgtest.openshiftcluster.com/ --trustall
Username: developer
Password: ****************
[infinispan-test-0-26062@infinispan-test//containers/default]> create cache sessions --template=org.infinispan.DIST_SYNC
[infinispan-test-0-26062@infinispan-test//containers/default]>
[infinispan-test-0-26062@infinispan-test//containers/default]> quit
The generated cache is as follows:
cat /opt/infinispan/server/data/caches.xml

<?xml version="1.0"?>
<infinispan xmlns="urn:infinispan:config:13.0">
    <cache-container>
        <caches>
            <distributed-cache name="sessions" mode="SYNC" remote-timeout="17500" statistics="true">
                <locking concurrency-level="1000" acquire-timeout="15000" striping="false"/>
                <state-transfer timeout="60000"/>
            </distributed-cache>
        </caches>
    </cache-container>
</infinispan>
How to deploy the Spring Boot project
The next step is to clone hotrodspringboot, a project that I have made available on my GitHub repository. This is a basic project that stores and retrieves cache data from the Data Grid cluster. It is deployed in a separate OpenShift namespace:
git clone -b openshift https://github.com/alexbarbosa1989/hotrodspringboot
You then need to create a truststore from the tls.crt cluster certificate.
keytool -importcert -keystore truststore.jks -alias server -file tls.crt
The data from truststore.jks allows the Spring Boot application to create the secure connection to the Data Grid cluster.
The sample Spring Boot application comes with a set of variables in the application.properties file that must be replaced by the data previously gathered to make a correct connection with the Data Grid cluster. That application.properties file is located in the ${project-home}/src/main/resources/ directory.
So the next step is to update the variables in application.properties file according to the Data Grid cluster data:
| Variable | Value |
|---|---|
$SERVICE_HOSTNAME |
infinispan-test.dgtest.svc.cluster.local |
$CLUSTER_NAME |
infinispan-test |
$USER_NAME |
developer |
$USER_PASSWORD |
SYtaUwZfPzNjHYeC |
$TRUST_STORE_FILE_PATH |
/mnt/secrets/truststore.jks |
$TRUST_STORE_PASSWORD |
password |
Once you've customized the application.properties file with those mapped values, it should look like this:
# context-path
server.servlet.context-path=/redhat

# Connection
infinispan.remote.server-list=infinispan-test.dgtest.svc.cluster.local
infinispan.remote.client-intelligence=BASIC

management.endpoints.web.exposure.include=*

# Authentication
infinispan.remote.use-auth=true
infinispan.remote.sasl-mechanism=SCRAM-SHA-512
infinispan.remote.auth-realm=default
infinispan.remote.auth-server-name=infinispan-test
infinispan.remote.auth-username=developer
infinispan.remote.auth-password=SYtaUwZfPzNjHYeC
infinispan.remote.sasl_properties.javax.security.sasl.qop=auth

# Encryption
infinispan.remote.sni_host_name=infinispan-test.dgtest.svc.cluster.local
infinispan.remote.trust_store_file_name=/mnt/secrets/truststore.jks
infinispan.remote.trust_store_password=password
infinispan.remote.trust_store_type=jks

# Marshalling
infinispan.remote.marshaller=org.infinispan.commons.marshall.JavaSerializationMarshaller
infinispan.remote.java-serial-whitelist=com.redhat.hotrod.*
Create a new project in OpenShift for Spring Boot application deployment
Now it's time to create an OpenShift project for your Spring Boot application. Create a new project on your OpenShift cluster named springboot-test.
oc new-project springboot-test
Next, create a secret with the previously created truststore.jks file in the springboot-test project:
oc create secret generic truststore-secret --from-file=truststore.jks
Deploy the Spring Boot application
Now you're ready to deploy the application on the springboot-test OpenShift project.
oc project springboot-test mvn clean fabric8:deploy -Popenshift
Wait until the pod is up and running.
oc get pods

class="language-bash" NAME READY  STATUS RESTARTS  AGE
hotrodspringboot-1-plkf7  1/1  Running  0 39s
hotrodspringboot-s2i-1-build  0/1  Completed  0 92s
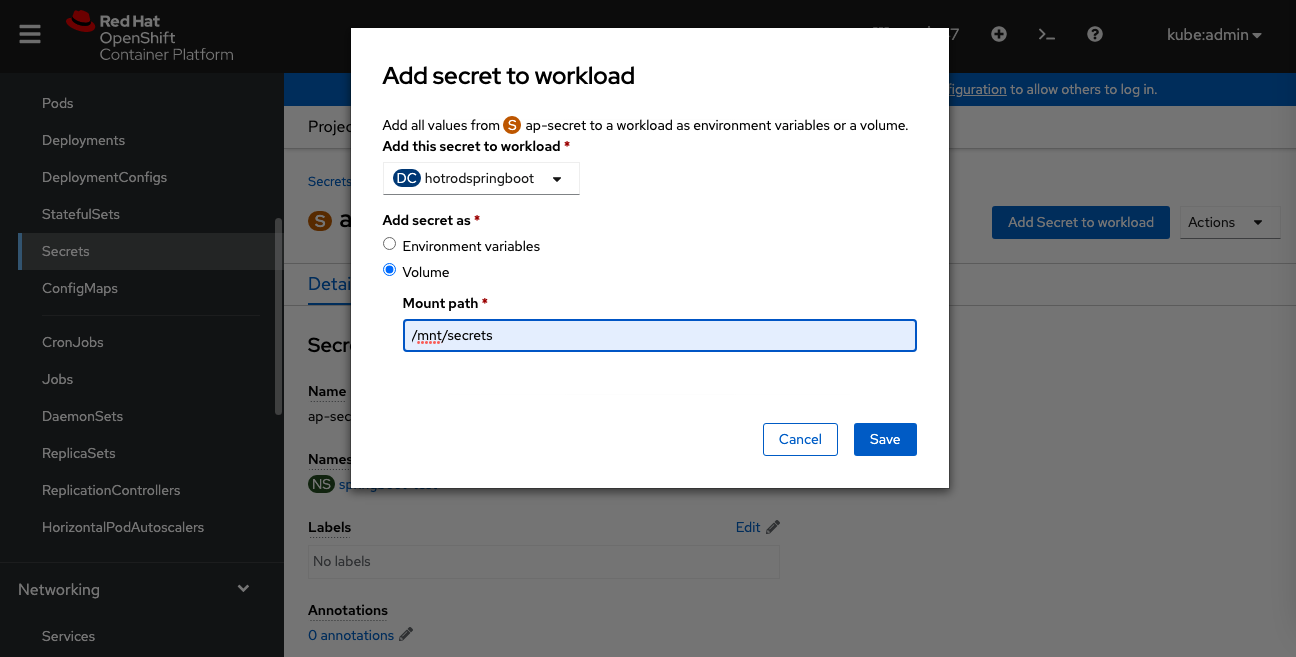
Now you need to add the secret to the deployment configuration. In this case, the mount path, /mnt/secrets, must be the same as the one defined in the application.properties file:
oc set volume dc/hotrodspringboot --add --name=truststore-secret -m /mnt/secrets/ -t secret --secret-name=truststore-secret --default-mode='0755'
Alternatively, you can load the secret using the Openshift web console by navigating to Projects -> springboot-test -> secrets -> ap-secret -> Add Secret to workload (Figure 1).
This process generates a new pod deployment after the new pod rollout is finished.
oc get pods

NAME  READY  STATUS RESTARTS  AGE
hotrodspringboot-2-deploy 0/1  Completed  0 100m
hotrodspringboot-2-x7lgx  1/1  Running  0 100m
hotrodspringboot-s2i-1-build  0/1  Completed  0 154m
hotrodspringboot-s2i-2-build  0/1  Completed  0 102m
Test the deployed integration
In order to test the service, you need to get the Spring Boot exposed route.
oc get routes

NAME  HOST/PORT
hotrodspringboot  hotrodspringboot-springboot-test.openshiftcluster.com

PATH  SERVICES  PORT  TERMINATION  WILDCARD
hotrodspringboot  8080  None
Next, you need to create a new cache entry, which takes the form of a key/value pair. This application uses a REST endpoint to get the data to store in the cache. The context path used for the update service is /update-cache/{cacheName}/{cacheKey}/{cacheValue}. Here is an example:
$ curl -X GET http://hotrodspringboot-springboot-test.openshiftcluster.com/redhat/update-cache/sessions/cacheKey1/cacheValue1

SUCCESS
cacheValue1
You can repeat this process to create a second cache entry or however many key/value pairs that you want for your test:
$ curl -X GET http://hotrodspringboot-springboot-test.openshiftcluster.com/redhat/update-cache/sessions/cacheKey2/cacheValue2

SUCCESS
cacheValue2
Now you can get the values from any of the previously stored cache data. As was the case with the update service, the application contains a REST endpoint for querying data from the cache. You can make a query using the key name from any of the previously stored key/value pairs using the context path /get-cache-value/{cacheName}/{cacheKey}, as in this example:
$ curl -X GET http://hotrodspringboot-springboot-test.openshiftcluster.com/redhat/get-cache-value/sessions/cacheKey1
The value for key: cacheKey1 is: cacheValue1
At this point, the Data Grid session cache stores both cache entries. You can also verify the entries on the Data Grid side.
[infinispan-test-0-26062@infinispan-test//containers/default]> cache sessions
[infinispan-test-0-26062@infinispan-test//containers/default/caches/sessions]> stats
{
"time_since_start" : 5364,
"time_since_reset" : 5364,
"current_number_of_entries" : -1,
"current_number_of_entries_in_memory" : -1,
"total_number_of_entries" : 2,
"off_heap_memory_used" : 0,
"data_memory_used" : 0,
"stores" : 2,
You can continue storing and querying data using these methods.
Conclusion
Data Grid integration allows applications to store and quickly use data externally. This example is a simple use case that can also apply to larger data sets across cloud and hybrid platforms. The official product and Operator documentation provide more Data Grid features to fit your use case.
Last updated: September 20, 2023