Kubernetes has some capabilities for monitoring the health of a node and to react to status changes with the intent of protecting a workload. However, these capabilities are insufficient for workloads that make intense use of storage and secondary networks, such as the virtual machine use case or telco deployments. In this article, I discuss the limitation of current capabilities within Kubernetes and demonstrate some approaches to remediate this situation.
How Kubernetes detects node issues
The component responsible for detecting situations that may impact a node is the kubelet. The checks it performs are documented, but it is only able to verify that a connection can be established with the control plane, and that a node has enough resources (PIDs, memory, disk space) to start a pod. It also reports a status of being ready, which is a condition that can be generally interpreted as the kubelet process itself being ready.
When an issue is encountered, it is recorded as a condition on the node in the status section. For example, this represents a healthy node (some fields are omitted for brevity):
conditions:
  - type: MemoryPressure
    status: 'False'
    reason: KubeletHasSufficientMemory
    message: kubelet has sufficient memory available
  - type: DiskPressure
    status: 'False'
    reason: KubeletHasNoDiskPressure
    message: kubelet has no disk pressure
  - type: PIDPressure
    status: 'False'
    reason: KubeletHasSufficientPID
    message: kubelet has sufficient PID available
  - type: Ready
    status: 'True'
    reason: KubeletReady
    message: kubelet is posting ready status
The node controller also turns conditions into taints. A condition associated with pressure against the node is turned into NoSchedule taints, while readiness conditions are turned into NoExecute taints.
By default, the status of a node is set to Unknown (with a corresponding Unreachable taint being added) 50 seconds after the last successful check-in with the control plane.
How Kubernetes protects pods from unhealthy nodes
By default, pods receive the following tolerations:
   - key: node.kubernetes.io/not-ready
     operator: Exists
     effect: NoExecute
     tolerationSeconds: 300
   - key: node.kubernetes.io/unreachable
     operator: Exists
     effect: NoExecute
     tolerationSeconds: 300
This means that if a node becomes unready or unreachable, pods on that node will tolerate that condition for 300 seconds (5 minutes). After that, they are evicted from the node and rescheduled to another available node.
Notice that if a pod is evicted, it is deleted gracefully. This means that the pod object is only deleted once there is confirmation from the kubelet the pod has been removed. When a node is unready or otherwise unreachable, no confirmation is received. The graceful deletion has a 6 minute timeout. So under normal circumstances, deleting a pod from an unready node takes around 12 minutes (50s + 5m + 6m).
Pods in the Guaranteed and Burstable QoS class for memory also receive the following toleration:
   - key: node.kubernetes.io/memory-pressure
     operator: Exists
     effect: NoSchedule
DaemonSets instead receive tolerations for all of the well-known node conditions because there is no point in de-scheduling a DaemonSet pod.
Considerations for virtual machines
The sequence of events described above also applies to pods running virtual machines. However, virtual machines require additional considerations, including:
- Prevent virtual machine disks from becoming inconsistent when multiple virtual machine instances are running concurrently.
- Increase the reaction time to a node being unhealthy (12 minutes is too long in some cases).
When a Node is unreachable, it becomes difficult to understand the state of the underlying workloads. If these workloads are virtual machines, they might still be running and they might still be attached to storage.
It's important to ensure that a virtual machine is not running anywhere before another instance is started. To avoid storage from becoming inconsistent, it must at least be confirmed that storage is not being accessed by the original virtual machine. The process of isolating resources from unhealthy nodes is known as fencing.
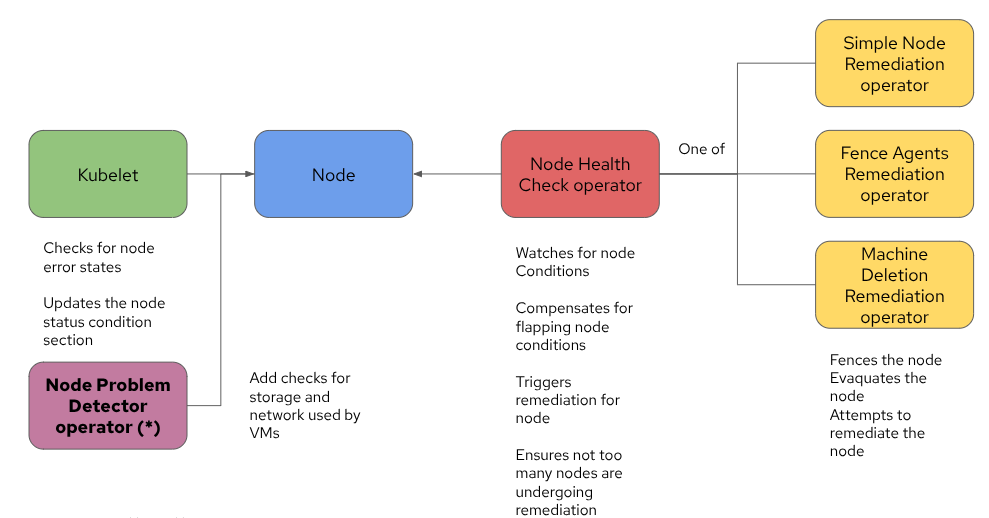
There are operators that can be configured to perform the fencing of a node, and to restart workloads allocated on that node:
- Node health check (NHC)
- Self node remediation (SNR)
- Fence agents remediation (FAR)
- Machine deletion remediation (MDR)
The diagram in Figure 1 depicts how these operators interact with each other and their scope of responsibility.

As discussed previously, the Kubelet, through its own health checks (or the control plane, if the Kubelet does not check in within the designated threshold), sets the conditions on the node. The NHC detects these conditions and triggers the appropriate remediations. It also includes additional capabilities, such as ensuring that a condition has been occurring for a certain period of time before triggering a remediation and controlling how many nodes undergo remediation at the same time.
Once a remediation type is triggered, the associated remediation operator will fence the node and restart the workloads. At that time, the workloads will be rescheduled on a different node.
With OpenShift Virtualization, the Fence Agent Remediation operator is recommended to perform the remediation. FAR should be configured to use the standard out-of-service taint as the remediation strategy. The out-of-service taint causes the immediate and forceful deletion of the Pods and any related VolumeAttachments, making it a fast and safe strategy for stateful applications, like Virtual Machines.
By aggressively tuning these operators (out of scope for this article), one can bring the reaction time down to about one minute and a half.
The current limitations
Typical virtual machine deployments make use of storage and secondary networks. Storage is needed to run virtual machines,, and typically a virtual machine is exposed to a network on a different network than the control plane. This is sometimes referred to as a management network. The Kubelet only performs a finite number of checks by default, none of which are related to storage or to secondary networks. The control plane connectivity health check implicitly checks for the health of the management network.
As a result, Kubernetes is blind to issues occurring on external storage or secondary networks (along with an array of other issues that may affect the node node), which are crucial for the operational health of virtual machines. If a storage issue occurs, a virtual machine is paused until storage is restored, but the virtual machine pod doesn't get scheduled to another node. Should a network issue occur, typically the VM is network-isolated, but the virtual machine pod keeps running on that node.
Can a virtual machine health check help in this situation? It's certainly possible to develop health checks to probe for those two issues, but a failed virtual machine health check causes the virtual machine to be restarted. It doesn't mark the node as unusable. Virtual machines can still be scheduled on that node, and this only compounds the problem.
So how can we design a solution that actually marks the node as unusable until the issue is resolved?
The node problem detector operator
The Kubernetes community developed the Node Problem Detector (NPD) operator as a solution to this very problem. The NPD operator deploys a daemonset that performs additional health checks on the node, and adds relative conditions to the Node status. Assuming you have the correct health checks defined for the Node Problem Detector operator, you can now detect and react to storage and secondary network issues. The architecture evolves to a design similar to the following:
Essentially, the core components remain the same, with the addition of the NPD to help the Kubelet detect node-level issues with greater detail.
The NPD operator includes a predefined set of additional health checks and can be configured to run customized health checks.
Important
The NPD operator is currently unsupported by Red Hat.
Designing node health checks
The default node health checks performed by Kubelet are insufficient for detecting storage and secondary network issues in the virtual machine use case. Let's utilize the Node Problem Detector operator and design custom health checks for storage and secondary networks.
For storage, assume that our example block devices are served using multipath. This is almost always the case when a SAN array is involved, whether storage is served over fiber channel (FC) or iSCSI.
For secondary networks, assume that VM networks (typically VLANs) all flow through a pair of dedicated NICs, which are bonded at the node level. This is another very typical scenario because in most situations, two NICs are used for the control plane network and two NICs for virtual machine traffic.
When designing health checks, we recommend trying to make the health checks node-local. For example, detect that a network link is down for an individual node. It's much harder to design good health checks that extend probing beyond the node and involve lower layers in the network architecture or the storage deployment.
The examples below are created following the Node Problem Detector operator guidelines and examples for custom health checks.
Storage health checks
When storage is on multipath devices, the multipath -C <device> command is very useful to test whether device mapper considers the connections are up.
Here's a simple example of a health check defined in NPD:
#!/bin/bash

# This plugin checks if the ntp service is running under systemd.
# NOTE: This is only an example for systemd services.
readonly OK=0
readonly NONOK=1
readonly UNKNOWN=2

# Return success if we can read data from the block device
export device=$(chroot /node-root multipath -ll | grep "NETAPP,LUN" | awk '{print $2}' | shuf | head -n 1)
if chroot /node-root multipath -C $device; then
   echo "ontap-san-test is accessible"
   exit $OK
else
   echo "ontap-san-test is NOT accessible"
   exit $NONOK
fi
A few things to note:
- This command must be run from the node. More precisely, it's very complex to make it run from the NPD operator pod. When you run it from the node itself, you can use
chrooton a path that mounts the entire node file system. - As illustrated above, we first retrieve all the multipath devices of a certain type (
NETAPP,LUNin this example, which are created by the storage class that supports virtual machines). Then, after shuffling the result, a single device is chosen to perform the health check against. While not comprehensive, randomly selecting one of the devices should indicate whether there is a larger issue which affects all of the devices within the node. To ensure that there's always at least one device, we mount a volume from that storage class within the NPD DaemonSet. All the DaemonSet pod instances mount the same device, and this can be achieved because the storage class must necessarily support theReadWriteMany(RWX) access mode.
Here's an example of defining metadata for this health check:
{
   "plugin": "custom",
   "pluginConfig": {
   "invoke_interval": "15s",
   "timeout": "3s",
   "max_output_length": 80,
   "concurrency": 3,
   "enable_message_change_based_condition_update": true
   },
   "source": "ontap-san-custom-plugin-monitor",
   "metricsReporting": true,
   "conditions": [
   {
       "type": "OntapSANProblem",
       "reason": "OntapSANIsUp",
       "message": "Ontap-san connection service is up"
   }
   ],
   "rules": [
   {
       "type": "permanent",
       "condition": "OntapSANProblem",
       "reason": "OntapSANIsDown",
       "path": "./custom-config/ontap-san-check.sh",
       "timeout": "3s"
   }
   ]
}
The Node Problem Detector operator consumes this configuration file and periodically runs the health check, and reports the condition on the node.
When everything is correctly configured, a healthy node returns a condition similar to the following:
   - type: OntapSANProblem
     status: 'False'
     lastHeartbeatTime: '2025-09-10T18:04:27Z'
     lastTransitionTime: '2025-09-10T01:22:32Z'
     reason: OntapSANIsUp
     message: Ontap-san connection service is up
When storage issues are present, the node condition appears similar to this output:
   - type: OntapSANProblem
     status: 'True'
     lastHeartbeatTime: '2025-09-10T18:14:18Z'
     lastTransitionTime: '2025-09-10T18:14:17Z'
     reason: OntapSANIsDown
     message: ontap-san-test is NOT accessible
Network health checks
For network health checks on a pair of bonded NICs, we can test the link status on the bond. This is a suitable check because a bond reports a healthy link if at least one of the NICs has a healthy link. This check is local and it's roughly equivalent to verifying that the cables are connected and that the bond and relative NICs are correctly activated. The ip link show <device> command offers a good way to test the link status. Assuming that the device name for our bond is bond0, we can run the health check with the following script:
#!/bin/bash

# This plugin checks if the ntp service is running under systemd.
# NOTE: This is only an example for systemd services.

readonly OK=0
readonly NONOK=1
readonly UNKNOWN=2

# Return success if the link is up
if ip link show bond0 | grep "state UP" | grep ,UP | grep ,LOWER_UP && exit 0 || exit 1; then
   echo "bond0 is up"
   exit $OK
else
   echo "bond0 is down"
   exit $NONOK
fi
Note that the series of pipes and greps in the command is used to verify that all of the statuses in the ip link show <device> command output report healthy connections.
The health check metadata looks similar to the following:
{
   "plugin": "custom",
   "pluginConfig": {
   "invoke_interval": "10s",
   "timeout": "3s",
   "max_output_length": 80,
   "concurrency": 3,
   "enable_message_change_based_condition_update": true
   },
   "source": "bond0-custom-plugin-monitor",
   "metricsReporting": true,
   "conditions": [
   {
       "type": "Bond0Problem",
       "reason": "Bond0IsUp",
       "message": "Bond0 connection is up"
   }
   ],
   "rules": [
   {
       "type": "permanent",
       "condition": "Bond0Problem",
       "reason": "Bond0IsDown",
       "path": "./custom-config/bond0-check.sh",
       "timeout": "3s"
   }
   ]
}
A healthy node produces something similar to this:
   - type: Bond0Problem
     status: 'False'
     lastHeartbeatTime: '2025-09-10T18:04:27Z'
     lastTransitionTime: '2025-09-10T01:22:32Z'
     reason: Bond0IsUp
     message: Bond0 connection is up
An unhealthy node looks similar to this:
   - type: Bond0Problem
     status: 'True'
     lastHeartbeatTime: '2025-09-10T18:14:18Z'
     lastTransitionTime: '2025-09-10T18:14:17Z'
     reason: Bond0IsDown
     message: Bond0 is down
Wrapping up the configuration
As mentioned before, we need to deploy the NPD with some variations on the DaemonSet to ensure that the health checks we've designed run correctly. To guarantee that at least one multipath device is found, we must create a PVC and mount it on the DaemonSet pods:
apiVersion: v1
kind: PersistentVolumeClaim
metadata:
 name: ontap-san-test
 labels:
   app.kubernetes.io/instance: node-problem-detector
   app.kubernetes.io/name: node-problem-detector
spec:
 accessModes:
 - ReadWriteMany
 volumeMode: Block
 resources:
   requests:
     storage: 1Gi # Requests 10 GiB of storage
 storageClassName: ontap-san
And to add the PVC to the DaemonSet pod, add this configuration:
     volumes:
     - name: ontap-san-test
       persistentVolumeClaim:
         claimName: ontap-san-test
It doesn't matter where we mount the container devices because, as you have seen, we are not going to test it from the container, and instead we chroot to the node. However, we have to mount the node filesystem somewhere so we can change root. This can be done as follows:
     volumes:
     - hostPath:
         path: /
       name: node-root
And we must define the corresponding volume mount:
       volumeMounts:
       - mountPath: /node-root
         name: node-root
We also need to run the pod in the node network namespace to see the bond0 interface. This can be achieved with the following configuration:
spec:
  hostNetwork: true
Once the NPD operator is configured to add new conditions to the nodes, the Node Health Check operator can be configured to react to those conditions. The updated configuration with the storage and network related conditions produce output similar to the following:
 unhealthyConditions:
   - duration: 300s
     status: 'False'
     type: Ready
   - duration: 300s
     status: Unknown
     type: Ready
   - duration: 120s
     status: 'True'
     type: OntapSANProblem
   - duration: 120s
     status: 'True'
     type: Bond0Problem
With this configuration, the NHC not only reacts to the Unknown and Unready states, but also to the two new health checks we added.
Refining the solution with Taints and Tolerations
The solution we've identified so far fences a node (causing it to reboot) when a node condition for storage or secondary networks related issues occur. This design is suitable if all pods or virtual machines on that node make use of both types of resources. In other words, if our cluster is fully dedicated to running virtual machines, then the above solution is satisfactory.
But if our cluster includes a mix of virtual machines and more traditional containerized workloads, is it appropriate to take down the node? After all, the node is otherwise healthy and can run traditional workloads. Is there a way to simply move the virtual machines out of the node while allowing other workloads to keep running on it?
Taints and tolerations can be used to automate this behavior. In general, a taint is used to suggest that something should not run or be scheduled on a particular node, while a toleration can be used to suggest that (notwithstanding the taint) a pod with the toleration can actually run on that tainted node. In other words, a taint pushes a pod away from a node, and a toleration neutralizes that repelling force.
The following automation must be in place to implement this strategy:
- When a node has a condition of type
OntapSANProblemorBond0Problem, a taint of typeNoExecutemust be added to the node. When a condition is resolved, the taint must be removed. - When a pod is created and it does not have a volume with the PVC storage class
ontap-san, a toleration is added for theOntapSANProblemtaint. - Similarly, if a pod is created and does not use a secondary network starting with
vlan-, we add a toleration to theBond0Problemtaint (assuming a naming convention in which network attachment definitions usingbond0all start withvlan-).
We can implement this automation with a policy engine. Kyverno is a policy engine with suitable capabilities. Here's an example policy that adds a taint to a node based on a condition (for brevity, I'm only showing the policy for the secondary network condition):
apiVersion: kyverno.io/v1
kind: ClusterPolicy
metadata:
 name: taint-node-on-bond0-condition
spec:
 admission: true
 background: false
 emitWarning: false
 rules:
 - match:
     any:
     - resources:
         kinds:
         - Node/status
         operations:
         - UPDATE
   preconditions:
     all:
     - key: "{{ request.object.status.conditions || `[]` | [?type == 'Bond0Problem'].status | [0] || 'NotFound' }}"
       operator: Equals
       value: "True"
     - key: "Bond0Problem"
       operator: AllNotIn
       value: "{{ request.object.spec.taints[].key || `[]` }}"
   mutate:
     patchesJson6902: |-
       - path: "/spec/taints/-"
        op: add
        value:
          key: Bond0Problem
          value: "true"
          effect: NoSchedule
     targets:
     - apiVersion: v1
       kind: Node
       name: '{{ request.object.metadata.name }}'
   name: set-node-taint
   skipBackgroundRequests: true
Notice that Kyverno by default does not watch nodes, so nodes must be explicitly enabled in the Kyverno configuration. There also must be a similar policy that removes the taint if the condition disappears (the manifest for such a condition is out of scope for this article).
Here's an example policy that adds a toleration to pods that do not use the secondary network:
apiVersion: policies.kyverno.io/v1alpha1
kind: MutatingPolicy
metadata:
 name: tolerate-bond0-problem
spec:
 autogen:
  mutatingAdmissionPolicy:
   enabled: false
  podControllers:
    controllers: []
 matchConstraints:
   resourceRules:
   - apiGroups: [ "" ]
     apiVersions: [ "v1" ]
     operations: ["CREATE", "UPDATE"]
     resources: [ "pods" ]
 failurePolicy: Ignore
 reinvocationPolicy: IfNeeded
 evaluation:
   admission:
     enabled: true
 matchConditions:
   - name: no-networks-whose-name-starts-with-vlan
     expression: |-
       !( object.metadata.namespace.startsWith('kube-') ||
       object.metadata.namespace.startsWith('openshift-') ||
       object.metadata.namespace.endsWith('-system') ||
       object.metadata.namespace == 'default' ||
       object.metadata.namespace == 'kyverno') &&
      (! has(object.metadata.annotations) ||
      ! ('k8s.v1.cni.cncf.io/networks' in object.metadata.annotations) ||
      ! object.metadata.annotations['k8s.v1.cni.cncf.io/networks'].contains('\"name\":') ||
      object.metadata.annotations['k8s.v1.cni.cncf.io/networks'].findAll('\"name\":\"([^\"]*)\"').map(s,s.split(':')[1].substring(1,s.split(':')[1].size()-1)).filter(name, name.startsWith('vlan-')).size() == 0)
 mutations:
 - patchType: JSONPatch
   jsonPatch:
     expression: |
       has(object.spec.tolerations) ?
      [
        JSONPatch{
          op: "add",
          path: "/spec/tolerations/-",
          value: {
            "key": "Bond0Problem",
            "operator": "Exists",
            "effect": "NoExecute"
          }
        }
      ] :
      [
        JSONPatch{
          op: "add",
          path: "/spec/tolerations",
          value: {
            "key": "Bond0Problem",
            "operator": "Exists",
            "effect": "NoExecute"
          }
        }
      ]
Protecting virtual machines
In this article, I've illustrated the types of activities that occur when a node fails, especially in a virtual machine use case. I outlined several recommended practices for handling node failure situations. I also identified several types of failure that Kubernetes ignores: Secondary networks and storage failures.
This article has provided a suitable solution for this challenge when working within environments hosting virtual machines. I've also evolved the design and devised an architecture that supports an environment with both virtual machines and traditional workloads.