For many years, organizations have optimized their networking hardware by running multiple functions and containers on Single Root I/O Virtualization (SR-IOV) network devices. The SR-IOV specification assigns a portion of a network interface card (NIC) or another device to a Kubernetes pod, so that you can share the same physical NIC among multiple pods while giving the pods direct access to the network. Organizations also use the Data Plane Development Kit (DPDK) to accelerate network traffic. This article shows you how to set up SR-IOV and DPDK on Red Hat OpenShift and run virtual functions in that environment.
Configuring SR-IOV on OpenShift
You can set up SR-IOV either by editing configuration files or by using the OpenShift web console, as shown in the sections that follow. In either case, you have to create a namespace, an OperatorGroup, and a Subscription.
Editing the configuration files
First, create a namespace for the SR-IOV Operator. In this example, we give our namespace the name openshift-sriov-network-operator and assign it a run level of 1 through the openshift.io/run-level label:
apiVersion: v1
kind: Namespace
metadata:
  name: openshift-sriov-network-operator
  labels:
    openshift.io/run-level: "1"
Next, create the OperatorGroup and bind it to the namespace we've just created:
apiVersion: operators.coreos.com/v1
kind: OperatorGroup
metadata:
  name: sriov-network-operators
namespace: openshift-sriov-network-operator
spec:
  targetNamespaces:
  - openshift-sriov-network-operator
Then, create the Subscription on the SR-IOV Operator:
apiVersion: operators.coreos.com/vialpha1
kind: Subscription
metadata:
  name: openshift-sriov-network-operator-subscription
  namespace: openshift-sriov-network-operator
spec:
  channel: "4.4"
  name: sriov-network-operator
  source: redhat-operators
  sourceNamespace: openshift-marketplace
Using the web console
Instead of editing configuration files directly, you can do the configuration through the OpenShift console.
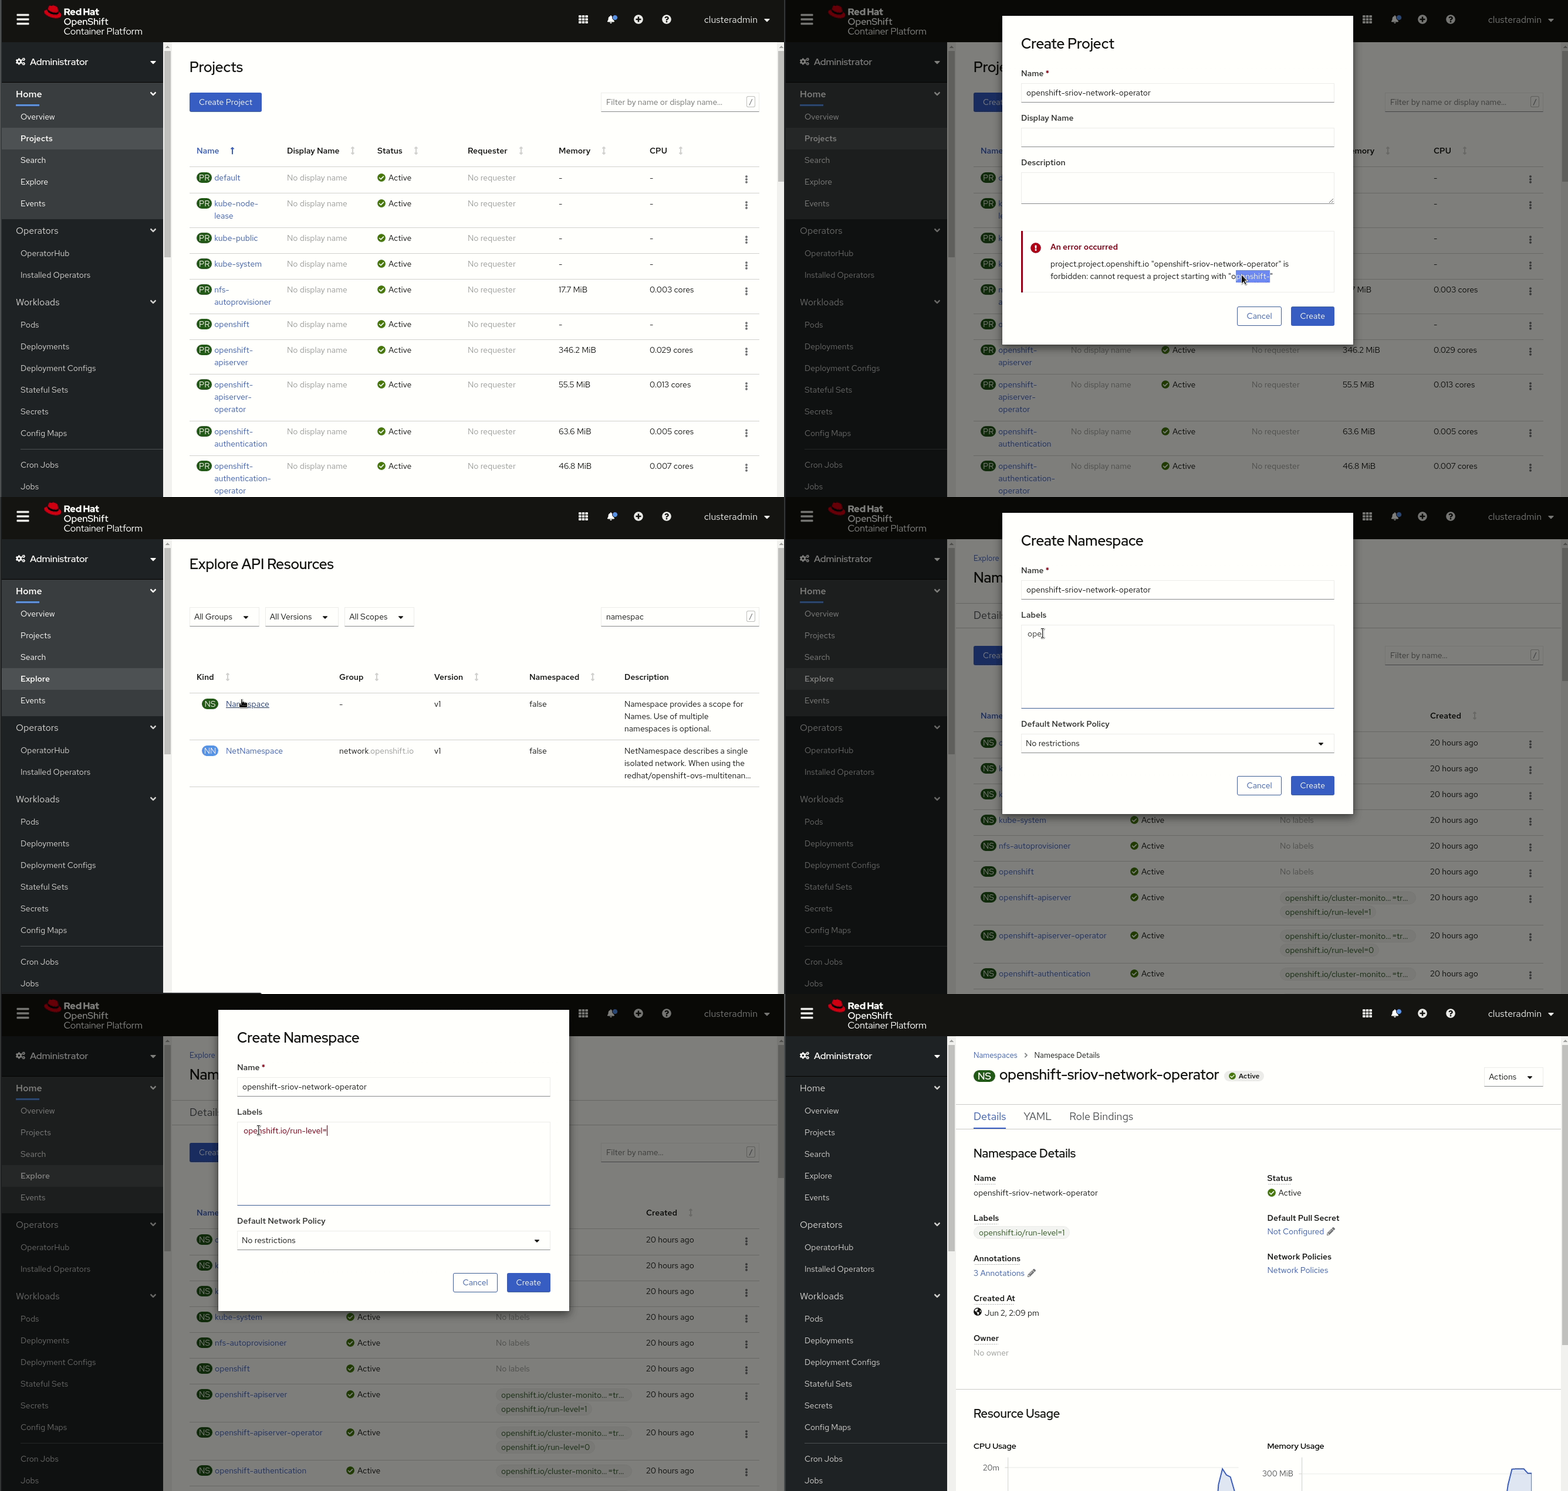
The demonstration in Figure 1 shows how to create a namespace object. If you use the Create Project button to create the namespace, you will not be able to name it openshift-sriov-network-operator because OpenShift does not allow you to create projects with names starting with openshift-. You can work around the limitation by creating a namespace object.
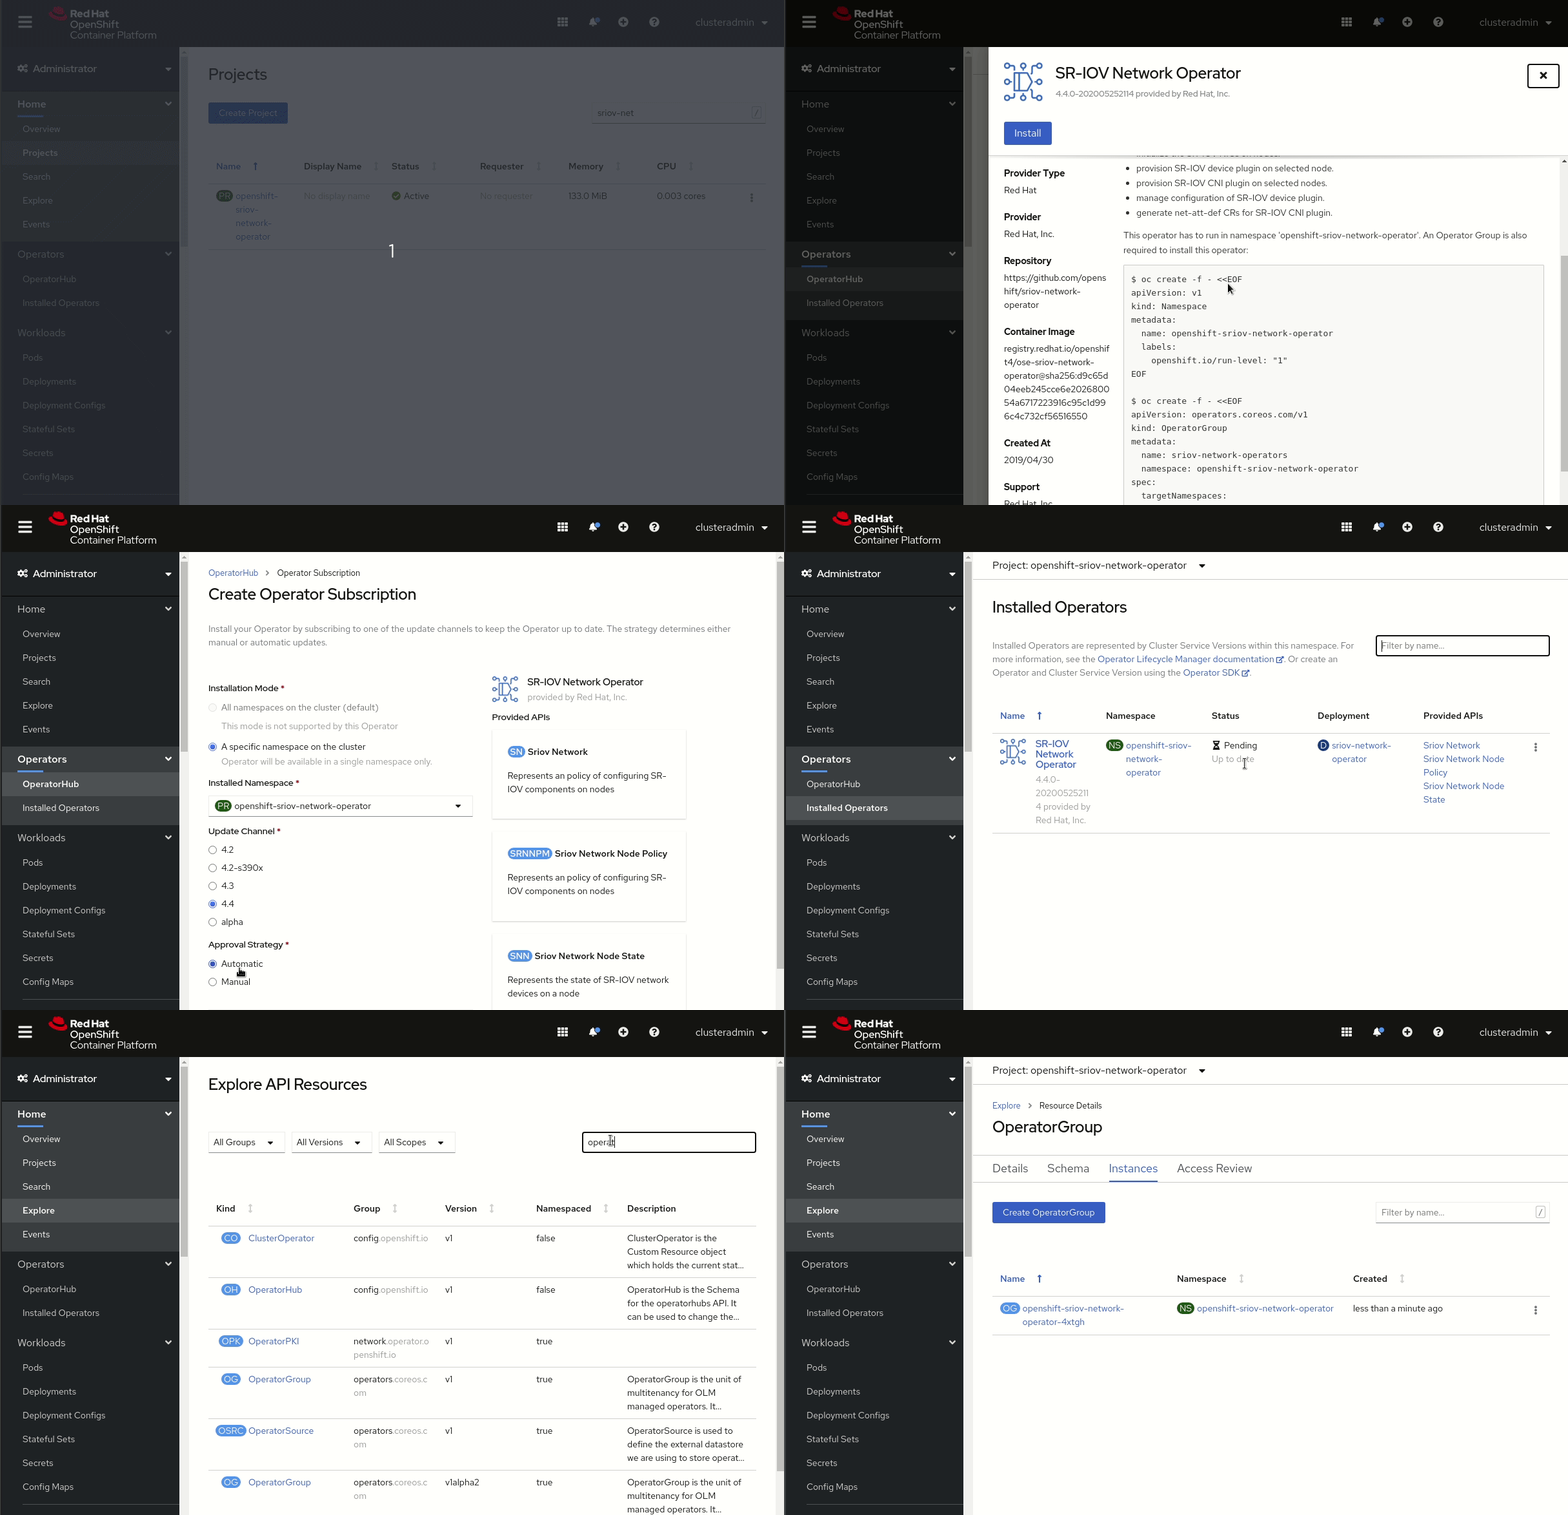
Then, as shown in Figure 2, you can go to the OperatorHub to install the SR-IOV Network Operator, which creates both the OperatorGroup and the Subscription.
The Node Feature Discovery Operator
The SR-IOV Network Node Policy requires the following node selector in the configuration file:
feature.node.kubernetes.io/network-sriov.capable: "true"
You can install the Node Feature Discovery (nfd) Operator to automatically label nodes so that you don’t need to add them manually. The Node Feature Discovery Operator allows you to find and label resources in all nodes and to include the node selector that will be required in configuring the network node policy. This operator finds nodes that are ready to support workloads with SR-IOV ports. Use the following YAML to install the operator:
apiVersion: operators.coreos.com/v1alpha1
kind: Subscription
metadata:
  name: nfd
  namespace: openshift-operators
spec:
  channel: "4.4"
  name: nfd
  source: redhat-operators
  sourceNamespace: openshift-marketplace
Next, use the Node Feature Discovery Operator to create a custom resource definition (CRD) that will be managed by the operator. An example of the node feature discovery CRD follows:
apiVersion: nfd.openshift.io/v1alpha1
kind: NodeFeatureDiscovery
metadata:
  name: nfd-master-server
  namespace: openshift-operators
spec:
  namespace: openshift-nfd
You can check that the operator is working by reviewing the node labels as follows:
$ oc get node --show-labels
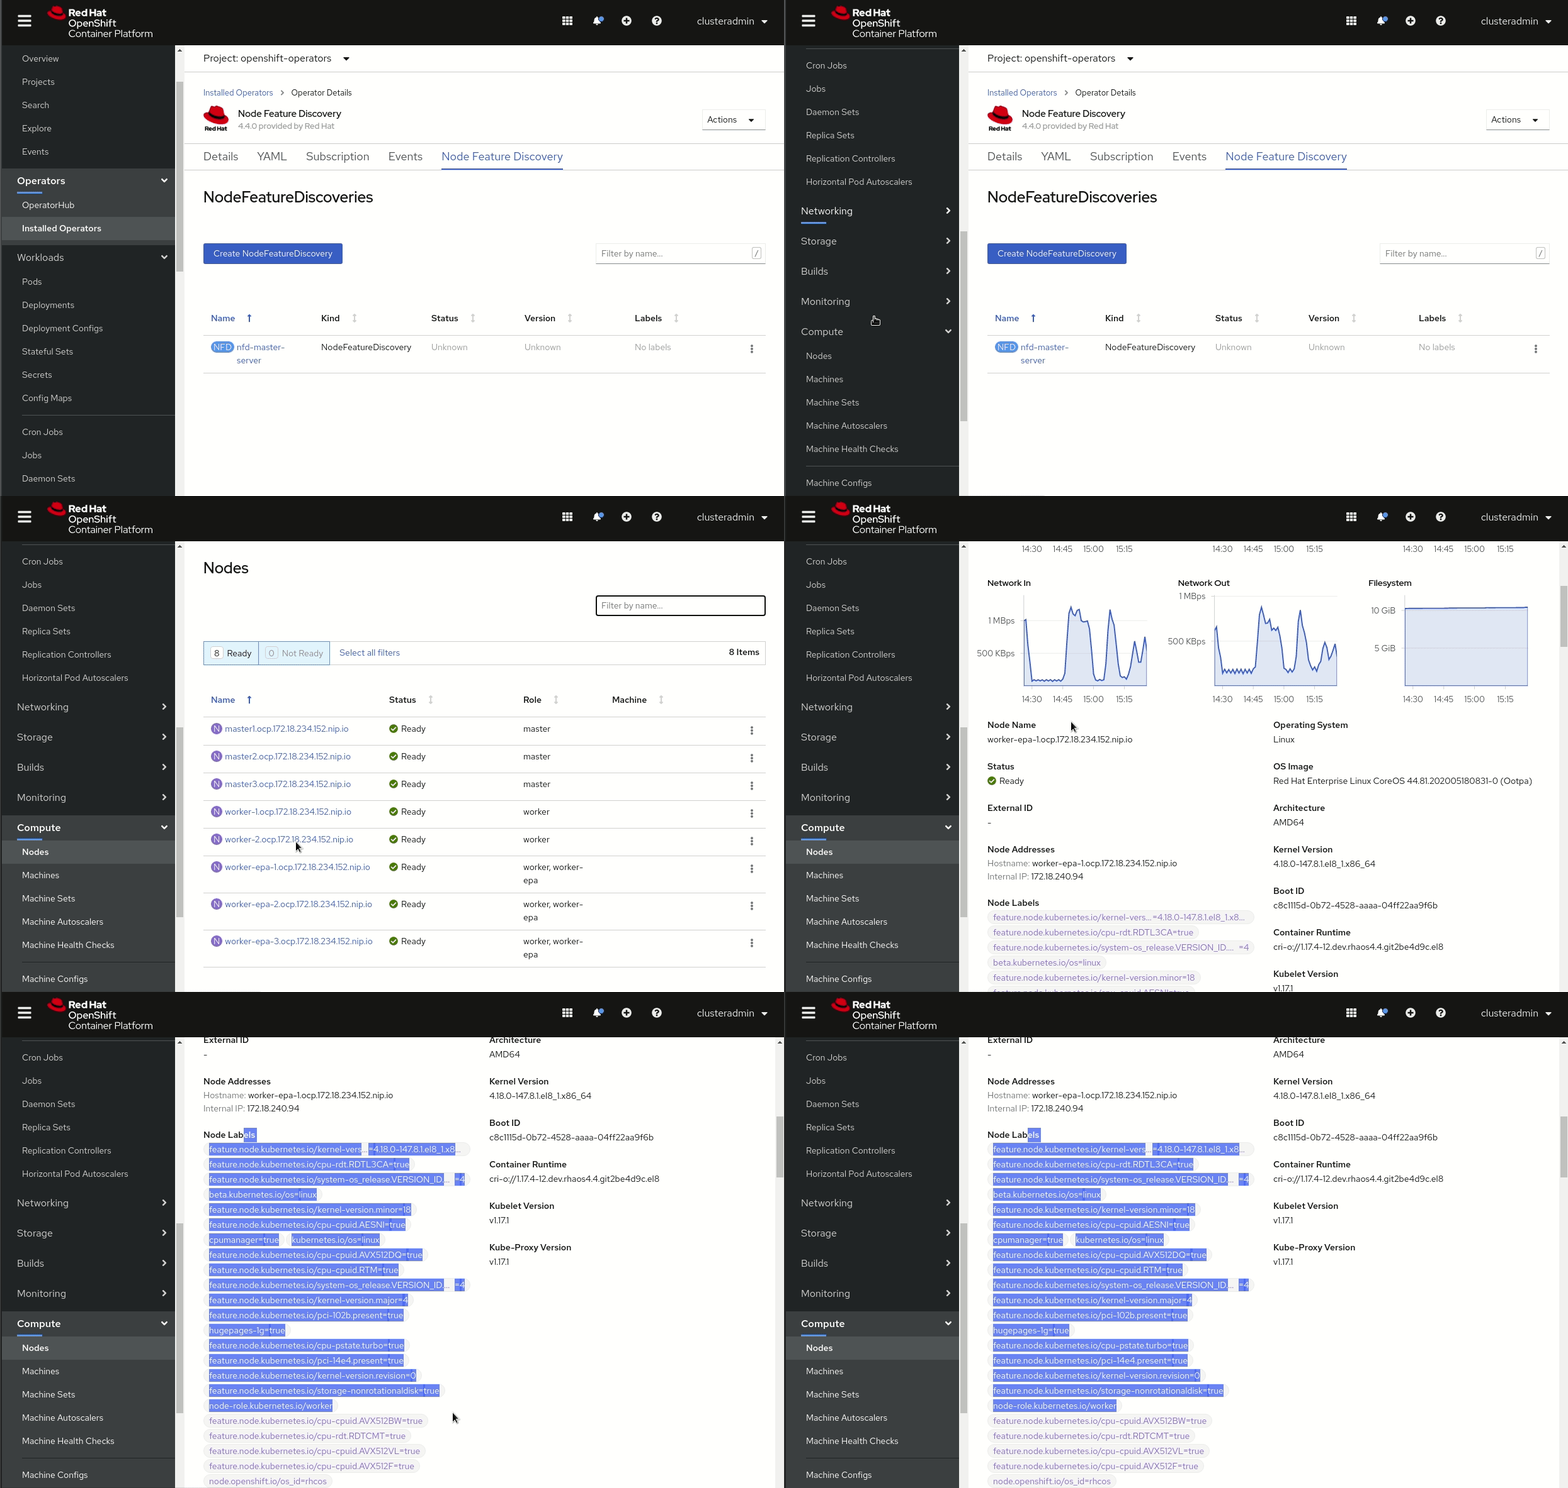
You can also use the console to validate the node labels, as shown in Figure 3. In the console, select Compute—>Nodes, select the node, and scroll down to see the list of node labels.
Configuring NICs and virtual functions
The next configuration task is to configure the NICs that will be allocable to provide SR-IOV ports. You need to specify the physical NIC as well as the number of virtual functions that can be used per NIC.
Not all NICs have the same number of virtual functions, so you need first to check the maximum number of virtual functions for each of your NICs. Use the Network Node State CRD in the SR-IOV Network Operator to provide the information. Enter the following command to run the operator:
$ oc get sriovnetworknodestate -n openshift-sriov-network-operator <node name> -o yaml
Only the SR-IOV capable NICs have virtual functions. Other NICs will show none.
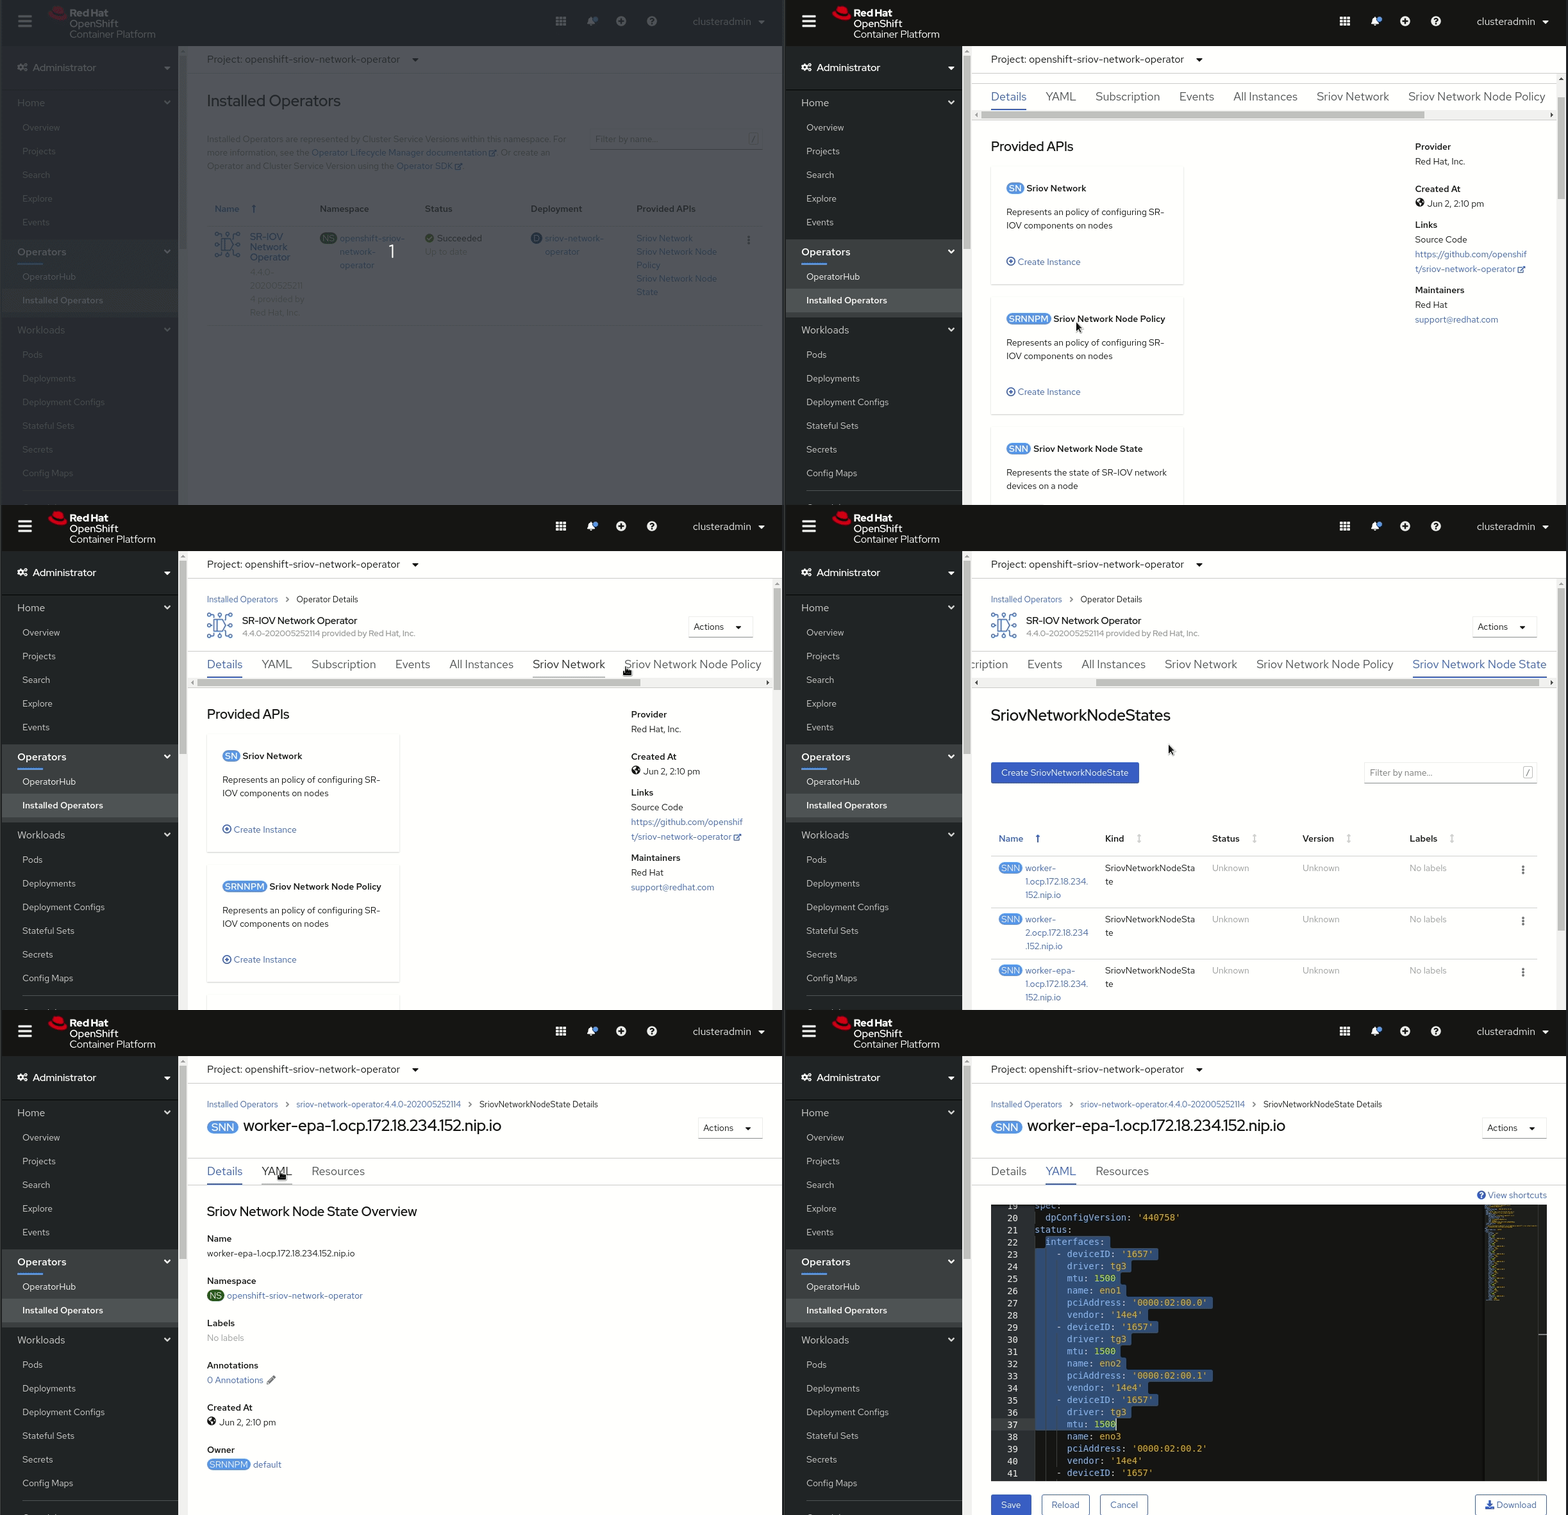
Alternatively, you can review the SR-IOV capable NICs in the web console, as shown in Figure 4. Go to Installed Operators, select the Sriov network state, click on a Sriov network node, and click on YAML to see the details.
Now select the SR-IOV capable NICs that you want to use in the environment. For this selection, you can use the SRIOV network node policy custom resource definition created by the SR-IOV Network Operator. You can include the name of the NIC physical function and the range of virtual functions to be used in the nicSelector specification, in the following format:
<pfname>#<first_vf>-<last_vf>
You can change the driver type for the virtual functions in the deviceType specification, which allows a choice of netdevice or vfio-pci for each virtual function. The netdevice option performs the device binding in kernel space, whereas vfio-pci does the binding in user space. The default value is netdevice. However, because we’re using DPDK in this example, we will be working in user space, so we'll select vfio-pci for the device type to perform the binding in user space.
Figure 5 shows how to select the device type using the console. Select the SR-IOV Network Operator, and create an SR-IOV network node policy instance.
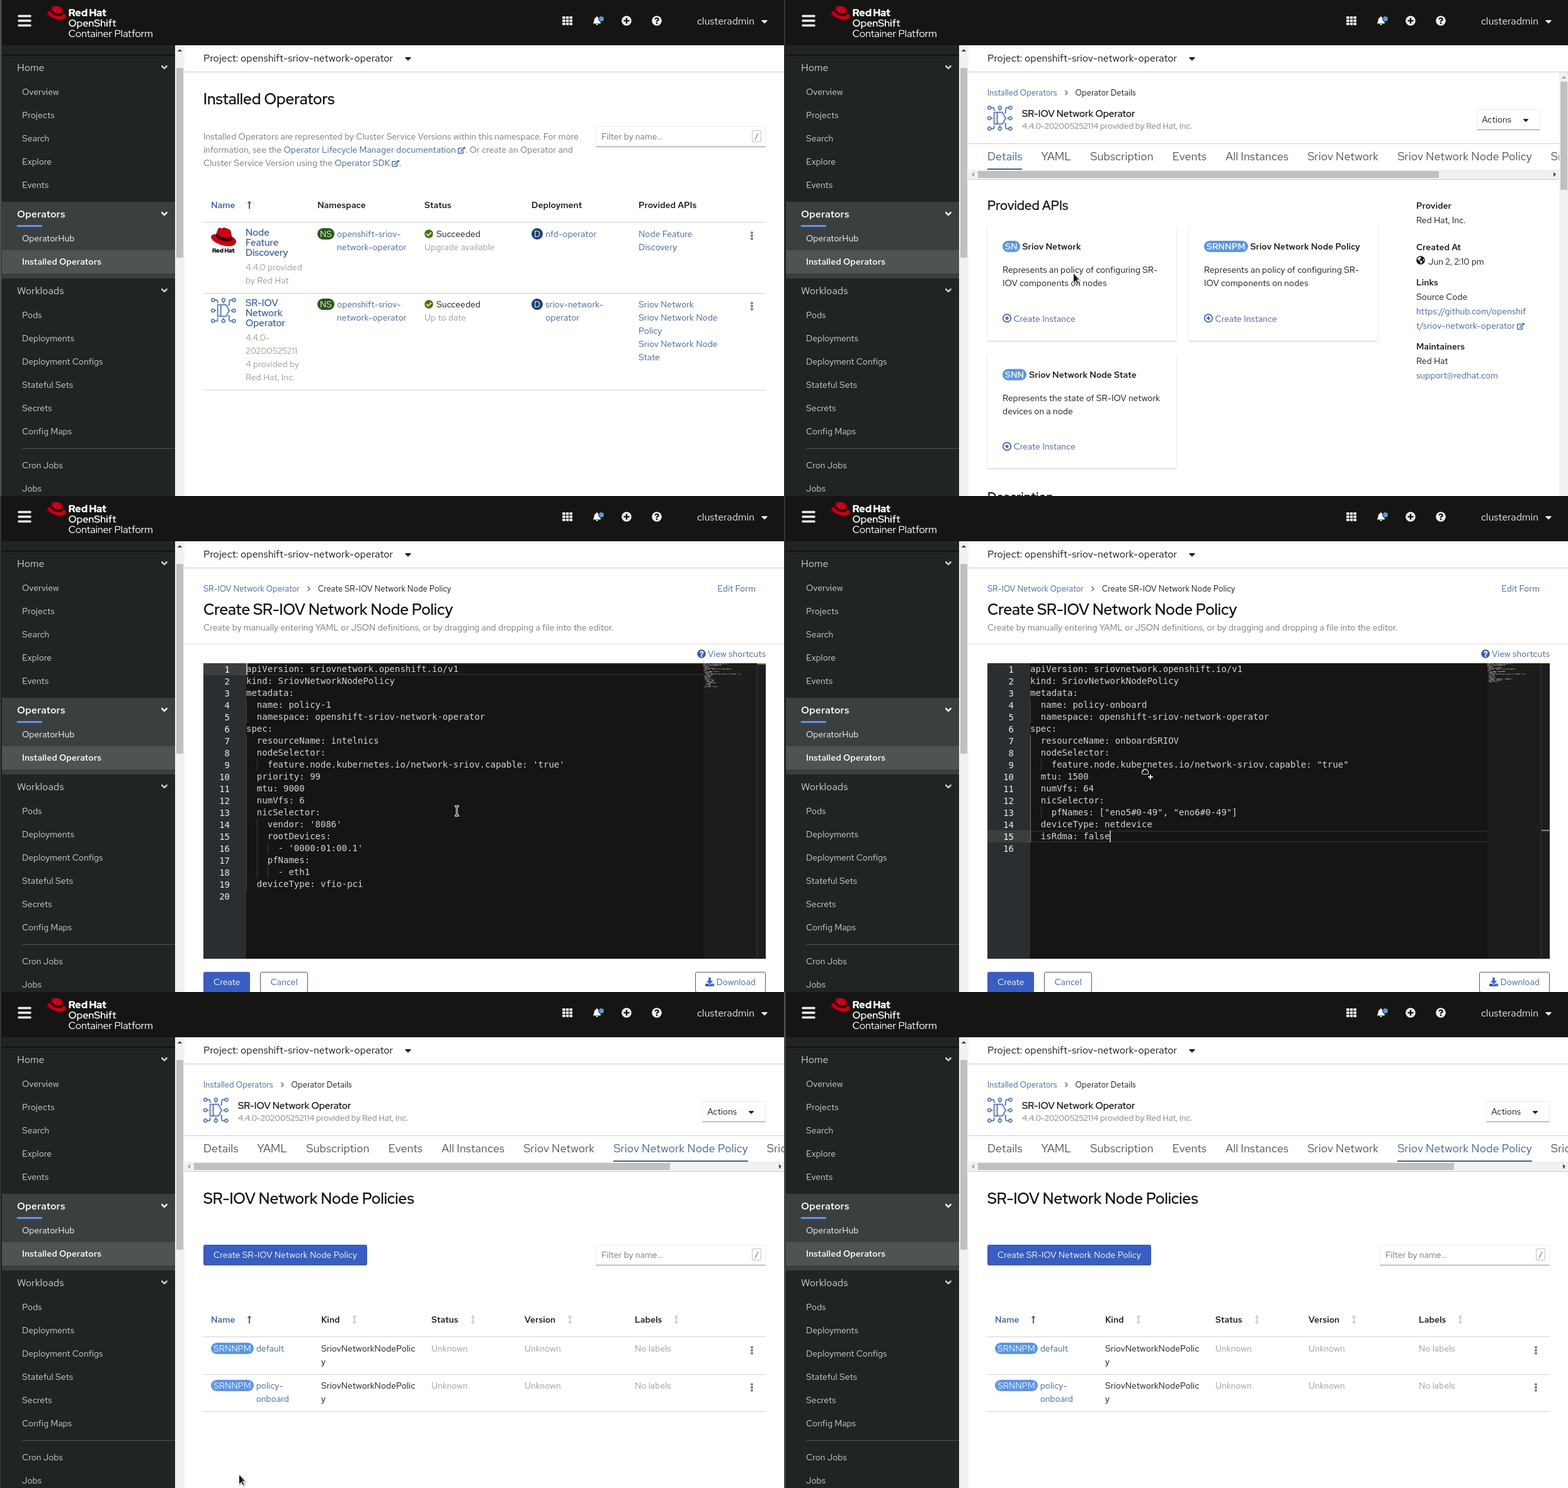
The following YAML file shows that the NIC selection is done per the SR-IOV network node policy:
apiVersion: sriovnetwork.openshift.io/v1
kind: SriovNetworkNodePolicy
metadata:
  name: policy-pcie
  namespace: openshift-sriov-network-operator
spec:
  resourceName: pcieSRIOV
  nodeSelector:
    feature.node.kubernetes.io/network-sriov.capable: "true"
  mtu: 1500
  numVfs: 64
  nicSelector:
    pfNames: ["ens1f0#0-49", "ens1f1#0-49"]
  deviceType: netdevice
  isRdma: false
Configuring the network
Next, you need to configure the network that will be attached to your SR-IOV ports in order to have SR-IOV working in your environment. When you configure the network, you can customize some aspects. If you don’t have a DHCP server in your network, you can define static IP addresses on your pods and enable static IP capability. Also, make sure the namespace is the one where you’ll be using the SR-IOV network:
apiVersion: sriovnetwork.openshift.io/v1
kind: SriovNetwork
metadata:
  name: sriovnet1
  namespace: openshift-sriov-network-operator
spec:
  ipam: |
    {
      "type": "static",
      "addresses": [
        {
          "address": "192.168.99.0/24",
          "gateway": "192.168.99.1"
        }
      ],
      "dns": {
        "nameservers": ["8.8.8.8"],
        "domain": "test.lablocal",
        "search": ["test.lablocal"]
      }
    }
  vlan: 0
  spoofChk: 'on'
  trust: 'off'
  resourceName: onboardSRIOV
  networkNamespace: test-epa
  capabilities: '{"ips": true}'
With these configuration changes, you should have SR-IOV working in your environment. To test your configuration, create two pods and add a secondary network using the SR-IOV network. You will also need to configure static IP addresses in both pods. Add nodeName definitions to force the pods to run in different worker nodes. Once the pods are running, just ping one pod from the other.
Configuring DPDK on OpenShift
Configuring DPDK follows the same steps for configuring SR-IOV, with a few modifications. First, DPDK requires configuring huge pages along with the SR-IOV configuration. And, as mentioned earlier, when using DPDK, you need to select a device type of vfio-pci to bind the device in user space.
An example for an Intel NIC follows:
Note: If you’re using a Mellanox NIC, you must use the netDevice driver type and set isRdma to true:
apiVersion: sriovnetwork.openshift.io/v1
kind: SriovNetworkNodePolicy
metadata:
  name: policy-onboard-dpdk
  namespace: openshift-sriov-network-operator
spec:
  resourceName: onboardDPDK
  nodeSelector:
    feature.node.kubernetes.io/network-sriov.capable: "true"
  mtu: 1500
  numVfs: 64
  nicSelector:
    pfNames: ["eno5#50-59", "eno6#50-59"]
  isRdma: false
  deviceType: vfio-pci
The SR-IOV network object configuration for DPDK is the same as the one used for a "plain" SR-IOV configuration:
apiVersion: sriovnetwork.openshift.io/v1
kind: SriovNetwork
metadata:
  name: dpdknet1
  namespace: openshift-sriov-network-operator
spec:
  ipam: |
    {
      "type": "static",
      "addresses": [
        {
          "address": "192.168.155.0/24",
          "gateway": "192.168.155.1"
        }
      ],
      "dns": {
        "nameservers": ["8.8.8.8"],
        "domain": "testdpdk.lablocal",
        "search": ["testdpdk.lablocal"]
      }
    }
  vlan: 0
  spoofChk: 'on'
  trust: 'off'
  resourceName: onboardDPDK
  networkNamespace: test-epa
  capabilities: '{"ips": true}'
Lastly, to test DPDK, use an image that uses DPDK to create a pod that includes both the huge pages configuration and the SR-IOV network definition.
Conclusion
In this article, I have tried to show that the popular and powerful SR-IOV and DPDK capabilities of network devices are easy to set up on OpenShift. The web console simplifies many tasks, and using operators automates a lot of the configuration. Try these features on your own projects to save resources and increase the capabilities of your network hardware.
Last updated: November 6, 2023