In an article published in August 2020, Authorizing multi-language microservices with Louketo Proxy, I explained how to use Louketo Proxy to provide authentication and authorization to your microservices. Since then, the Louketo Proxy project has reached its end of life, with developers recommending the oauth2-proxy project as an alternative.
In this article, I will outline how to secure a microservice with Keycloak and oauth2-proxy.
Using Keycloak
The following sections describe how to set up Keycloak on Red Hat OpenShift for the scenario in this article.
Test and deploy the Keycloak server
Begin by testing the Keycloak server. Use the following commands to deploy the Keycloak server on OpenShift:
$ export PROJECT="keyauth"

$ oc new-project ${PROJECT}
$ oc new-app --name sso \
   --docker-image=quay.io/keycloak/keycloak \
   -e KEYCLOAK_USER='admin' \
   -e KEYCLOAK_PASSWORD='oauth2-demo' \
   -e PROXY_ADDRESS_FORWARDING='true' \
   -n ${PROJECT}

$ oc create route edge --service=sso -n ${PROJECT}
We now need to add a client configuration to Keycloak so it can secure our application.
Create and configure the oauth2 authentication client
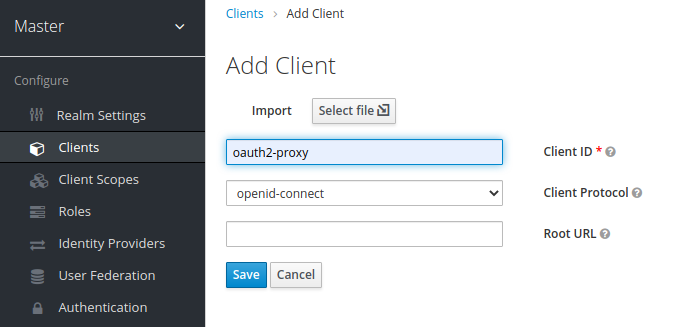
Log in to Keycloak with the username admin and password oauth2-demo. On the Keycloak user interface (UI), select Clients on the left navigation bar and select Create. On the Add Client page, fill out all the necessary fields, and click Save to create a new client, as shown in Figure 1.
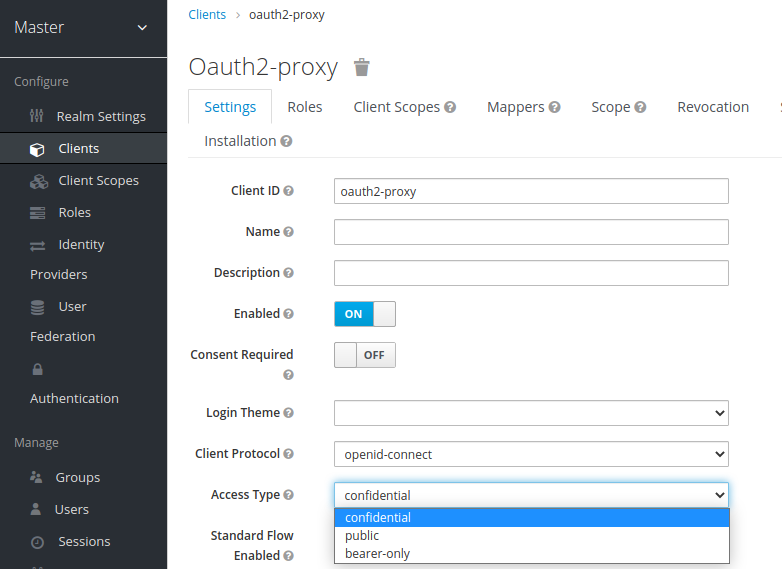
After adding the new client, go to the Oauth2-proxy page, and switch the client's Access Type field from public to confidential, as shown in Figure 2.
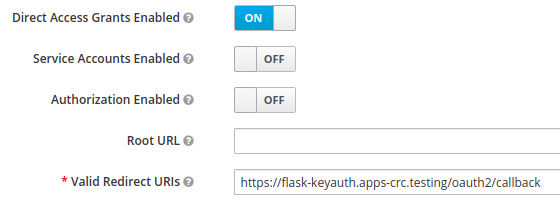
Next, set a valid callback URL for our oauth2-proxy securing our application. In this scenario, oauth2-proxy is securing a flask app. The URL is similar to the Keycloak URL, although instead of the prefix sso, it uses flask. For example, if your Keycloak URL is:
https://sso-keyauth.apps-crc.testing
you should set the following URL in the Valid Redirect URIs field:
https://flask-keyauth.apps-crc.testing/oauth2/callback
Figure 3 shows the dialog to create the redirect URL.
Then click Save on the client protocol of confidential, the page displays a new tab, Credentials. Click the tab and take note of the generated secret
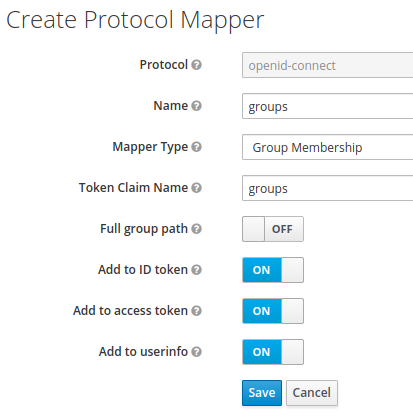
Configure the mappers
Keycloak supports passing group memberships of users to the microservice as X-Forwarded-Groups. This can be enabled by configuring a group mapper. This is a useful way to expose authorization functions within the microservice. For example we could restrict privileged functions of the microservices to users in the admin group.
Select the Mappers tab on the Create Protocol Mapper page, add a new mapper and enter all the groups using the following settings:
- Name:
groups - Mapper Type: Group Membership
- Token Claim Name:
groups - Full group path: OFF
Click Save when the fields are complete. Figure 4 shows the Create Protocol Mapper page with all fields complete.
Configure the user groups
Now select Groups from the left navigation bar and add two groups:
- admin
- basic_user
Configure the user
From the left navigation bar, select Users and add a user. Enter an email address and a password for the new user, and add the user to the basic_user and admin groups you've just created. Now you are ready to configure oauth2-proxy and the example application.
Deploy the application with oauth2-proxy sidecar
Now let's deploy our application with an oauth2-proxy sidecar. To make life easier, here is a Git repository with all of the OpenShift templates. Clone the repository and cd into the folder and run the following script to configure and deploy all of the templates, simply passing the OpenShift project name as a variable:
$ git clone https://github.com/snowjet/demo-oauth2-proxy.git
$ cd demo-oauth2-proxy

# deploy flask with oauth2-proxy in project keyauth
$ ./create_app.sh keyauth
The script above deploys a number of templates for the application. However, the important templates relating to oauth2-proxy are the configuration maps.
Configmap_ssopubkey.ymlcontains the Keycloak Public Certificate to validate the JSON Web Token (JWT) passed by oauth2-proxyConfigmap-oauth.ymlcontains the variables required to configure oauth2-proxy. These include:oidc_issuer_urlclient_secretredirect_urlcookie_secretwhitelist_domainscookie_domains
The remaining templates complete the deployment:
DeploymentConfigfor the application with a sidecar for oauth2-proxy- Service pointing to the oauth2-proxy
- Route pointing to the service for the oauth2-proxy
Testing the configuration
Once deployed, test the configuration and then browse to the example application. Remember to sign out of the admin portion of Keycloak before trying to sign in to the Keycloak web app. Then, on the Sign in screen, click Sign in with Keycloak, as shown in Figure 5.

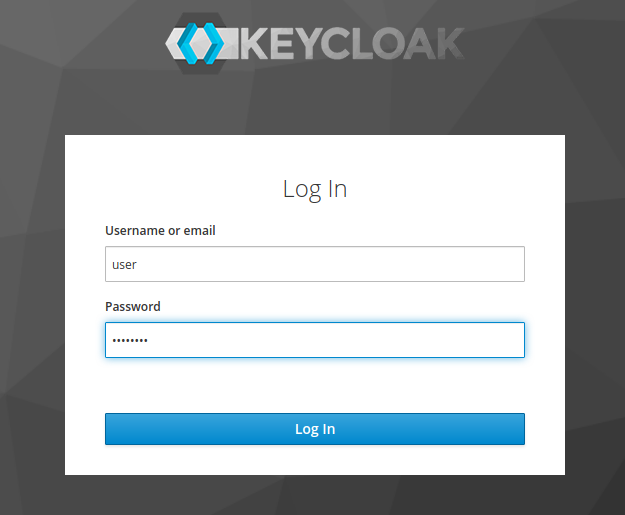
Once you are redirected to the Keycloak login dialog, type the username or email address and the password for the application user, as shown in Figure 6. Then click the login button to complete your entries.
After you are successfully authenticated, you will be redirected to an application page that returns a JSON file like the one shown in Figure 7. The file exposes the headers passed along by oauth2-proxy:

Conclusion
This article was an introduction to oauth2-proxy, a replacement for Louketo Proxy that provides authentication for your applications without making you code OpenID Connect clients within microservices. As always, I welcome your questions and any feedback and details you share in the comments.
Last updated: August 26, 2022