Page
Prerequisites and step-by-step guide

Prerequisites
- You should have an AWS account. We would need a 12-digit AWS account ID while creating the AMI image of Red Hat Enterprise Linux.
Step-by-step guide
- Log in to the RHEL image creation wizard. This wizard will provide a step-by-step process for creating an AWS EC2-compatible RHEL image. Log in with your existing account or register as a new user and proceed.
As shown in Figure 1 below, select the Amazon Web Services option as we will create an AWS AMI image for EC2 deployment. Click the "Next" button at the bottom of the page. There are multiple options for cloud-enabled RHEL images, however, for this exercise, we will create the AWS AMI image.
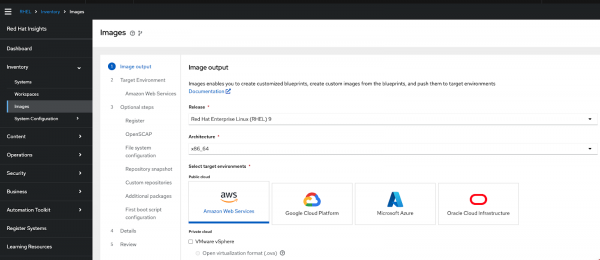
Figure 1: Select AWS option. Before proceeding with AWS option on image builder. Get your 12-digit AWS account id from AWS console. Login to your AWS console and copy "Account ID" as mentioned in below screenshot -

Figure 2: Copying Account ID from AWS console. On the next page, provide your 12-digit AWS account ID, which you can copy from your AWS console login.
Info alert: Note : Use the "Manually enter an account ID" option as shown in Figure 2 below. This way the process of image creation becomes faster. Click the "Next" button at the bottom of the page.
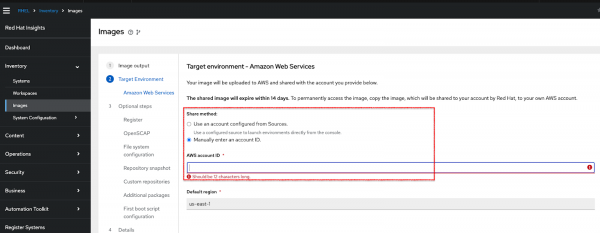
Figure 3: Provide AWS account ID. For step 3 (on the left side), see "Optional Steps" section. These steps provide customization options such as registering RHEL with updates, adding security profiles, customized partitioning, customer repositories etc to the RHEL image. In the first step, you will get a system-generated activation key to register with Red Hat to enhance security and track spending.
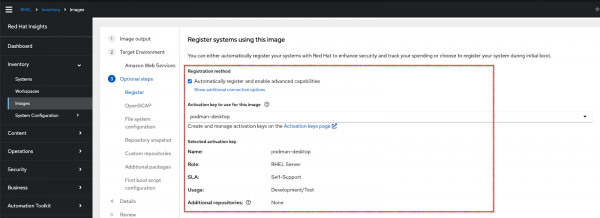
Figure 4: Activation key generated. In the next step, choose the OpenSCAP profile for your registered RHEL system as shown in Figure 5 below. OpenSCAP enables you to automatically monitor the adherence of your registered RHEL systems to a selected regulatory compliance profile. You can keep "None" if not required.
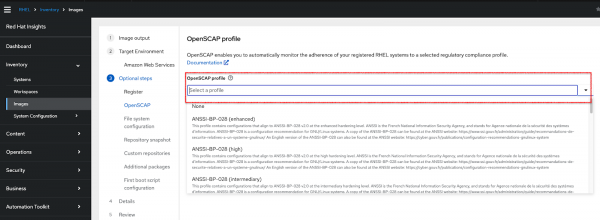
Figure 5: OpenSCAP profile selection. Next would be the partitioning option, keep it "Automatic" as shown in Figure 6 below. Create partitions for your image by defining mount points and minimum sizes. Image builder creates partitions with a logical volume (LVM) device type. Click the "Next" button at the bottom of the page.
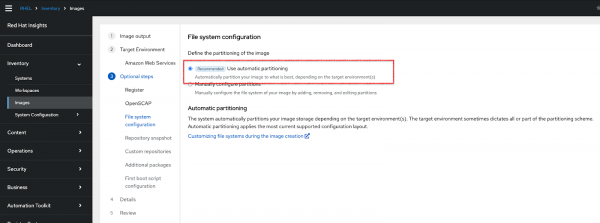
Figure 6: File system configuration. Next, you will see the "Repository snapshot" option. Select the "Use latest content" option to get the most recent repository when building the RHEL image as shown in Figure 7 below. The option "Use a snapshot" will let you choose a specific date. Image builder will reflect the state of repositories on the specific date selected. You can pickup any past date snapshop of RHEL as well.
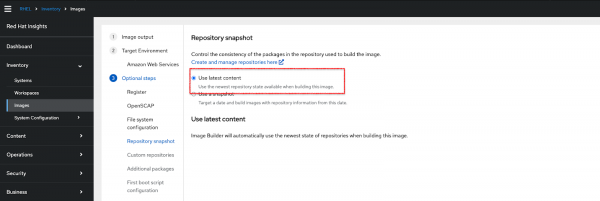
Figure 7: Repository snapshot option. The next option is "Custom repositories". You can choose custom repositories that you want to add packages from. If you don’t need, then you can click the "Next" button at the bottom to proceed without custom repositories.
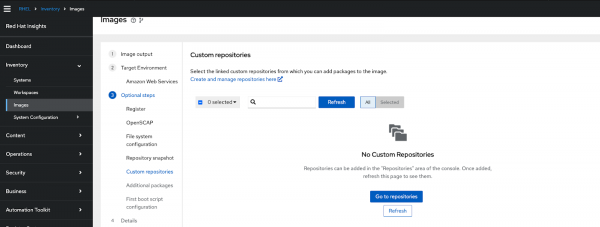
Figure 8: Custom repositories option. In the next option, you will see the option to add a package option. Skip this option and click the "Next" button at the bottom of the page.
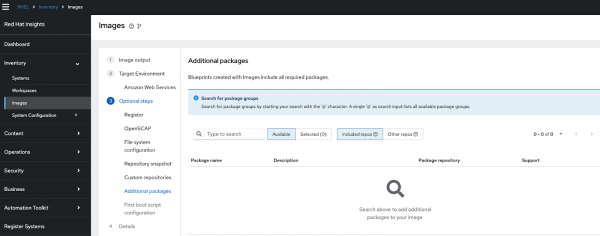
Figure 9: Additional packages option. Next, you will see "First boot script configuration". This option can create a specific RHEL boot script for executing certain commands. You can add your own script for a boot specific operation. For this exercise, you can skip this option and click "Next" at the bottom of the page.
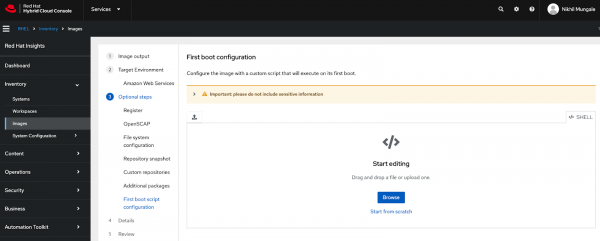
Figure 10: Boot script configuration. As we reach the final step of image creation, provide a name for the image under "Blueprint description" as shown in Figure 11 below.
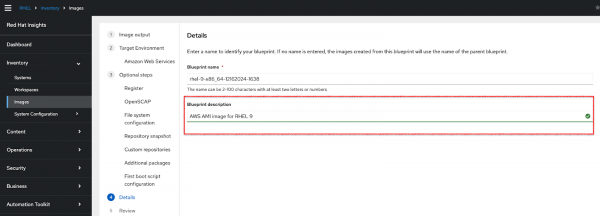
Figure 11: Blueprint description. Before creating the RHEL image for AWS, you can see all the configurations in the final step "Review" as shown in Figure 11 below. You can change any configuration, by returning to that step directly and making edits. Once all the configurations are as per your requirements, click the "Create Blueprint" option and the image creation will begin.

Figure 12: Create a blueprint option and review all previous steps. Once you click on the "Create blueprint" you will be redirected to the dashboard. You will see two options there. The "Blueprint" is your golden image or base image. This blueprint will be available forever. You can add/remove/modify this blueprint based on your requirements. The "image" is a version of a blueprint that you can create for a specific requirement. The image will expire in two weeks. For this exercise, let's build an image specifically for AWS deployment.
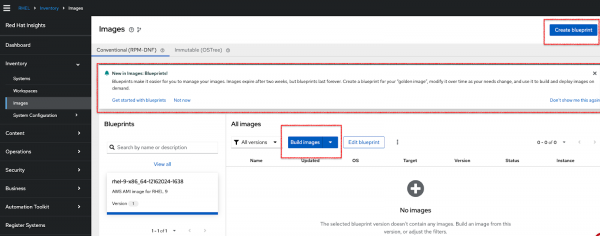
Figure 13: Options for blueprint creation and image build. Click on the "Build images". You can now see the AWS-specific image creation is in progress as shown in Figure 14 below. It will take some time to create an AWS AMI image.
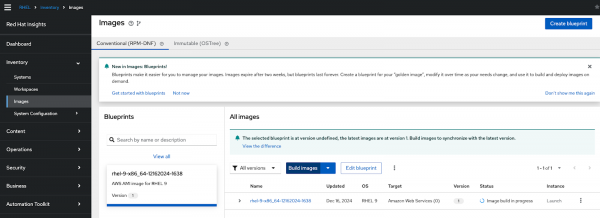
Figure 14: Image creation in progress. Once the image is created, you can see the Status as "Ready" and the "Launch" button enabled under the "Instance" column as shown in Figure 15 below.
Info alert: Note : It will take around 20mins to get the image ready to launch.
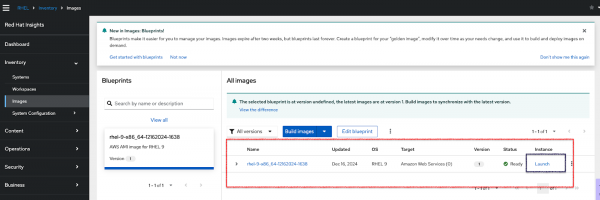
Figure 15: AWS AMI image ready to deploy on AWS. Once you click the "Launch" button, you will see a pop-up window for launching the AWS console and the AWS region based on location. Click on "Launch with AWS console" and then you will be redirected to the AWS console.
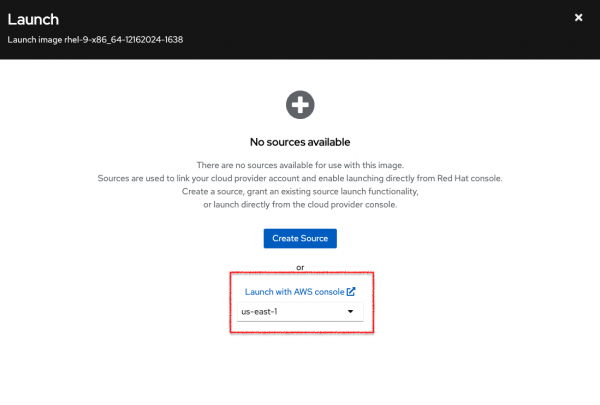
Figure 16: AWS login link. Once you click "Launch with AWS console", you will see the AWS console login screen as shown in Figure 17 below. Enter your AWS console credentials to login and set up the EC2 instance.
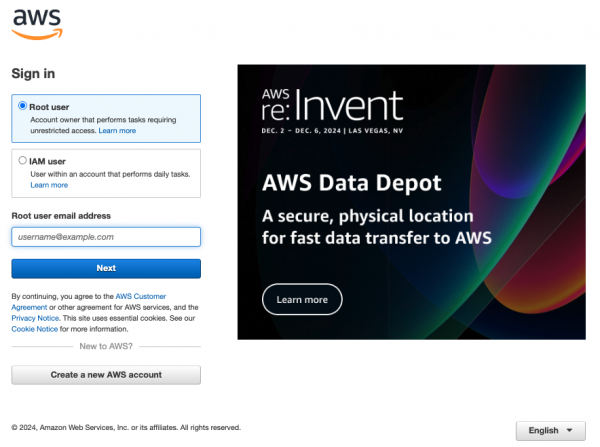
Figure 17: AWS login page. 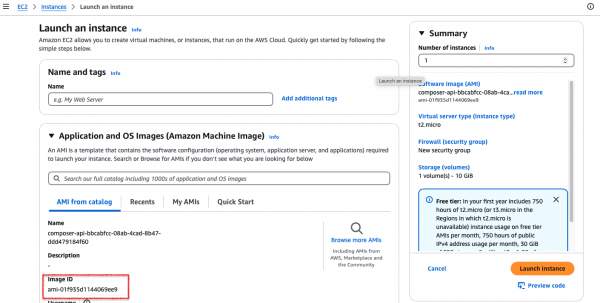
Figure 18: EC2 instance configuration window. In the AWS instance configuration, you can choose the EC2 parameters. Generally, by default, you will get a micro instance. If you want to test your instance, this is sufficient to test the RHEL 9 image on EC2. Keep default settings unless you are an expert in Amazon Web Services.
Info alert: Note: To connect from your laptop, configure key-pair during instance setup.

Figure 19: Create a new key pair for EC2 instance. 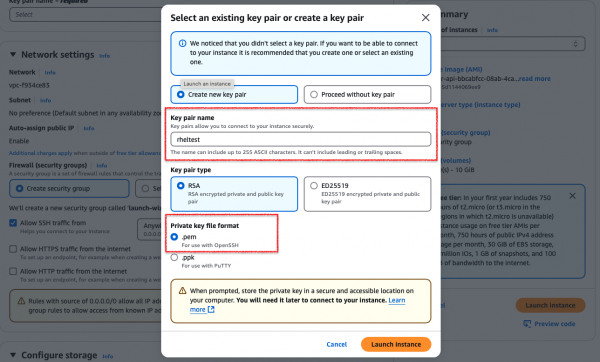
Figure 20: Give the key pair a name and select the .pem option. Once key-pair is added, we need to allow access to EC2 instance via your local laptop over SSH. To achieve this, go to the "Network Settings" section of the Launch instance page that is currently open. For "Allow SSH traffic from" poing, select "My IP" configuration. This will allow you to connect to EC2 from your local network.
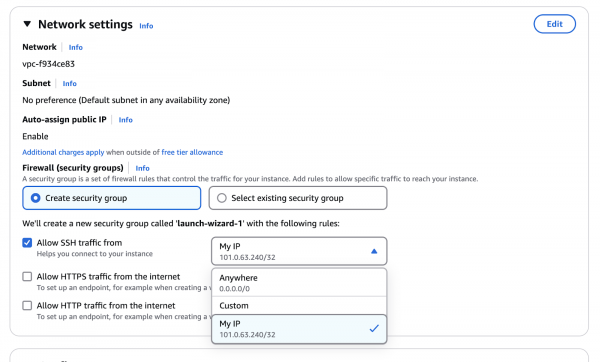
Figure 21. Configuring "my ip" to allow access to EC2. Once you click "Launch Instance", you will see the instance ready to connect with. Then go to the instance dashboard and you can see "Running". At the same time, the .pem file will get downloaded locally. This .pem file is required when you connect to an instance from a local SSH client.

Figure 22: AWS dashboard showing EC2 instance running. Now let's connect to the instance. Select the instance checkbox and see the "Connect" option enabled on the dashboard.

Figure 23: Connect with AWS EC2 instance from local computer. Once you click "Connect to instance", you will see various options to connect to your RHEL 9 instance. Choose the appropriate options and follow the instructions on the screen to connect.

Figure 24: Options to connect EC2 instance. In this exercise, we connected to the RHEL instance using a local SSH client. For this switch to the "SSH client" tab. To execute the SSH command, go to the folder where the .pem file is downloaded and follow the instructions in the "SSH client" tab.
Info alert: Note: Replace "root" with "ec2-user" in SSH command.

Figure 25: Connection to RHEL instance via SSH Client. Info alert: Note: If the connection fails, refer to the "Workaround.. "section.
Workaround if you face issues while connecting to the RHEL image
- You may face a connection issue while connecting to the RHEL instance. If the error shows "Failed to connect", follow the below steps to rectify and then try again from step 22 onwards.
Select the "Security" tab on the EC2 instance dashboard.
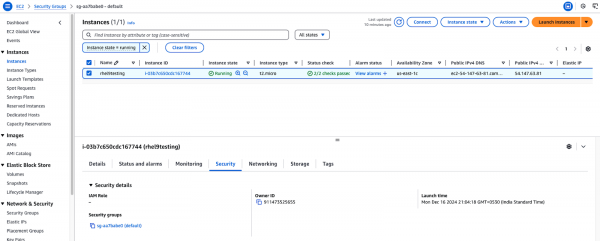
Figure 26: Security configurations on the EC2 instance dashboard. Open "Inbound rules" configurations. Click "launch-wizard" under Security groups.

Figure 27: Inbound rules. Click "Edit inbound rules"
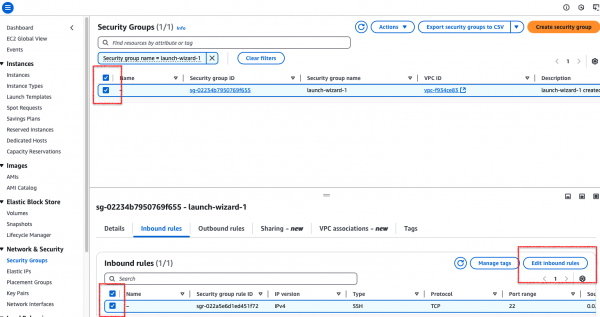
Figure 28: Edit inbound rules to add new rule. Click "Add rule". In the configuration window, select configurations as mentioned in the screen grab below. Source = My IP. Default IP subnet range will be shown. Keep it as is. Then click on "Save rules"
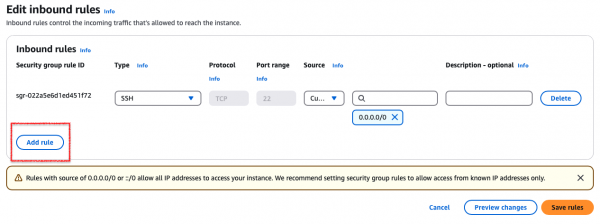
Figure 29: Add new rule. 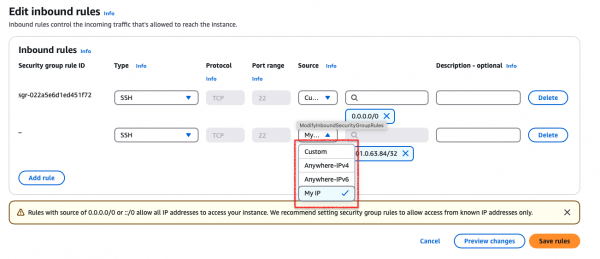
Figure 30: Select a specific type, and source and save the rule. Once the rule is saved, return to the instance dashboard. You can see the new Inbound rules.
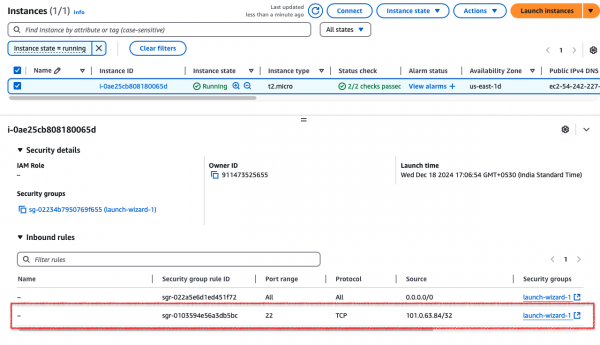
Figure 31: New inbound rule visible on EC2 instance dashboard. - Connect to the RHEL instance from your terminal as per step 22 above.
How to access the custom RHEL AMI using AWS AMI ID in the AWS Console?
Images created using Red Hat Image Builder are published as community AMIs and shared with the specified AWS account and region during blueprint creation. These images can be used to launch instances by referencing the AMI ID, either directly through the AWS Management Console or as part of your existing CI/CD pipelines.
In the next section, we will demonstrate how to create an EC2 instance using the AWS Management Console.
- Navigate to the Red Hat Image Builder console.
- Find the image you want to use and confirm its "Ready" status.
- Open the details section for the selected image.
Look for the AMI ID in the details section.
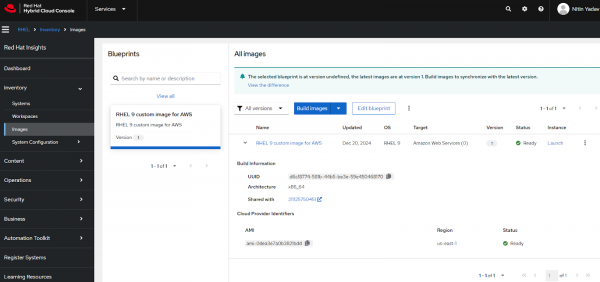
Figure 32: Listing the AWS AMI ID in the Red Hat Image Builder. - Log in to the AWS Management Console and go to the EC2 dashboard.
- Choose "Launch instance" to start creating a new EC2 instance.
In the "Application and OS Images" section, select "Browse more AMIs" to proceed, as shown below.

Figure 33: Selecting the new AMI from AWS image catalog. - Enter the AMI ID in the search box.
After the search completes, the corresponding AMI will appear in the search results, as illustrated below.
Info alert: Note: If the image does not appear in the search results, switch to the "Community AMIs" tab. Ensure that you are using the same AWS account and region specified during the blueprint creation process.
Click "Select" to choose the AMI, then proceed with the EC2 launch wizard to complete the process of creating a new instance.
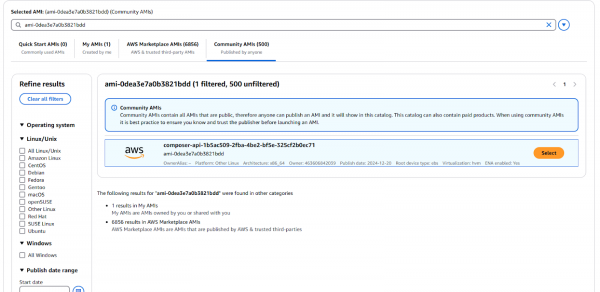
Figure 34: Finding the newly built image in the AWS image catalog using AMI ID.
Summary
To summarise our learning now, you learned how to create the RHEL image using Red Hat image builder and launch on the AWS EC2 instance. You can customize your RHEL image according to your requirements and can have multiple images based on the original RHEL blueprint. This gives you a starting point for setting up the RHEL and developing applications on that EC2 instance.
You can scale the instance as and when your workload increases.
