Page
Deploy a Kubernetes rolling update
Your first step in updating your OpenShift applications with a single command is to deploy a Kubernetes rolling update.
In order to get full benefit from taking this lesson, you need to:
- Have an OpenShift cluster from the Developer Sandbox
In this lesson, you will:
- Log in to your Developer Sandbox
- Spin up an application
- Run a command loop
- Observe deployment results
Log in to your OpenShift Sandbox at the command line
Log in to your OpenShift Sandbox by following these instructions.
Spin up an application (“myboot”, version 1)
Create a file on your local PC named
myboot-deployment.ymlwith the following contentsapiVersion: apps/v1 kind: Deployment metadata: labels: app: myboot name: myboot spec: replicas: 1 selector: matchLabels: app: myboot template: metadata: labels: app: myboot spec: containers: - name: myboot image: quay.io/rhdevelopers/myboot:v1 ports: - containerPort: 8080Notice that the Deployment object references the image
quay.io/rhdevelopers/myboot:v1.Run the following command, using the file you just created, to create the
Deploymentobject and get the application running in your cluster:oc create -f myboot-deployment.ymlCreate a file on your local PC named
myboot-service.ymlwith the following contents:apiVersion: v1 kind: Service metadata: name: myboot labels: app: myboot spec: ports: - name: http port: 8080 selector: app: myboot type: LoadBalancerRun the following command, using the file you just created, to create a
Serviceobject that references themyboot Deployment:oc create -f myboot-service.ymlRun the following command to create a route to the service. This allows the application to be reached from outside of the OpenShift cluster:
oc expose service/myboot
Run a curl command loop to view the application output
Run the following command to see the URL of the application. We will use this URL in the following
curlcommand loop:oc get routesYou will see output similar to the following:
NAME     HOST/PORT                                                                    PATH   SERVICES   PORT   TERMINATION   WILDCARD
myboot   myboot-rhn-engineering-dschenck-dev.apps.sandbox.x8i5.p1.openshiftapps.com          m
yboot http NoneRun a curl loop against the URL to see the application output. Replace the URL in the following command with the URL you got from the previous (
oc get routes) command and run the command at a command line.If you are using Bash:
for ((i=1;i<=10000;i++)); do curl http://myboot-rhn-engineering-foo-
dev.apps.sandbox.x8i5.p1.openshiftapps.com; sleep .01; done;
If you are using PowerShell:
while ($true) { (curl myboot-rhn-engineering-foo-dev.apps.sandbox.x8i5.p1.openshiftapps.com).content;start-sleep -Milliseconds 200; }Figure 1 is an example of the kind of output you can expect.
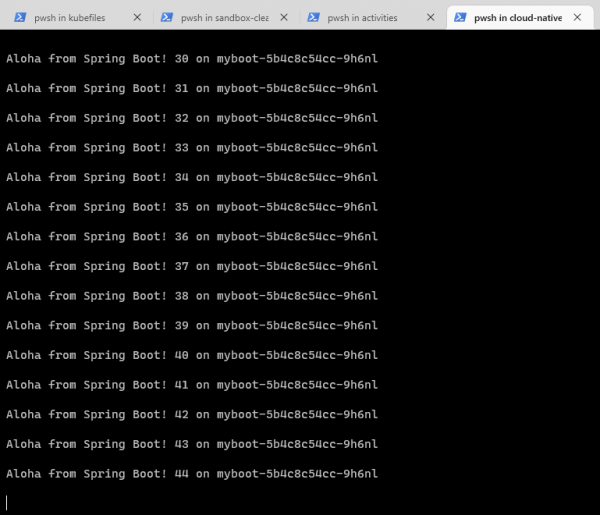
Figure 1: Example of the output from the curl loop command against the service running in OpenShift.
Change deployment image to version 2
Run the following command to switch to the version 2 image for the “myboot” application:
oc set image deploy/myboot myboot=quay.io/rhdevelopers/myboot:v2Observe rolling deployment results
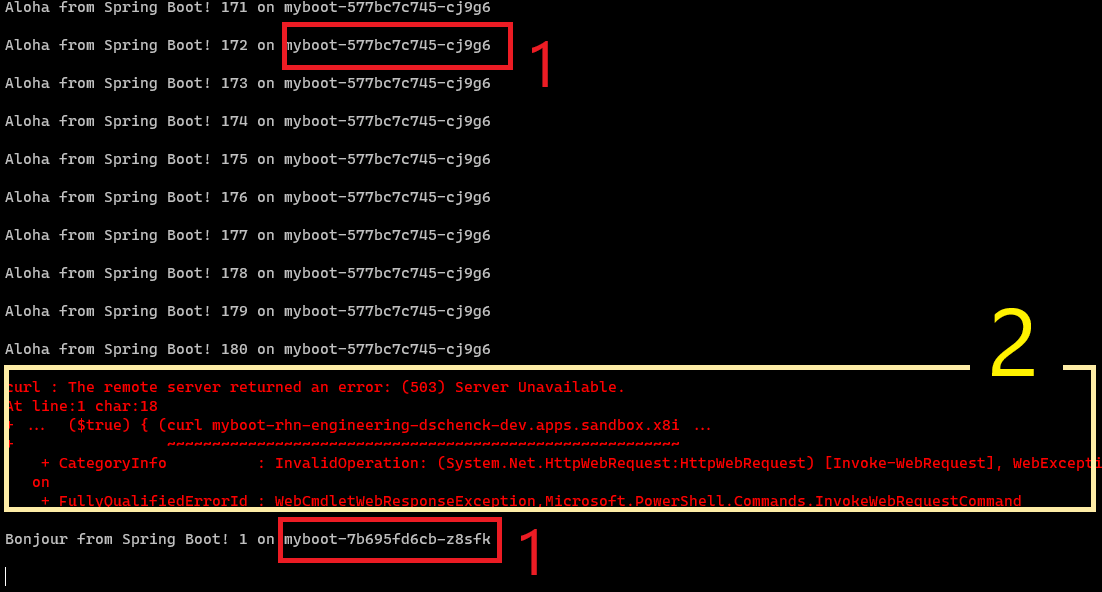
You will see the output of the curl loop change. This is a result of the rolling update.
You will most likely see some output that is the result of your pods being in a “not ready” state. This behavior is not optimal and can easily be prevented by adding a readiness probe to your deployment.
Figure 2 illustrates both the rolling update and the error associated with not using a readiness probe:
- The sections labeled with a 1 show the results before and after the rolling update. Notice that the host name has changed, demonstrating that a new pod has replaced the old one.
- The section labeled with a 2 is an example of the error that may occur in the time during which the old pod has been removed from service and the new pod is not ready. This situation can be avoided by using a readiness probe.
Congratulations. You have deployed your rolling update. Now you're ready to proceed to the next lesson: Guarantee application availability with OpenShift readiness probes.