Page
Create a host service using the Developer Sandbox

Deploying a new version of an application is usually risky. Despite our best efforts to ensure that it is bug-free, correct, and (usually) backwards-compatible, unanticipated errors can arise, seemingly out of nowhere. One way to reduce the risk of a new deployment is by using the Canary deployment model, which introduces the new version to a small audience before completing the rollout. This lesson introduces you to the Canary deployment model.
Prerequisites
- A Developer Sandbox for Red Hat OpenShift (Developer Sandbox) account
- The OpenShift command-line interface (CLI)
In this learning path, you will:
- Access the Developer Sandbox
- Spin up a host service
- Run a cURL command
- Set a pod count
What is the Canary Deployment?
Here’s an explanation of the Canary Deployment from Red Hat’s Cloud Native Compass:
A deployment pattern where a new version is eased into production by making it available to an increasingly-larger subset of users, until it either reaches 100 percent of the audience or is deemed not ready and is abandoned (and the audience percentage is set to zero).
By using intelligent routing, such as that provided by Istio, it is possible to direct web requests to a service based on user-defined criteria, such as geographical location, user ID, etc. With that functionality, it becomes possible to split traffic to an existing version and a new, Canary version.
The term Canary in this context refers to the old idea of carrying a canary in a cage into a coal mine, using it as a snapshot of the mine’s conditions. If, for example, the canary died, it meant there was a buildup of dangerous gases such as carbon monoxide. This signaled to the miners that conditions were life-threatening and it was time to exit the mine.
In software, a Canary Deployment allows you to monitor the success of a new version — performance, correctness, robustness, etc. — with a small audience. Based on success or failure of the application, the user base is then either slowly expanded until 100 percent of the users are using the new version, or scaled back to zero and the application terminated.
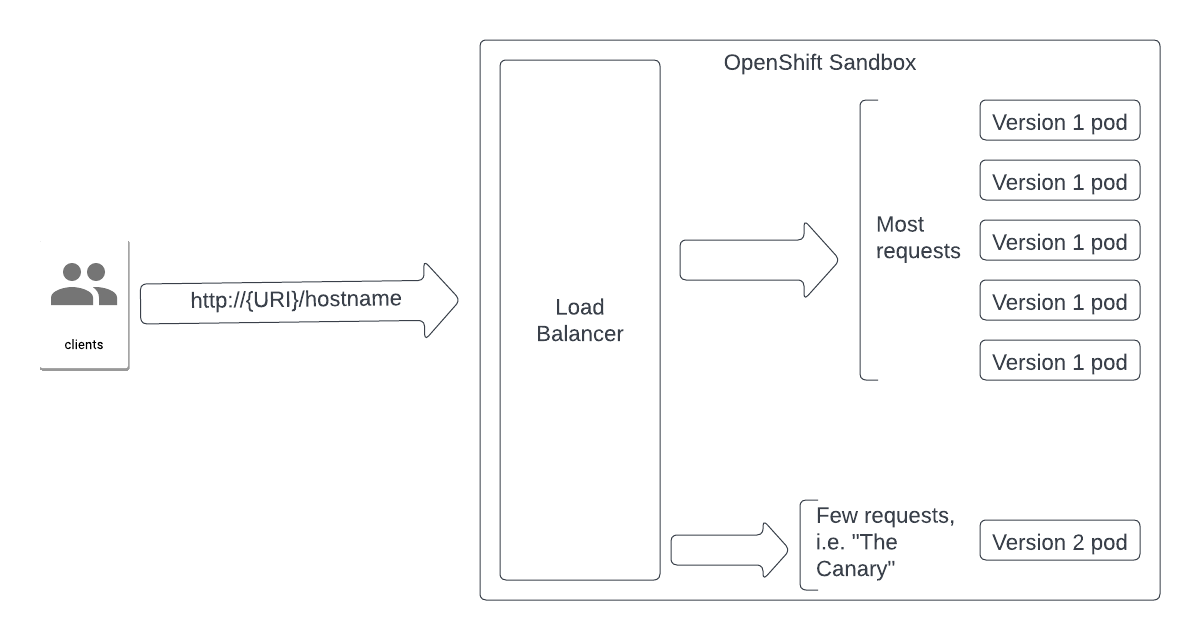
Here are two diagrams to help visualize the Canary Deployment learning path. As you can see in Figure 1, the majority of requests are being sent to Version 1 of our microservice, while a few requests trickle to Version 2.
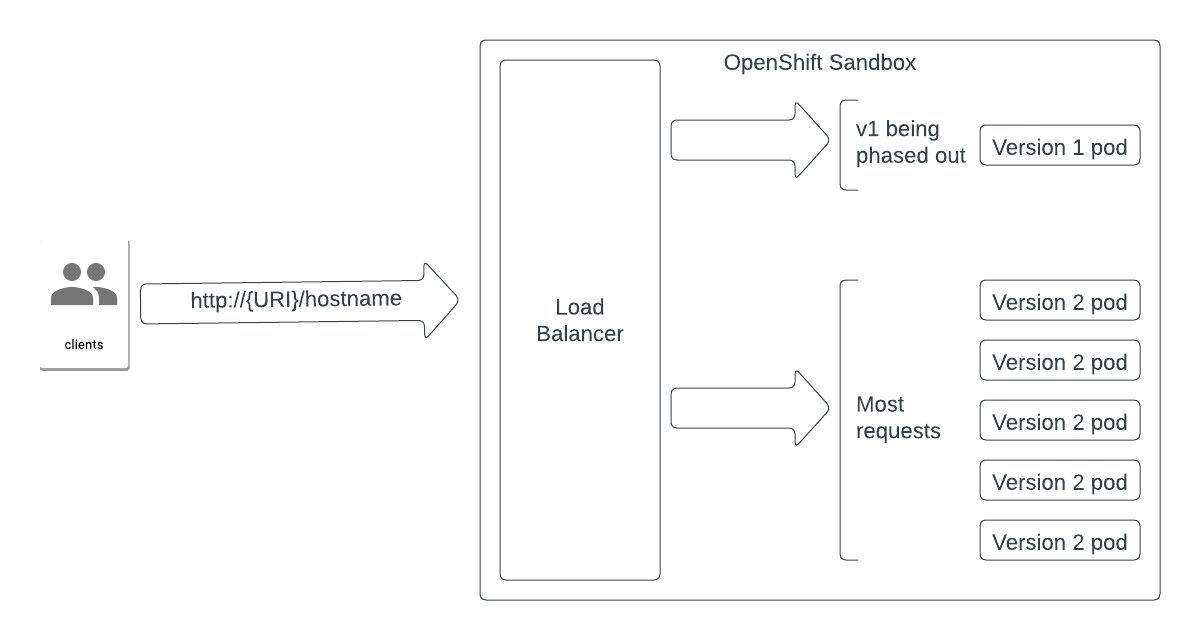
After we are satisfied with the viability of Version 2, we shift the burden to Version 2 (Figure 2).
Log into your Developer Sandbox at the command line
Log into your Developer Sandbox for Red Hat OpenShift by following these instructions.
Spin up the host service, gethostname
This activity uses a microservice that returns the name of the host where it is running. Because we are using OpenShift, the host name will be the pod ID: gethostname-v1-2-w2qxw, for example.
Run the following command to create our microservice, the gethostname-v1 application:
oc new-app quay.io/rhdevelopers/gethostname:v1 --name gethostname --as-deployment-config=true -l app=gethostnameTo allow anyone to reach it via an HTTP GET operation, run the following command to create an external route to the application:
oc expose service/gethostname --name gethostname-microservice
Run a cURL command loop to view the application output
To see the Canary Deployment in action, we’ll use a cURL command loop to get a result from the application. To do that, we need the URL of the route.
Run the following command to get the URL of the application:
oc get routesYou’ll use this information to start a cURL loop at the command line. Here’s an example output:
NAME                       HOST/PORT                                                                                      PATH             SERVICES         PORT       TERMINATION   WILDCARD

gethostname-microservice   gethostname-microservice-rhn-engineering-username-dev.apps.sandbox.x8i5.p1.openshiftapps.com   gethostname-v1                    8080-tcp                 None
Run the appropriate command to start a cURL loop:
If you are using Bash:
for ((i=1;i<=10000;i++)); do curl http://gethostname-microservice-rhn-engineering-username-dev.apps.sandbox.x8i5.p1.openshiftapps.com/hostname; echo -e; sleep .3; done;If you are using PowerShell:
while ($true) { curl gethostname-microservice-rhn-engineering-dsch-dev.apps.rm3.7wse.p1.openshiftapps.com/hostname;start-sleep -Milliseconds 300;echo '' }You will see output similar to the following:
VERSION 1 - The name of the host is: gethostname-v1-2-w2qxw                                                                                                                       VERSION 1 - The name of the host is: gethostname-v1-2-w2qxw                                                                                                                       VERSION 1 - The name of the host is: gethostname-v1-2-w2qxw                                                                                                                       VERSION 1 - The name of the host is: gethostname-v1-2-w2qxw
VERSION 1 - The name of the host is: gethostname-v1-2-w2qxw
VERSION 1 - The name of the host is: gethostname-v1-2-w2qxw
VERSION 1 - The name of the host is: gethostname-v1-2-w2qxw
VERSION 1 - The name of the host is: gethostname-v1-2-w2qxw
Set pod count for Version 1
By creating nine pods for Version 1 of our microservice, we can ensure that this version will get the bulk of the requests. With five pods running Version 1 and one pod running Version 2 (as you’ll see in the next part of this activity), we can expect nine out of ten requests to go to Version 1. In this scenario, Version 2 is the “canary”.
Run the following command to scale up Version 1 to nine pods:
oc scale --replicas=9 dc/gethostnameSummary
Congratulations. You've logged into your Developer Sandbox and scaled up Version 1 of the application. Now it's time to spin up Version 2.
