Page
Model deployment options using LangChain.js
While we might use local models for experimentation and an inner development loop, production deployments will most often use either a cloud-based service or a model hosted by your enterprise in an environment like Red Hat OpenShift AI. The great news is that when using LangChain.js, only minor tweaks are needed to move between running your application between any of these approaches.
LangChain.js has support for a number of back ends and you can find the current list in the LangChain.js GitHub repository (in langchainjs/langchain/src/llms). See Figure 1.

These back ends should allow us to create a model just like we did with the llama_cp support and then use that model instance with our existing application. Adding to the options that these integrations provide, some LLM runtimes like vLLM aim to provide an OpenAI-compatible endpoint so that we can use the OpenAI API support to connect to models running in those environments as well.
In this lesson, we’ll walk through the steps to connect to a model in both OpenAI and OpenShift AI. In both cases, we’ll use the OpenAI implementation of the model API to create a model.
In order to get full benefit from taking this lesson, you need:
- An OpenAI account or access to an OpenShift AI instance hosting a model served through a vLLM runtime.
In this lesson, you will:
- Learn how to switch between different back ends while keeping most of the application unchanged
Set up the environment
If you want to run the examples in this lesson, you will need either an OpenAI key or an accessible OpenShift AI instance running an vLLM runtime and its endpoint, but you can easily follow along without either of those.
If you have an OpenAI key, you will need to put that key in a file called key.json in the directory immediately outside of the lesson-3-4 directory. The key.json file should be in this format:
{
 "apiKey": "your key"
}
How to use different deployment options
To illustrate how you can use different deployment options, we’ll look at the modifications to the RAG example in langchainjs-backends.mjs.This is identical to the RAG example, except here we’ve generalized the model creation step. We’ve added a function to allow creation of the model with different back ends. Notice we have the following options, where you can uncomment the one you choose to use:
////////////////////////////////
// GET THE MODEL
const model = await getModel('llama-cpp', 0.9);
//const model = await getModel('openAI', 0.9);
//const model = await getModel('Openshift.ai', 0.9);
All you need to do is uncomment the desired line in order to switch the RAG application to use a different back end. You can easily develop locally (or whatever makes sense in your organization) and then switch to the appropriate back end for production. It also makes it easy for organizations to switch from one back end to another, avoiding lock-in that might come from coding to a specific services API or endpoint.
If you run the example without modification, it will run with the local model just like the example in Lesson 3.
Now let’s look at the getModel method to see what’s needed for each back end:
async function getModel(type, temperature) {
  console.log("Loading model - " + new Date());
  let model;
  if (type === 'llama-cpp') {
    ////////////////////////////////
    // LOAD MODE
    const __dirname = path.dirname(fileURLToPath(import.meta.url));
    const modelPath = path.join(__dirname, "models", "mistral-7b-instruct-v0.1.Q5_K_M.gguf")
    const { LlamaCpp } = await import("@langchain/community/llms/llama_cpp");
    model = await new LlamaCpp({ modelPath: modelPath,
                                 batchSize: 1024,
                                 temperature: temperature,
                                 gpuLayers: 64 });
  } else if (type === 'openAI') {
    ////////////////////////////////
    // Connect to OpenAPI
    const { ChatOpenAI } = await import("@langchain/openai");
    const key = await import('../key.json', { with: { type: 'json' } });
    model = new ChatOpenAI({
      temperature: temperature,
      openAIApiKey: key.default.apiKey
    });
  } else if (type === 'Openshift.ai') {
    ////////////////////////////////
    // Connect to OpenShift.ai endpoint
    const { ChatOpenAI } = await import("@langchain/openai");
    model = new ChatOpenAI(
      { temperature: temperature,
        openAIApiKey: 'EMPTY',
        modelName: 'mistralai/Mistral-7B-Instruct-v0.2' },
      { baseURL: 'http://vllm.llm-hosting.svc.cluster.local:8000/v1' }
    );
  };
  return model;
};
This method accepts a string to select which back end to use. The section for llama_cp should look very familiar as it has the same code used in the original RAG example, generalized to take temperature as a parameter. Back ends can have different runtime specific parameters, but often there will be a common set of parameters like temperature, etc., that are passed on to the model.
Looking at the section for OpenAI:
    ////////////////////////////////
    // Connect to OpenAPI
    const { ChatOpenAI } = await import("@langchain/openai");
    const key = await import('../key.json', { with: { type: 'json' } });
    model = new ChatOpenAI({
      temperature: temperature,
      openAIApiKey: key.default.apiKey
    });
We’ve swapped out the modelName for the openAIApiKey. There might be other options you want to specify, but that’s all it takes to switch from running with the local model to using the OpenAI service.
If you run the application, you should get a similar answer, which came from the model hosted by OpenAI:
answer: 'Based on the provided context,it is recommended to avoid using `npm` to start a Node.js application for the reasons mentioned,such as reducing components,processes, and potential security vulnerabilities.'Now let’s try the same thing by running with a model served in a OpenShift AI environment using the vLLM runtime. We did not set that up ourselves; I was given access to a running OpenShift AI instance. We will leave it to you to look at the OpenShift AI documentation if you are interested in what’s needed to set that up. In most cases, this will be set up and managed by your IT organization.
Looking at the section for OpenShift AI:
  } else if (type === 'Openshift.ai') {
    ////////////////////////////////
    // Connect to OpenShift.ai endpoint
    const { ChatOpenAI } = await import("@langchain/openai");
    model = new ChatOpenAI(
      { temperature: temperature,
        openAIApiKey: 'EMPTY',
        modelName: 'mistralai/Mistral-7B-Instruct-v0.2' },
      { baseURL: 'http://vllm.llm-hosting.svc.cluster.local:8000/v1' }
    );
  };
You can see that we used the same integration as we did for OpenAI, as vLLM provides a compatible endpoint.We did have to provide the baseURL (http://vllm.llm-hosting.svc.cluster.local:8000/v1) option, though, in order to point to the model running in OpenShift AI instead of the public OpenAI service. In our case, no API key was needed, although that is unlikely in a real deployment. In that case, for vLLM, you simply pass EMPTY for the API key.
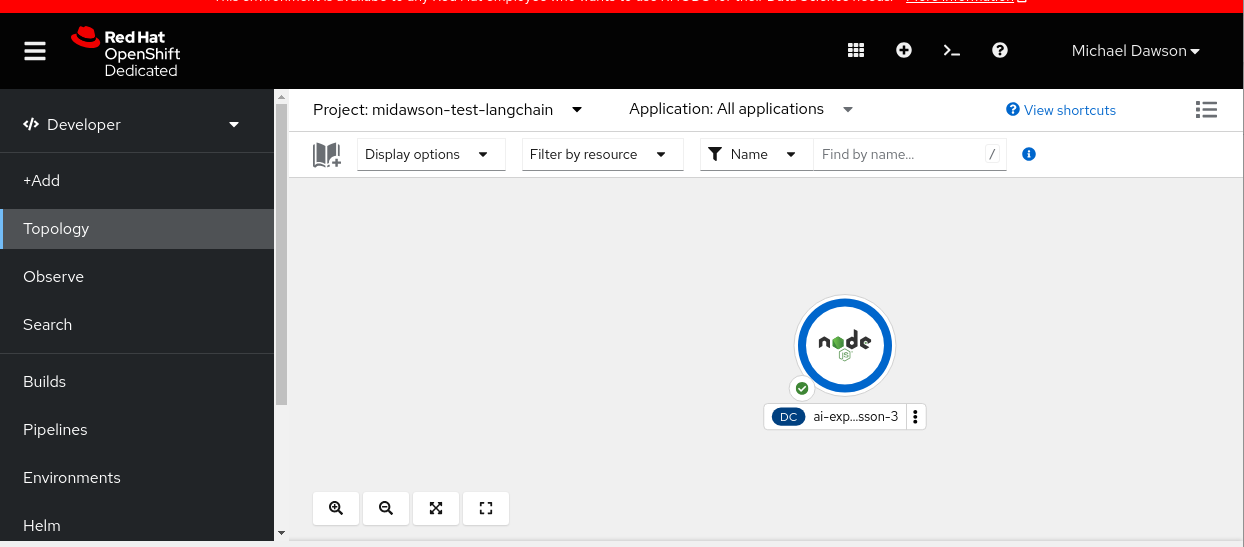
We deployed the example using nodeshift deploy (see nodeshift CLI for OpenShift Node.js deployment) as an application running in the OpenShift instance hosting OpenShift AI, as shown in Figure 2:
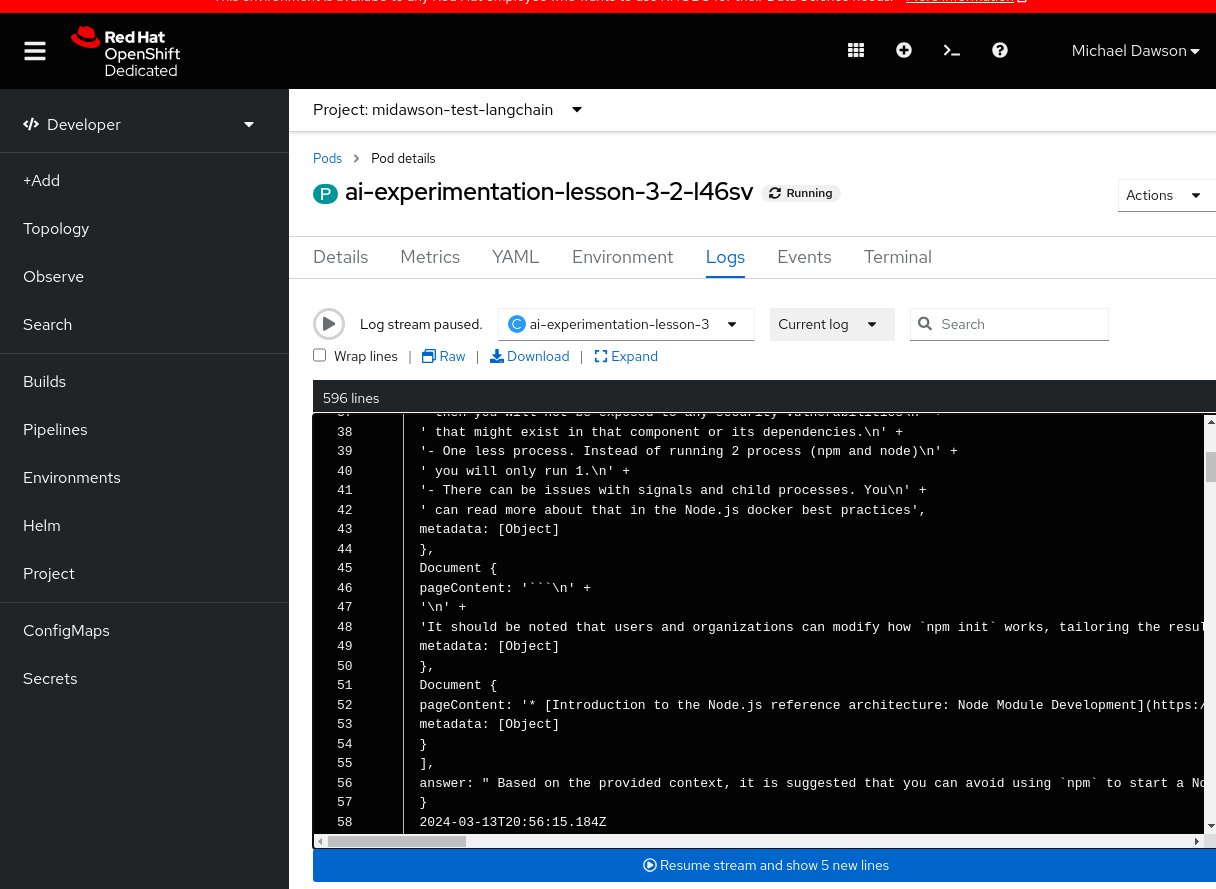
And from the logs for the pod, we can see that the example ran and returned the expected output, as shown in Figure 3.
If you try to do this yourself, I’ll note that we added some extra code to keep the pod running long enough while I went to view the logs as follows:
} else if (type === 'Openshift.ai') {
    ////////////////////////////////
    // Connect to OpenShift.ai endpoint
    const { ChatOpenAI } = await import("@langchain/openai");
    model = new ChatOpenAI(
      { temperature: temperature,
        openAIApiKey: 'EMPTY',
        modelName: 'mistralai/Mistral-7B-Instruct-v0.2' },
      { baseURL: 'http://vllm.llm-hosting.svc.cluster.local:8000/v1' }
    );
    setInterval(() => {
      console.log('keep-alive');
    }, 120000);
  };
We hope that you can see from the example that with the abstractions the LangChain.js APIs provide, we can easily switch between models running locally, in cloud services, or in an environment like OpenShift AI operated by your organization. This helps to maximize your flexibility and avoid lock-in to any particular service.
Conclusion
In this learning path, we walked through how to:
- Send basic queries to a model running locally with LangChain.js.
- Speed up your local mode with a GPU.
- Send queries augmented through retrieval-augmented generation (RAG) to a model with LangChain.js.
- Switch between model deployment options including local models, the OpenAI cloud service, and a model running in Red Hat OpenShift AI.
We hope this learning path has helped you understand some of the key topics when it comes to integrating large language models into your Node.js and JavaScript applications. If you want to dive deeper and learn more check out Diving Deeper with large language models and Node.js.
Want to learn more? Check out the following resources:
