Page
Containers 101
In this lesson, you will learn the basics of containers.
In order to get full benefit from taking this lesson, you need:
- A basic understanding of how an operating system works.
In this lesson, you will:
- Learn how the Linux kernel, services, and daemons work together to create and deploy containers.
- Learn how the architecture of the kernel and supporting services affects security and performance.
- Explain the API interactions of daemons and the host kernel to create isolated processes.
- Understand the basics of why people move on to container orchestration.
- Command the nomenclature necessary to technically discuss the basics of the single and multi-host toolchain.
Containers: An introduction
If you understand Linux, you probably already have 85% of the knowledge you need to understand containers. If you understand how processes, mounts, networks, shells, and daemons work with commands like ps, mount, ip addr, bash, httpd and mysqld, then you simply need to understand a few extra primitives to become an expert with containers.
Remember that all of the things that you already know today, still apply. From security and performance to storage and networking, containers are just a different way of packaging and delivering Linux applications.
There are four basic primitives to learn to get you from app developer and/or Linux administrator to feeling comfortable with containers:
Once you understand the basic four primitives, you will be able to move on to some advanced concepts covered in this learning path, including:
- Container standards: Understanding OCI, CRI, CNI, and more.
- Container tools ecosystem: Podman, Buildah, Skopeo, and cloud registries.
- Production image builds: Sharing and collaborating between technical specialists.
- Intermediate architecture: Production environments.
- Advanced architecture: Build in resilience.
- Container history: Context for where we are today.
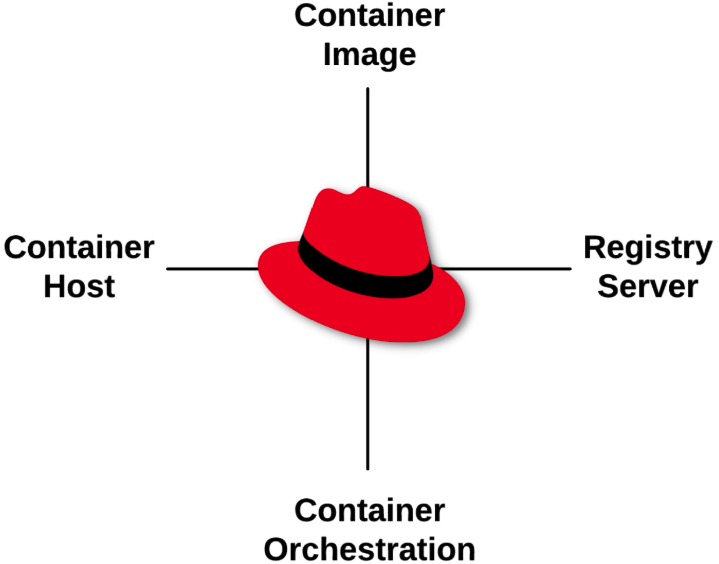
Now, let's start with the introductory lesson, which covers these four basic primitives (Figure 1):
Container images
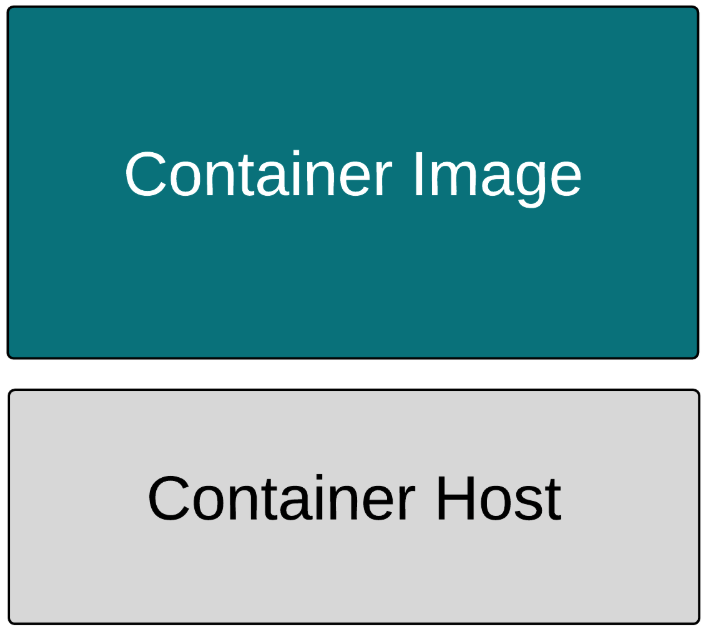
Container images are not mysterious. In fact, they are tar files, and they are tar files with an associated JSON file. Together, we call these an image bundle. The on-disk format of this bundle is defined by the OCI Image Specification. All major container engines, including Podman, Docker, RKT, CRI-O, and containerd, build and consume these bundles. These files are images until they are started as executables on top of a host (Figure 2):
But let's dig into three concepts a little deeper:
Portability: Since the OCI standard governs image specification, a container image can be created with Podman, pushed to almost any container registry, shared with the world, and consumed by almost any container engine, including Docker, RKT, CRI-O, containerd, and, of course, other Podman instances. Standardizing on this image format lets us build infrastructure like registry servers that can be used to store any container image, be it RHEL 6, RHEL 7, RHEL8, Fedora, or even Windows container images. The image format is the same, no matter which operating system or binaries are in the container image.
Note
Podman can download a Fedora image, uncompress it, and store it in the local /var/lib/containers image storage even though this isn't a Fedora container host.
To see an example of this, run the following command:
podman pull quay.io/fedora/fedoraCompatibility: This addresses the content inside the container image. No matter how hard you try, ARM binaries in a container image will not run on POWER container hosts. Containers do not offer compatibility guarantees; only virtualization can do that. This compatibility problem extends to processor architecture and versions of the operating system. Try running a RHEL 8 container image on a RHEL 4 container host. That isn't going to work. However, as long as the operating systems are reasonably similar, the binaries in the container image will usually run.
Note
Podman can download a Fedora image, uncompress it, and store it in the local /var/lib/containers image storage even though this isn't a Fedora container host.
podman run -t quay.io/fedora/fedora cat /etc/redhat-releaseYou should see a result like this:
podman run -t quay.io/fedora/fedora cat /etc/redhat-release Fedora release 42 (Adams)Supportability: This is what vendors can support. This is about investing in testing, security, performance, and architecture, as well as ensuring that images and binaries are built in a way that they run correctly on a given set of container hosts. For example, Red Hat supports RHEL 6, UBI 7, and UBI 8 container images on both RHEL 7 and RHEL 8 container hosts (Red Hat Enterprise Linux CoreOS is built from RHEL bits). Red Hat cannot guarantee that every permutation of container image and host combination on the planet will work. It would expand the testing and analysis matrix resources at a non-linear growth rate. To demonstrate compatibility, run a Red Hat Universal Base Image (UBI) container using Podman:
podman run -t registry.access.redhat.com/ubi10/ubi cat /etc/redhat-releaseAnalyzing portability, compatibility, and supportability, we can deduce that a RHEL 7 image will work on a RHEL 7 host perfectly. The code in both was designed, compiled, and tested together. The Product Security Team at Red Hat is analyzing Common Vulnerabilities and Exposures (CVEs) for this combination, and performance teams are testing RHEL 7 web servers with a RHEL 7 kernel. The entire machine of software creation and testing does its work in this configuration with programs and kernels compiled, built, and tested together. Matching versions of container images and hosts inherit all of this work (Figure 3).

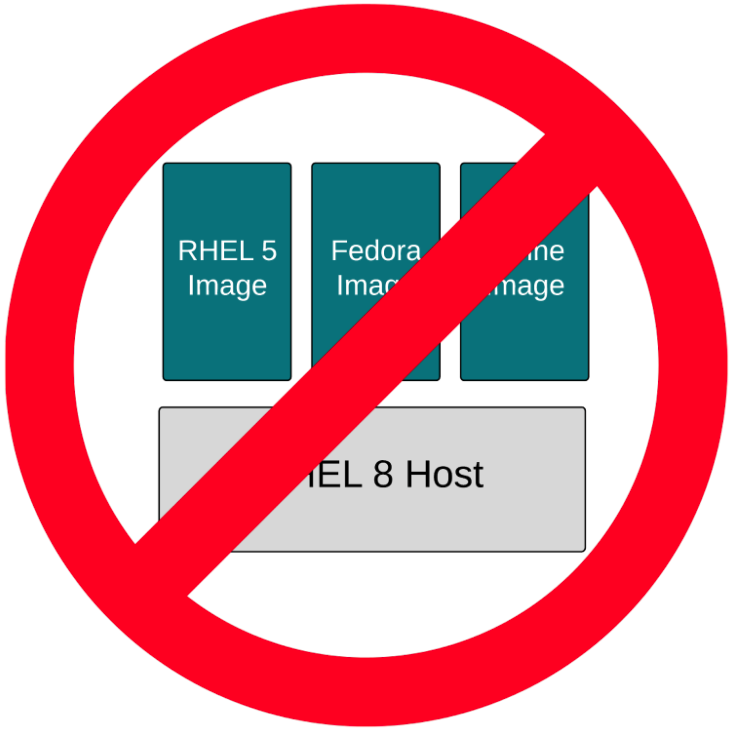
Figure 3: If the host and image match, you know it’s compatible. However, there are limits. Red Hat can't guarantee that RHEL 5, Fedora, and Alpine images will work like they were intended to on a RHEL 7 host. The container image standards guarantee that the container engine will be able to ingest the images, pulling them down and caching them locally. But nobody can guarantee that the binaries in the container images will work correctly. Nobody can guarantee that there won't be strange CVEs that show up because of the version combinations (yeah, that's a thing), and of course, nobody can guarantee the performance of the binaries running on a kernel for which it wasn't compiled. That said, many times, these binaries will appear to just work (Figure 4).

Figure 4: Mismatched image and host may, or may not, work. This leads us to supportability as a concept separate from portability and compatibility. This is the ability to guarantee, to some level, that certain images will work on certain hosts. Red Hat can do this between selected major versions of RHEL for the same reason that we can do it with the RHEL Application Compatibility Guide. Red Hat takes special precautions to compile programs in a way that doesn't break compatibility. They also analyze CVEs and test performance. A bare minimum of testing, security, and performance can go a long way in ensuring supportability between versions of Linux, but there are limits. One should not expect that container images from RHEL 9, 10, or 11 will run on RHEL 8 hosts (Figure 5).

Figure 5: RHEL hosts are backward compatible.


Now that we have sorted out the basics of container images, let's move on to registries.
Container registries
Registries are really just fancy file servers that help users share container images. The magic of containers is really the ability to find, run, build, share, and collaborate with a new packaging format that groups applications and all of their dependencies together.
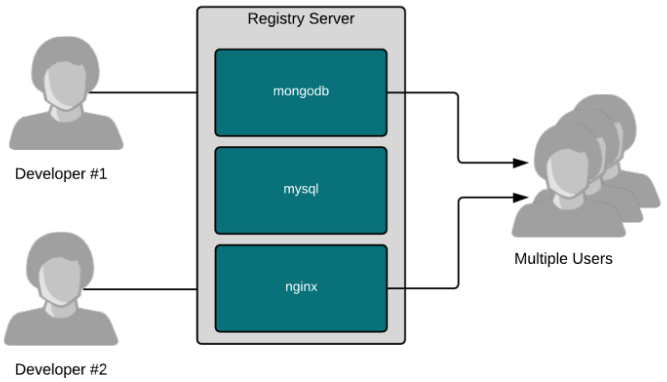
Container images make it easy for software builders to package software, as well as provide information about how to run it. Using metadata, software builders can communicate how users can and should run their software, while providing the flexibility to also build new things based on existing software.
Registry servers just make it easy to share this work with other users. Builders can push an image to a registry, allowing users and even automation like CI/CD systems to pull it down and use it thousands or millions of times. Some registries, like the Red Hat Container Catalog, offer images that are highly curated, well-tested, and enterprise-grade. Others, like Quay, are cloud-based registries that give individual users public and private spaces to push their own images and share them with others. Curated registries are good for partners who want to deliver solutions together (like Red Hat and CrunchyDB), while cloud-based registries are good for end users collaborating on work.
As an example that demonstrates the power of sharing with quay.io, let's pull a container image that was designed and built for this lesson:
podman pull quay.io/rhdevelopers/linux-container-internals-2-0-introduction:latestIf using macOS:
podman pull quay.io/rhdevelopers/linux-container-internals-2-0-introduction:macosNow, run this simulated database:
podman run -d -p 3306:3306 quay.io/rhdevelopers/linux-container-internals-2-0-introduction:latestIf using macOS:
podman run -d -p 3306:3306 quay.io/rhdevelopers/linux-container-internals-2-0-introduction:macosPoll the simulated database with our very simple client, curl:
curl localhost:3306 --http0.9Notice how easy these commands were. We didn't have to know very much about how to run it. All of the complex logic for how to run it was embedded in the image. Here's the build file, so that you can inspect the start logic (ENTRYPOINT). You might not fully understand the bash code there, but that's OK. That's part of why containers are useful.
# Version 1

# Pull from Red Hat Universal Base Image
FROM registry.access.redhat.com/ubi9/ubi-minimal

MAINTAINER Scott McCarty smccarty@redhat.com

# Update the image
RUN microdnf -y install nmap-ncat && \
    echo "Hi! I'm a database. Get in ma bellie!!!" > /srv/hello.txt

# Output
ENTRYPOINT bash -c 'while true; do /usr/bin/nc -l -p 3306 < /srv/hello.txt; done'
Realizing how easy it is to build and share using registry servers is the goal of this lesson. You can embed the runtime logic into the container image using a build file, thereby communicating not just what to run, but also how. You can share the container image, making it easier for others to use. You can also share the build file using something like GitHub to make it easy for others to build off of your work (open source for the win).
Now, let's move on to container hosts.
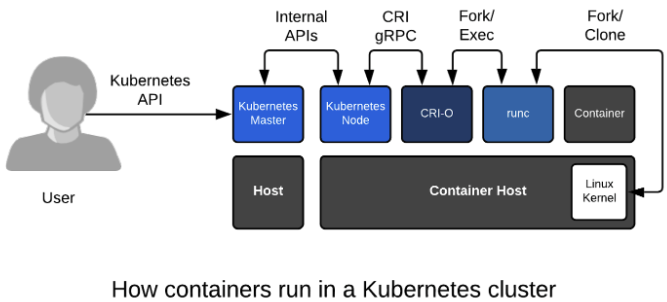
Container hosts
To understand the container host, we must analyze the layers that work together to create a container. They include:
Container engine
A container engine can loosely be described as any tool that provides an API or CLI for building or running containers. This started with Docker, but also includes Podman, Buildah, rkt, and CRI-O. A container engine accepts user inputs, pulls container images, creates some metadata describing how to run the container, and passes this information to a container runtime.
Container runtime
A container runtime is a small tool that expects to be handed two things: A directory, often called a root filesystem (or rootfs), and some metadata called config.json (or spec file). The most common runtime runc is the default for every container engine mentioned above. However, there are many innovative runtimes, including katacontainers, gvisor, crun, and railcar.
Linux kernel
The kernel is responsible for the last mile of container creation, as well as resource management during its running lifecycle. The container runtime talks to the kernel to create the new container with a special kernel function called clone(). The runtime also handles talking to the kernel to configure things like cgroups, SELinux, and SECCOMP (more on these later). The combination of kernel technologies invoked is defined by the container runtime, but there are very recent efforts to standardize this in the kernel.

Containers are just regular Linux processes that were started as child processes of a container runtime instead of by a user running commands in a shell. All Linux processes live side by side, whether they are daemons, batch jobs, or user commands. The container engine, container runtime, and containers (child processes of the container runtime) are no different. All of these processes make requests to the Linux kernel for protected resources like memory, RAM, and TCP sockets.
Execute a few commands with Podman and notice the process IDs and namespace IDs. Containers are just regular processes.
podman ps -a
podman top $(podman ps -n -1 -q) huser user hpid pid %C etime tty time args
We will explore this deeper in later lessons, but for now, commit this to memory. Containers are simply Linux.
Container orchestration
Before proceeding with this section, you will need to complete the following two prerequisite steps:
Container orchestration is the next logical progression after you become comfortable working with containers on a single host. With a single container host, containerized applications can be managed quite similarly to traditional applications, while gaining incremental efficiencies. With orchestration, there is a significant paradigm shift: developers and administrators alike need to think differently, making all changes to applications through an API. Some people question the complexity of orchestration, but the benefits far outweigh the work of learning it. Today, Kubernetes is the clear winner when it comes to container orchestration, because with it, you gain:
- Application definitions: YAML and JSON files can be passed between developers or from developers to operators to run fully-functioning, multi-container applications.
- Easy application instances: Run many versions of the same application in different namespaces.
- Multi-node scheduling: Controllers built into Kubernetes can manage 10 or 10,000 container hosts with no extra complexity.
- Powerful APIs: Developers, cluster admins, and automators alike can define application state and tenancy, and even cluster node states with OpenShift 4.
- Operational automation: The Kubernetes Operator Framework can be thought of as a robot systems administrator deployed side by side with applications that manage mundane and complex tasks for the application, such as backups and restores.
- Higher-level frameworks: Once you adopt Kubernetes orchestration, you gain access to an innovative ecosystem of tools like Istio, Knative, and the previously mentioned operator framework.
To demonstrate, all we need is bash, curl, and netcat, which lets us pipe text across a TCP port. If you are familiar with basic Bash scripting, this tiny lesson teases apart the value of the orchestration versus the application itself. This application doesn't do much, but it does demonstrate the power of a two-tier application running in containers with both a database and a web front end.
In this lesson, we use the same container image from before, but this time we embed the how-to-run logic in the Kubernetes YAML. Here's a simple representation:
User -> Web App (port 80) -> Database (port 3306)
Take a quick look at this YAML file, but don't get too worried if you don't fully understand the YAML. There are plenty of great tutorials on Kubernetes, and most people learn it over iterations and new application builds:
curl https://raw.githubusercontent.com/redhat-developer-demos/intro-both/refs/heads/main/intro-both.yamlIn the database, we are opening a file and using netcat to ship it over Port 3306. In the web app, we are pulling in the data from Port 3306 and shipping it back out over to Port 80, like a normal application would. The idea is to show a simple example of how powerful this is, without having to learn other technology. We can fire this application up in an instant with a single oc command:
oc create -f https://raw.githubusercontent.com/redhat-developer-demos/intro-both/refs/heads/main/intro-both.yamlWait for the cheese pizza and pepperoni pizza pods to start.
If using Bash:
for i in {1..5}; do oc get pods;sleep 3; doneIf using PowerShell:
for ($i = 1; $i -le 5; $i++) { oc get pods; sleep 3 }Wait until all pods are in RUNNING status.
Next, expose the intro-front service to the internet by running this command:
oc expose service/intro-frontWhen the pods are done being created, pull some data from our newly created web app. Notice that we get back what would be the front-end website.
If using Bash:
curl $(oc get routes intro-front -ojsonpath='{.spec.host}')If using PowerShell:
curl (oc get routes intro-front -ojsonpath='{.spec.host}')Note
The command in brackets above is simply getting the URL of the web server.
Now, let's pull data directly from the database.
If using Bash:
curl $(oc get routes intro-front -ojsonpath='{.spec.host}'/backend)If using PowerShell:
curl (oc get routes intro-front -ojsonpath='{.spec.host}'/backend)Note
You could fire up 50 copies of this same application in Kubernetes with 49 more commands (in different projects). It's that easy.
Summary
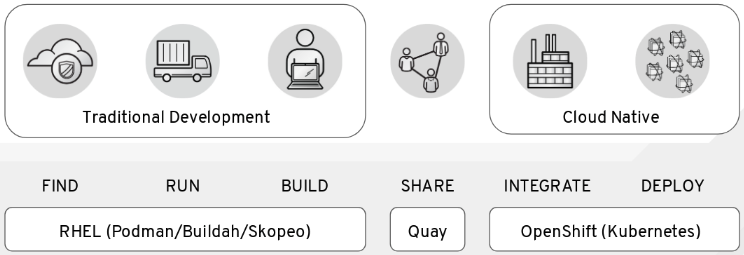
In this lesson, we have covered container images, registries, hosts, and orchestration as four new primitives you need to learn on your container journey. If you are struggling to understand why you need containers, why you need to move to orchestration, or how to explain it to your management or others in your team, thinking about it in this context will help (Figure 9):
It is a journey, and we are always happy to help. If you want more options, consider the following learning paths:
- Install Podman Desktop and connect it to your Developer Sandbox
- Download and install the Red Hat OpenShift CLI
- Move your Developer Sandbox objects to another cluster
The next lesson in this series explores images in depth.