Page
Container engines and the Linux kernel
This lesson focuses on understanding how a particular host actually runs the container images. We'll look at all aspects, from the deep internals of how containerized processes interact with the Linux kernel, to the Podman daemon and how it receives REST API calls and translates them into system calls to tell the Linux kernel to create new containerized processes.
In order to get full benefit from taking this lesson, you need:
- To complete Containers 101.
- A GitHub command-line interface.
- A copy of the GitHub repository: https://github.com/redhat-developer/demos/intro-both.
By the end of this lesson, you will:
- Understand the basic interactions of the major daemons and APIs in a typical container environment.
- Internalize the function of system calls and kernel namespaces.
- Understand how SELinux and sVirt secure containers.
- Command a conceptual understanding of how cgroups limit containers.
- Use SECCOMP to limit the system calls a container can make.
- Have a basic understanding of container storage and how it compares to normal Linux storage concepts.
- Gain a basic understanding of container networking and namespaces.
- Troubleshoot a basic Open vSwitch setup with Kubernetes/Red Hat OpenShift.
Daemons and APIs: Docker, Kubernetes Master, Node, and their interaction with the Linux kernel
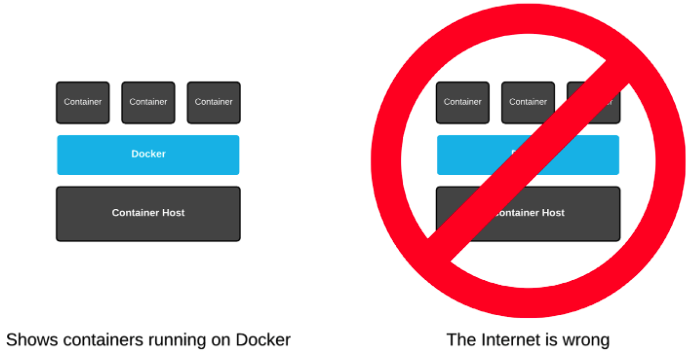
If you do a quick web search, you will find hundreds of architectural drawings that depict things the wrong way or only tell part of the story. This leads the innocent viewer to come to the wrong conclusion about containers. One might suspect that even the makers of these drawings have the wrong conclusion about how containers work and hence propagate bad information. So, forget everything you think you know.
How do people get it wrong? In two main ways:
First, most of the architectural drawings above show the Podman daemon as a wide blue box stretched out over the container host. The containers are shown as if they are running on top of the Podman daemon. This is incorrect. Containers don't run on Podman. The Podman engine is an example of a general-purpose container engine. Humans talk to container engines, and container engines talk to the kernel. The containers are actually created and run by the Linux kernel. Even when drawings do actually show the right architecture between the container engine and the kernel, they never show containers running side by side. Containers Are Linux (Figure 1).
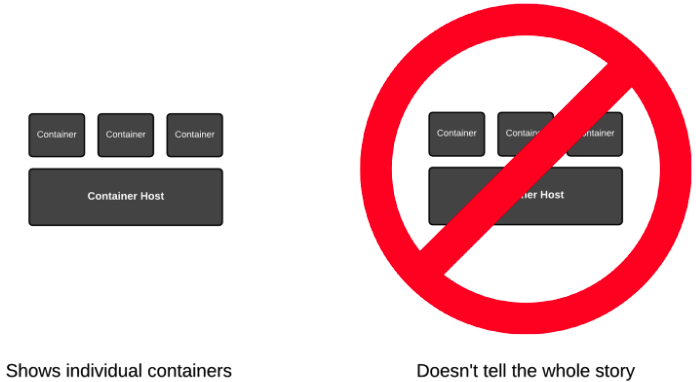
Second, when drawings show containers as Linux processes, they never show the container engine side by side. This leads people to never think about these two things together, and users are left with only part of the story:
For this lesson, let’s start from scratch. In the terminal, let's start with a simple experiment.
Start three containers that will all run the top command:
podman run -td registry.access.redhat.com/ubi9/toolbox top

podman run -td registry.access.redhat.com/ubi9/toolbox top

podman run -td registry.access.redhat.com/ubi9/toolbox top
Now, let's inspect the process table of the underlying host.
If you are using Linux on your PC:
ps -efZ | grep -v grep | grep " top"If you are using Windows or macOS on your PC:
podman machine ssh
ps -efZ | grep -v grep | grep " top"
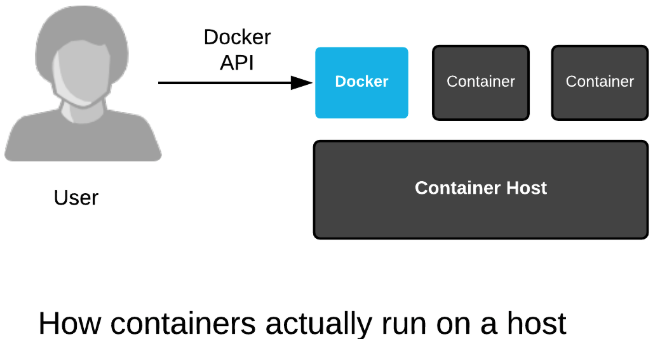
exitNotice that we started each of the top commands in containers. We started three with Podman, but they are still just a regular process that can be viewed with the trusty old ps command. That's because containerized processes are just fancy Linux processes with extra isolation from normal Linux processes. A simplified drawing will look like Figure 3:
In the kernel, there is no single data structure that represents what a container is. This has been debated back and forth for years. Some people think there should be, others think there shouldn't. The current Linux kernel community philosophy is that the Linux kernel should provide a bunch of different technologies, ranging from experimental to very mature, and enable users to mix these technologies together in creative, new ways.
And, that's exactly what a container engine (Docker, Podman, CRI-O) does. It leverages kernel technologies to create what humans call containers. The concept of a container is a user construct, not a kernel construct. This is a common pattern in Linux and Unix. This split between lower-level (kernel) and higher-level (userspace) technologies allows kernel developers to focus on enabling technologies, while users experiment with them and find out what works well (Figure 4).
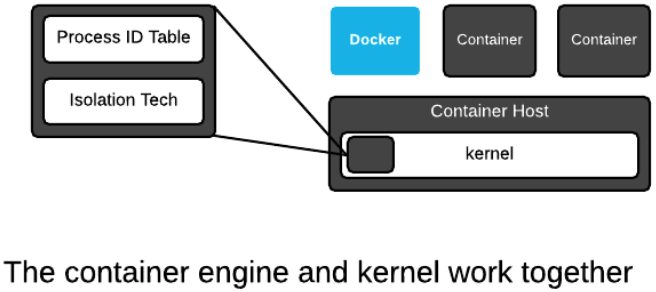
The Linux kernel only has a single major data structure that tracks processes: The process ID table. The ps command dumps the contents of this data structure. But this is not the total definition of a container. The container engine tracks which kernel isolation technologies are used and what data volumes are mounted. This information can be thought of as metadata that defines what humans call a container. We will dig deeper into the technical underpinnings, but for now, understand that containerized processes are regular Linux processes that are isolated using kernel technologies, like Namespaces, SELinux, and cgroups. This is sometimes described as sandboxing, isolation, or an illusion of virtualization.
In the end, containerized processes are just regular Linux processes. All processes live side by side, whether they are regular Linux processes, long-lived daemons, batch jobs, interactive commands that you run manually, or containerized processes. All of these processes make requests to the Linux kernel for protected resources like memory, RAM, and TCP sockets. We will explore this deeper in later labs, but for now, commit this to memory.
Step-by-step creation of a container
In this step, we are going to investigate the basic construction of a container. The general construction of a container is similar to almost all OCI-compliant container engines:
- Pull/expand/mount an image.
- Create an OCI-compliant
specfile. - Call
runcwith thespecfile.
Note
If you are using macOS, this is a read-only section. The commands contained in this section cannot be executed in a macOS environment.
Pull/expand/mount an image
Let's use Podman to create a container from scratch. Podman makes it easy to break down each step of the container construction for learning purposes.
First, let's pull the image, expand it, and create a new overlay filesystem layer as the read/write root filesystem for the container. To do this, we will use a specially constructed container image, which lets us break down the steps instead of starting all at once.
If you are using a Podman VM (such as Windows or macOS), you must first move inside your Podman VM by using the podman machine ssh command.
If you are using RHEL, start a Super User session using the su command.
Run the following command:
podman create --name on-off-container -v /mnt:/mnt:Z quay.io/rhdevelopers/on-off-containerIf using a Mac:
podman create --name on-off-container -v /mnt:/mnt:Z quay.io/rhdevelopers/on-off-container:macosBy running the above command, we have created storage.
Note
Under the STATUS column, the container is in a Created state. This is not a running container. Just the first step in creation has been executed.
Run the following command:
podman ps -aTry to look at the storage with the mount command.
Hint
You won't be able to find it.
Run the following command to install the jq utility:
sudo dnf install -y jqWhile you're still inside your Podman VM, run the following command:
mount | grep -v podman | grep mergedHopefully, you didn't look at the storage with the mount command for too long because you can't see it with the mount command. That's because this storage has been mounted in what's called a mount namespace. You can only see the mount from inside the container. To see the mount from outside the container, Podman has a cool feature called podman-mount. This command will return the path of a directory in which you can poke around.
Run the following command:
podman mount on-off-containerThe directory you get back is a system-level mount point into the overlay filesystem used by the container. You can literally change anything in the container's filesystem now. Run the following four commands to poke around:
mount | grep -v podman | grep merged

ls $(podman mount on-off-container)

touch $(podman mount on-off-container)/test

ls $(podman mount on-off-container)
See the test file there. You will see this file in our container later when we start and create a shell inside. Let's move on to the spec file.
Create a spec file
At this point, the container image has been cached locally and mounted, but we don't actually have a spec file for runc yet. Creating a spec file manually is quite tedious because they are made up of complex JSON with a lot of different options governed by the OCI runtime spec. Luckily for us, the container engine will create one for us. This exact same spec file can be used by any OCI-compliant runtime that can consume it (runc, crun, katacontainers, gvisor).
Let's run some experiments to show when it's created. First, let's inspect the place where it should be:
cat ./.local/share/containers/storage/overlay-containers/$(podman ps -l -q --no-trunc)/userdata/config.json | jq .If using RHEL:
cat /var/lib/containers/storage/overlay-containers/$(podman ps -l -q --no-trunc)/userdata/config.json|jq .The above command errors out because the container engine hasn't created the config.json file yet. We will initiate the creation of this file by using Podman combined with a specially constructed container image.
podman start on-off-containerThe config.json file has been created. Inspect it for a while. Notice that there are options in there that are strikingly similar to the command-line options of Podman. The spec file really highlights the API.
cat ./.local/share/containers/storage/overlay-containers/$(podman ps -l -q --no-trunc)/userdata/config.json | jq .If using RHEL:
cat /var/lib/containers/storage/overlay-containers/$(podman ps -l -q --no-trunc)/userdata/config.json|jq .Podman has not started a container. It only created the config.json and immediately exited. Notice under the STATUS column that the container is now in the Exited state:
podman ps -aIn the next step, we will create a running container with runc.
Call a runtime
Now that we have storage and a config.json, let's complete the circuit and create a containerized process with this config.json. We have constructed a container image, which only starts a process in the container if the /mnt/on file exists. Let's create the file and start the container again.
touch /mnt/on
podman start on-off-container
When Podman started the container this time, it fired up top. Under the STATUS column, the container is now in the Up state:
podman ps -aLet's fire up the shell inside our running container.
podman exec -it on-off-container bashLook for the test file we created before we started the container.
ls -alhThe file is there as we would expect. You have just created a container in three basic steps. Did you know and understand that all of this was happening every time you ran a Podman or Podman command?
Time to clean up your work. Run the following four commands to exit back to your machine’s command line, stop, and remove the container:
exit

exit

podman kill on-off-container

podman rm on-off-container
SELinux and sVirt: Dynamically generated contexts to protect your containers
The goal of this exercise is to gain a basic understanding of SELinux/sVirt.
Note
To execute the commands in this section, you must be running Linux. If you are using Windows or MacOS, you may wish to read this section or skip ahead to the next lesson, Multi-container applications.
Run the following commands:
podman run -dt registry.access.redhat.com/ubi9/ubi sleep 10
podman run -dt registry.access.redhat.com/ubi9/ubi sleep 10
ps -efZ | grep container_t | grep sleep
Example output:
system_u:system_r:container_t:s0:c228,c810 root 18682 18669  0 03:30 pts/0 00:00:00 sleep 10
system_u:system_r:container_t:s0:c184,c827 root 18797 18785  0 03:30 pts/0 00:00:00 sleep 10
Notice that each container is labeled with a dynamically generated Multi-level Security (MLS) label. In the example above, the first container has an MLS label of c228,c810, while the second has a label of c184,c827. Since each of these containers has a different MLS label, they cannot access each other's memory and files.
SELinux doesn't only label the processes, it also labels the files accessed by the process. Make a directory for data, and inspect the SELinux label on the directory. Notice the type is set to user_tmp_t, but there are no MLS labels set:
mkdir /tmp/selinux-test
ls -alhZ /tmp/selinux-test/
Example output:
drwxr-xr-x. root root system_u:object_r:container_file_t:s0:c177,c734 .
drwxrwxrwt. root root system_u:object_r:tmp_t:s0       ..
Run the following command a few times and notice the MLS labels change every time. This is sVirt at work:
podman run -t -v /tmp/selinux-test:/tmp/selinux-test:Z registry.access.redhat.com/ubi7/ubi ls -alhZ /tmp/selinux-testFinally, look at the MLS label set on the directory. It is always the same as the last container you ran. The :Z option auto-labels and bind-mounts so that the container can access and change files on the mount point. This prevents any other process from accessing this data and is done transparently to the end user.
ls -alhZ /tmp/selinux-test/Cgroups: Dynamically created with container instantiation
The goal of this exercise is to gain a basic understanding of how containers prevent the use of each other's reserved resources. The Linux kernel has a feature called cgroups, short for control groups, which limits, accounts for, and isolates the resource usage of processes, like CPU, memory, disk I/O, and network.
Normally, these control groups would be set up by a system administrator with cgexec or configured with systemd (systemd-run --slice), but with a container engine, this configuration is handled automatically.
To demonstrate, run two separate containerized sleep processes:
podman run -dt registry.access.redhat.com/ubi7/ubi sleep 10
podman run -dt registry.access.redhat.com/ubi7/ubi sleep 10
sleep 3
for i in $(podman ps | grep sleep | awk '{print $1}' | grep [0-9]); do find /sys/fs/cgroup/ | grep $i; done
Notice how each containerized process is put into its own cgroup by the container engine. This is quite convenient, similar to sVirt.
Summary
Container engines run on the Linux kernel. This lesson demonstrated just how intertwined they are.
It is a journey, and we are always happy to help. If you want more options, consider the following learning paths:
- Install Podman Desktop and connect it to your Developer Sandbox
- Download and install the Red Hat OpenShift CLI
- Move your Developer Sandbox objects to another cluster
In the next lesson, you will learn how to deploy and manage multi-container applications.
