Page
Deploy an application via RSP
Let’s use the following servlet example to demonstrate the Runtime Server Protocol (RSP): https://github.com/robstryker/SimpleServlet. Load this example into your IntelliJ window and check out the code, then import it via File -> Open and paste in the cloned folder.
Before you start, build the project first. Select the Build -> Run Build or Ctrl+F9. Either action will run the Maven build. Note: You can also run mvn clean install from the command line if you’re running a Java version less than 17.
Introduction to RSP application deployments
RSP projects present you with several choices when it comes to deploying projects. To deploy artifacts, a user can do one of the following:
- Deploy an already packaged file or archive.
- Deploy a folder that represents an exploded archive to be copied directly as a pre-built deployment.
- Deploy a folder that includes an .rsp/rsp.assembly.json file that tells the RSP how to collect files from multiple folders and where to put each of these files in the output location.
Deploy an archive
To deploy an archive, you'll eventually need to switch over to the RSP Servers view, but before we do that, we should copy the path of the file we want to deploy:
- Look in your project, locate your pre-packaged war file, and right-click on the war file then select Copy Path/Reference (Figure 15).
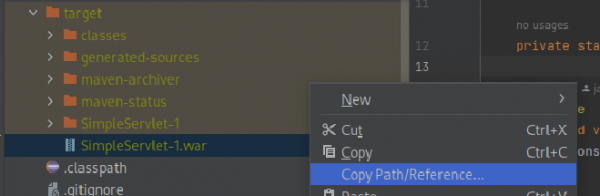
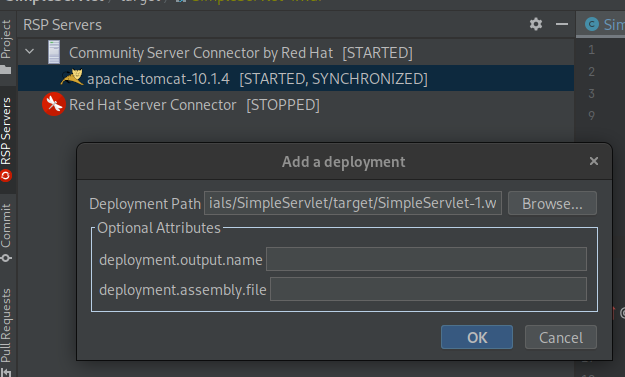
Figure 15: The pre-packaged war file. - Go to the RSP Server view and right-click on your chosen application server. Select Add Deployment (Figure 16). A dialog will appear, giving you options.

Figure 16: Add a deployment to an application server. - Paste the absolute path of the file to be deployed. If you wish to change the name, you can modify the deployment.output.name field with the desired file output name, then copy SimpleServlet-1.war into the proper directory but with a new name of SimpleServlet.war.
- The Server Connector tooling watches this file for changes (i.e., if you re-run the Maven build) and automatically redeploys the changed archive. The downside is that if you don’t run a build or automatically update your war file, the RSP will not recognize it as changed and re-deploy it.

Deploy a Folder
If your environment/build produces an exploded archive, like the example in this lesson, you can deploy it in much the same way as a packaged archive.
Pros:
- Still simple. A single folder is copied over, then copied again if the file changes.
- You can instantly discover and copy changes to this folder.
Cons:
- Users don’t often modify files in the build output folder. Instead, they change source files.
- You still need to run a full Maven build to recreate this exploded structure.
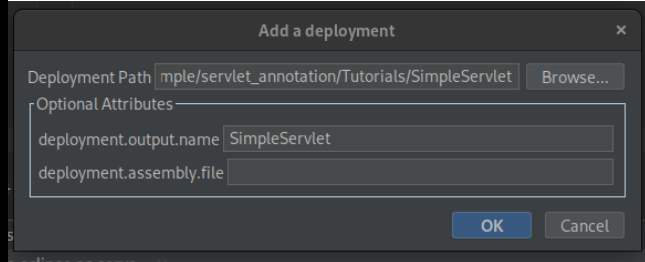
To deploy a folder, start by locating it and copying its absolute path. Then go to the RSP Servers view and select Add Deployment. This will produce an identical dialog to the packaged archive you saw before. For most server types, only deployables with an approved name structure are allowed. Some servers require specific suffixes. Others require no suffix at all.
In this case, the folder we’ve selected is SimpleServlet-1. This folder has no suffix, which is fine for Tomcat, but the -1 is strange. To solve this, set the deployment.output.name value to SimpleServlet.
One problem with choosing the folder shown above is that most often, a target folder with compiled classes and properly organized resources in a deployable structure are only available after running a full Maven build. When you make changes later to the index.html file in a src/main/webapp or other resources folder, those changes are not automatically propagated to the build output directory.
This means that even though the RSP is watching the deployable folder for changes, the RSP won’t notice or propagate those new changes to the output folder. If the changes aren’t in the output folder, the RSP won’t be aware that something has changed.
Deploy via rsp.assembly.json
The rsp.assembly.json file is a custom descriptor you can add to a project or folder pull in files from several different subdirectories. This descriptor virtually assembles your exploded deployment for you, watches their files for changes, and updates the official deployment when the inputs change. However, when trying to assemble a deployment, it is almost impossible to find a file or folder that’s already in your preferred tree structure and that’s updated frequently, automatically, and quickly,
There are often 3 different types of resources you can look at as possible deployment inputs when trying to come up with a solution.
- The first resource type is the raw source code or resource files in the source tree. These files are usually changed first, but are unlikely to be arranged in a tree structure suitable for deployment without any changes. They usually haven’t even been compiled yet.
- The second resource type is the output folders of your IDE’s incremental builder. This may be a bin folder, a target folder, or a target/classes. When you make changes to a file, you can recompile the file and put it somewhere. These files are updated frequently (possibly less frequently than raw source, depending on autobuild settings). Without changes, they are also unlikely to be arranged in a tree structure suitable for deployment.
- The third resource type is the build output folder or output artifact that represents the assembled archive, which you would typically run only when you execute a larger and slower build system command. In a Maven war project, this might be in the target/archiveName-1 folder or somewhere similar. This folder is often arranged perfectly to be used as an exploded deployment, but is the least likely to be up to date. Either the raw source files or incrementally-built class files are more likely to be up to date than this folder.
So how do you solve this problem?
To assemble a deployable artifact that is in the proper deployment structure and frequently updated, create an rsp.assembly.json file that maps specific input folders into a destination folder within the output build artifact, as shown below.
{

  "mappings": [

     {

        "source-path": "target/SimpleServlet-1/",

        "deploy-path": "/"

     },

     {

        "source-path": "src/main/webapp/",

        "deploy-path": "/"

     },

     {

        "source-path": "target/classes/",

        "deploy-path": "/WEB-INF/classes/"

     }

  ]
In this file, you are directing your assembler to take everything in the target/SimpleServlet-1 folder and map it directly into the root of your destination. This folder is already in the correct structure, but the files inside that folder might be outdated if a full build has not been run recently.
Instruct the assembler to take any file in target/classes and place it inside your deployment’s WEB-INF/classes folder. These files are likely to be changed by an incremental or manual build-command in the IDE to compile any changed class files. When the IDE’s auto-builder runs and places new .class files in the target/classes folder, the RSP will recognize those changes and immediately copy them into the deployment.
Perform the deployment
Instead of selecting a pre-built archive or an exploded folder created from the build command, the path you use as the deployable will instead be the project root. This only works if the folder we’re selecting has a .rsp/rsp.assembly.json file underneath it.
If the selected project does NOT have a .rsp/rsp.assembly.json file, and you don’t set an alternate assembly file in the settings during deployment, the project path will be treated as a normal folder to be published, and every single file or folder beneath it (recursively) will be copied without modification. This obviously won’t make a well-formed deployment, since src/main folders with .java files are not usually placed into deployment files.
But assuming the project does have a .rsp/rsp.assembly.json file, you can use the project root as your deployment path without problem (Figure 17).
If you wanted to put your assembly file in a different location, you could do that as long as you set the relative path of where that assembly file is in this dialog. The default value is .rsp/rsp.assembly.json. If you want to place this file anywhere else, you need to declare it.
After deploying
Once you add the deployment as shown above, you will see in the RSP Servers view that deployment has been added (Figure 18).

You will also see the application server has picked up the deployment (Figure 19).

Depending on which type of deployment workflow you used (archive, folder, or assembly descriptor), once the RSP notices a change in the watched folders, the deployment will switch state to Publish Required (Figure 20). This means that the deployment recognized a change, and you need to re-deploy the application.

The application will re-deploy within seconds.