API Management
Create web application programming interfaces and manage how they're accessed and used with API Management
What are APIs?
Application programming interfaces (APIs) deliver fundamental business value in a digital world—from supporting internal innovation and enabling cross-enterprise agility, to creating new products and revenue streams.
An API is a set of tools, definitions, and protocols for building application software. It lets your product or service communicate with other products and services without having to know how they’re implemented. APIs can simplify app development which saves developers time and companies money. When you’re designing new tools and products—or managing existing ones—APIs give you flexibility, they simplify API design, administration, and use, and they provide opportunities for innovation.
APIs let you open up access to your resources while maintaining security and control. How you open access and to who is up to you. Connecting to APIs, and creating applications that consume the data or functionality exposed by APIs, can be done with a distributed integration platform that connects everything—including legacy systems and the Internet of Things (IoT).

Red Hat 3scale API Management
Red Hat 3scale API Management makes it easy to manage your APIs for internal or external users. Share, secure, distribute, control, and monetize your APIs on an infrastructure platform built with performance, customer control, and future growth in mind. 3scale components can be deployed on-premise, in the cloud, as a managed service, or on any required combination.
API-based Integration
APIs are at the center of a quality integration strategy. Enterprise APIs can be implemented in combination with enterprise integration patterns (EIPs) through one or a combination of the following ways:
- Expose legacy applications.
- Expose traditional service based applications.
- Expose modern microservices architecture, and cloud/containerized applications.
API Management provides the same set of APIs for different audiences through packaging and unique consumption plans. API owners can decide the consumer profile for APIs.


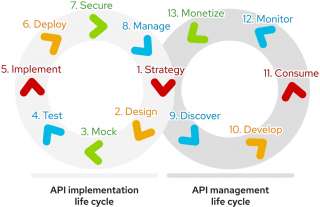
API life cycle
The stages of an API life cycle are represented in twin interconnected life cycles: the API implementation life cycle and the API management life cycle. Together, these two stages form the complete API life cycle.
Kubernetes Patterns
The evolution of microservices and containers in recent years has significantly changed the way we design, develop, and run software. Today’s applications are optimized for scalability, elasticity, failure, and speed of change. Driven by new principles, modern architectures require a different set of patterns and practices.
With this book, you'll learn to:
- Create cloud-native applications with Kubernetes as a runtime platform
- Manage container and platform interactions
- Apply configuration patterns to your Kubernetes-based applications
- Build container images directly within the cluster
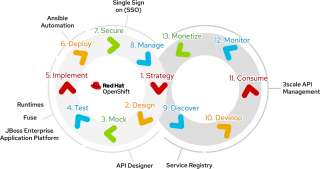
API life cycle with Red Hat
API management and service mesh
With the rise in popularity of micro services architecture (MSA), there is an increasing overlap between API Management and service mesh use cases.
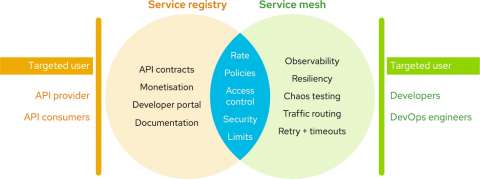
API Management
- Some of the key functionalities like rate limiting, policy enforcement, access control and security can be provided by both API Management and service mesh.
- The key difference is that API Management provides the functionality at the application layer(L7), whereas service mesh implements these at the transport layer (L4).
- The benefits of API Management are in providing partner and developer ecosystem; developer portal and signup options; API contracts and documentation; and federated API access control with OIDC (OpenID Connect).
- Thus, API Management makes it easier to target API consumers and developers rather than intra-service communication.

Service mesh
- A service mesh provides traffic monitoring, access control, discovery, security, resiliency, and other useful things to a group of services.
- In addition, the other functionality provided like observability, resiliency, chaos engineering, traffic routing, retries/timeouts and TLS security make it convenient to use service mesh for communication between and across services within a MSA.

In most solutions, it is not a choice of either/or, but using both API Management and service mesh together to provide the right functionality for the architecture.
Learn more about API Management

Learn how to integrate the Gateway API for OpenShift with OpenShift Service...

Learn how to migrate from Llama Stack’s deprecated Agent APIs to the...

Explore new features in Red Hat JBoss EAP XP 6, including upgrades to...

Use SDG Hub to generate high-quality synthetic data for your AI models. This...

Learn how to install and use new MCP plug-ins for Red Hat Developer Hub that...
HyperShift streamlines OpenShift cluster management with hosted control...
API resources

Track valuable metrics using Red Hat 3scale API Management's custom metrics...
3scale API resources

This tutorial aims to exemplify the construction and implementation of custom...

Explore an approach to load testing against Red Hat 3scale API Management...
Learn how to integrate Keycloak Authorization Services with 3scale API...
