In Kubernetes networking, the Gateway API represents the future of ingress management, while Istio Service Mesh continues to provide robust service-to-service communication. But what happens when you need to integrate Kubernetes’s native Gateway API implementation with a service mesh? This article details a real-world challenge we encountered, and the workaround we prototyped.
When two service meshes meet
Note: If you already have Red Hat OpenShift Service Mesh and Gateway API configured, you can skip to the "The challenge: Two meshes, two certificate authorities" section or jump straight to "The solution: Unified certificate authority" section.
OpenShift 4.19 includes native support for the Gateway API through its own service mesh implementation. This is fantastic for standardized ingress management, but what if you’re already invested in Istio for your service mesh needs? We discovered that making these two technologies work together requires understanding how certificate authorities (CAs) and mutual TLS (mTLS) interact across mesh boundaries.
This article will walk you through the following steps:
- Installing and configuring the OpenShift Service Mesh operator.
- Setting up the Gateway API with the openshift-default GatewayClass.
- Deploying Istio with its CNI plug-in.
- Implementing the Bookinfo application with the Gateway API.
- Solving the certificate trust challenge between meshes with a unified CA approach.
Install the service mesh operators
Note: This installation is purely for demonstration purposes to showcase the scenario described and is not intended for a production environment. If you already have OpenShift Service Mesh installed and configured, skip to "The challenge" section.
First, let’s install the necessary operators in OpenShift. We’ll need both the OpenShift Service Mesh operator (for Gateway API support) and our Istio installation.
cat <<EOF | oc apply -f -
## service-mesh-operator.yaml
apiVersion: operators.coreos.com/v1alpha1
kind: Subscription
metadata:
  name: servicemeshoperator3
  namespace: openshift-operators
spec:
  channel: stable
  installPlanApproval: Automatic
  name: servicemeshoperator3
  source: redhat-operators
  sourceNamespace: openshift-marketplace
EOF
Apply the operators:
## Wait for operators to be ready
oc get csv -n openshift-operators
Install OpenShift Service Mesh
The installation order matters. First, we need to install the CNI component, then the control plane.
Step 1: Install the CNI
The service mesh container network interface (CNI) plug-in must be installed first because it handles network interception without requiring elevated privileges.
cat <<EOF | oc apply -f -
## istio-cni.yaml
apiVersion: v1
kind: Namespace
metadata:
  name: istio-cni
---
apiVersion: sailoperator.io/v1
kind: IstioCNI
metadata:
  name: default
spec:
  namespace: istio-cni
  profile: openshift
EOF
Apply the CNI configuration:
## Wait for CNI to be ready
oc wait --for=condition=Ready istiocni default -n istio-cni --timeout=300s
Step 2: Control plane namespace
Create a control plane namespace.
cat <<EOF | oc apply -f -
## istio-system-namespace.yaml
apiVersion: v1
kind: Namespace
metadata:
  name: istio-system
  labels:
    istio-discovery: default
EOF
Step 3: Install service mesh control plane
Now install the service mesh control plane.
cat <<EOF | oc apply -f -
## istio-default.yaml
kind: Istio
apiVersion: sailoperator.io/v1
metadata:
  name: default
  namespace: istio-system
spec:
  namespace: istio-system
  updateStrategy:
    type: InPlace
  values:
    meshConfig:
      discoverySelectors:
      - matchLabels:
          istio-discovery: default
      outboundTrafficPolicy:
        mode: REGISTRY_ONLY
---
## peer-auth.yaml
apiVersion: security.istio.io/v1beta1
kind: PeerAuthentication
metadata:
  name: default
  namespace: istio-system
spec:
  mtls:
    mode: STRICT
EOF
## Wait for the control plane to be ready
oc wait --for=condition=Ready istio/default -n istio-system --timeout=300s
## Verify all components are running
oc get pods -n istio-systemConfigure the GatewayClass
The GatewayClass is a cluster-scoped resource that defines which controller will manage gateway resources. OpenShift provides openshift-default as the default GatewayClass:
cat <<EOF | oc apply -f -
## gateway-class.yaml
apiVersion: gateway.networking.k8s.io/v1
kind: GatewayClass
metadata:
  name: openshift-default
spec:
  controllerName: openshift.io/gateway-controller/v1
EOF
## Verify all components are running
oc get pods -n openshift-ingress
During the creation of the GatewayClass resource, the Ingress operator installs a lightweight version of OpenShift Service Mesh, an Istio custom resource, and a new deployment in the openshift-ingress namespace.
Deploy Bookinfo with Gateway API
Now let’s deploy the Bookinfo application configured to work with the Gateway API.
Step 1: Create the Bookinfo Namespace
First, create the Bookinfo namespace with proper labels for the sidecar injection.
cat <<EOF | oc apply -f -
## bookinfo-namespace.yaml
apiVersion: v1
kind: Namespace
metadata:
  name: bookinfo
  labels:
    istio-discovery: default
    istio.io/rev: default
EOF
Step 2: Deploy the Bookinfo application
Deploy the Bookinfo application components (services and deployments).
## Deploy the Bookinfo application from Istio samples
oc apply -n bookinfo -f https://raw.githubusercontent.com/istio/istio/release-1.24/samples/bookinfo/platform/kube/bookinfo.yaml
This creates the following components:
- Services: details, ratings, reviews, and productpage
- Deployments:
- details-v1
- ratings-v1
- reviews-v1, reviews-v2, reviews-v3
- productpage-v1
Next verify the deployment:
## Check all pods are running with sidecars injected
oc get pods -n bookinfo -w
## You should see 2/2 containers for each pod (application + sidecar)
Step 3: Configure Gateway API access
Now that the Bookinfo application is deployed and running, let’s expose it using the Gateway API. Create the gateway resource in the openshift-ingress namespace.
To get your OpenShift cluster’s ingress domain (which you’ll need for setting hostname fields), use the following command:
## Get the ingress domain
export BASE_DOMAIN=$(oc get ingresses.config.openshift.io cluster -o jsonpath='{.spec.domain}')
This will output something like apps.cluster.example.com. Replace occurrences of gwapi.apps.cluster.example.com in the YAMLs with the value appropriate for your cluster.
cat <<EOF | oc apply -f -
## gateway.yaml
apiVersion: gateway.networking.k8s.io/v1
kind: Gateway
metadata:
  name: mesh-gateway
  namespace: openshift-ingress
spec:
  gatewayClassName: openshift-default
  listeners:
  - name: http
    hostname: "*.gwapi.${BASE_DOMAIN}"
    port: 80
    protocol: HTTP
    allowedRoutes:
      namespaces:
        from: All
EOF
Step 5: Create the HTTPRoute
Create the HTTPRoute to route traffic to the Bookinfo services:
cat <<EOF | oc apply -f -
## httproute.yaml
apiVersion: gateway.networking.k8s.io/v1
kind: HTTPRoute
metadata:
  name: bookinfo
  namespace: bookinfo
spec:
  parentRefs:
  - name: mesh-gateway
    namespace: openshift-ingress
  hostnames:
  - "bookinfo.gwapi.${BASE_DOMAIN}"
  rules:
  - matches:
    - path:
        type: Exact
        value: /productpage
    - path:
        type: PathPrefix
        value: /static
    - path:
        type: Exact
        value: /login
    - path:
        type: Exact
        value: /logout
    - path:
        type: PathPrefix
        value: /api/v1/products
    backendRefs:
    - name: productpage
      port: 9080
EOF
The challenge: 2 meshes, 2 CAs
Here’s where things get interesting. When we tried to access the Bookinfo application through the Gateway API, we encountered this cryptic error:
$ curl http://bookinfo.gwapi.${BASE_DOMAIN}/productpage
upstream connect error or disconnect/reset before headers.
retried and the latest reset reason: remote connection failure,
transport failure reason: TLS_error:|268435581:SSL routines:
OPENSSL_internal:CERTIFICATE_VERIFY_FAILED:TLS_error_end
The Envoy sidecar logs revealed the root cause:
warning envoy config DeltaAggregatedResources gRPC config stream to xds-grpc closed:
connection error: desc = "transport: authentication handshake failed:
tls: failed to verify certificate: x509: certificate signed by unknown authority
(possibly because of \"crypto/rsa: verification error\" while trying to verify
candidate authority certificate \"cluster.local\")"
What was happening? We had two separate service mesh implementations:
- OpenShift’s built-in service mesh (openshift-default) managing the Gateway API.
- Our OpenShift Service Mesh installation managing the application workloads.
Each mesh had its own certificate authority (CA):
- OpenShift’s Gateway API was trying to establish TLS connections to the backend services.
- The service mesh sidecar proxies were expecting mTLS with certificates from the service mesh’s CA.
- Neither trusted the other’s certificates.
This is a classic PKI trust problem: two separate certificate authorities that don’t trust each other.
The diagram in Figure 1 illustrates the core problem:
- Two separate meshes: OpenShift Gateway API mesh and OpenShift Service Mesh (OSSM)
- Two different CAs: Each mesh generates its own self-signed certificate authority.
- No trust relationship: Neither CA trusts certificates signed by the other.
- Result: TLS handshake failures when the gateway tries to connect to backend services.

The solution: Unified certificate authority
The solution involves establishing a common trust root by configuring custom CA certificates for both meshes. We’ll create a single root CA and then generate separate intermediate CAs for each mesh, all signed by the same root (Figure 2).
Note that, The shared-root approach shown here is a pragmatic workaround for the current state of the technology. For production deployments requiring fine-grained trust boundaries between separate PKI hierarchies, the Gateway API's BackendTLSPolicy would be the proper solution—allowing the gateway to explicitly specify which CA to trust for backend connections. However, BackendTLSPolicy is not yet available in OpenShift's Gateway API implementation. Until then, the shared-root approach provides a working solution for mTLS communication between Gateway API and service mesh workloads.
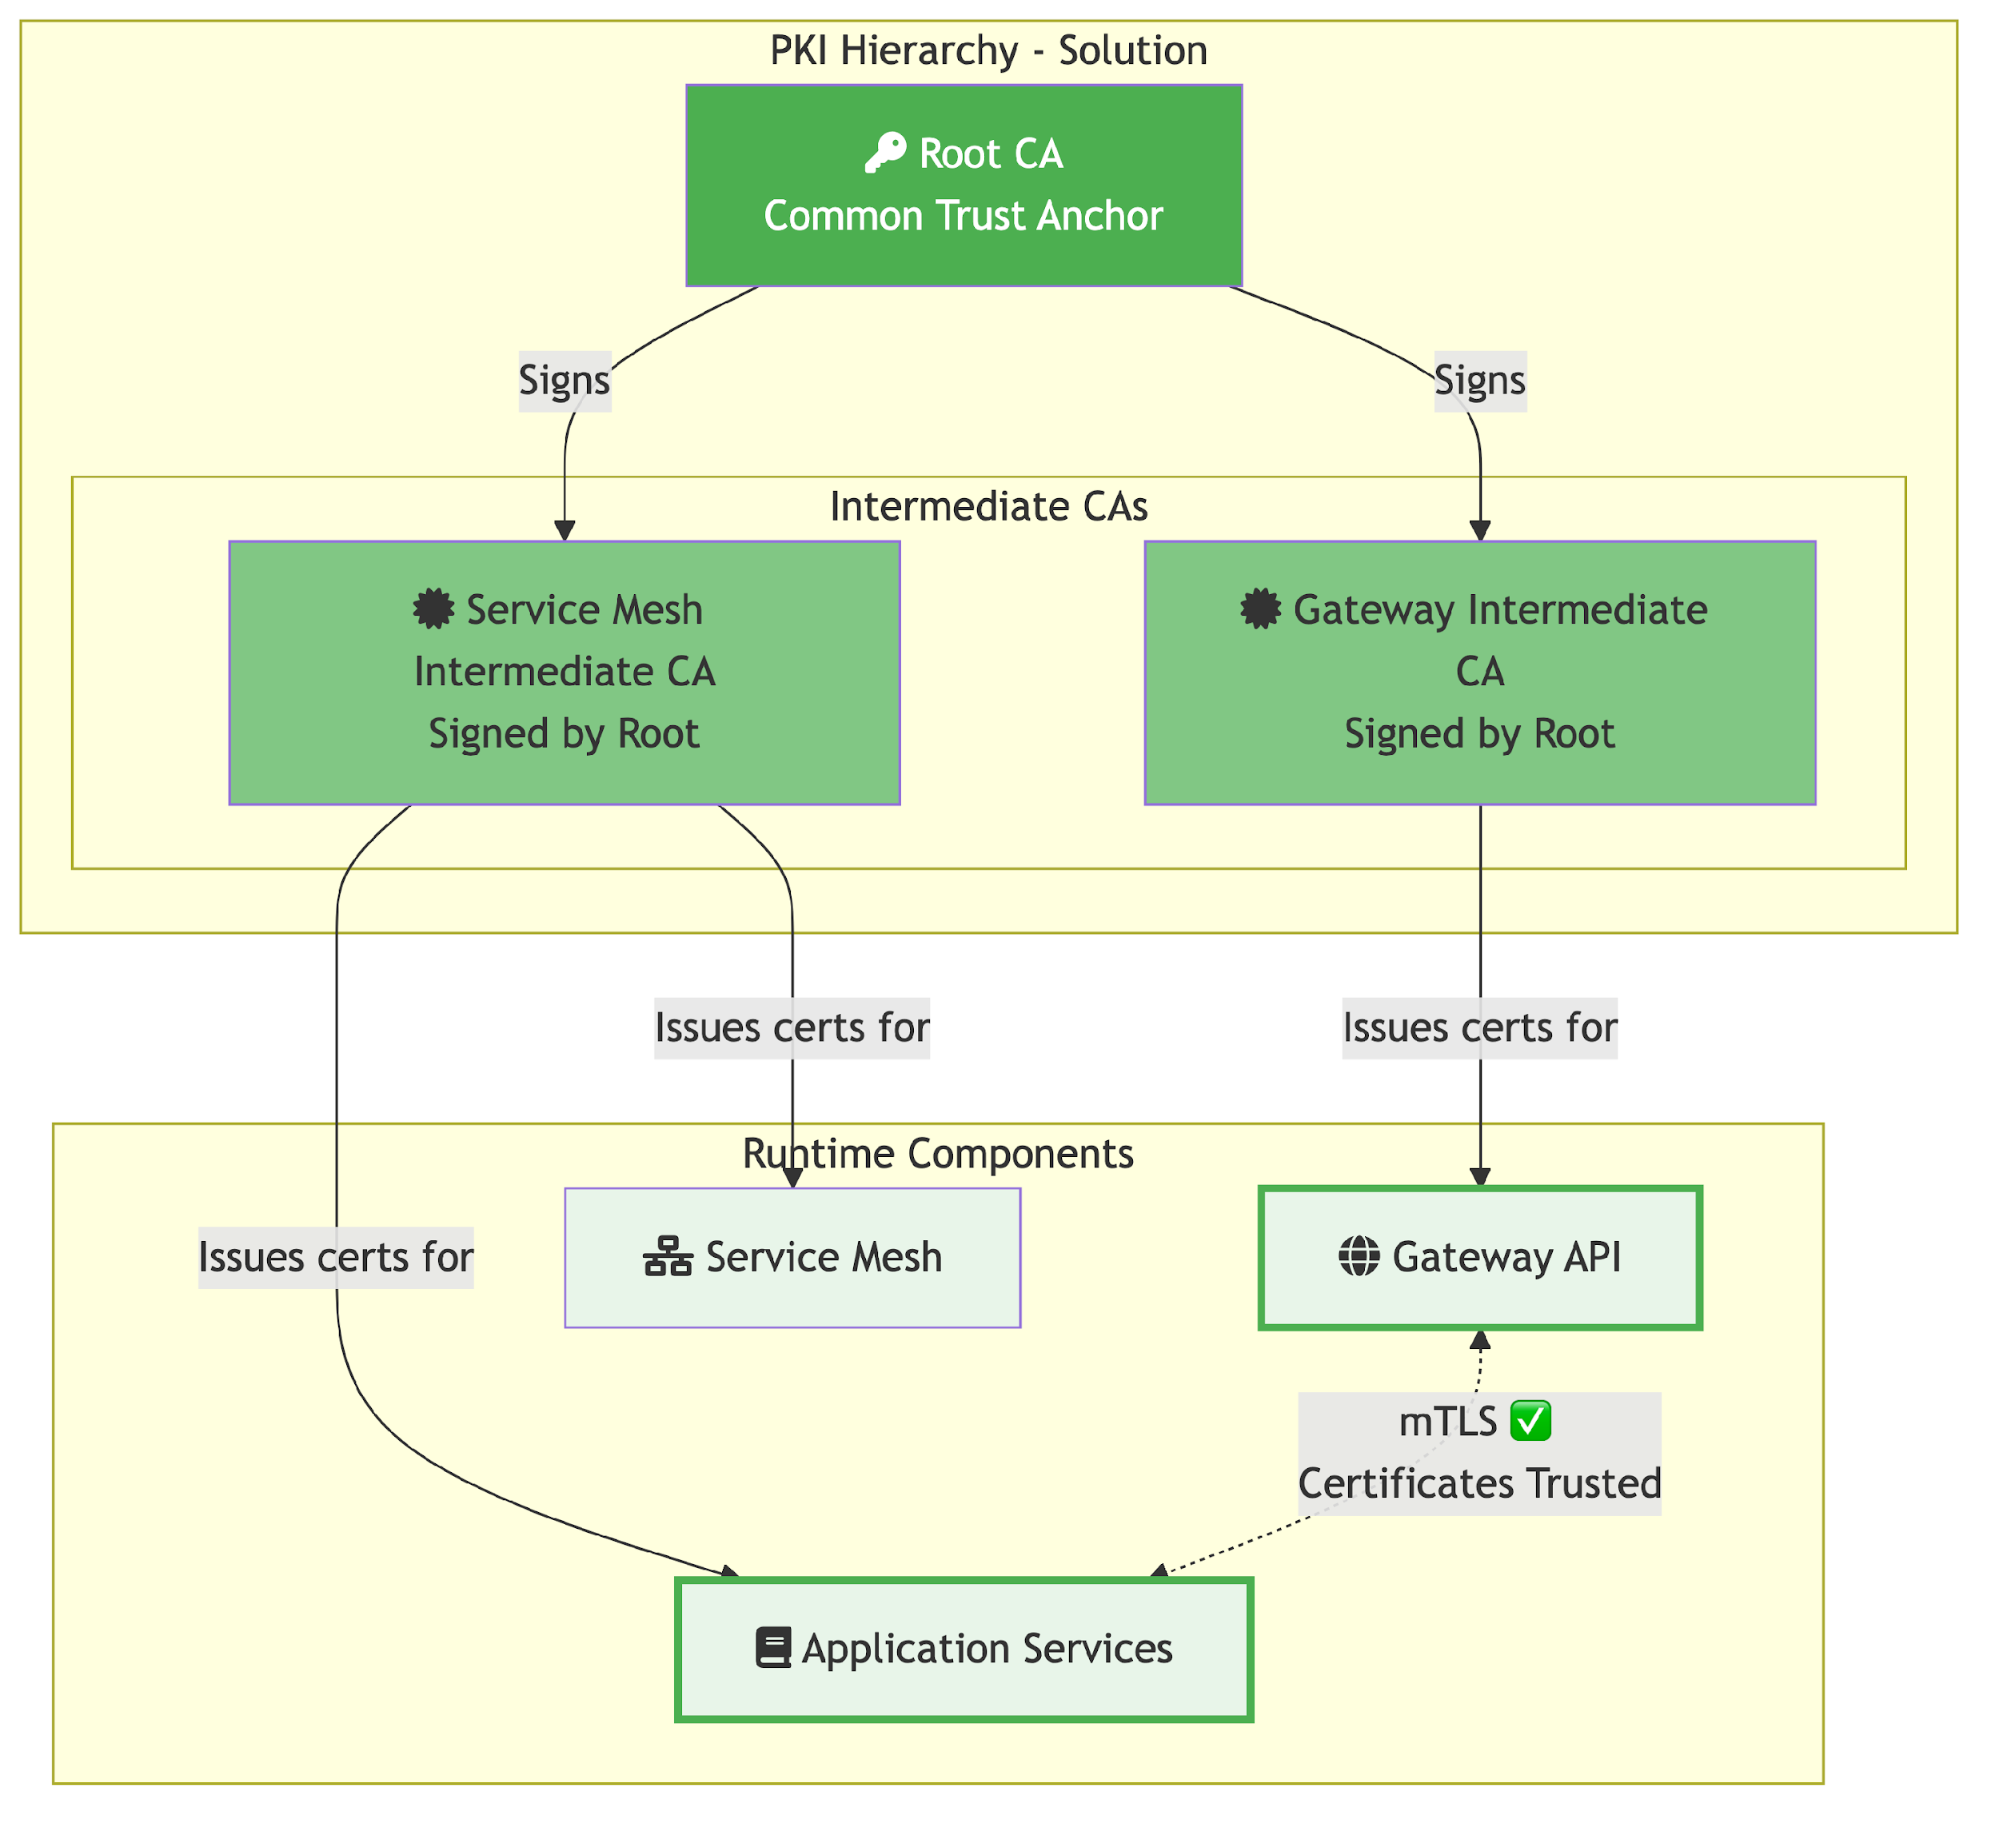
With this unified CA architecture:
- Single root CA acts as the common trust anchor for both meshes.
- Separate intermediate CAs: Each mesh maintains its own intermediate CA, but both are signed by the same root.
- Trust chain established: Both meshes trust the common root, therefore they trust each other’s certificates.
- mTLS success: Secure communication between Gateway API and service mesh workloads.
We’ll cover two approaches:
Manual approach: Using OpenSSL commands for full control and understanding.
Cert-manager approach: Automated certificate management
Important: The following instructions are for demo purposes. For production clusters, consider using a production-ready CA solution such as HashiCorp Vault with cert-manager or managing your root CA on an offline machine with strong security protection.
The manual approach
This implementation approach gives you full control over certificate generation using OpenSSL commands. It’s ideal for understanding the certificate chain and for proof-of-concept deployments.
Step 1: Create certificates directory
Create a directory for certificates:
## Create a directory for certificates
mkdir -p certs
cd certs
Step 2: Generate root certificate and key
First, we create a common root CA that both meshes will trust:
## Generate root key
openssl genrsa -out root-key.pem 4096

## Generate root certificate
openssl req -new -x509 -sha256 -days 3650 \
    -key root-key.pem \
    -out root-cert.pem \
    -subj "/C=CH/O=SM/CN=SM Root CA"
This creates:
- root-cert.pem: Root certificate
- root-key.pem: Root private key
Step 3: Generate service mesh CA intermediate
Generate the intermediate CA for OpenShift Service Mesh:
mkdir -p istio

## Generate intermediate key for Service Mesh
openssl genrsa -out istio/ca-key.pem 4096

## Generate Service Mesh CSR
openssl req -new -sha256 \
    -key istio/ca-key.pem \
    -out istio/ca-cert.csr \
    -subj "/C=CH/O=SM/CN=SM Service Mesh Intermediate CA"

## Create intermediate certificate config
cat > istio/ca.conf <<EOF
[req]
distinguished_name = req_distinguished_name
x509_extensions = v3_ca

[req_distinguished_name]

[v3_ca]
basicConstraints = CA:TRUE
keyUsage = keyCertSign, cRLSign
subjectKeyIdentifier = hash
authorityKeyIdentifier = keyid:always,issuer:always
EOF

## Sign Service Mesh certificate with root CA
openssl x509 -req -sha256 -days 1825 \
    -in istio/ca-cert.csr \
    -CA root-cert.pem \
    -CAkey root-key.pem \
    -CAcreateserial \
    -out istio/ca-cert.pem \
    -extensions v3_ca \
    -extfile istio/ca.conf

## Create certificate chain
cat istio/ca-cert.pem root-cert.pem > istio/cert-chain.pem

## Copy root certificate to cluster directory
cp root-cert.pem istio/
This creates in the Istio directory:
- ca-cert.pem: Service Mesh CA Intermediate certificate
- ca-key.pem: Service Mesh CA Intermediate private key
- cert-chain.pem: Certificate chain (Service Mesh CA + root)
- root-cert.pem: Copy of root certificate
Step 4: Configure the service mesh
Create the secret for the service mesh:
## Create the cacerts secret
oc create secret generic cacerts -n istio-system \
    --from-file=istio/ca-cert.pem \
    --from-file=istio/ca-key.pem \
    --from-file=istio/root-cert.pem \
    --from-file=istio/cert-chain.pem
Restart the control plane to pick up the new certificates:
oc rollout restart deployment/istiod -n istio-system
Step 5: Generate the Gateway CA intermediate
Now create the intermediate CA for the OpenShift Gateway API:
mkdir -p gateway

## Generate intermediate key for Gateway
openssl genrsa -out gateway/ca-key.pem 4096

## Generate gateway CSR
openssl req -new -sha256 \
    -key gateway/ca-key.pem \
    -out gateway/ca-cert.csr \
    -subj "/C=CH/O=SM/CN=OpenShift Gateway Intermediate CA"

## Create gateway certificate config
cat > gateway/ca.conf <<EOF
[req]
distinguished_name = req_distinguished_name
x509_extensions = v3_ca

[req_distinguished_name]

[v3_ca]
basicConstraints = CA:TRUE
keyUsage = keyCertSign, cRLSign
subjectKeyIdentifier = hash
authorityKeyIdentifier = keyid:always,issuer:always
EOF

## Sign gateway certificate with root CA
openssl x509 -req -sha256 -days 1825 \
    -in gateway/ca-cert.csr \
    -CA root-cert.pem \
    -CAkey root-key.pem \
    -CAcreateserial \
    -out gateway/ca-cert.pem \
    -extensions v3_ca \
    -extfile gateway/ca.conf

## Create certificate chain
cat gateway/ca-cert.pem root-cert.pem > gateway/cert-chain.pem

## Copy root certificate to cluster directory
cp root-cert.pem gateway/
This creates in the gateway directory:
- ca-cert.pem: OpenShift Gateway CA Intermediate certificate
- ca-key.pem: OpenShift Gateway CA Intermediate private key
- cert-chain.pem: Certificate chain (gateway + root)
- root-cert.pem: Copy of root certificate
Step 6: Configure Gateway API with custom CA
Create the secret for the OpenShift gateway:
## Create the cacerts secret in openshift-ingress namespace
oc create secret generic cacerts -n openshift-ingress \
    --from-file=gateway/ca-cert.pem \
    --from-file=gateway/ca-key.pem \
    --from-file=gateway/root-cert.pem \
    --from-file=gateway/cert-chain.pem
If there’s a gateway-specific service mesh deployment:
oc rollout restart deploy/istiod-openshift-gateway -n openshift-ingress
oc rollout restart deploy/mesh-gateway-openshift-default -n openshift-ingress
Step 7: Update workload namespaces
Force certificate refresh in all namespaces:
## Delete old root certificate ConfigMaps
oc delete cm istio-ca-root-cert -n bookinfo 2>/dev/null || true
oc delete cm istio-ca-root-cert -n openshift-ingress 2>/dev/null || true

## Restart workloads to get new certificates
oc rollout restart deployment -n bookinfo
The cert-manager approach
For production environments, cert-manager provides automated certificate lifecycle management.
Step 1: Create root CA with cert-manager
For this demo, we’ll create a self-signed root CA. In production, you would typically import your organization’s root CA or use an external PKI provider.
## Create root CA key and certificate (for demo purposes)
mkdir -p certs
cd certs

openssl genrsa -out root-key.pem 4096
openssl req -new -x509 -sha256 -days 3650 \
    -key root-key.pem \
    -out root-cert.pem \
    -subj "/C=CH/O=SM/CN=SM Root CA"

## Create a Kubernetes secret with the root CA
oc create secret tls root-ca-key-pair \
  --cert=root-cert.pem \
  --key=root-key.pem \
  -n cert-manager
Step 2: Create a ClusterIssuer
Create a ClusterIssuer that will sign intermediate certificates:
cat <<EOF | oc apply -f -
apiVersion: cert-manager.io/v1
kind: ClusterIssuer
metadata:
  name: root-issuer
spec:
  ca:
    secretName: root-ca-key-pair
EOF
Step 3: Generate a service mesh intermediate CA
Create the certificate resource for OpenShift Service Mesh:
cat <<EOF | oc apply -f -
apiVersion: cert-manager.io/v1
kind: Certificate
metadata:
  name: istio-ca
  namespace: istio-system
spec:
  isCA: true
  duration: 87600h # 10 years
  secretName: cacerts
  commonName: SM Service Mesh Intermediate CA
  privateKey:
    algorithm: RSA
    size: 4096
  subject:
    organizations:
      - cluster.local
      - cert-manager
      - istio-system
  usages:
    - digital signature
    - key encipherment
    - cert sign
    - crl sign
  issuerRef:
    name: root-issuer
    kind: ClusterIssuer
---
apiVersion: cert-manager.io/v1
kind: Issuer
metadata:
  name: istio-ca
  namespace: istio-system
spec:
  ca:
    secretName: cacerts
EOF
Step 4: Generate the OpenShift Gateway intermediate CA
Create the certificate resource for the OpenShift Gateway API:
cat <<EOF | oc apply -f -
apiVersion: cert-manager.io/v1
kind: Certificate
metadata:
  name: istio-ca
  namespace: openshift-ingress
spec:
  isCA: true
  duration: 87600h # 10 years
  secretName: cacerts
  commonName: SM OpenShift Ingress Intermediate CA
  privateKey:
    algorithm: RSA
    size: 4096
  subject:
    organizations:
      - cluster.local
      - cert-manager
      - openshift-ingress
  usages:
    - digital signature
    - key encipherment
    - cert sign
    - crl sign
  issuerRef:
    name: root-issuer
    kind: ClusterIssuer
---
apiVersion: cert-manager.io/v1
kind: Issuer
metadata:
  name: istio-ca
  namespace: openshift-ingress
spec:
  ca:
    secretName: cacerts
EOF
Step 5: Restart service mesh components
Restart the control planes to pick up the new certificates:
## Service Mesh control plane
oc delete secret istio-ca-secret -n istio-system
oc delete cm istio-ca-root-cert -n istio-system
oc rollout restart deployment/istiod -n istio-system

## OpenShift Gateway
oc delete secret istio-ca-secret -n openshift-ingress
oc delete cm istio-ca-root-cert -n openshift-ingress
oc rollout restart deployment/istiod-openshift-gateway -n openshift-ingress
oc rollout restart deployment/mesh-gateway-openshift-default -n openshift-ingress
Step 6: Update
Update the workload namespaces as follows:
## Delete old root certificate ConfigMap and restart workloads
oc delete cm istio-ca-root-cert -n bookinfo 2>/dev/null || true
oc rollout restart deployment -n bookinfo
Verify the cert-manager has successfully created the certificates.
## Check certificate status
oc get certificate -A

## Verify the Service Mesh certificate
oc describe certificate istio-ca -n istio-system

## Check the generated secret
oc get secret cacerts -n istio-system -o jsonpath='{.data.ca\.crt}' | base64 -d | openssl x509 -text -noout | grep -E "(Subject:|Issuer:)"
There are advantages of the cert-manager approach, such as:
- Automatic renewal: Certificates are automatically renewed before expiry.
- Centralized management: All certificates managed through Kubernetes resources.
- Audit trail: Certificate events and status tracked in Kubernetes.
- Integration: Works seamlessly with external PKI providers.
- GitOps ready: Certificate definitions can be stored in Git.
Testing and verification
After configuring the unified certificate authority with either the manual or cert-manager approach, it's important to verify that the integration is working correctly. We will test the end-to-end traffic flow and validate that both meshes are now using certificates signed by the common root CA.
The simplest way to verify the integration is to test the application through the gateway API endpoint. If the unified CA configuration is correct, requests will flow from the gateway through the mTLS-secured connection to the service mesh workloads without certificate errors.
Test the gateway API endpoint as follows:
## Test the application
curl http://bookinfo.gwapi.${BASE_DOMAIN}/productpage

## You should now see the Bookinfo product page HTML
To confirm that both meshes are using certificates from the unified CA hierarchy, you can inspect the certificate secrets directly. The istioctl proxy-config secret command shows the certificates loaded by each Envoy proxy.
Verify the certificate chain:
## Gateway
istioctl -n openshift-ingress proxy-config secret $(oc -n openshift-ingress get pod -lgateway.networking.k8s.io/gateway-name=mesh-gateway -o jsonpath={..metadata.name})

## Product Page
istioctl -n bookinfo proxy-config secret $(oc -n bookinfo get pod -lapp=productpage -o jsonpath='{.items[0].metadata.name}')
Both outputs should show certificates with a ROOTCA entry that matches your custom root certificate. This confirms the proxies have loaded the new CA hierarchy.
For deeper inspection, you can establish a TLS connection to a backend service and examine the certificate chain directly. This verifies that your custom intermediate CA are issuing workload certificates.
## Get a pod
POD=$(oc get pod -n bookinfo -l app=productpage -o jsonpath='{.items[0].metadata.name}')

## Check the certificate
oc exec $POD -n bookinfo -c istio-proxy -- \
    openssl s_client -showcerts -connect reviews.bookinfo.svc.cluster.local:9080 2>/dev/null | \
    openssl x509 -text -noout | grep -E "(Subject:|Issuer:)"

## Output should show your custom CA:
## Issuer: C=CH, O=SM, CN=SM Service Mesh Intermediate CA
## Subject: CN=reviews.bookinfo.svc.cluster.local
Configure istio-csr
You can also configure the istio-system namespace with the experimental Istio CSR integration as follows. Ensure istio-csr is installed and configured to use the cert-manager certificate:
## Verify istio-csr is running
oc new-project istio-csr

oc -n cert-manager-operator patch subscriptions.operators.coreos.com openshift-cert-manager-operator \
  --type='merge' -p '
spec:
  config:
    env:
      - name: UNSUPPORTED_ADDON_FEATURES
        value: "IstioCSR=true"
'
cat <<EOF | oc apply -f -
apiVersion: operator.openshift.io/v1alpha1
kind: IstioCSR
metadata:
  name: default
  namespace: istio-csr
spec:
  istioCSRConfig:
    certManager:
      issuerRef:
        kind: Issuer
        name: istio-ca
        group: cert-manager.io
    istiodTLSConfig:
      trustDomain: cluster.local
    istio:
      namespace: istio-system
EOF
Patch the Istio CR:
oc patch istio default -n istio-system --type merge -p '
spec:
  values:
    global:
      caAddress: cert-manager-istio-csr.istio-csr.svc:443
    pilot:
      env:
        ENABLE_CA_SERVER: "false"
'
Summary
Integrating OpenShift’s Gateway API with OpenShift Service Mesh presents unique challenges, particularly around certificate trust and mTLS communication. However, with proper understanding of the PKI infrastructure and careful configuration of certificate authorities, these technologies can work together harmoniously.
This article demonstrated two approaches to solving the certificate trust challenge: the manual approach and the cert-manager approach. Both approaches achieve the same goal: establishing a common trust root that allows the Gateway API and service mesh to communicate securely. Your choice depends on your specific requirements, environment constraints, and operational maturity.
As Kubernetes networking continues to evolve, we expect to see better native integration between Gateway API implementations and service meshes. Until then, understanding the underlying certificate infrastructure and trust relationships remains crucial for successful integrations.
The Gateway API represents the future of Kubernetes ingress, and service mesh provides essential features for microservices communication. By solving the certificate challenge with either approach presented here, we can leverage the best of both worlds: standardized ingress management with Gateway API and sophisticated service-to-service communication with OpenShift Service Mesh.
Additional resources: