Using Red Hat Data Grid as an external cache for Red Hat's single sign-on technology makes it possible for Data Grid to store data independent of the application layer. This way, Data Grid provides application elasticity, failover across data centers, and a reduced memory footprint.
The most common use case for this combination is cross-datacenter replication mode, where Red Hat's single sign-on (SSO) technology uses Data Grid to replicate data between data centers.
To back up data across sites in an xPaaS environment such as Red Hat OpenShift, the recommended approach is to deploy Data Grid using the Data Grid Operator.
This article offers quick instructions for getting Red Hat Data Grid 8.1.1 working with Red Hat's single sign-on technology version 7.4.5. The article does not use a full cross-datacenter setup; just a Data Grid server and an SSO client running on OpenShift. We will use the Hot Rod protocol for communication, with both authentication and Secure Sockets Layer (SSL) enabled.
Note: Data Grid can be used as an external cache container for application-specific data. As an external cache, it allows the data layer to scale independently of the application. It also allows different clusters, which may reside in various domains, to access data from the same Data Grid cluster.
Setting up the environment
The integration described in this article requires the following technologies:
- The
occlient on a laptop - Red Hat's single sign-on technology 7.4.5
- Data Grid 8.1.1
- OpenShift 4.6.x
To create a project for the integration, run:
$ oc new-project project_name
Setting up Data Grid
Install Data Grid 8.1.1 using the Data Grid Operator (see Installing Data Grid Operator on Red Hat OpenShift for instructions).
NAME                                  READY   STATUS    RESTARTS   AGE

infinispan-operator-88d585dd7-xc5xh   1/1     Running   0          58s
Create an Infinispan custom resource (CR) for the cluster and a cache CR for each of the caches you need.
An Operator makes it easy to deploy Data Grid in a variety of configurations. Once you’ve deployed the Operator from the OpenShift OperatorHub, it exposes custom resources (called Infinispan cluster and Infinispan cache), which Data Grid uses to provision the caches on an existing cluster.
To use custom cache definitions along with Data Grid capabilities, such as cross-site replication, we create clusters of Data Grid service nodes. These nodes create an Infinispan cluster using Data Grid as a service.
First, create an Infinispan cluster from the OpenShift console by going to Installed Operators—>Infinispan Cluster—>Create. Then, select the DataGrid service type under the Service field. Figure 1 shows these selections.

The Infinispan CR will look like this:
$ oc get infinispan
NAME AGE
rhsso-infinispan 53s
You can get the status of pods as follows:
$ oc get pods
NAME                                              READY     STATUS    RESTARTS          AGE
infinispan-operator-88d585dd7-xc5xh 1/1                    Running        0            6m43s
rhsso-infinispan-0                                 1/1     Running        0            100s
rhsso-infinispan-1                                 1/1     Running        0            29s
Create a basic-auth secret for authentication
The Data Grid Operator must authenticate with Data Grid service clusters to create caches. We will add credentials to a basic-auth secret so the Data Grid Operator can access the Infinispan cluster when creating caches.
You can create a basic-auth key/value secret by filling out the details in a form from the OpenShift console. Alternatively, you can create a YAML file as described in 11.5.1. Adding Credentials to Create Caches.
To retrieve the developer credentials from the Operator generated by the secret, run:
oc get secret rhsso-infinispan-generated-secret \
-o jsonpath="{.data.identities\.yaml}" | base64 --decode
Figure 2 shows the dialog to create the key/value secret.

Create the Infinispan caches
Using the Operator, create a cache CR for each of the caches you need. You can use the following CR to create the work cache. Likewise, create other caches such as sessions, authenticationSessions, offlineSessions, clientSessions, offlineClientSessions, loginFailures, and actionTokens:
apiVersion: infinispan.org/v2alpha1
kind: Cache
metadata:
name: work
namespace: rhsso744dg81
spec:
adminAuth:
secretName: basic-auth
clusterName: eap-infinispan
name: work
template: >-
<infinispan><cache-container><replicated-cache name="work" statistics="true" mode="SYNC"
start="EAGER"><transaction mode="NONE" locking="PESSIMISTIC"/><locking
acquire-timeout="0" /></replicated-cache></cache-container></infinispan>
When you are finished, the cache status should look like what is shown in Figure 3.

Create the route
Next, create a route for accessing the Data Grid console, as shown in Figure 4.
Fill in the hostname in the format:
NAME_OF_THE_ROUTE-PROJECT_NAME.apps.cndcluster9.ocp.gsslab.pnq2.redhat.com
For example:
dg-rhsso744dg81.apps.cndcluster9.ocp.gsslab.pnq2.redhat.com

Set up the Hot Rod connection
Finally, retrieve the tls.crt file from rhsso-infinispan-cert-secret (the secret generated by the Data Grid Operator) to use it for the Hot Rod connection:
$ oc get secret rhsso-infinispan-cert-secret \
> -o jsonpath='{.data.tls\.crt}' | base64 --decode > tls.crt
Setting up the SSO client
To set up single sign-on using the directions in this section, refer to the documentation for configuring keystores and configuring secrets for an SSO server. The tasks required are:
- Create the HTTPS keystore.
- Generate a secure key for the JGroups keystore.
- Create and link secrets.
Create the HTTPS keystore
Enter the following commands to generate a CA certificate. Provide an identical password when signing the certificate-sign request with the CA certificate below:
$ openssl req -new -newkey rsa:4096 -x509 -keyout xpaas.key -out xpaas.crt -days 365 -subj "/CN=xpaas-sso-demo.ca"
Generating a 4096 bit RSA private key
............................................................................................................................................................................................................................++
.....................................................................................................++
writing new private key to 'xpaas.key'
Enter PEM pass phrase:
Verifying - Enter PEM pass phrase:
Next, generate a CA certificate for the HTTPS keystore. Provide a password for the keystore:
$ keytool -genkeypair -keyalg RSA -keysize 2048 -dname "CN=secure-sso-sso-app-demo.openshift.example.com" -alias jboss -keystore keystore.jks

Enter keystore password:
Re-enter new password:
Enter key password for <jboss>
(RETURN if same as keystore password):
Enter the following commands to generate a certificate-sign request for the HTTPS keystore:
$ keytool -certreq -keyalg rsa -alias jboss -keystore keystore.jks -file sso.csr
Enter keystore password:

#list the Generated files:
$ ls
tls.crt
xpaas.key
xpaas.crt
keystore.jks
sso.csr
Sign the certificate-sign request with the CA certificate. Provide the same password that you used to generate the CA certificate:
$ openssl x509 -req -CA xpaas.crt -CAkey xpaas.key -in sso.csr -out sso.crt -days 365 -CAcreateserial
Signature ok
subject=/CN=secure-sso-sso-app-demo.openshift.example.com
Getting CA Private Key
Enter pass phrase for xpaas.key:
Import the CA certificate into the HTTPS keystore, using the same keystore password as above. Reply yes to Trust this certificate? [no]::
$ keytool -import -file xpaas.crt -alias xpaas.ca -keystore keystore.jks Enter keystore password: Trust this certificate? [no]: yes
Import the signed certificate-sign request into the HTTPS keystore with same keystore password:
$ keytool -import -file sso.crt -alias jboss -keystore keystore.jks

Enter keystore password:
Certificate reply was installed in keystore
Generate a secure key for the JGroups keystore
Enter the following commands to provide the keystore password:
$ keytool -genseckey -alias secret-key -storetype JCEKS -keystore jgroups.jceks

Enter keystore password:
Re-enter new password: Enter key password for <secret-key> (RETURN if same as keystore password):
Import the CA certificate into a new SSO server truststore and provide the truststore password. Reply yes to the Trust this certificate? [no]: question:
$ keytool -import -file xpaas.crt -alias xpaas.ca -keystore truststore.jks

Enter keystore password:
Re-enter new password:  Trust this certificate? [no]: yes
Create and link a secret
Enter the following commands to create the secrets for the HTTPS and JGroups keystores, and SSO server truststore, generated in the previous section:
$ oc create secret generic sso-app-secret --from-file=keystore.jks --from-file=jgroups.jceks --from-file=truststore.jks
Link these secrets to the default service account, which is used to run SSO pods:
$ oc secrets link default sso-app-secret
Verify the secret is linked to the service account:
$ oc describe serviceaccounts default
Name: default
Namespace: rhsso744dg81
Labels: <none>
Annotations: <none>
Image pull secrets: default-dockercfg-gnvw9
Mountable secrets: default-token-pjmzp
default-dockercfg-gnvw9
sso-app-secret
Tokens: default-token-k4k6m
default-token-pjmzp
Events: <none>
Deploying the SSO image
We'll use the application template to deploy the single sign-on image. The steps are as follows:
- Clone the templates from GitHub:
$ git clone https://github.com/jboss-container-images/redhat-sso-7-openshift-image
- Change to the templates directory:
$ cd redhat-sso-7-openshift-image/templates
- Deploy the application with the template using the proper parameters:
$ oc new-app --template=sso74-https -p HTTPS_SECRET="sso-app-secret" -p HTTPS_KEYSTORE="keystore.jks" -p HTTPS_NAME="jboss" -p HTTPS_PASSWORD="redhat" -p JGROUPS_ENCRYPT_SECRET="sso-app-secret" -p JGROUPS_ENCRYPT_KEYSTORE="jgroups.jceks" -p JGROUPS_ENCRYPT_NAME="secret-key" -p JGROUPS_ENCRYPT_PASSWORD="redhat" -p SSO_TRUSTSTORE="truststore.jks" -p SSO_TRUSTSTORE_PASSWORD="redhat" -p SSO_TRUSTSTORE_SECRET="sso-app-secret"
- Go to the directory from which you retrieved the
tls.crtfile fromrhsso-infinispan-cert-secret(the secret generated by the Operator) while setting up Data Grid. This certificate will be used for the Hot Rod connection:$ keytool -importcert -file tls.crt -keystore truststore.jks
- Create a secret with the truststore file, and add the volume and volume mount entries on the deployment configuration:
$ oc create secret generic truststore-secret --from-file=truststore.jks
secret/truststore-secret created

$ oc set volume dc/sso --add --name=truststore-secret -m /etc/truststore -t secret --secret-name=truststore-secret --default-mode='0755'
Alternatively, you can navigate on the web console to the secret, click add secret to workload, and fill in the form. After adding the secret as a volume and specifying the path (
/etc/truststore), you will be able to use/etc/truststore/truststore.jksas the truststore. Figure 5 shows the option to add a secret to the workload.
Figure 5: Add a secret to the workload. - Verify the volume:
$ oc get dc
NAME REVISION DESIRED CURRENT TRIGGERED BY
sso 2 1 1 config,image(sso74-openshift-rhel8:7.4)
$ oc set volume dc/sso --all
sso
secret/sso-app-secret as eap-keystore-volume
mounted at /etc/eap-secret-volume
secret/sso-app-secret as eap-jgroups-keystore-volume
mounted at /etc/jgroups-encrypt-secret-volume
secret/sso-app-secret as sso-truststore-volume
mounted at /etc/sso-secret-volume
secret/truststore-secret as truststore-secret
mounted at /etc/truststore
- To make configuration changes to single sign-on using the command-line interface, create a file named
sso-extensions.cliwith the following content:embed-server --std-out=echo --server-config=standalone-openshift.xml batch /system-property=javax.net.debug:add(value="ssl,handshake") /subsystem=infinispan/cache-container=keycloak:write-attribute(name=module,value=org.keycloak.keycloak-model-infinispan) /socket-binding-group=standard-sockets/remote-destination-outbound-socket-binding=remote-cache/:add(host=rhsso-infinispan.rhsso.svc.cluster.local,port=${remote.cache.port:11222},fixed-source-port=true) run-batch batch /subsystem=infinispan/cache-container=keycloak/replicated-cache=work/store=remote:add(cache=work,remote-servers=[remote-cache],fetch-state=false,passivation=false,preload=false,purge=false,shared=true,properties={rawValues=true,remoteStoreSecurityEnabled=true,statistics=true,marshaller=org.keycloak.cluster.infinispan.KeycloakHotRodMarshallerFactory,infinispan.client.hotrod.trust_store_file_name=/etc/truststore/truststore.jks,infinispan.client.hotrod.trust_store_password=redhat,infinispan.client.hotrod.sasl_mechanism=DIGEST-MD5,infinispan.client.hotrod.auth_username=developer,infinispan.client.hotrod.auth_password=JkSURXkBfLqsRG6M,infinispan.client.hotrod.use_ssl=true,remoteStoreSecurityEnabled=true,statistics=true,infinispan.client.hotrod.auth_realm=default,infinispan.client.hotrod.auth_server_name=infinispan}) /subsystem=infinispan/cache-container=keycloak/distributed-cache=sessions/store=remote:add(cache=sessions,remote-servers=[remote-cache],fetch-state=false,passivation=false,preload=false,purge=false,shared=true,properties={rawValues=true,marshaller=org.keycloak.cluster.infinispan.KeycloakHotRodMarshallerFactory,infinispan.client.hotrod.trust_store_file_name=/etc/truststore/truststore.jks,infinispan.client.hotrod.trust_store_password=redhat,infinispan.client.hotrod.sasl_mechanism=DIGEST-MD5,infinispan.client.hotrod.auth_username=developer,infinispan.client.hotrod.auth_password=JkSURXkBfLqsRG6M,infinispan.client.hotrod.use_ssl=true,remoteStoreSecurityEnabled=true,statistics=true,infinispan.client.hotrod.auth_realm=default,infinispan.client.hotrod.auth_server_name=infinispan}) /subsystem=infinispan/cache-container=keycloak/distributed-cache=offlineSessions/store=remote:add(cache=offlineSessions,remote-servers=[remote-cache],fetch-state=false,passivation=false,preload=false,purge=false,shared=true,properties={rawValues=true,marshaller=org.keycloak.cluster.infinispan.KeycloakHotRodMarshallerFactory,infinispan.client.hotrod.trust_store_file_name=/etc/truststore/truststore.jks,infinispan.client.hotrod.trust_store_password=redhat,infinispan.client.hotrod.sasl_mechanism=DIGEST-MD5,infinispan.client.hotrod.auth_username=developer,infinispan.client.hotrod.auth_password=JkSURXkBfLqsRG6M,infinispan.client.hotrod.use_ssl=true,remoteStoreSecurityEnabled=true,statistics=true,infinispan.client.hotrod.auth_realm=default,infinispan.client.hotrod.auth_server_name=infinispan}) /subsystem=infinispan/cache-container=keycloak/distributed-cache=clientSessions/store=remote:add(cache=clientSessions,remote-servers=[remote-cache],fetch-state=false,passivation=false,preload=false,purge=false,shared=true,properties={rawValues=true,marshaller=org.keycloak.cluster.infinispan.KeycloakHotRodMarshallerFactory,infinispan.client.hotrod.trust_store_file_name=/etc/truststore/truststore.jks,infinispan.client.hotrod.trust_store_password=redhat,infinispan.client.hotrod.sasl_mechanism=DIGEST-MD5,infinispan.client.hotrod.auth_username=developer,infinispan.client.hotrod.auth_password=JkSURXkBfLqsRG6M,infinispan.client.hotrod.use_ssl=true,remoteStoreSecurityEnabled=true,statistics=true,infinispan.client.hotrod.auth_realm=default,infinispan.client.hotrod.auth_server_name=infinispan}) /subsystem=infinispan/cache-container=keycloak/distributed-cache=offlineClientSessions/store=remote:add(cache=offlineClientSessions,remote-servers=[remote-cache],fetch-state=false,passivation=false,preload=false,purge=false,shared=true,properties={rawValues=true,marshaller=org.keycloak.cluster.infinispan.KeycloakHotRodMarshallerFactory,infinispan.client.hotrod.trust_store_file_name=/etc/truststore/truststore.jks,infinispan.client.hotrod.trust_store_password=redhat,infinispan.client.hotrod.sasl_mechanism=DIGEST-MD5,infinispan.client.hotrod.auth_username=developer,infinispan.client.hotrod.auth_password=JkSURXkBfLqsRG6M,infinispan.client.hotrod.use_ssl=true,remoteStoreSecurityEnabled=true,statistics=true,infinispan.client.hotrod.auth_realm=default,infinispan.client.hotrod.auth_server_name=infinispan}) /subsystem=infinispan/cache-container=keycloak/distributed-cache=loginFailures/store=remote:add(cache=loginFailures,remote-servers=[remote-cache],fetch-state=false,passivation=false,preload=false,purge=false,shared=true,properties={rawValues=true,marshaller=org.keycloak.cluster.infinispan.KeycloakHotRodMarshallerFactory,infinispan.client.hotrod.trust_store_file_name=/etc/truststore/truststore.jks,infinispan.client.hotrod.trust_store_password=redhat,infinispan.client.hotrod.sasl_mechanism=DIGEST-MD5,infinispan.client.hotrod.auth_username=developer,infinispan.client.hotrod.auth_password=JkSURXkBfLqsRG6M,infinispan.client.hotrod.use_ssl=true,remoteStoreSecurityEnabled=true,statistics=true,infinispan.client.hotrod.auth_realm=default,infinispan.client.hotrod.auth_server_name=infinispan}) /subsystem=infinispan/cache-container=keycloak/distributed-cache=actionTokens/store=remote:add(cache=actionTokens,remote-servers=[remote-cache],fetch-state=false,passivation=false,preload=false,purge=false,shared=true,properties={rawValues=true,marshaller=org.keycloak.cluster.infinispan.KeycloakHotRodMarshallerFactory,infinispan.client.hotrod.trust_store_file_name=/etc/truststore/truststore.jks,infinispan.client.hotrod.trust_store_password=redhat,infinispan.client.hotrod.sasl_mechanism=DIGEST-MD5,infinispan.client.hotrod.auth_username=developer,infinispan.client.hotrod.auth_password=JkSURXkBfLqsRG6M,infinispan.client.hotrod.use_ssl=true,remoteStoreSecurityEnabled=true,statistics=true,infinispan.client.hotrod.auth_realm=default,infinispan.client.hotrod.auth_server_name=infinispan}) run-batch reload quit - Use this
sso-extensions.clifile to create a config map and mount it as a volume:$ oc create configmap jboss-cli --from-file=sso-extensions.cli $ oc set volume dc/sso --add --name=jboss-cli -m /opt/eap/extensions -t configmap --configmap-name=jboss-cli --default-mode='0755' --overwrite
- Define a site name in the deployment config using
JAVA_OPTS:$ oc set env dc/sso \ -e "JAVA_OPTS_APPEND= \ -Djboss.site.name=site1"
- To log in to the SSO console, create a user:
sh-4.4$ ./add-user-keycloak.sh \
> -r master \
> -u admin \
> -p password

sh-4.4$ ./jboss-cli.sh --connect ':reload'

Verifying the integration
The last step is to verify the integration. First, you will log in to the OpenShift project, then you will open a shell in the SSO pod.
Log in to the OpenShift project
Run oc get pods -o wide to grab the SSO pod's IP address.
Open a shell in the SSO pod
Take the following steps to open a shell in the SSO pod.
- Use a remote shell as follows:
$ oc rsh sso-49-scgz2
- Change to the
opt/eap/bin/folder:$ cd opt/eap/bin/
- Open the Data Grid console and navigate to the
clientSessionscache. - Invoke the single sign-on CLI and create a connection:
$ ./kcadm.sh config credentials --server http://10.129.2.250:8080/auth --realm master --user admin --password password
- Refresh the Data Grid console and observe that the number of entries in the
clientSessionscache is incremented with each invocation of the SSO command-line interface, as shown in Figure 6.
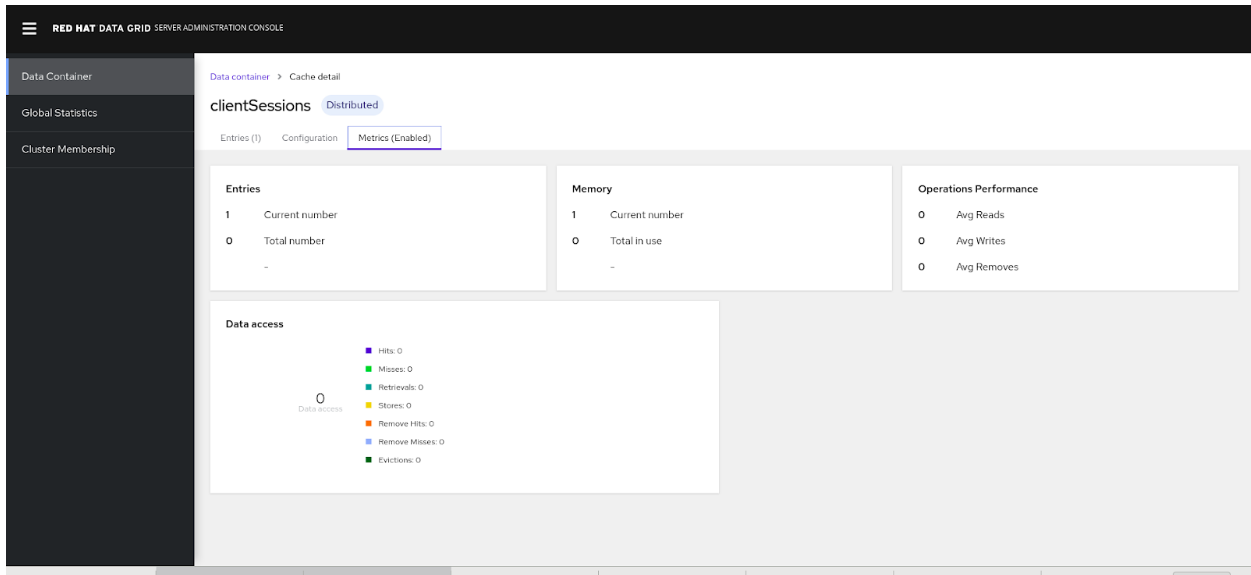
Note that cache entries are also incremented in case any users are added on the SSO end. If the SSO pod is recreated there is no loss of data and cache entries are retained on Data Grid.
Conclusion
Red Hat Data Grid is a valuable solution for large data sets across cloud platforms. Data Grid delivers many features for hybrid cloud deployments on OpenShift. In this article, you’ve seen how to connect a single-sign on technology client with a Data Grid server as a remote store, and then deploy them on Red Hat OpenShift.
Last updated: February 11, 2024