Redhat Developers  Logo
  • Products

    Featured

    • Red Hat Enterprise Linux
      Red Hat Enterprise Linux Icon
    • Red Hat OpenShift AI
      Red Hat OpenShift AI
    • Red Hat Enterprise Linux AI
      Linux icon inside of a brain
    • Image mode for Red Hat Enterprise Linux
      RHEL image mode
    • Red Hat OpenShift
      Openshift icon
    • Red Hat Ansible Automation Platform
      Ansible icon
    • Red Hat Developer Hub
      Developer Hub
    • View All Red Hat Products
    • Linux

      • Red Hat Enterprise Linux
      • Image mode for Red Hat Enterprise Linux
      • Red Hat Universal Base Images (UBI)
    • Java runtimes & frameworks

      • JBoss Enterprise Application Platform
      • Red Hat build of OpenJDK
    • Kubernetes

      • Red Hat OpenShift
      • Microsoft Azure Red Hat OpenShift
      • Red Hat OpenShift Virtualization
      • Red Hat OpenShift Lightspeed
    • Integration & App Connectivity

      • Red Hat Build of Apache Camel
      • Red Hat Service Interconnect
      • Red Hat Connectivity Link
    • AI/ML

      • Red Hat OpenShift AI
      • Red Hat Enterprise Linux AI
    • Automation

      • Red Hat Ansible Automation Platform
      • Red Hat Ansible Lightspeed
    • Developer tools

      • Red Hat Trusted Software Supply Chain
      • Podman Desktop
      • Red Hat OpenShift Dev Spaces
    • Developer Sandbox

      Developer Sandbox
      Try Red Hat products and technologies without setup or configuration fees for 30 days with this shared Openshift and Kubernetes cluster.
    • Try at no cost
  • Technologies

    Featured

    • AI/ML
      AI/ML Icon
    • Linux
      Linux Icon
    • Kubernetes
      Cloud icon
    • Automation
      Automation Icon showing arrows moving in a circle around a gear
    • View All Technologies
    • Programming Languages & Frameworks

      • Java
      • Python
      • JavaScript
    • System Design & Architecture

      • Red Hat architecture and design patterns
      • Microservices
      • Event-Driven Architecture
      • Databases
    • Developer Productivity

      • Developer productivity
      • Developer Tools
      • GitOps
    • Secure Development & Architectures

      • Security
      • Secure coding
    • Platform Engineering

      • DevOps
      • DevSecOps
      • Ansible automation for applications and services
    • Automated Data Processing

      • AI/ML
      • Data Science
      • Apache Kafka on Kubernetes
      • View All Technologies
    • Start exploring in the Developer Sandbox for free

      sandbox graphic
      Try Red Hat's products and technologies without setup or configuration.
    • Try at no cost
  • Learn

    Featured

    • Kubernetes & Cloud Native
      Openshift icon
    • Linux
      Rhel icon
    • Automation
      Ansible cloud icon
    • Java
      Java icon
    • AI/ML
      AI/ML Icon
    • View All Learning Resources

    E-Books

    • GitOps Cookbook
    • Podman in Action
    • Kubernetes Operators
    • The Path to GitOps
    • View All E-books

    Cheat Sheets

    • Linux Commands
    • Bash Commands
    • Git
    • systemd Commands
    • View All Cheat Sheets

    Documentation

    • API Catalog
    • Product Documentation
    • Legacy Documentation
    • Red Hat Learning

      Learning image
      Boost your technical skills to expert-level with the help of interactive lessons offered by various Red Hat Learning programs.
    • Explore Red Hat Learning
  • Developer Sandbox

    Developer Sandbox

    • Access Red Hat’s products and technologies without setup or configuration, and start developing quicker than ever before with our new, no-cost sandbox environments.
    • Explore Developer Sandbox

    Featured Developer Sandbox activities

    • Get started with your Developer Sandbox
    • OpenShift virtualization and application modernization using the Developer Sandbox
    • Explore all Developer Sandbox activities

    Ready to start developing apps?

    • Try at no cost
  • Blog
  • Events
  • Videos

Using a custom devfile registry and C++ with Red Hat CodeReady Workspaces

April 14, 2021
Mary Cochran
Related topics:
ContainersDevOpsKubernetes
Related products:
Developer Tools

Share:

    Red Hat CodeReady Workspaces provides teams with predefined workspaces to streamline application development. Out of the box, CodeReady Workspaces supports numerous languages and plugins. However, many organizations want to customize a workspace and make it available to developers across the organization as a standard. In this article, I show you how to use a custom devfile registry to customize a workspace for C++ development. Once that's done, we will deploy an example application using Docker.

    Note: A devfile dictates which project is in the environment, which tools are available in the terminal, and more. For more information, please refer to the CodeReady Workspaces documentation.

    Setting up the workspace

    To get started with the example in this article, fork the following repository:

    https://github.com/redhat-developer/codeready-workspaces

    Enter the codeready-workspaces/dependencies/che-devfile-registry/devfiles directory, which holds the configuration files for each stack or plugin. There are two configuration files for each stack or plugin: devfile.yaml and meta.yaml. For the purposes of this example, simply copy the 05_cpp folder to a new folder named 05_custom_cpp. From there, you can edit the files to meet your needs:

    $ cd dependencies/che-devfile-registry/devfiles/
    $ cp -r 05_cpp 05_custom_cpp
    $ cd 05_custom_cpp/
    $ ls
    devfile.yaml meta.yaml

    The meta.yaml file stays largely the same, but you can edit the display name and description. Here is my meta.yaml:

    ---
    displayName: C/C++ Hello
    description: C and C++ Developer Tools stack with GCC 8.3.1, cmake 3.11.4 and make 4.2.1
    tags: ["UBI8", "C", "C++", "clang", "GCC", "g++", "make", "cmake"]
    icon: /images/type-cpp.svg
    globalMemoryLimit: 1686Mi
    

    You will make more updates in the devfile.yaml file. For this example, we'll simply update the project that gets imported to the workspace automatically, like so:

    ---
    apiVersion: 1.0.0
    metadata:
      generateName: cpp-custom-
    projects:
      -
        name: Hello
        source:
          type: git
          location: 'https://github.com/mmistretta/hello.git'
    components:
    

    If you want to change the stack even further, you can update things such as the Docker image, the plugins, and even the commands that developers can run with a click of a button. For example, to install Docker or Podman for use in the stack, edit the Docker image to be a custom one. The Dockerfile for the stacks-cpp-rhel8 used for this stack can be found at the Red Hat CodeReady Workspaces - C/C++ Stack web page and customized from there.

    Save your files before proceeding to the next task.

    Building your devfile registry image

    Next, you need to build the registry image. For this example, we will use Docker and the Red Hat Universal Base Image (UBI). From the codeready-workspaces/dependencies/che-devfile-registry directory, run the following commands to build an image and push it to your registry. Replace the italicized text below with the appropriate values for your environment:

    $ ./build --organization your-org --registry your_registry --tag version --rhel
    $ docker push your-image
    

    To ensure your image is valid, you can test it by running:

    $ docker run your-image
    

    Now, you can utilize your custom devfile registry.

    Creating your Che Cluster for CodeReady Workspaces

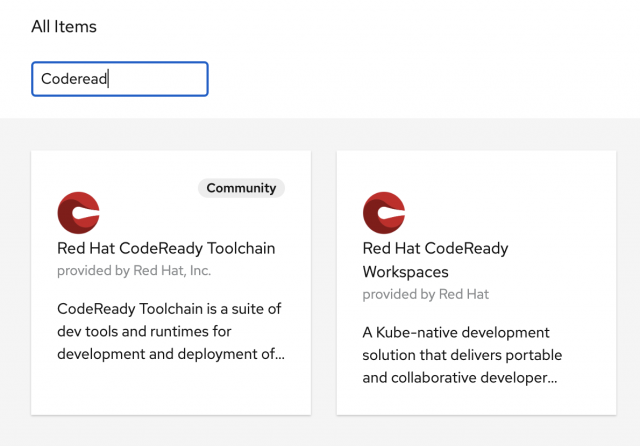
    Now, make sure the CodeReady Workspaces Operator is installed. As an admin user, search for the Operator in the Red Hat OpensShift OperatorHub, as shown in Figure 1.

    Find and select the CodeReady Workspaces Operator in the OperatorHub
    Figure 1: Find and select the CodeReady Workspaces Operator in the OperatorHub.

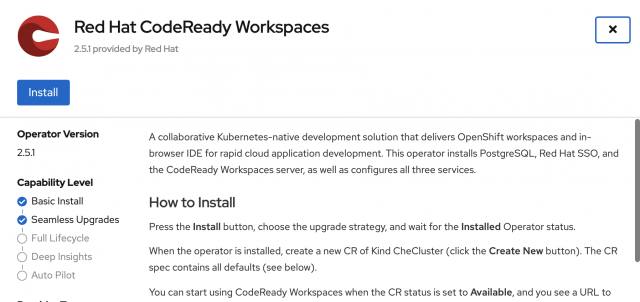
    Install the Operator as shown in Figure 2.

    Install the CodeReady Workspaces Operator
    Figure 2: Install the CodeReady Workspaces Operator.

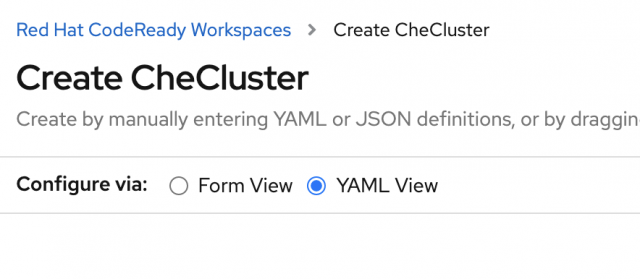
    After installing the Operator, select it. Then, select  Provided APIs—>CodeReady Workspaces Cluster and click the Create Instance link, as shown in Figure 3.

    From Provided APIs->CodeReady Workspaces Cluster, click on the Create Instance link to start creating your instance.
    Figure 3: Start creating your instance with the Create Instance link.

    Select Yaml View as the "Configure via" option, as shown in Figure 4.

    Select the YAML view as the configuration option
    Figure 4: Select the YAML view as the configuration option.

    Now, edit the YAML file created by this process. Scroll down to the server section and replace the devfileRegistryImage entry with your image, as shown here:

    server:
      pluginRegistryImage: ''
      selfSignedCert: false
      devfileRegistryImage: 'quay.io/mcochran/che-devfile-registry:1.2'
      tlsSupport: true
      cheFlavor: codeready
      cheImageTag: ''
    

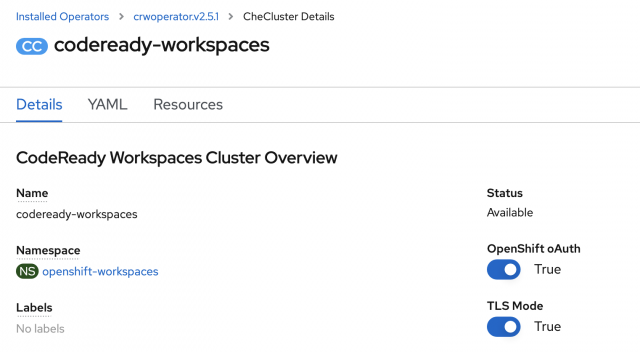
    Click Create and wait several minutes for the Che cluster to become available. Figure 5 shows the screen that CodeReady Workspaces displays upon successful creation.

    The displayed properties of a CodeReady Workspaces cluster
    Figure 5: The displayed properties of a CodeReady Workspaces cluster.

    Using the workspace

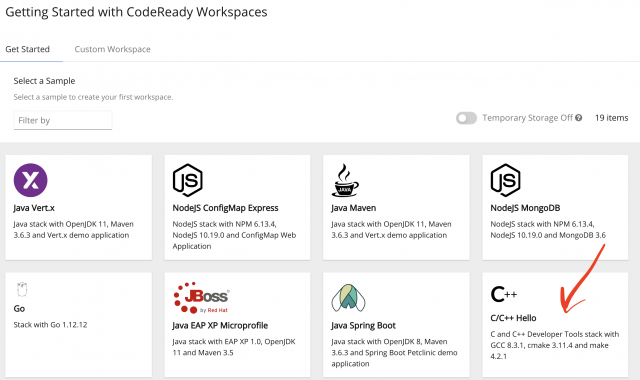
    Click on your CodeReady Workspaces URL and log in to the cluster. If you've left the default permissions in place during the cluster configuration, you can log in as any OpenShift user. If prompted, select "Allow the selected permissions." On the Getting Started landing page, you will then see the custom C++ stack you created (denoted by a red arrow in Figure 6).

    Available workspaces, including the one you've just created
    Figure 6: Available workspaces, including the one you've just created.

    Select the workspace and watch it spin up. When it opens, you should see the Hello project that you specified in the devfile. Here, you can inspect some of the files, such as hello-main.cpp:

    
    #include <iostream>
    
    int main(int argc, char const *argv[])
    {
       std::cout << "Hello Docker container!" << std::endl;
       return0;
    }
    

    Now, you can open a terminal to compile and run the code, as shown in the following example. You can also compile and run counter-main.cpp or any other C++ code:

    $ cd Hello/
    $ make hello-main
    $ ./hello-main
    

    You should see the program print a "Hello Docker container!" message and then terminate. At this point in development, you could make any changes you would like to see in the code, compile it, run it, and push your changes to Git, which could kick off a pipeline to deploy to OpenShift.

    Deploying the application as a Docker instance

    In this example, you do not have Docker tools installed in your CodeReady Workspaces stack, but Docker is installed using the Dockerfile in your Hello Git project. If you would like to test some C++ code in an environment with Docker tooling, enter commands like the following. In this example, rhsm.secret.yaml contains my credentials for my registry, and I am using quay.io with the organization mcochran as my registry. Be sure to replace these variables with the ones for your own environment:

    $ DOCKER_BUILDKIT=1 docker build --progress=plain --secret id=rhsm,src=rhsm.secret.yaml -t quay.io/mcochran/cpp-hello:latest -f Dockerfile .
    $ docker push quay.io/mcochran/cpp-hello:latest
    

    Then, create a pod.yaml file to deploy your code using the Docker image:

    apiVersion: v1
    kind: Pod
    metadata:
      labels:
        app: hello-cpp
      name: hello-cpp-exec
    spec:
      containers:
      - name: hello-cpp
        image: quay.io/mcochran/cpp-hello
        livenessProbe:
          exec:
            command:
            - cat
            - /tmp/healthy
          initialDelaySeconds: 5
          periodSeconds: 5
      restartPolicy: Never
    

    Save your file, then log in to OpenShift from the command line and deploy the pod:

    $ oc login
    $ oc create -f pod.yaml
    

    Because this code simply says "hello," the pod will run quickly. You can review the logs afterward for pods that have shut down in the workloads—>pods section of the admin console.

    Summary

    This article has demonstrated how to create a custom devfile registry to make dedicated workspaces available to your team. I showed you how to use a devfile to provide the code and tools appropriate to your environment, and you've seen how convenient it is to deploy an application in CodeReady Workspaces using Docker.

    Last updated: February 5, 2024

    Recent Posts

    • Why Models-as-a-Service architecture is ideal for AI models

    • How to run MicroShift as a container using MINC

    • OpenShift 4.19 brings a unified console for developers and admins

    • 3 steps to secure network segmentation with Ansible and AWS

    • Integrate vLLM inference on macOS/iOS using OpenAI APIs

    Red Hat Developers logo LinkedIn YouTube Twitter Facebook

    Products

    • Red Hat Enterprise Linux
    • Red Hat OpenShift
    • Red Hat Ansible Automation Platform

    Build

    • Developer Sandbox
    • Developer Tools
    • Interactive Tutorials
    • API Catalog

    Quicklinks

    • Learning Resources
    • E-books
    • Cheat Sheets
    • Blog
    • Events
    • Newsletter

    Communicate

    • About us
    • Contact sales
    • Find a partner
    • Report a website issue
    • Site Status Dashboard
    • Report a security problem

    RED HAT DEVELOPER

    Build here. Go anywhere.

    We serve the builders. The problem solvers who create careers with code.

    Join us if you’re a developer, software engineer, web designer, front-end designer, UX designer, computer scientist, architect, tester, product manager, project manager or team lead.

    Sign me up

    Red Hat legal and privacy links

    • About Red Hat
    • Jobs
    • Events
    • Locations
    • Contact Red Hat
    • Red Hat Blog
    • Inclusion at Red Hat
    • Cool Stuff Store
    • Red Hat Summit

    Red Hat legal and privacy links

    • Privacy statement
    • Terms of use
    • All policies and guidelines
    • Digital accessibility

    Report a website issue