https://youtu.be/fXgAKlaBOGs
In a previous article, "OpenShift 4.0 Developer Preview on AWS is up and running" I included instructions for using macOS or Linux to install and manage your Red Hat OpenShift 4.0 cluster. Since I recently added a Windows 10 PC to my technology mix, I decided to try to use Windows as my only choice.
I was saddened to learn that the installer, openshift-install, isn't available for Windows. But, like any developer who won't be denied; I found a way.
The key to success is to embrace the Windows Subsystem for Linux (WSL). With this tool in hand, you can download and install the necessary bits to start up your Red Hat OpenShift 4.0 cluster on AWS, then switch over to PowerShell on Windows to log in and do your development. In my case, my code is written in C# and, although the WSL Linux that I used (Fedora Remix) does have vi installed, I want to do my work in Visual Studio Code. Windows is my comfort zone; why should I be forced to leave it? Besides, I know how to exit VS Code (**grin**).
Overview
Here is the plan, the TL;DR:
- Enable WSL (Windows).
- Install a Linux Distro (Windows).
- Configure AWS (Linux).
- Install openshift-install (Linux).
- Start the cluster (Linux).
- Install the OpenShift CLI for Windows (Windows).
- Copy the configuration file from WSL to Windows (Both).
- Log in from Windows (Windows).
But first...
I strongly recommend reading the aforementioned article, "OpenShift 4.0 Developer Preview on AWS is up and running", for some details that are not repeated here. Don't worry if you don't understand all the Linux commands; the important part is to know what steps need to happen.
Enable WSL
The PowerShell command is:
Enable-WindowsOptionalFeature -Online -FeatureName Microsoft-Windows-Subsystem-Linux
Install a Linux distro
Go to the Microsoft Store on your Windows PC and install the Linux distro of your choosing. For this article, I spent the five bucks and opted for the "Fedora Remix" distro. If you install a different distro, the package-related commands will differ (e.g., "yum" for Fedora versus "apt-get" for Ubuntu). The rest will be the same, however.
Install the distro and open a terminal window.
Configure AWS
For this, follow the instructions at steps one and two on the Red Hat OpenShift 4.0 on AWS installation page.
Install openshift-install
The instructions from the developer preview are browser-based. That is, you visit a web page and click on a button to download the bits. We're not going to use that. We're going to use wget instead to download the bits from the command line.
Use your distro's package management tool to make sure wget is installed. On my Fedora Remix distro, I had to run sudo yum install -y wget.
Open your Windows browser of choice and visit the openshift installer releases web page. Right mouse-click on the link for "openshift-install-linux-amd64" and select the option to copy the link to your local clipboard. Then switch over to your Linux terminal window so you can paste in the link and run the command:
wget <paste-the-link-in-here>

You'll see a few super-long URLs scroll by before you see the bits downloading to your Linux distro in your WSL.
Rename the downloaded bits with this command:
mv openshift-install-linux-amd64 openshift-install
Now, make it executable with this command:
chmod +x openshift-install
Start the cluster
Now you have the OpenShift installer available on your Linux distro. You can take the steps needed to start your Red Hat OpenShift 4.0 cluster on AWS. If you followed the "Configure AWS" steps above, you'll have the Access ID and key needed.
You can copy the Pull Secret from the installation page mentioned earlier as well.
The magic starts to happen when you use the following command in your Linux terminal:
./openshift-install create cluster
Be patient. I've had it take up to 24 minutes for a cluster to install. Don't worry; it's worth the wait.
Install the OpenShift CLI for Windows
When the installation is finished, your cluster will be up and running. You won't be able to log in until the time, but you can go ahead and make sure the OpenShift command-line tool, oc, is installed on your Windows PC. At your PowerShell command line, run:
choco install -y openshift-cli
Again, if you don't have Chocolatey installed on your Windows machine, stop everything and get it immediately. It's that good.
Copy the configuration file from WSL to Windows
Here's the part where you make the transition from Linux to Windows, which will allow you to run everything from your PowerShell command line—and from inside VS Code too, if you wish.
After the installation is finished and the cluster is up and running, a configuration file will be written to your Linux distro's filesystem. The file is /home/<your-username>/auth/kubeconfig. We need to copy this file to a location where we can read it from Windows PowerShell.
To date (April 2019), the WSL filesystem maps to the Windows filesystem as follows:
/mnt/c (Linux) maps to C:\ (Windows)
Note: Future versions of Windows 10 will make it much easier to share data files between WSL and Windows. For now, just to be safe, we'll copy the configuration file.
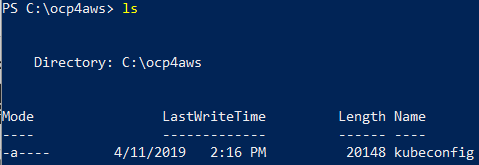
So, we can create a directory—I did it off the root of my C: drive to keep it simple—and then use the Linux cp(copy) command to get the config file over to Windows.
In PowerShell:
mkdir C:\ocp4aws
In Linux:
sudo cp /home/<username>/auth/kubeconfig /mnt/c/ocp4aws
Switch back to your PowerShell terminal and move the directory C:\ocp4aws. A listing of the directory contents will show the file kubeconfig, which is now available to your PowerShell session.
There's just one more step before logging in.
In PowerShell, set the environment variable "KUBECONFIG" that points to your config file:
$env:KUBECONFIG="C:\ocp4aws\kubeconfig"
Stop. Take a Breath
Up to this point, it's been a winding path with a lot of steps just to be able to log in to an OpenShift 4.0 cluster on AWS. Here's the good news: After this, you just need to do two steps: Set the $env:KUBECONFIG environment variable and run oc login.... That means, when you return to your PC tomorrow, you run two steps and, boom, you're connected to your cluster.
In other words:
$env:KUBECONFIG="C:\ocp4aws\kubeconfig"
oc login -u kubeadmin -p <password-generated-during-cluster-install>
Log in from Windows
Simply run the command as instructed in your Linux terminal session. It should look like the following—with a different password.
oc login -u kubeadmin -p KSiVQ-gww7K-HEaiv-HNnfG
Keep this information. You'll need it to log into your cluster again.
Next Steps
To create or destroy a cluster, use the openshift-install command within your Linux distro terminal.
After creating a new cluster, you'll have a new login password. It'll be displayed in your Linux distro terminal after the cluster is created. Copy that to your clipboard to paste into PowerShell to log in from Windows.
Before you log in from Windows, make sure the $env:KUBECONFIG is set.
That's it. You can now create, use and destroy your Red Hat OpenShift 4.0 cluster on AWS from your Windows PC.
Last updated: March 28, 2023