In this article, I will show how you can implement a common use case that often happens when you migrate a classic Java EE application into a Red Hat OpenShift environment.
Scenario
Usually a classic Java EE application stores a user's information, such the profile's configuration, in the HTTP session. In a typical production scenario, there are several application server instances that build a cluster and are used to implement high availability, failover, and load balancing. To make sure that stateful information is preserved across the application server instances, you must distribute your session as described in the Java EE 7 specification section EE.6.4, "Servlet 3.1 Requirements."
But how can you do that in an xPaaS environment, such as OpenShift, where you usually deploy a stateless application?
The recommended approach is to revisit your application in order to make it stateless; in this way, you can scale it in a better way without problems. However, a common request, when a customer evaluates the use of an xPaaS environment, is to migrate an application without modifying it.
Solution
The solution to this problem is to distribute the application inside a cluster of Red Hat JBoss Enterprise Application Platform (EAP) instances. But you can improve your architecture through the externalization of the HTTP session from JBoss EAP to Red Hat JBoss Data Grid.
JBoss Data Grid can be used as an external cache container for application-specific data in JBoss EAP, such as HTTP sessions. This allows scaling of the data layer independently of the application, and enables different JBoss EAP clusters, which may reside in various domains, to access data from the same JBoss Data Grid cluster. Using it, you could preserve your stateful data in scenarios like these:
- Pod crashes caused by unpredictable problems
- Deployment of a new version of your application into the xPaaS environment
Furthermore, when sessions are dealing with large objects, the use of an external JBoss Data Grid cluster will keep the individual JBoss EAP nodes light and free of heap usage.
Implementation
For the implementation of this solution, I will use JBoss EAP and JBoss Data Grid inside OpenShift.
Environment Configuration
In this article, I will implement this architecture using:
- Minishift v1.15.1 for my local environment
- JBoss EAP 7.1.2
- JBoss Data Grid 7.1.2
- OpenShift 3.9
- Apache Maven 3.3.9
- GIT 2.16.3
Create OpenShift Node
The first step is to create the OpenShift machine, using Minishift, in order to have an xPaaS environment. I will use Minishift v1.15.1 and OpenShift 3.9.
Minishift
If you don't have Minishift installed in your machine, you can download the Red Hat Container Development Kit.
Then, check your Minishift installation:
$ minishift version
You should obtain output like this:
minishift v1.15.1+f19ac09
CDK v3.4.0-2
Then create your OpenShift environment using the minishift start command as shown in the example below. The command will be interactive and you will provide your Red Hat Subscription Management username and password (the same username and password that you used to register yourself to the Red Hat developer program.
$ minishift start --cpus 4 --memory 6144
Then you will be able to connect to the web console, at https://192.168.64.9:8443, using the following credentials:
- Username:
developer - Password:
developer
Create the Project
Now you are able to create the project:
$ oc new-project http-session-externalization --display-name="HTTP Session Externalization into JDG" --description="Project to demonstrate how to externalize EAP HTTP sessions into a remote JDG cluster"
Install JBoss Data Grid and Scale It to a Cluster Size of Three
Install JBoss Data Grid using the template and create the cache to store HTTP session information:
$ oc new-app --template=datagrid71-basic -p CACHE_NAMES=http-session-cache -p MEMCACHED_CACHE=memcached
Note: In order to avoid an issue related to JBoss Data Grid version 7.1.2, you must set the value of MEMCACHED_CACHE to a value that is different than the default proposed by template. In the command example above, I set the value of MEMCACHED_CACHE parameter to memcached, but you can choose any value except the default.
Scale up to three nodes:
$ oc scale --replicas=3 dc datagrid-app
The three instances create a cluster using the openshift.DNS_PING protocol, and the service datagrid-app-ping is responsible for managing the communication between JBoss Data Grid instances. The service is built through the template datagrid71-basic, which is used to create the JBoss Data Grid app.
Verify the JBoss Data Grid cluster
To verify the cluster composition, go to Applications → Pods and select one of the pods named datagrid-app-x-xxxxx.

Then click Open Java Console.
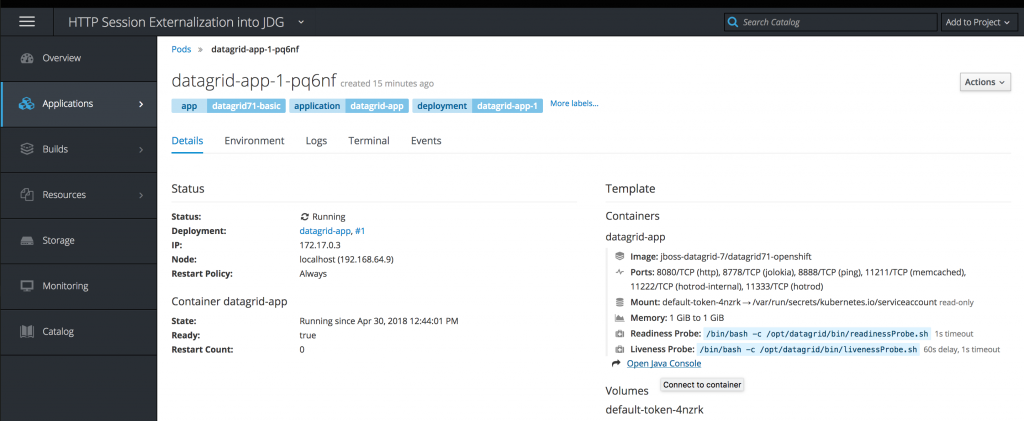
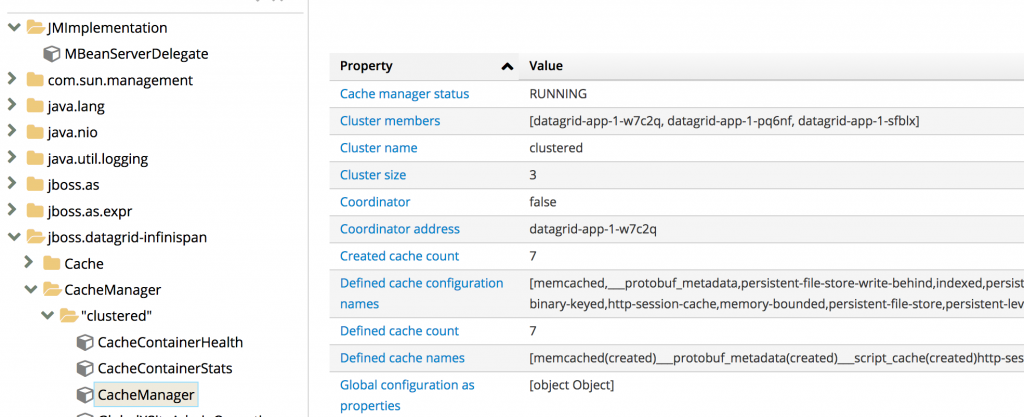
In the JMX tree, choose jboss.datagrid-infinispan → CacheManager → clustered → CacheManager and verify the value of Cluster size; it should be 3.
Deploy Your Application in the JBoss EAP App
Now it's time to deploy the application. You have two strategies to build and deploy it:
- Using one of the JBoss EAP templates and a GIT source repository
- Using a binary build, the WAR artifact, and the official JBoss EAP container image
I will show both implementations.
JBoss EAP Template and GIT Source Repository
In order to create the app, execute the following command:
$ oc new-app --template=eap71-basic-s2i -p SOURCE_REPOSITORY_URL=https://github.com/mvocale/http-session-counter-openshift.git -p SOURCE_REPOSITORY_REF= -p CONTEXT_DIR= -e JGROUPS_PING_PROTOCOL=openshift.DNS_PING -e OPENSHIFT_DNS_PING_SERVICE_NAME=eap-app-ping -e OPENSHIFT_DNS_PING_SERVICE_PORT=8888 -e CACHE_NAME=http-session-cache
In this way, you will launch a build of the source code, stored in a GIT repository, that creates an image and, finally, a deployment of your application using the variables defined before.
Binary Build and JBoss EAP Container Image
Sometimes you must work in an enviroment with some restrictions that create trouble in operations such Maven builds. In this case, you should compile your project, in order to have a deployable artifact, and then use it to release your application.
In this case, you should clone the example GIT project:
$ cd ~/Projects
$ git clone https://github.com/mvocale/http-session-counter-openshift.git
Then compile the project using Maven:
$ mvn clean package
After that, create a directory that stores the artifact and the JBoss EAP configuration file (use the standalone-openshift.xml file that you can find in the configuration directory of the project):
### Set to my user_home ####
$ cd
### Create a directory deploy_dir ####
$ mkdir deploy_dir
### Create a directory configuration ####
$ mkdir deploy_dir/configuration
$ cd deploy_dir/
### Copy the artifact ####
$ cp ~/Projects/http-session-counter-openshift/target/http-session-counter.war .
### Copy the JBoss EAP configuration file ####
$ cp ~/Projects/http-session-counter-openshift/configuration/standalone-openshift.xml configuration
Now deploy the application into OpenShift:
#### Create a new build based on binary strategy ####
$ oc new-build registry.access.redhat.com/jboss-eap-7/eap71-openshift --binary=true --name=eap-app
### Set the current position to my user_home where I previous created the deploy_dir directory ####
$ cd
#### Start a new build ####
$ oc start-build eap-app --from-dir=~/deploy_dir
#### Create a new app and set the cluster attribute for JBoss EAP and the remote cache name where I want to store HTTP session information ####
$ oc new-app eap-app -e JGROUPS_PING_PROTOCOL=openshift.DNS_PING -e OPENSHIFT_DNS_PING_SERVICE_NAME=eap-app-ping -e OPENSHIFT_DNS_PING_SERVICE_PORT=8888 -e JGROUPS_CLUSTER_PASSWORD=myPwd$!! -e CACHE_NAME=http-session-cache
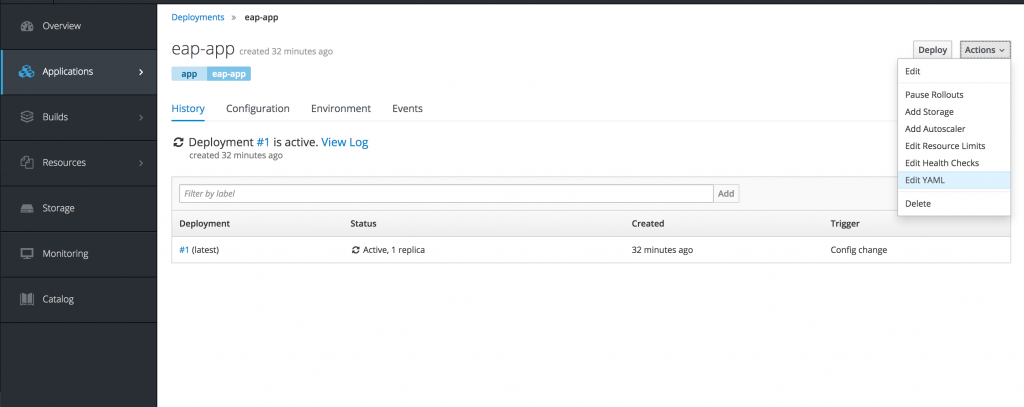
Then you should patch the deployment config in order to expose the Jolokia port in the eap-app service created by the new-app operation. The easiest way to do this is to use the web console. Go to Application → Deployment and select the eap-app deployment configuration.
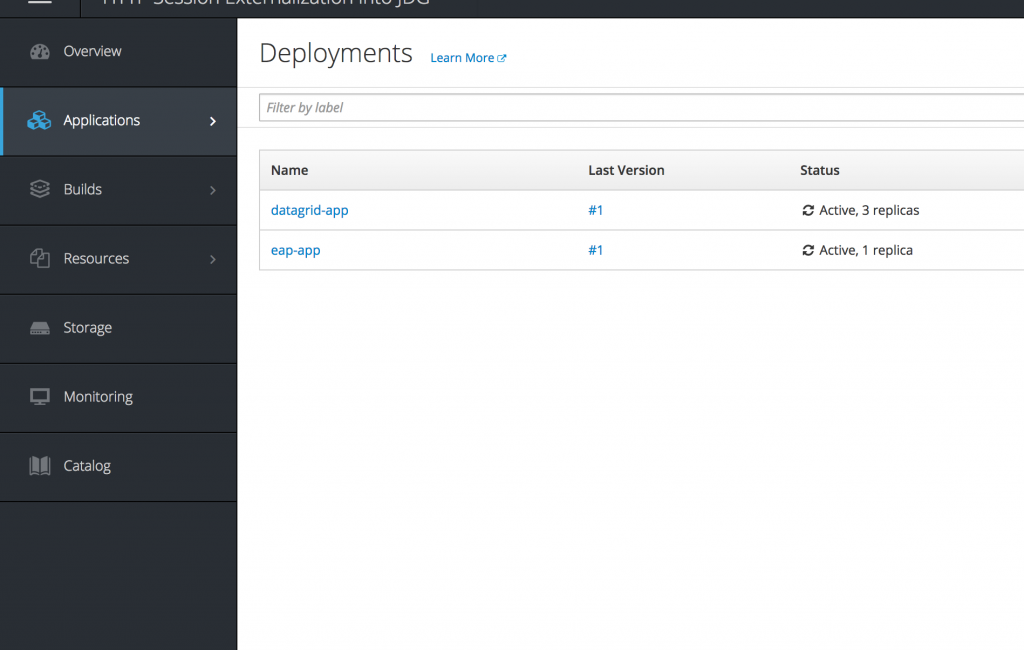
Then select Actions → Edit YAML in order to update it.
Now update the ports section of the deployment configuration using this code:
ports:
  - containerPort: 8080
    name: http
    protocol: TCP
  - containerPort: 8443
    name: https
    protocol: TCP
  - containerPort: 8778
    name: jolokia
    protocol: TCP
Now create and expose the service needed for the JBoss EAP cluster configuration:
$ oc expose dc eap-app --port=8888 --name=eap-app-ping --cluster-ip=None
Finally, create the route needed to access the application:
$ oc expose svc/eap-app
Scale Up the Application to a Cluster Size of Two
After the deployment of your application is completed, regardless of the chosen deployment strategy, you should be able to scale up your application using this command:
$ oc scale --replicas=2 dc eap-app
Verify the JBoss EAP Cluster
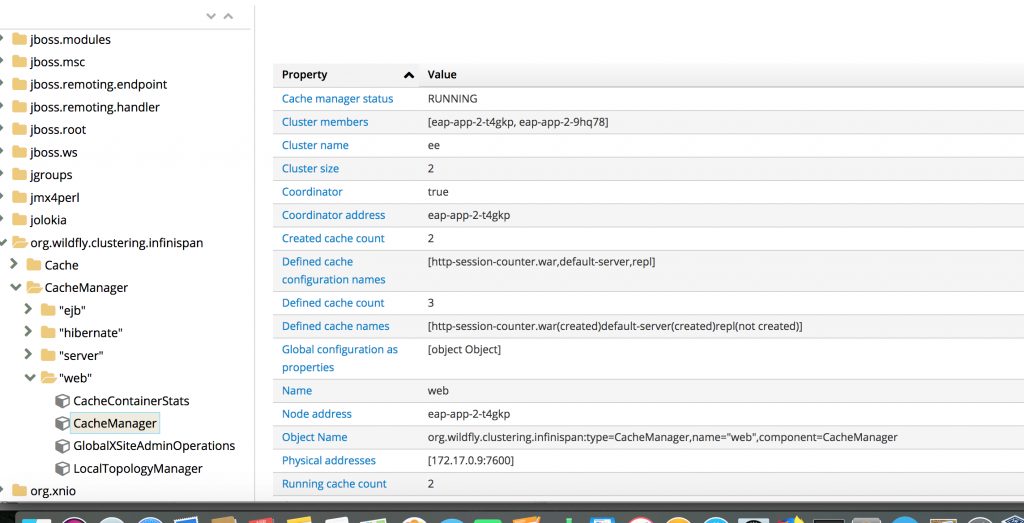
To verify the cluster composition, you should perform the same steps that you did for the JBoss Data Grid. The only difference is that you need to go to Applications → Pods and select one of the pods named eap-app-x-xxxxx.
Then, once you have opened the Java console, choose org.wildfly.clustering.infinispan → CacheManager → web → CacheManager and verify the value of Cluster size; it should be 2.
The two instances create a cluster using the openshift.DNS_PING protocol, and the service eap-app-ping is responsible for managing the communication between JBoss EAP instances. If you want to use KUBE_PING as a procotol to build a cluster, you must perform the following steps:
#### Create a service account of the name eap-service-account for EAP 7 ####
$ oc create serviceaccount eap-service-account -n http-session-externalization

#### Assign a view permission to the service account in the current project namespace ####
$ oc policy add-role-to-user view system:serviceaccount:$(oc project -q):eap-service-account -n $(oc project -q)

#### Also assign the default service account the view access ####
$ oc policy add-role-to-user view system:serviceaccount:$(oc project -q):default -n $(oc project -q)
Then you should change/add the following environment variables into the deployment configuration:
 JGROUPS_PING_PROTOCOL=openshift.KUBE_PING
 OPENSHIFT_KUBE_PING_NAMESPACE=http-session-externalization (the value is the project name)
 OPENSHIFT_KUBE_PING_LABELS=eap-app (the value is the application name)
Test the HTTP Session Externalization
For testing, I will use the Firefox browser and its Developer Tools, especially the Network component.
First of all execute, oc get routes and determine the service URL for the JBoss EAP pods.
$ oc get routes
The output should be something similar to this:
eap-app eap-app-http-session-externalization.192.168.64.9.nip.io eap-app 8080-tcp None
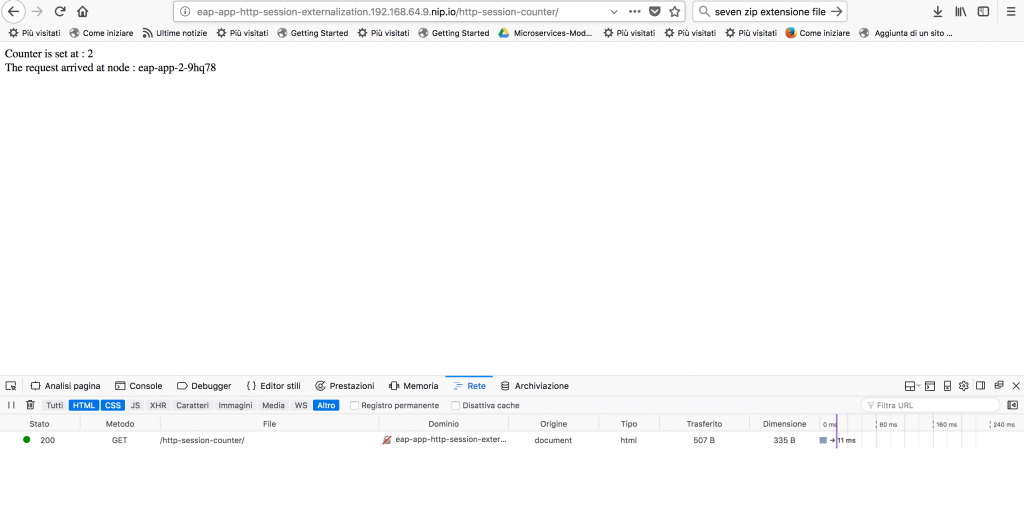
Copy the URL to a web browser and append the context path /http-session-counter; the counter is set to 1 in the session.
 Enable the Network tool of the Developer Tools and then re-run/refresh the same URL; the counter is now set to
 2, as shown in the image below:
Now select the record in the developer tool and do copy -> copy as cURL.
Paste the result in a terminal and perform the operation. The counter should continue to increase:
$ curl 'http://eap-app-http-session-externalization.192.168.64.9.nip.io/http-session-counter/' -H 'Host: eap-app-http-session-externalization.192.168.64.9.nip.io' -H 'User-Agent: Mozilla/5.0 (Macintosh; Intel Mac OS X 10.13; rv:59.0) Gecko/20100101 Firefox/59.0' -H 'Accept: text/html,application/xhtml+xml,application/xml;q=0.9,*/*;q=0.8' -H 'Accept-Language: it-IT,it;q=0.8,en-US;q=0.5,en;q=0.3' --compressed -H 'Cookie: JSESSIONID=TvkZgWtyxDIW-Cxr63CyzbsO2G4i3UKaCsq3pY_m.eap-app-1-49d68' -H 'Connection: keep-alive' -H 'Upgrade-Insecure-Requests: 1'
The output will be something like this:
<!DOCTYPE html PUBLIC "-//W3C//DTD HTML 4.01 Transitional//EN" "http://www.w3.org/TR/html4/loose.dtd">
<html>
<head>
<meta http-equiv="Content-Type" content="text/html; charset=UTF-8">
<title>Http Session Counter</title>

</head>
<body>
 Counter is set at : 3 <br/>
 The request arrived at node : eap-app-1-49d68
</body>
</html>
Now scale down the application in order to simulate all types of problems that could cause pods to be destroyed and re-created:
#### This will shut down all the JBoss EAP pods ####
$ oc scale --replicas=0 dc eap-app
Then scale up the cluster again:
#### This will create two fresh new JBoss EAP pods ####
$ oc scale --replicas=2 dc eap-app
If you perform the same tests, both from the browser and from the terminal via curl, you should notice that the counter value still increases.
Key Points of the Architecture
The key points of the implementation that has just been implemented are the following:
1) You must mark your application as distributable through the web.xml file:
<?xml version="1.0" encoding="UTF-8"?>
<web-app xmlns="http://xmlns.jcp.org/xml/ns/javaee" xmlns:xsi="http://www.w3.org/2001/XMLSchema-instance" xsi:schemaLocation="http://xmlns.jcp.org/xml/ns/javaee http://xmlns.jcp.org/xml/ns/javaee/web-app_3_1.xsd" version="3.1">
    ...
    <distributable/>
    ...
</web-app>
2) The JBoss EAP instances must build a cluster in order to activate the HTTP session replication feature.
3) The communication between JBoss EAP and JBoss Data Grid is defined in this section of standalone-openshift.xml: infinispan subsystem -> web cache container -> remote-store:
<subsystem xmlns="urn:jboss:domain:infinispan:4.0">
    ...
    <cache-container name="web" default-cache="repl" module="org.wildfly.clustering.web.infinispan">
        ...
        <replicated-cache name="repl" mode="ASYNC">
            <locking isolation="REPEATABLE_READ"/>
            <transaction mode="BATCH"/>
            <remote-store remote-servers="remote-jdg-server"
                 cache="${env.CACHE_NAME}" socket-timeout="60000"
                 preload="true" passivation="false" purge="false" shared="true"/>
        </replicated-cache>
        ....
    </cache-container>
</subsystem>
4) The remote-jdg-server is an outbound socket connection that is defined in this section of the standalone-openshift.xml: socket-binding-group -> outbound-socket-binding:
<socket-binding-group name="standard-sockets" default-interface="public" port-offset="0">
    ...
    <outbound-socket-binding name="remote-jdg-server">
        <remote-destination host="${env.DATAGRID_APP_HOTROD_SERVICE_HOST:127.0.0.1}" port="${env.DATAGRID_APP_HOTROD_SERVICE_PORT:11222}"/>
        </outbound-socket-binding>
</socket-binding-group>
5) The value of env.DATAGRID_APP_HOTROD_SERVICE_HOST and env.DATAGRID_APP_HOTROD_SERVICE_PORT are automatically provided to the pods by the service datagrid-app-hotrod. In OpenShift, the service automatically adds the environment variables using the following schema: ${SVCNAME}_SERVICE_HOST, where ${SVCNAME} is the service name.
Conclusion
You have seen how to preserve old-style Java EE application behaviour in an xPaaS environment such as OpenShift. This could be useful to port stateful applications to cloud environments without impacting the applications. In this way, using this implementation, you could move the stateful part of your application from the application server to the data layer. You could consider this as a first step to going towards a stateless and cloud-ready application.
Last updated: March 24, 2023