In Kubernetes, many developers are familiar with using Ingresses and Services to access web-based containerized applications, such as HTTP and HTTPS traffic.
However, as part of my job, I am often asked about "uncommon" ports (such as UDP or different TCP port combinations) and how to run and expose them outside the cluster.
Why would you want to expose or run these "nonstandard" ports? Here are a few common examples:
- TCP and UDP ports for database and database clustering connections (see MS SQL and PostGreSQL).
- As more virtual machines (VMs) are deployed in Kubernetes using the Kubevirt upstream project, you must offer SSH (TCP port 22) and RDP (TCP 3389 and UDP 3389) connections to those VMs.
- UDP ports often support applications like real-time gaming, video conferencing, DNS name resolution, and some IoT functions.
In this post, I explain how to create Kubernetes services that support ports other than TCP/80 and TCP/443. I also show how to expose those services outside the cluster for cloud and datacenter deployments.
What are Kubernetes Services and Ingresses?
In Kubernetes, a Service is a way to expose an application running as one or more Pods in your cluster. The Service is an abstraction to help expose groups of Pods over a network. A selector usually determines which Pods a Service targets.
You can think of a service as a "Kubernetes-native reverse proxy." A reverse proxy takes inbound traffic, looks at some metadata (hostname, path, headers, TCP port), and forwards it to the correct backend instance. Along the way it might load balance, retry, hide the backend's identity, or keep connections warm. It sits out front saying, "Don't worry about finding the servers; talk to me."
A Kubernetes Service behaves the same way, only simplified and embedded into the cluster fabric. A Service gives you a single virtual IP address. In Red Hat OpenShift, it provides a DNS service name. Any traffic that hits that IP is quietly funneled to one of the Pods behind it. The caller doesn't know or care about Pod IP churn because the Service keeps that turbulence out of sight. This is the core of the reverse proxy ethos: a stable façade over mutable internals.
There are several types of Services. The most common is the ClusterIP type, which makes the Service reachable only from within the cluster. Figure 1 shows this process.

This diagram shows a Pod (on the right-hand side) served by an internal ClusterIP Service in green, linked by a selector. Communication from another Pod (called Pod Test) will route via the internal Service to reach the target Pod.
To make the ClusterIP service accessible from outside the cluster, the standard option is to expose it using an Ingress, as shown in Figure 2. (OpenShift extends this concept with Routes, which offer additional enterprise-grade features.)
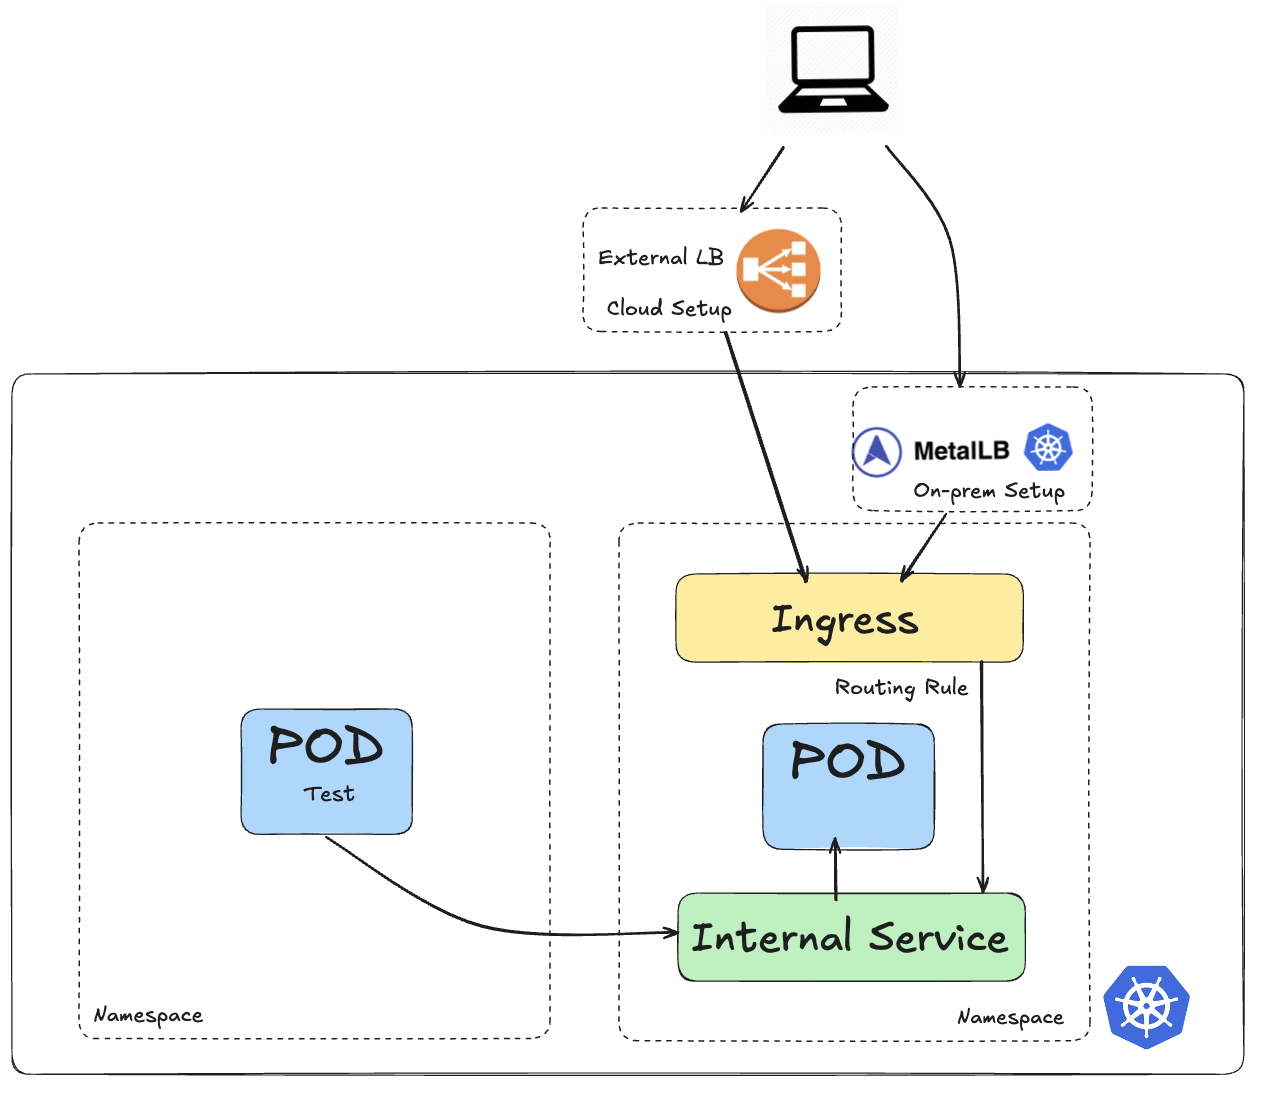
With an Ingress, you create a load balancer that allows external traffic (represented by the computer) to reach the Pod through the Service.
The drawback with an Ingress is that it does not expose arbitrary ports or protocols. Exposing services other than HTTP (TCP:80) and HTTPS (TCP:443) to the internet typically uses a Service of type NodePort or LoadBalancer.
So for nonstandard traffic, the creation of a Service of type LoadBalancer will be used to allow traffic from outside the cluster to reach the Pod(s). This is shown in Figure 3.
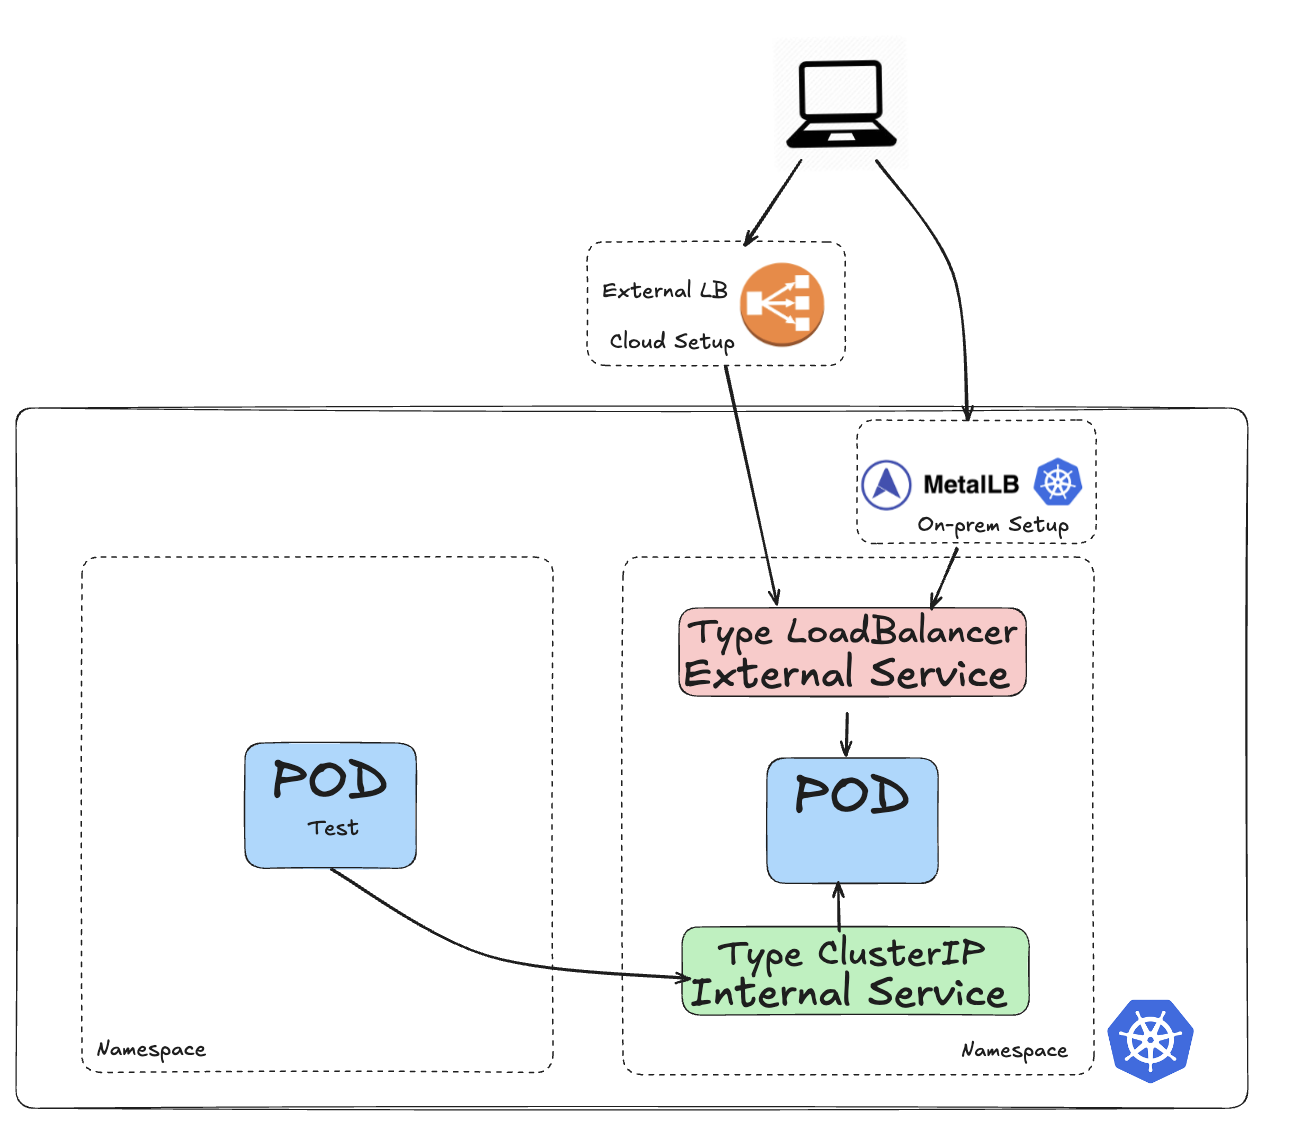
In this diagram, there is a Pod (on the right-hand side) that is serviced by an internal Service (of type ClusterIP) in green as defined by a selector and also by an external Service (of type LoadBalancer) in red also using a selector. The external service is also coupled to a load balancer that can be sitting outside the cluster (typically in cloud providers like AWS, Google or Azure) or inside the cluster (for datacenter deployments).
In the rest of this blog, we will demonstrate how both ClusterIP and LoadBalancer Service types can be used for traffic that does not use TCP:80 and TCP:443, e.g for any other UDP or TCP port or any combination thereof.
A little more about MetalLB
MetalLB appears in the Figure 3 diagram, and it deserves a few more words.
A Kubernetes LoadBalancer Service is the cluster's way of saying, "Give me a stable, externally reachable IP and handle all the messy routing for me." Inside the cluster it behaves like any other Service: a single virtual address that forwards traffic to the matching Pods.
The special bit is what happens outside the cluster. When you create a Service of type LoadBalancer, Kubernetes tells the underlying infrastructure to provision a real, outward-facing load balancer. In cloud environments, this might be an AWS Elastic Load Balancer (ELB), Azure Load Balancer, Google Cloud Platform forwarding rule, or another service.
In cloud platforms, load balancers are conjured by APIs, but in the datacenter, there is no such magic. This is where MetalLB helps; it essentially teaches your cluster to speak the language of real routers, giving LoadBalancer Services first-class treatment without any cloud provider behind them.
The overall setup
In this post, I demonstrate a Pod listening on UDP:5005. The setup for a nonstandard TCP port (that is, other than 80 or 443) follows the same process. See this GitHub repository for more details and examples if you are interested.
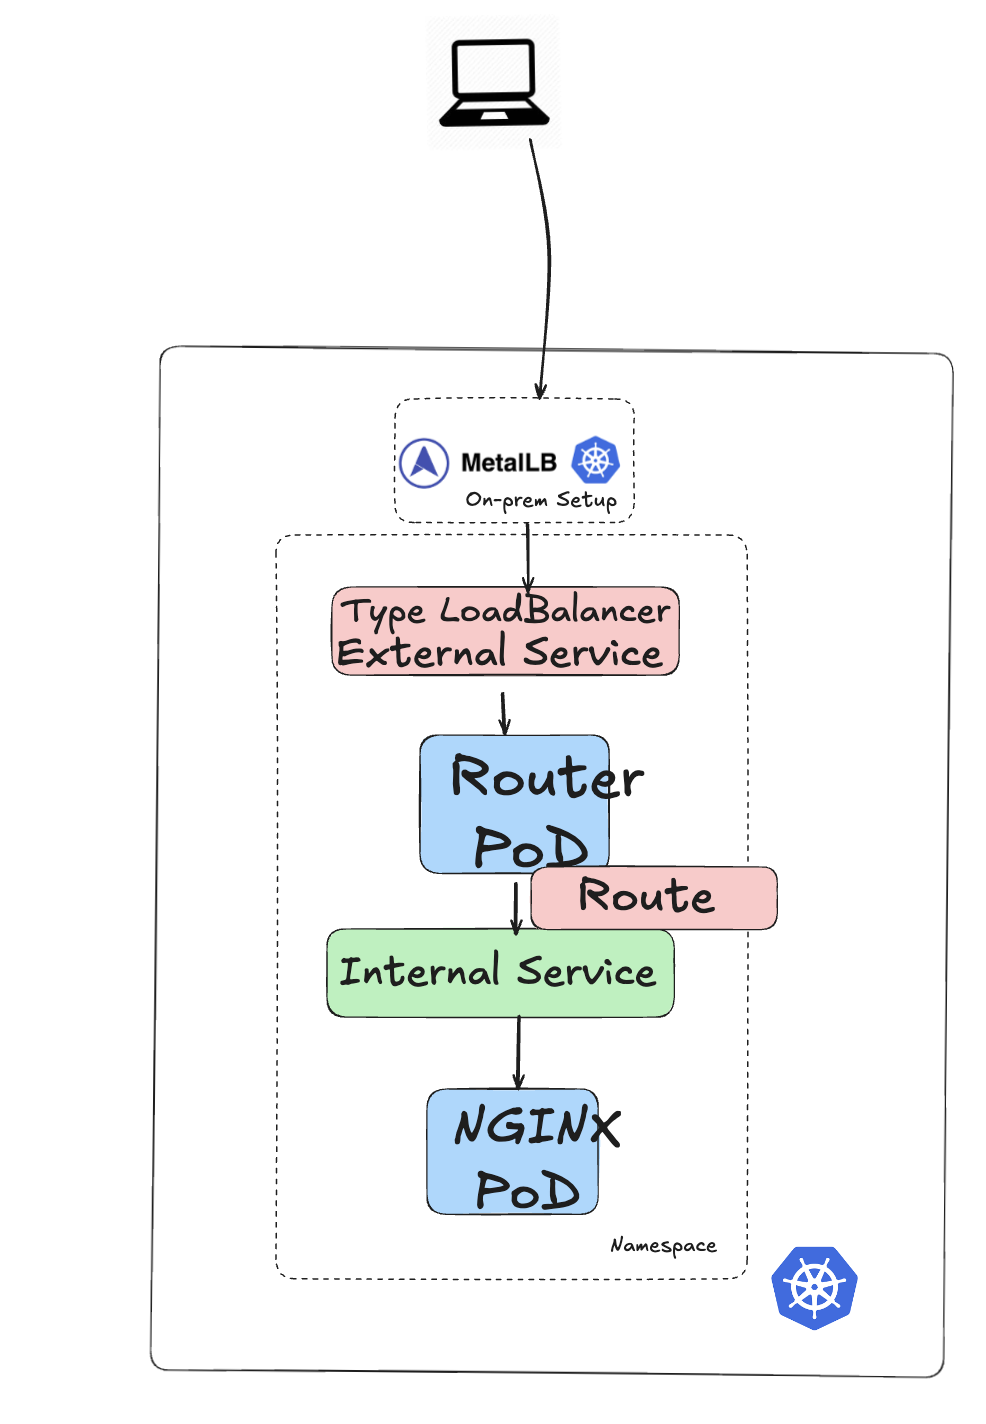
Figure 4 illustrates the architecture for this setup, showing how both the internal and external services connect to the target Pod.
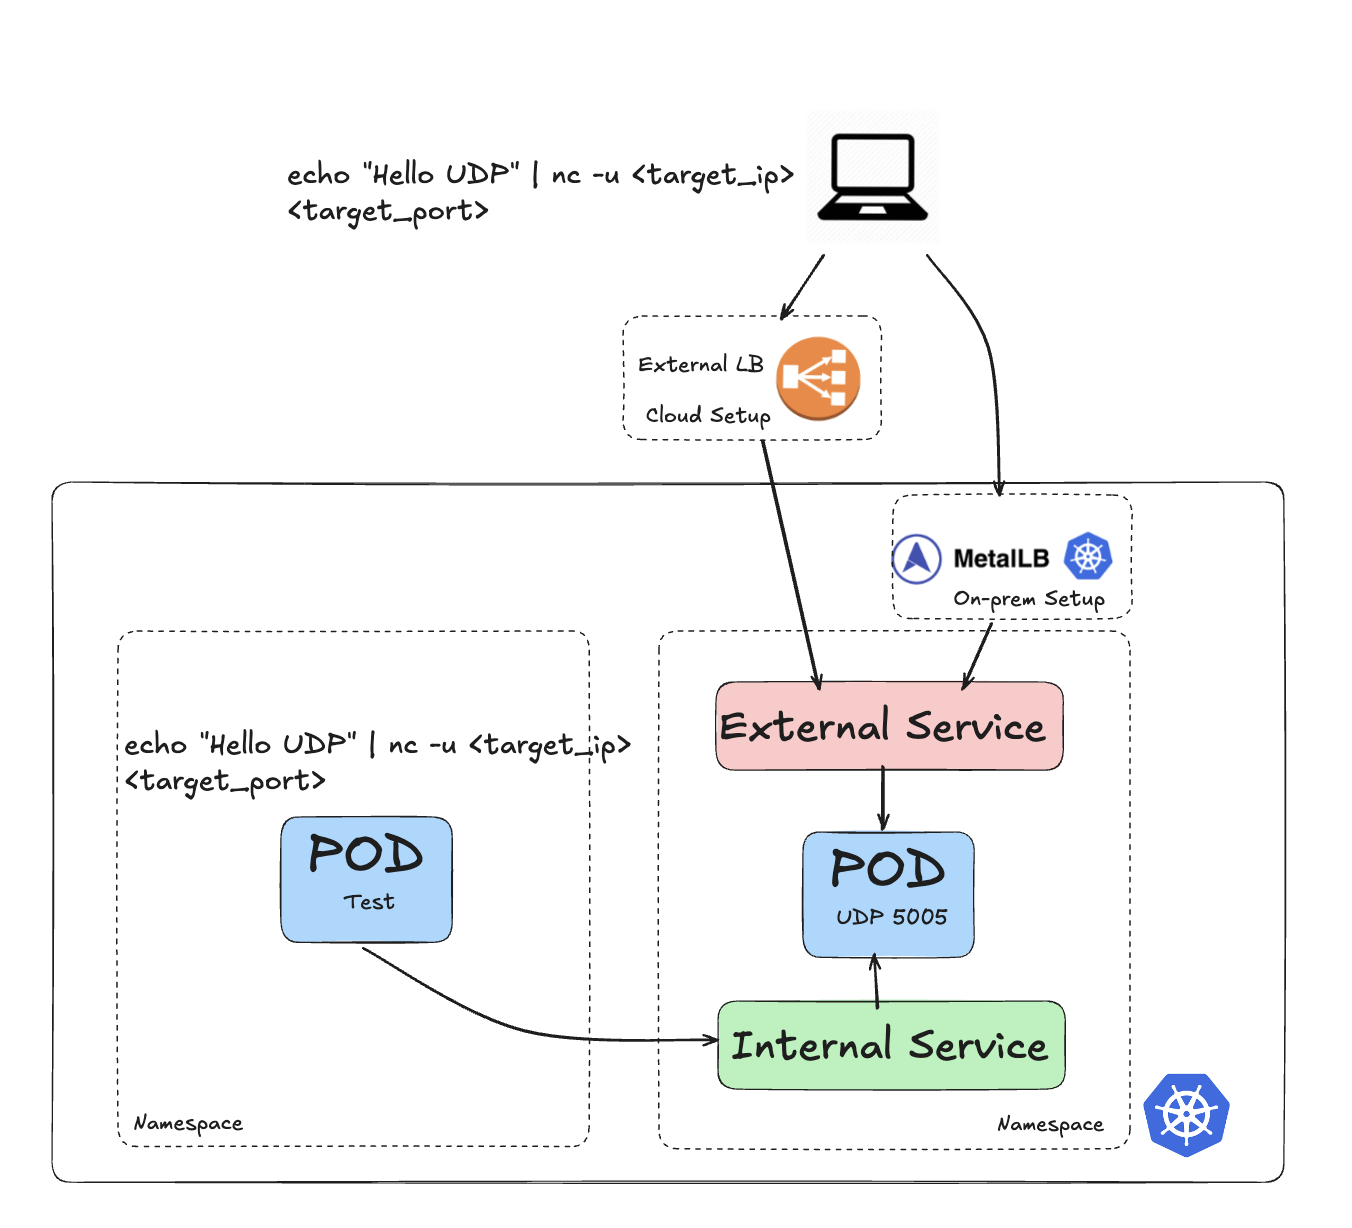
After deploying the udp-pod Pod (see the GitHub repository for the build and deployment), I created two Services:
my-service, an internal Kubernetes Service of typeClusterIP:kind: Service apiVersion: v1 metadata: name: my-service spec: ports: - name: simple-udp protocol: UDP port: 5005 targetPort: 5005 type: ClusterIP selector: app.kubernetes.io/name: kubernetes-services-gitexternal-lb-udp, an external Kubernetes Service of typeLoadBalancer:kind: Service apiVersion: v1 metadata: name: external-lb-udp namespace: metallb-system annotations: ### specific to the Load-balancer used spec: ports: - protocol: UDP port: 5005 targetPort: 5005 type: LoadBalancer selector: app.kubernetes.io/name: kubernetes-services-git
On-premise, colocation, and datacenter deployments
For these deployments, you can use MetalLB to expose the Service, as shown in the external-lb-udp Service annotations.
  annotations:
    MetalLB.universe.tf/address-pool: ip-addresspool-beehive
    metallb.io/ip-allocated-from-pool: ip-addresspool-beehive
You can find more information on the MetalLB setup in the GitHub repository.
Looking at the my-service and external-lb-udp Services, we can see that both are pointing to the udp-pod Pod.
First, let's look at my-service (Figure 5).
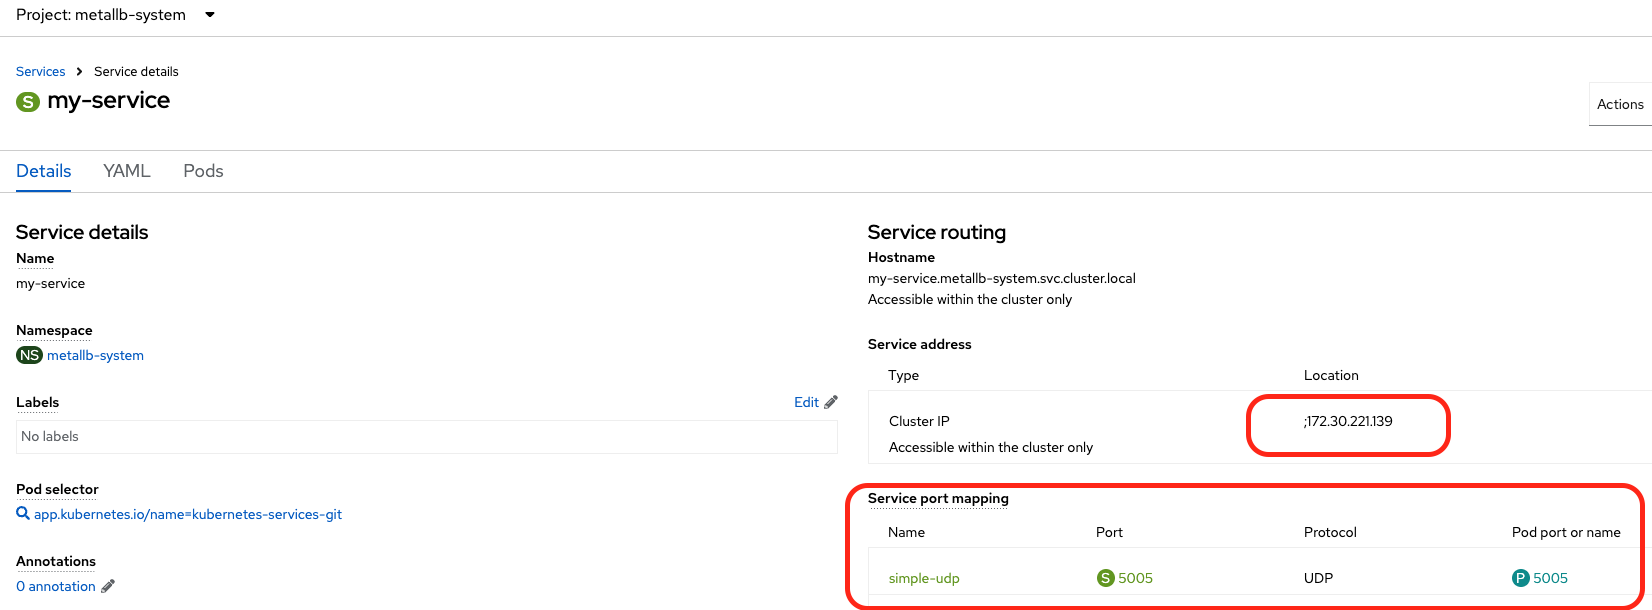
We can see that my-service has an IP address of 172.30.221.139 and is doing a 5005/UDP to 5005/UDP port mapping towards the udp-pod.
And then let's look at external-lb-udp (Figure 6).
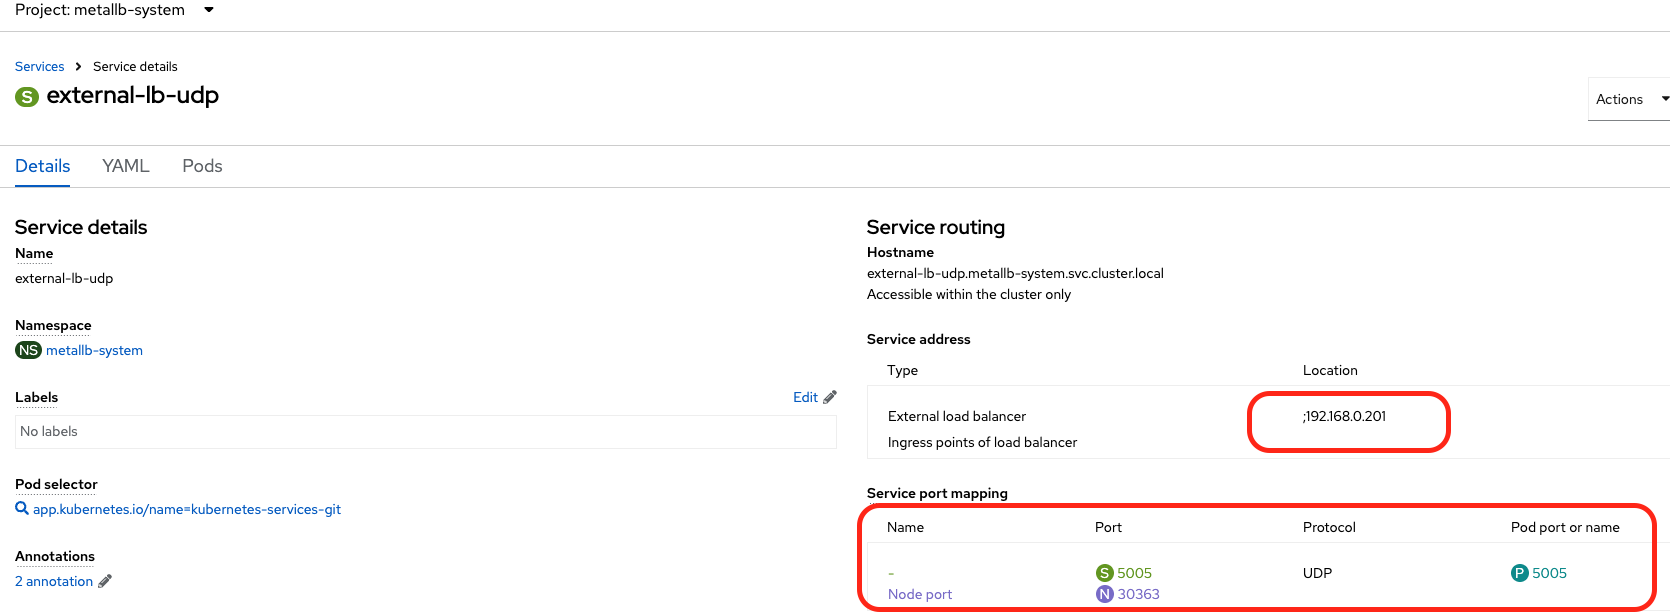
Similarly, we can see that external-lb-udp has an IP address of 192.168.0.201 (the 192.168.0.0/24 is the external network our test system is running on) and is doing a 5005/UDP to 5005/UDP port mapping towards the udp-pod.
Now, we can test access to this udp-pod using the following command:
echo "Message" | nc -u <target_ip> <target_port>
The -u flag for Netcat specifies UDP.
You can run this command either from another Pod, where the traffic will route via the my-service Service, or from your laptop, where the traffic will route via the external-lb-udp Service.
If I generate a command from another Pod within my cluster, I get the following:
Listening on UDP port 5005
b'Hello UDP\n'
b'Hello from outside\n'
b'Hello from rainy Melbourne\n'
b'traffic sent from within the cluster\n'
If I run the command from an external computer, I get the following:
Listening on UDP port 5005
b'Hello UDP\n'
b'Hello from outside\n'
b'Hello from rainy Melbourne\n'
b'traffic sent from within the cluster\n'
b'traffic sent from outside the cluster\n'
We've managed to expose access to the port on the Pod both internally (via a ClusterIP Service type) and externally (via a LoadBalancer Service type).
Cloud deployments
For a cloud-based service, the only difference in the configuration is for the load balancer that sits outside of the cluster (as opposed using MetalLB, where the load balancer sits within the cluster).
Here is external Service YAML definition for a cloud load balancer:
kind: Service
apiVersion: v1
metadata:
  name: external-udp-service
  namespace: simon-udp-app
  annotations:
    service.beta.kubernetes.io/aws-load-balancer-type: nlb
spec:
  ports:
    - name: simple-udp
      protocol: UDP
      port: 5005
      targetPort: 5005
  type: LoadBalancer
  selector:
    app.kubernetes.io/name: kubernetes-services-git
The only difference compared to the Service deployed for the datacenter use case, is the annotations component.
Figure 7 shows the Service after deployment.
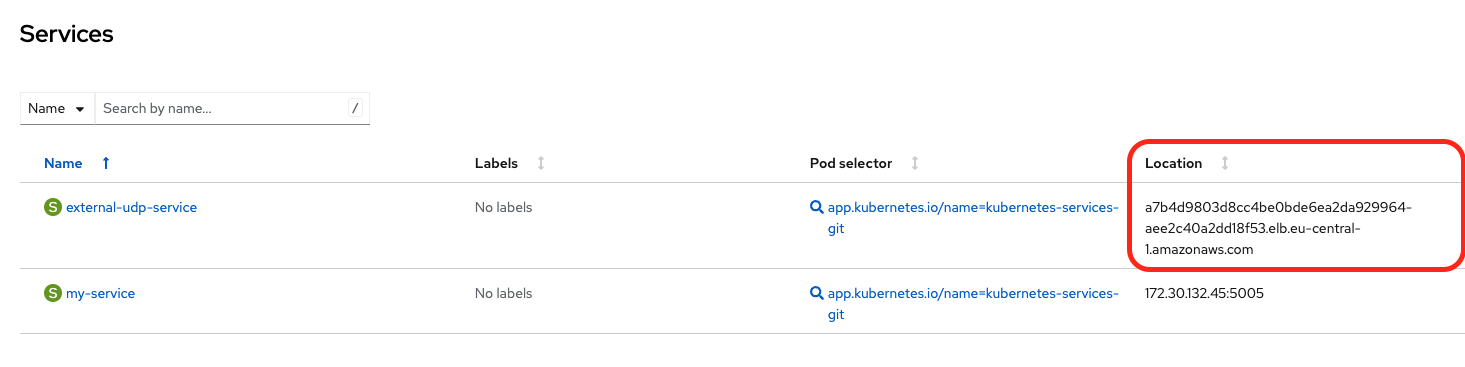
The Location column points to an AWS load balancer.
I can now perform the same test on the external side. Here is the output:
Listening on UDP port 5005
b'external udp on aws\n'
Access to the port on the Pod is now exposed both internally using a ClusterIP Service and externally using a LoadBalancer Service. This requires only minimal configuration changes, such as adding annotations for the external Service.
How about Ingress for on-premise, colocation, and datacenter deployments?
In previous blog posts, I discussed Ingress sharding and creating multiple Ingress controllers to expose various applications.
To demonstrate on-premise support, I added the following IngressController configuration to use MetalLB. This defines the loadBalancer value under endpointPublishingStrategy and includes a routeSelector.
apiVersion: operator.openshift.io/v1
kind: IngressController
metadata:
  name: ingress-metal-lb
  namespace: openshift-ingress-operator
spec:
  nodePlacement:
    nodeSelector:
      matchLabels:
        node-role.kubernetes.io/worker: ''
  domain: apps.metal-lb.melbourneopenshift.com
  routeSelector:
    matchLabels:
      type: externalapplications
  endpointPublishingStrategy:
    loadBalancer:
      scope: External
    type: LoadBalancerService
Figure 8 provides a simplified view of the cluster architecture.
The ingress-metal-lb Ingress controller runs on top of the default controller. It uses a specific Pod called router-ingress-metal-lb-c97d8589f-h2cbv.
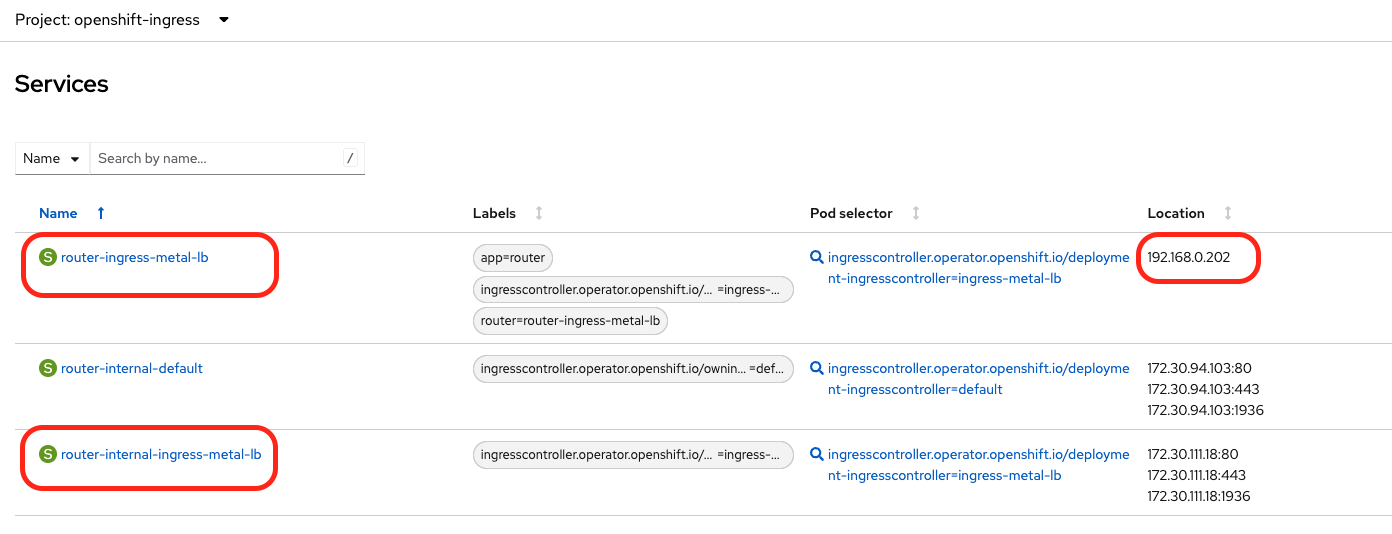
The router-ingress-metal-lb-c97d8589f-h2cbv Pod is targeted by two services: an internal router-internal-ingress-metal-lb and an external router-ingress-metal-lb. Note that the external service uses the IP address 192.168.0.202 from the MetalLB address pool (Figure 9).
Now if we deploy a simple NGINX Pod with a Service on port 80 and expose it via a route that is mapped to the ingress-metal-lb controller, we have the following:
- A
ClusterIPService callednginx-servicewith an IP address of172.30.33.141pointing to a Pod callednginxon TCP port 80 (http). - A route with the
type: externalapplicationslabel to make sure it goes through theingress-metal-lbcontroller we created earlier.
kind: Route
apiVersion: route.openshift.io/v1
metadata:
name: external-app
namespace: metallb-system
uid: b07f8645-cd92-4da3-a19c-8fe197ab6e3a
resourceVersion: '2375797'
creationTimestamp: '2025-11-17T04:36:49Z'
labels:
type: externalapplications
managedFields: ...
spec:
host: external-app.apps.metal-lb.melbourneopenshift.com
to:
kind: Service
name: nginx-service
weight: 100
port:
targetPort: 80
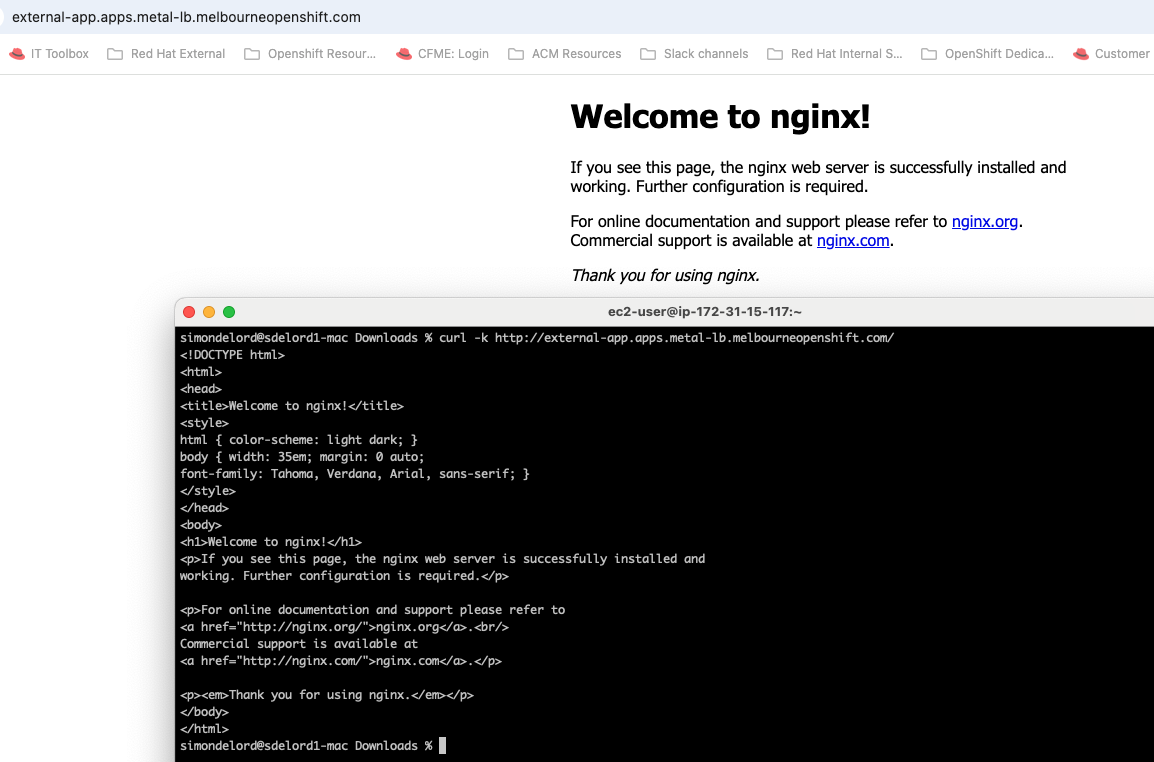
wildcardPolicy: NoneYou can then access the newly created external route using a web browser or curl call. For example: http://external-app.apps.metal-lb.melbourneopenshift.com. See Figure 10.
Conclusion
In this blog, I explained how to configure and expose Kubernetes Services using ports other than the standard TCP/80 (HTTP) and TCP/443 (HTTPS) ports.
The process for setting up and exposing those Services requires minimal configuration changes (typically only modifying the annotations for the external Service), regardless of whether the Kubernetes environment is in a datacenter or in the cloud.
Thanks to Shane Boulden, Derek Waters, and Kiran Patel for their thorough review and feedback.
Last updated: February 23, 2026