Simple Linux Utility for Resource Management (Slurm) is a widely adopted open source workload manager used in high-performance computing (HPC) environments. It provides job scheduling, resource allocation, and distributed orchestration across cluster nodes. As organizations modernize infrastructure using Kubernetes and Red Hat OpenShift, there is increasing demand to run traditional HPC workloads inside containerized platforms. Running Slurm on OpenShift enables teams to combine Slurm’s mature scheduling model with Kubernetes-native scalability and automation. This article demonstrates how to deploy Slurm on OpenShift using the Slinky operator. We will install the operator, configure authentication, deploy the controller and compute resources, and verify a working Slurm cluster running inside OpenShift.
What is Slinky?
Slinky is a collection of tools that enables Slurm to operate inside Kubernetes environments such as OpenShift. It bridges traditional HPC scheduling with modern cloud-native platforms, allowing organizations to run Slurm workloads as containers. At a high level, Slinky packages Slurm components as container images and provides a Kubernetes operator to manage them. The operator automates deployment, scaling, and lifecycle management of Slurm components inside the cluster.
Slinky includes:
- A Slurm operator that deploys and manages Slurm clusters.
- Containerized Slurm daemons such as
slurmctldandslurmd. - Optional integration mechanisms that allow Slurm and Kubernetes scheduling to coexist.
By running Slurm inside OpenShift, you preserve familiar tools like sbatch, squeue, and scontrol, while leveraging OpenShift’s networking, security, and scaling capabilities.
Slinky makes it possible to bring Slurm jobs into your OpenShift infrastructure, so you can run jobs that behave like they would on an HPC cluster but inside a Kubernetes environment. Slinky brings together Slurm and Kubernetes into a unified platform.
Why run Slurm on OpenShift?
Running Slurm on OpenShift enables organizations to integrate traditional HPC workloads into containerized infrastructure without redesigning scheduling workflows. This is particularly valuable in environments where cloud-native services and batch-oriented workloads must coexist within the same platform.
By leveraging Kubernetes for container orchestration and Slurm for workload scheduling, teams can separate infrastructure concerns from job management concerns. Kubernetes manages pod lifecycle, networking, and scaling, while Slurm continues to handle queueing, prioritization, and resource allocation policies. This integration is especially relevant for AI and machine learning pipelines, research computing platforms, and hybrid cloud deployments where containerized environments are standard but established HPC tooling remains essential.
Slurm architecture on OpenShift
Before deploying Slurm on OpenShift, it is important to understand how the Slinky operator maps traditional Slurm components into Kubernetes-native resources. Instead of managing bare-metal nodes directly, the operator defines Slurm components using Kubernetes custom resource definitions (CRDs), which are reconciled into pods and services inside the cluster.
In this model, the Slurm controller (slurmctld) runs as a managed pod, while compute daemons (slurmd) are deployed as scalable pods defined by a NodeSet custom resource. Kubernetes handles container scheduling, networking, and lifecycle management, while Slurm continues to manage job queues, resource allocation, and workload scheduling semantics. This separation of responsibilities allows existing HPC workflows to run without modification while benefiting from Kubernetes orchestration and automation.
The OpenShift cluster
The entire setup runs inside a single OpenShift cluster, which provides worker nodes (physical or virtual machines), pod scheduling and isolation, and namespace-based separation of concerns. This makes it straightforward to run Slurm alongside other containerized workloads without interference.
Namespace: slinky
The slinky namespace hosts the Slurm operator, which is the control plane component responsible for managing the Slurm cluster. The operator installs Slurm-related custom resource definitions (CRDs) such as NodeSet, watches and reconciles Slurm custom resources created in the slurm namespace, and manages the full lifecycle of Slurm components, including the controller and compute pods. The Slurm operator does not run Slurm workloads itself; it acts solely as a controller that manages resources in other namespaces.
Namespace: slurm
The slurm namespace contains all runtime Slurm components. The Slurm controller pod runs slurmctld inside a container, acting as the central scheduler. It receives user job submissions via sbatch and srun commands, decides where jobs run based on available compute nodes, and coordinates distributed jobs across multiple compute pods.
The NodeSet is a custom resource defined in the slurm namespace that represents a group of Slurm compute nodes. The Slurm operator watches the NodeSet and creates the required number of slurmd pods, scaling them up or down as needed. It is important to note that NodeSet is not a Kubernetes worker node; it is a controller-level abstraction that manages slurmd pods.
OpenShift worker nodes and Slurm compute pods
Each OpenShift worker node represents a physical or virtual machine in the cluster. Inside worker nodes, Slurm compute pods run with each pod executing one slurmd daemon, meaning one slurmd pod is equivalent to one Slurm compute node. These pods execute the job tasks assigned by slurmctld. In a typical deployment, Worker Node A might host one slurmd pod, Worker Node B might host two slurmd pods sharing the same hardware, and Worker Node C might host one slurmd pod.
When multiple slurmd pods run on the same worker node, they share the underlying CPU, memory, GPU, and network resources. From Slurm's perspective these appear as separate compute nodes, while from Kubernetes' perspective they are simply multiple pods on the same node. This advanced configuration requires careful CPU and memory requests and limits, optional CPU pinning or GPU allocation, and awareness that hardware contention can occur when pods compete for resources.
Slurm also supports distributed multi-node jobs in this architecture. A single Slurm job can be allocated multiple compute nodes on different worker nodes, and slurmctld coordinates execution across all assigned slurmd pods as the tasks communicate over the network. For example, a distributed job may run across slurm compute pod 0 on Worker Node A and slurm compute pod 3 on Worker Node C as well.
Figure 1 illustrates the high-level architecture of Slurm running inside an OpenShift cluster using the Slinky operator.

Running Slurm inside OpenShift begins with installing the Slinky operator, which manages the lifecycle of Slurm resources within the cluster.
Install Slurm
You can install Slurm on OpenShift in two ways: through the OpenShift web console for a guided, UI-driven experience, or through the terminal using a Helm-based CLI deployment. The web console approach is ideal if you want a straightforward install without scripting. The terminal approach is better suited for repeatability, automation, or keeping your configuration in version control. Both methods produce the same result: a Slurm cluster with a controller and NodeSet in the slurm namespace, differing only in how you create and update resources.
Option 1: OpenShift web console
The web console provides a guided installation experience through the OpenShift OperatorHub. Before starting, ensure you have admin access to an OpenShift cluster and installed cert-manager (required for TLS certificate management between Slurm components). You can install cert-manager through the Software Catalog in the same way as the Slurm operator.
Install the Slurm operator via OperatorHub
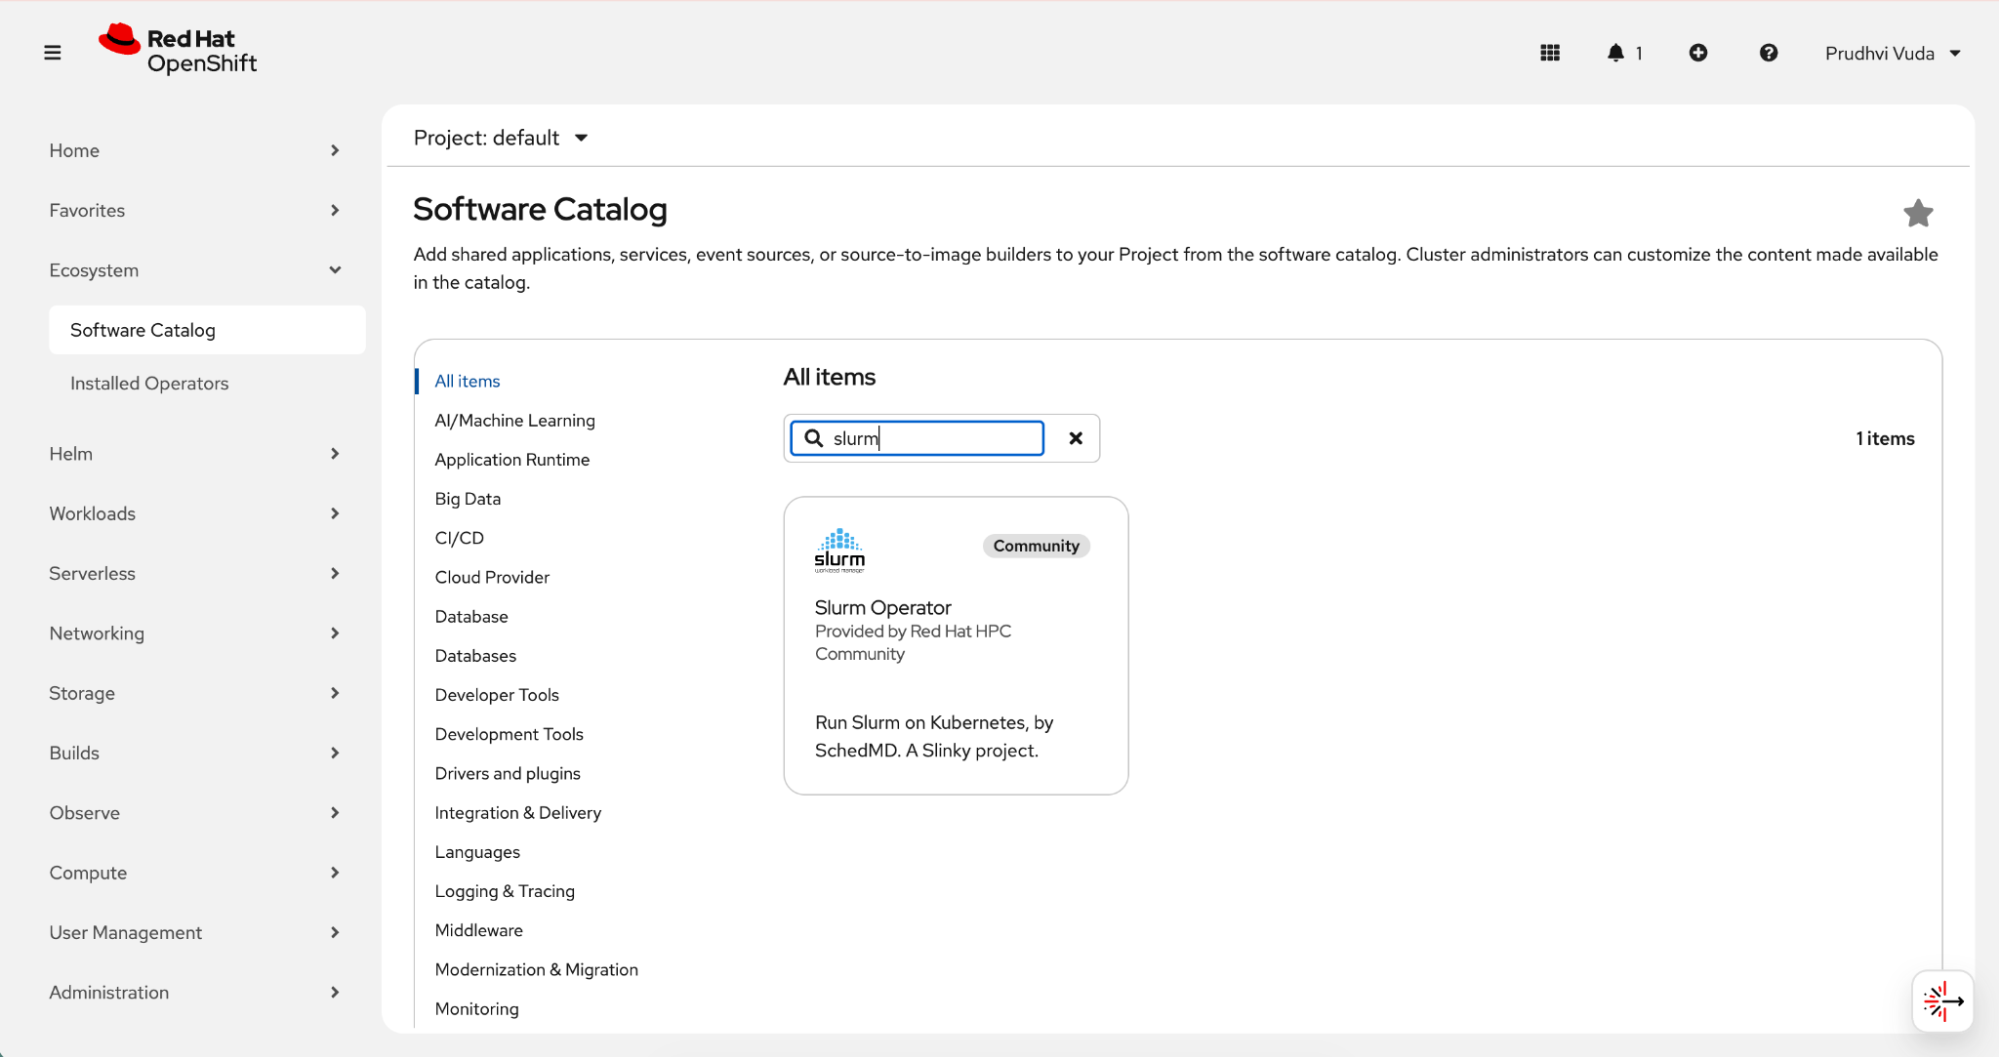
The first step is to locate the Slurm operator in the OpenShift Software Catalog. Navigate to Ecosystem → Software Catalog and search for "slinky" or "slurm." You should see the Slurm Operator card provided by the Red Hat HPC community.
Figure 2 shows the Slurm operator available in the OpenShift Software Catalog before installation.
Click the Slurm operator card and then click the Install button.
Configure the installation with the following settings:
- Set the installation mode to: "A specific namespace on the cluster"
- Set the installed Namespace to "Create new namespace" and name it "slinky"
- Select the latest available update channel (such as "stable" or "alpha")
- Choose Automatic as the Approval strategy
Click Install and wait for the status to show "Succeeded."
Once installed, you should verify that the operator is running correctly before proceeding.
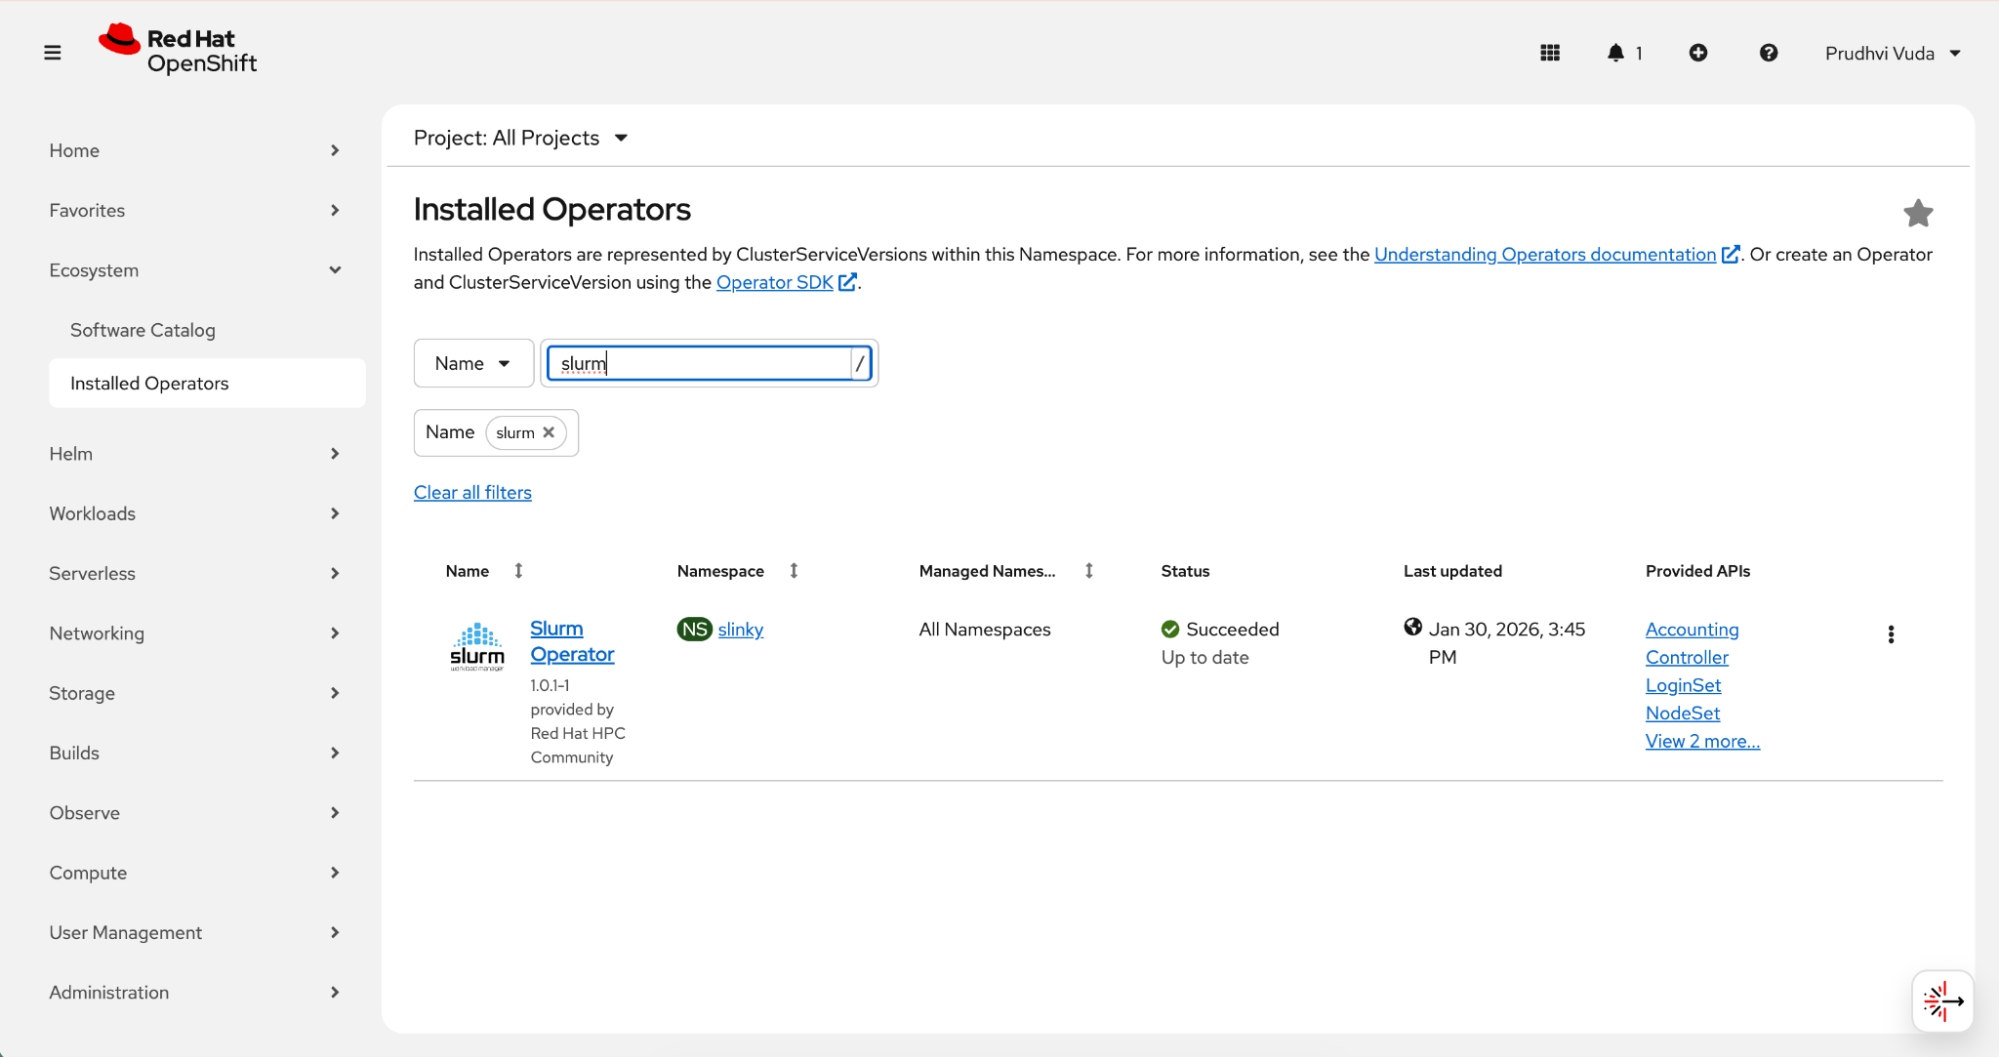
Navigate to Ecosystem → Installed Operators, filter by the slinky namespace, and confirm that the Slurm Operator shows a "Succeeded" status.
Figure 3 shows the slurm-operator pod running in the slinky namespace.
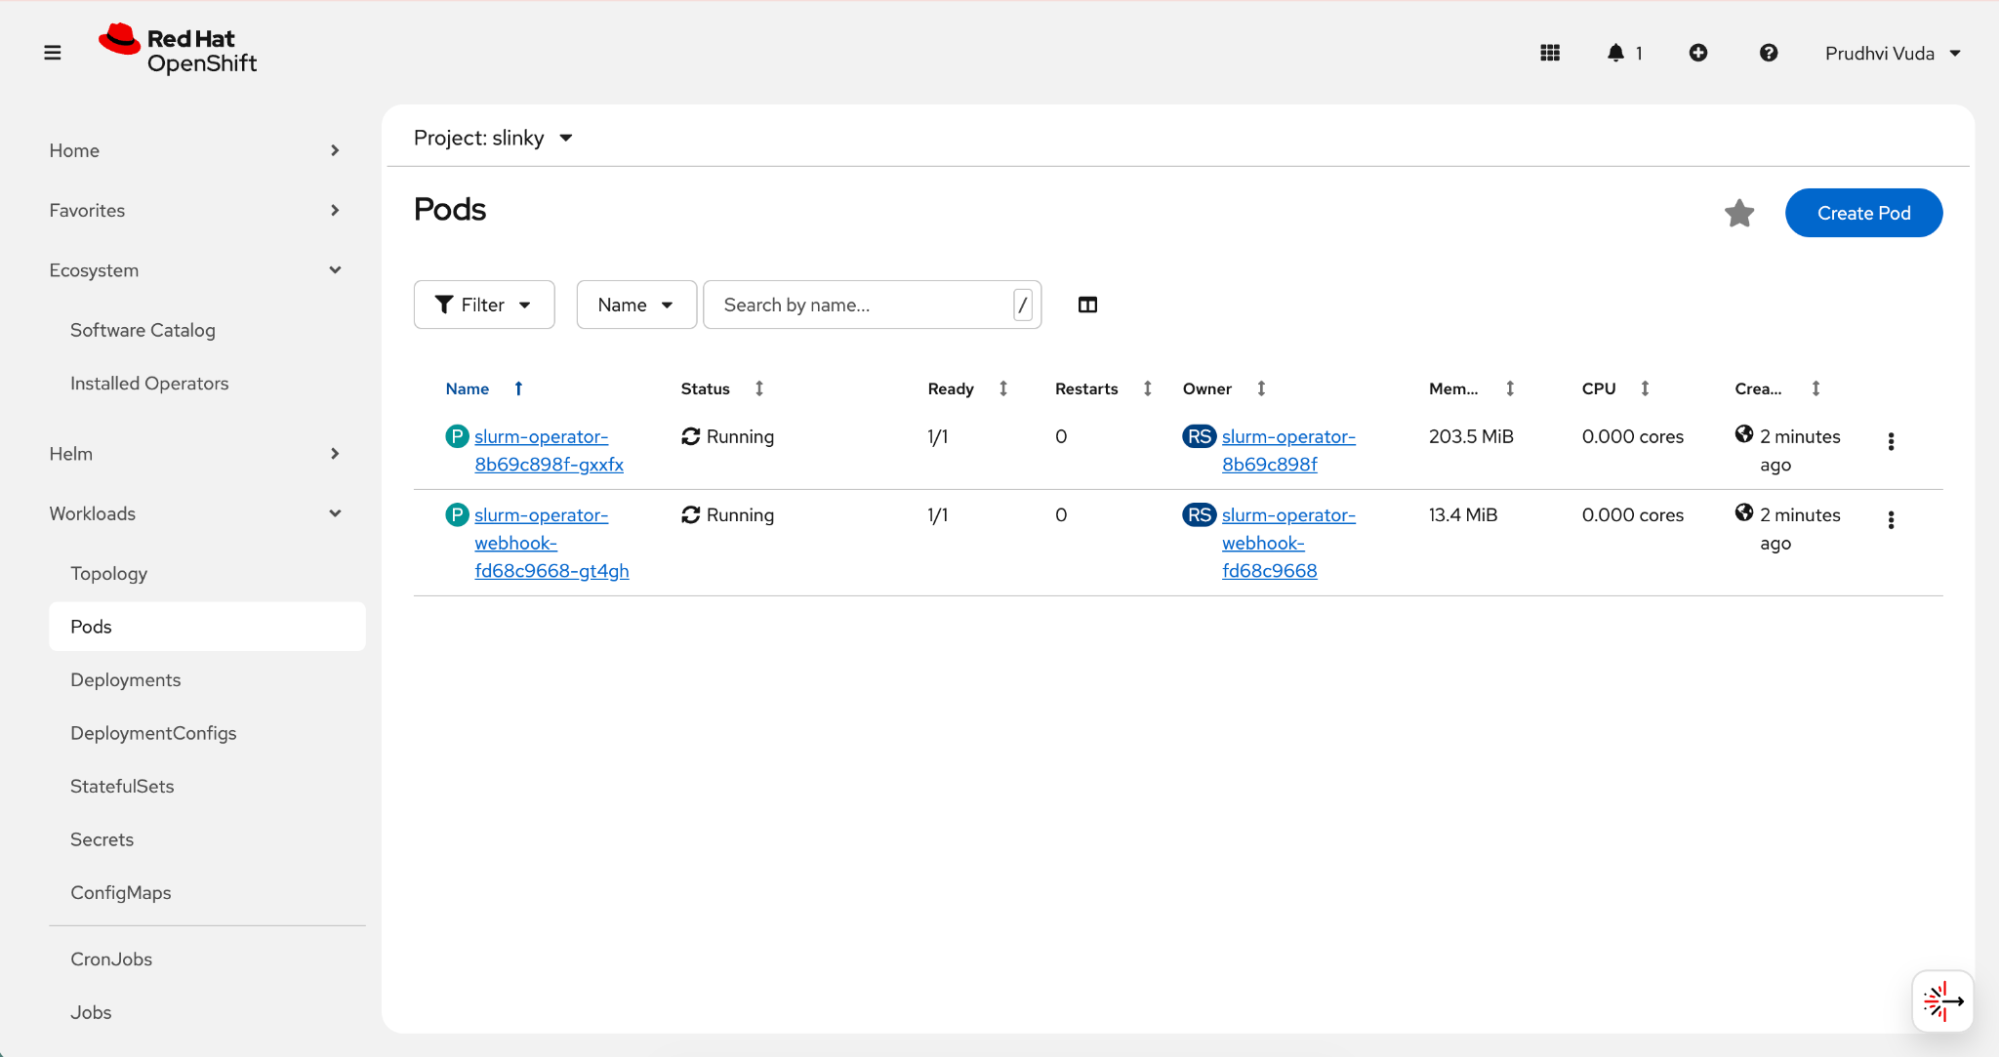
You can also verify at the pod level by going to Workloads → Pods and filtering by the slinky namespace. You should see the slurm-operator-xxx pod in a running state.
Figure 4 shows Slurm operator pods in the workloads view running under the slinky namespace.
The operator pattern ensures the desired cluster state is continuously reconciled. This means that if a Slurm component pod fails or configuration drifts, the operator automatically restores it to the declared state. This reduces manual cluster management compared to traditional Slurm deployments.
Deploy the Slurm cluster
Now that we've installed the operator, we can deploy a Slurm cluster. The deployment process follows a specific order like namespace creation, secret configuration, controller deployment, and finally NodeSet creation because each step depends on the completion of the previous one.
Do not use the Create Deployment page because it only accepts standard deployment resources. Instead, use the operator UI's Create Controller and Create NodeSet options designed specifically for managing Slurm cluster lifecycle through the operator.
Create the namespace and configure security: Start by creating the slurm namespace where the runtime components will live. Navigate to Home → Projects, click Create Project, enter
slurmas the name, and click Create. After the project is created, you need to grant the anyuid Security Context Constraint to allow Slurm pods to run with their required UID.Run the following command from a terminal:
oc adm policy add-scc-to-user anyuid -z default -n slurm
Slurm components require secure authentication between the controller and compute nodes. Before creating cluster resources, you must configure the necessary secrets. The controller requires JWT and Slurm keys. Create them before creating the controller. Use the operator default secret names and key names so the operator UI template works without editing secret references.
Create the required secrets: Slurm uses shared authentication keys to establish trust between the controller and compute daemons. In a Kubernetes environment, these credentials are stored as secrets and mounted into the relevant pods. Creating these secrets before deploying cluster resources ensures that authentication succeeds during initialization.
The Slurm controller requires two authentication secrets, you must create a JWT key and a Slurm key before deploying the controller. Using the operator default secret names ensures the operator UI template works without requiring you to edit secret references manually.
Go to Workloads → Secrets in the slurm namespace and create the two secrets as follows.
For the first secret, click Create → Key/value secret, name it
slurm-auth-jwths256, add a key namedjwt_hs256.key, and set its value to a random base64 string (for example, generated withopenssl rand -base64 32).For the second secret, click Create → Key/value secret, name it
slurm-auth-slurm, add a key namedslurm.key, and set its value to another random base64 string.
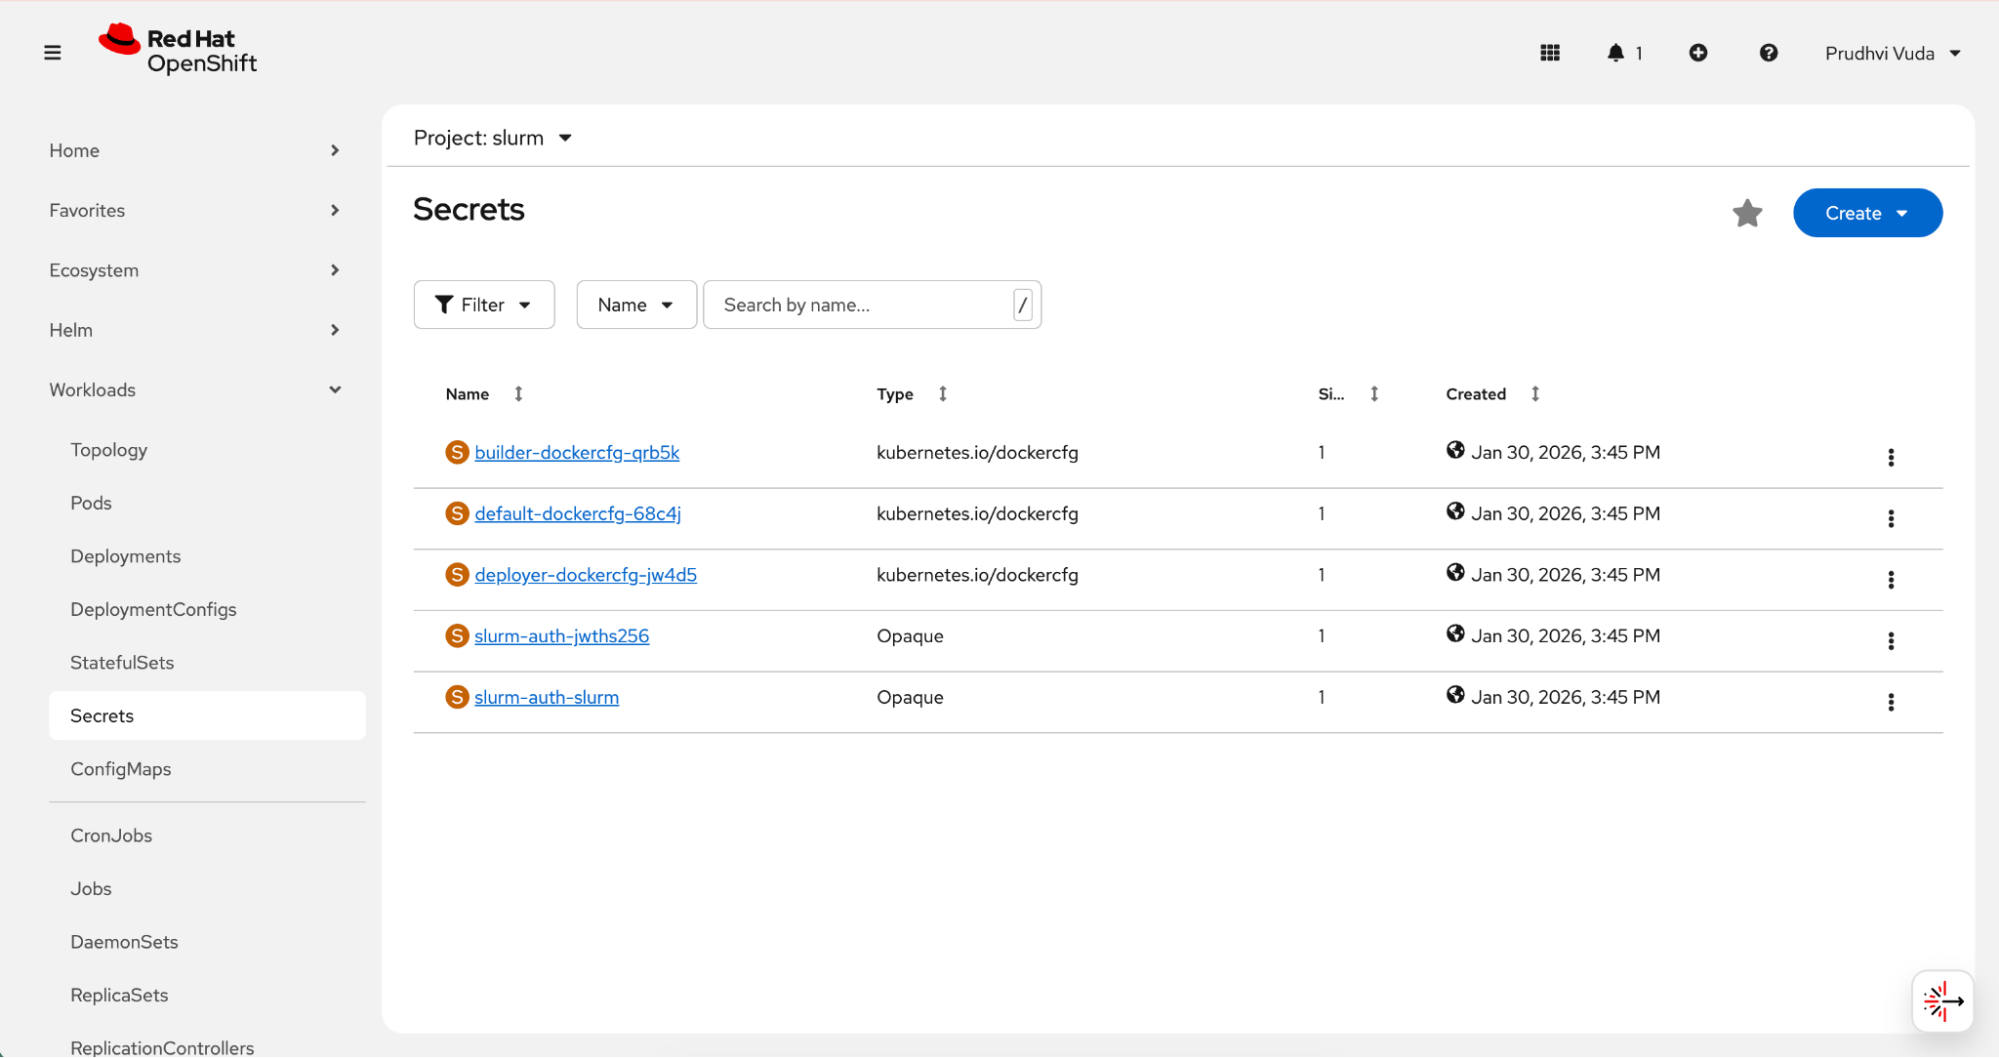
After creating the authentication secrets, you should see them listed as shown in Figure 5.
With authentication configured, you can now deploy the Slurm controller, which manages scheduling and cluster state.
Create the controller: With the secrets in place, you can now create the Slurm controller, which acts as the central job scheduler. Navigate to Ecosystem → Installed Operators, filter by namespace, and click on the Slurm Operator.
Look for the controller resource type in the Provided APIs section and click it. If you see an All instances tab, click it and then click + Create.
On the Create Controller page, select the YAML view and modify the default template with your controller configuration, specifying the secret references, container images, resource requests and limits, and any extra Slurm configuration.
Once you've created the controller custom resource, it appears as shown in Figure 6.
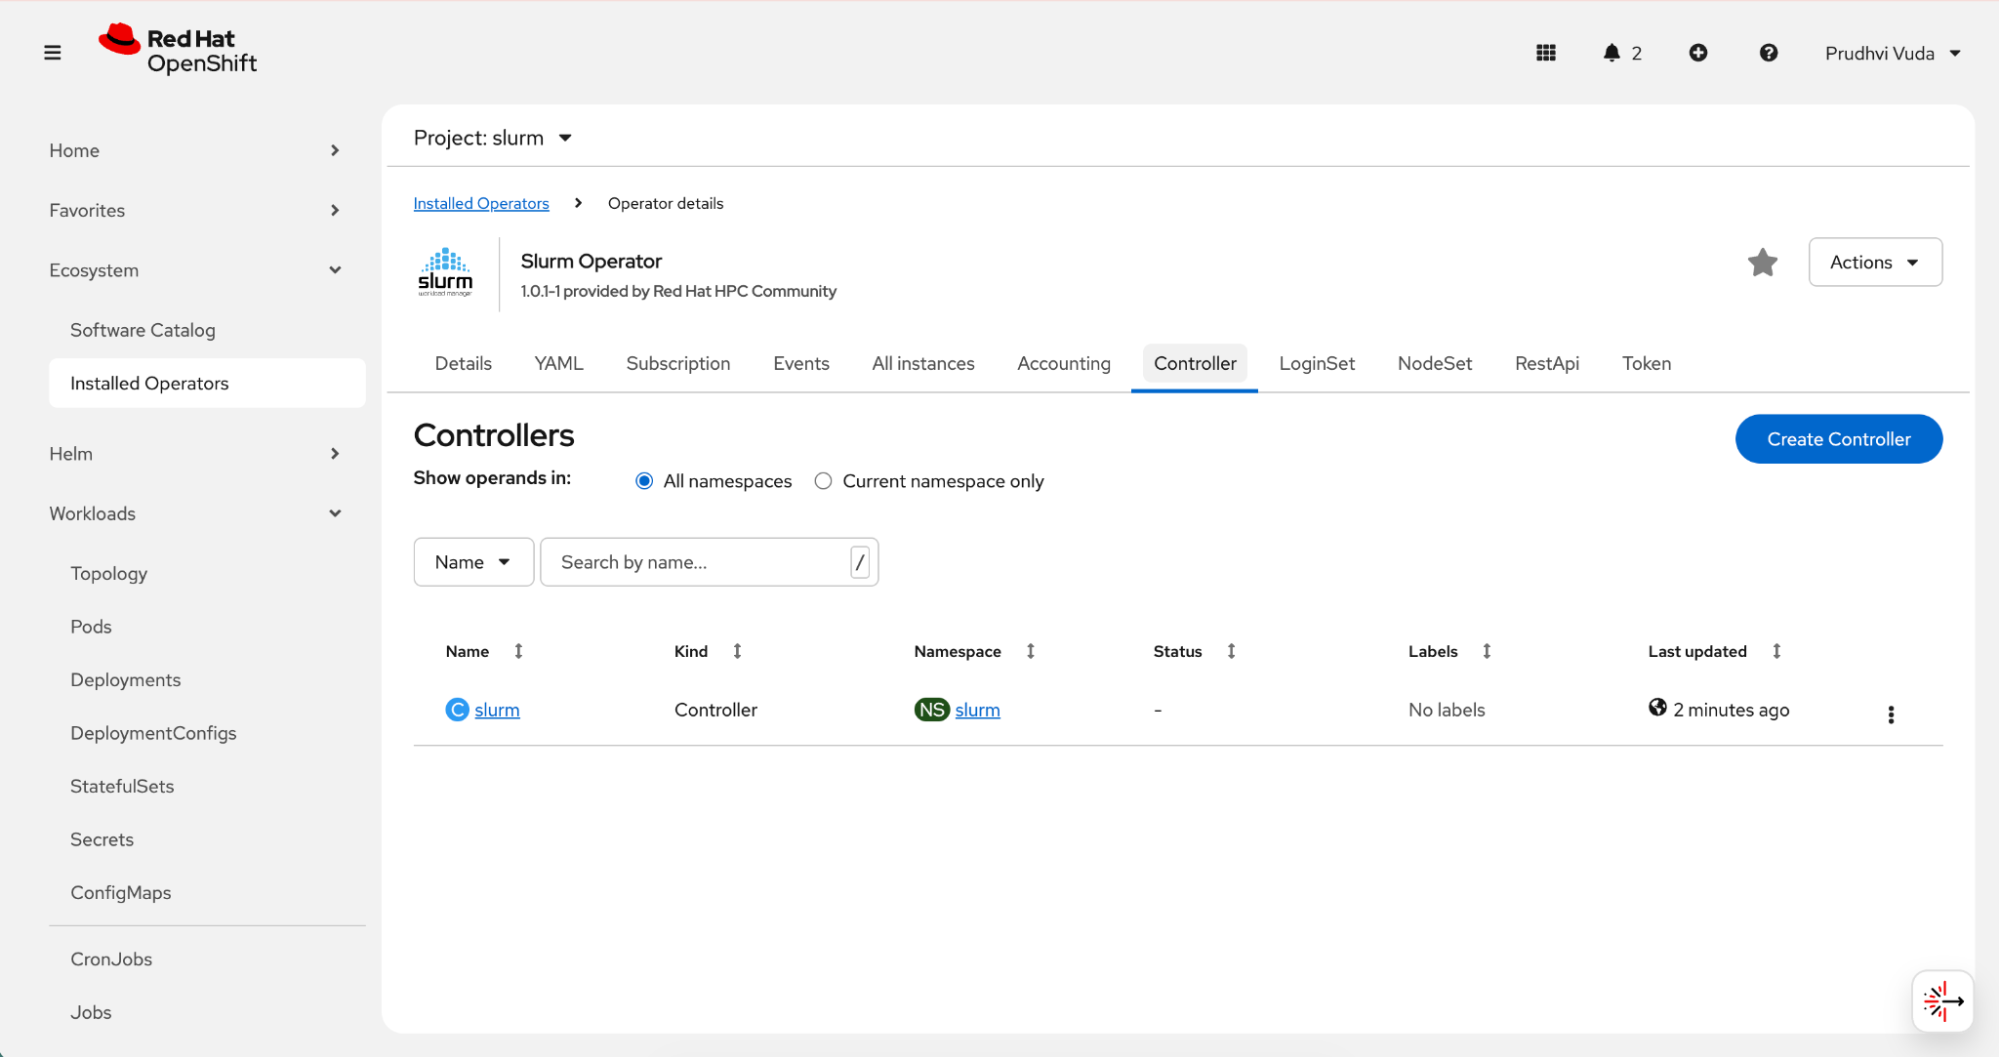
After deploying the controller, define the compute resources that will execute scheduled jobs by creating a NodeSet custom resource.
Because the controller maintains cluster state and scheduling decisions, it should be deployed with appropriate resource requests and limits in production environments. While this example uses a single replica for simplicity, high-availability configurations may require additional architectural considerations.
Create the NodeSet: After the controller is running and ready, you can create the NodeSet, which defines the compute nodes of the cluster. You must specify resources in NodeSet under spec.slurmd.resources, not directly under spec.resources.
Navigate back to the Slurm operator in Installed Operators, find the NodeSet resource type, and click Create NodeSet.
Select the YAML view and modify the default template with your nodeset configuration, specifying the number of replicas and resource limits for each compute pod.
After defining compute replicas, the NodeSet resource appears as shown in Figure 7.
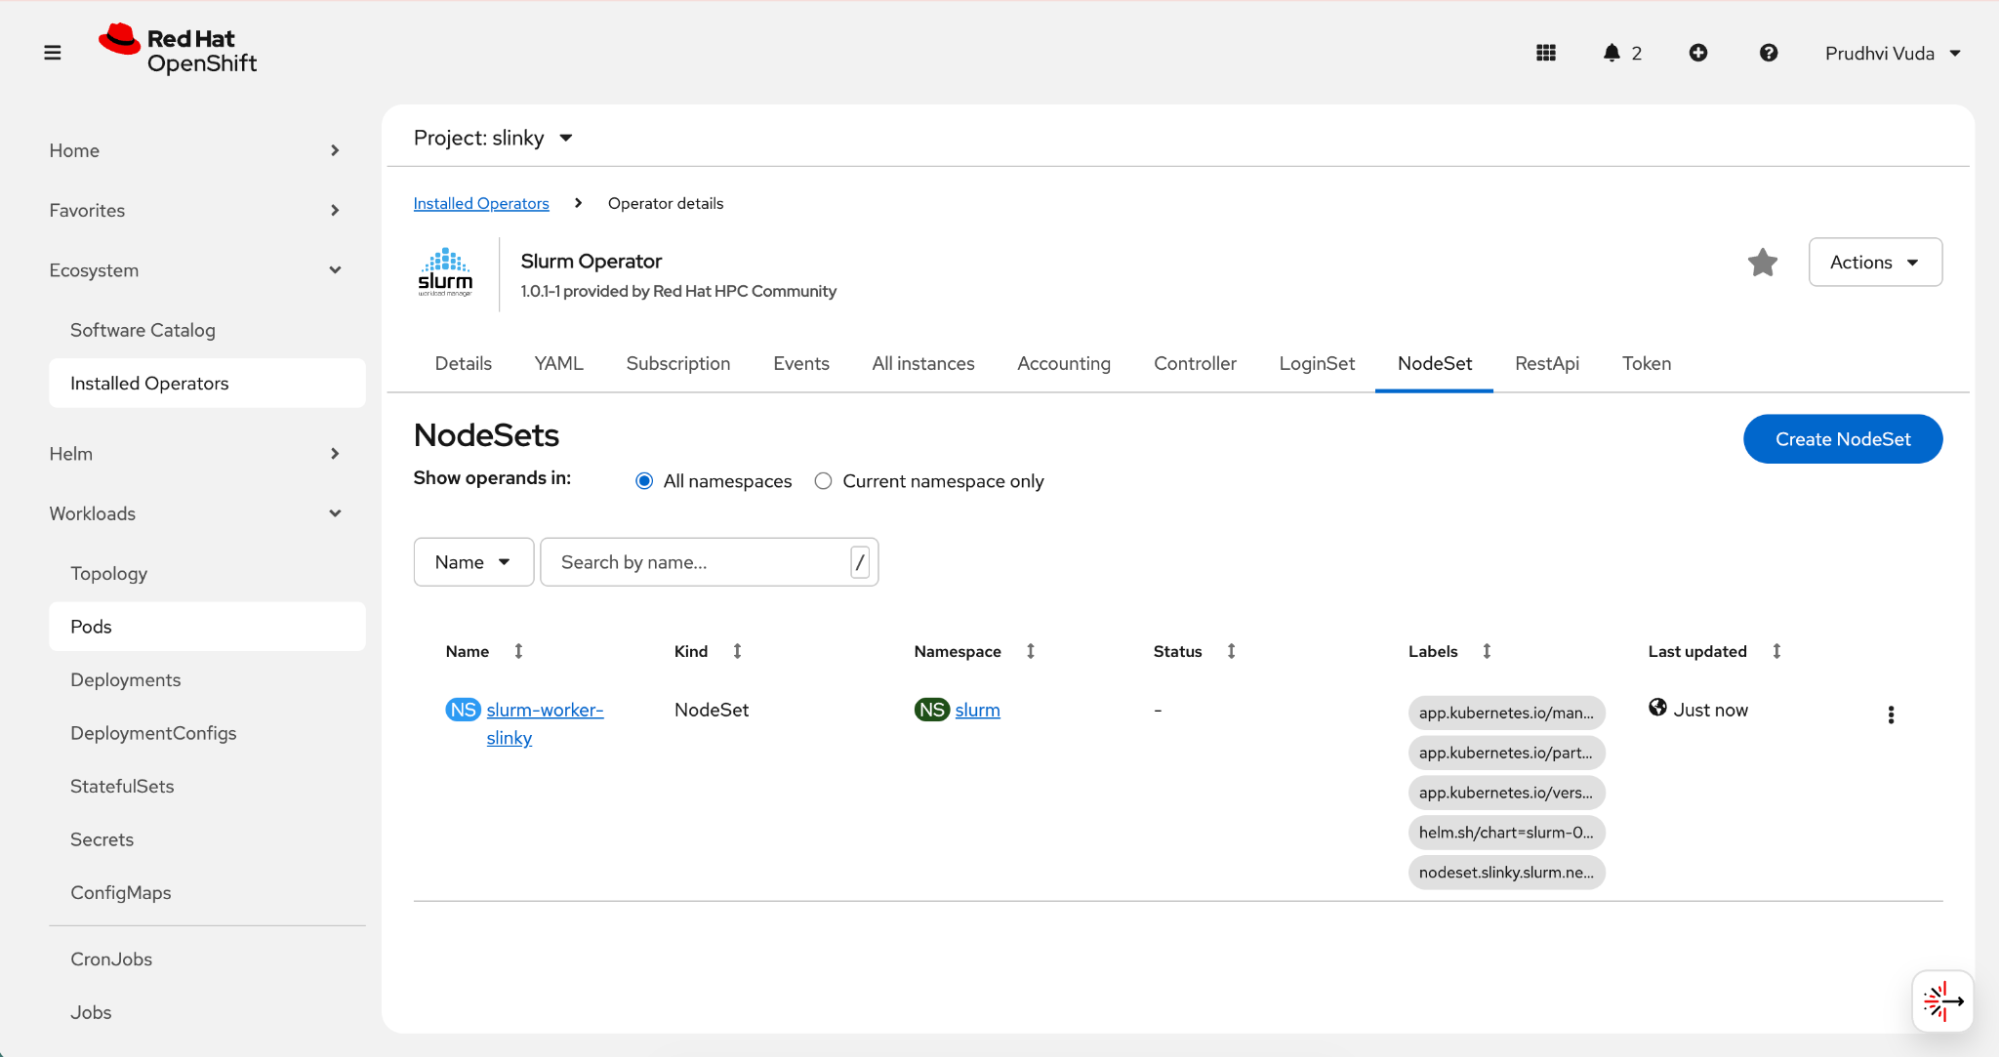
Each NodeSet replica corresponds to a slurmd daemon running inside a pod. From Slurm’s perspective, these pods behave as compute nodes. From a Kubernetes’ perspective, they are standard workloads subject to scheduling policies, resource quotas, and node constraints. This dual abstraction enables administrators to control infrastructure at the Kubernetes layer while preserving Slurm-level job scheduling behavior.
Option 2: Terminal or CLI deployment
The Helm-based CLI deployment is the recommended approach for repeatable, automated, or Git-managed installations. Before starting, ensure that cert-manager is installed for TLS certificate management and that you have the oc CLI logged into the cluster and Helm v3.x installed.
Step 1: Install the slurm-operator and its CRDs
Enter the following to install the slurm-operator and its CRDs.
# Install CRDs
helm install slurm-operator-crds \ oci://ghcr.io/slinkyproject/charts/slurm-operator-crds \
  --namespace slinky --create-namespace --server-side=false
# Install the Operator
helm install slurm-operator \
  oci://ghcr.io/slinkyproject/charts/slurm-operator \
  --namespace slinky --wait
Step 2: Configure security and secrets
Slurm requires specific UIDs (typically 401) and shared keys for authentication.
Prepare the namespace as follows:
oc create namespace slurm
oc adm policy add-scc-to-user anyuid -z default -n slurm
Create the authentication secrets by generating random base64 strings for jwt-hs256-key and slurm-key, then create the secret as follows.
JWT_KEY=$(openssl rand -base64 32)
SLURM_KEY=$(openssl rand -base64 32)
oc create secret generic slurm-auth-jwths256 -n slurm \
  --from-literal=jwt_hs256.key="$JWT_KEY" \
  --dry-run=client -o yaml | oc apply -f -
oc create secret generic slurm-auth-slurm -n slurm \
  --from-literal=slurm.key="$SLURM_KEY" \
  --dry-run=client -o yaml | oc apply -f -
Step 3: Deploy cluster resources
Deploy the controller (management) and NodeSet (compute nodes).
Controller: Use the slinky.slurm.net/v1beta1 API to define the controller, referencing the slurm-keys previously created.
apiVersion: slinky.slurm.net/v1beta1
kind: Controller
metadata:
  name: slurm
  namespace: slurm
spec:
  jwtHs256KeyRef:
    name: slurm-auth-jwths256
    key: jwt_hs256.key
  slurmKeyRef:
    name: slurm-auth-slurm
    key: slurm.key
  slurmctld:
    image: 'ghcr.io/slinkyproject/slurmctld:25.11-ubuntu24.04'
    resources:
      requests:
        cpu: "2"
        memory: "4Gi"
      limits:
        cpu: "4"
        memory: "8Gi"
  persistence:
    enabled: true
    resources:
      requests:
        storage: 4Gi
    accessModes:
      - ReadWriteOnce
  reconfigure:
    image: 'ghcr.io/slinkyproject/slurmctld:25.11-ubuntu24.04'
    resources: {}
  logfile:
    image: 'docker.io/library/alpine:latest'
    resources: {}
  extraConf: |
    PartitionName=all Nodes=ALL Default=YES MaxTime=UNLIMITED State=UP
    # Increase job retention time in memory (default is 300 seconds = 5 minutes)
    # Set to 3600 seconds (1 hour) - adjust as needed
MinJobAge=3600NodeSet: Define the number of replicas (compute pods) and resource limits (CPU/Memory) for the worker nodes.
apiVersion: slinky.slurm.net/v1beta1
kind: NodeSet
metadata:
  name: slurm-worker-slinky
  namespace: slurm
  labels:
    app.kubernetes.io/managed-by: Helm
    app.kubernetes.io/part-of: slurm
    app.kubernetes.io/version: '25.11'
    helm.sh/chart: slurm-0.4.1
    nodeset.slinky.slurm.net/name: slurm-worker-slinky
spec:
  controllerRef:
    name: slurm
    namespace: slurm
  replicas: 2
  partition:
    enabled: true
  slurmd:
    image: 'ghcr.io/slinkyproject/slurmd:25.11-ubuntu24.04'
    resources:
      requests:
        cpu: "1"
        memory: "2Gi"
      limits:
        cpu: "2"
        memory: "4Gi"
    env:
      - name: POD_CPUS
        value: '0'
      - name: POD_MEMORY
        value: '0'
  logfile:
    image: 'docker.io/library/alpine:latest'
    resources: {}
  template:
    metadata:
      labels:
        app.kubernetes.io/managed-by: Helm
        app.kubernetes.io/part-of: slurm
        app.kubernetes.io/version: '25.11'
        helm.sh/chart: slurm-0.4.1
        nodeset.slinky.slurm.net/name: slurm-worker-slinky
    spec:
      affinity: {}
      hostname: slinky-
      imagePullSecrets: null
      initContainers: []
      nodeSelector:
        kubernetes.io/os: linux
      priorityClassName: null
      tolerations: []
      volumes: []
  updateStrategy:
    rollingUpdate:
      maxUnavailable: 100%
    type: RollingUpdate
Create a file called slurm-cluster.yaml with these configurations and do the following.
oc apply -f configs/slurm-cluster.yamlTest the cluster
After deploying the cluster, you should verify that all components are running correctly before submitting jobs. The verification process involves checking pod status, service availability, and basic Slurm scheduler responses.
Verify pod status
Before submitting any jobs, confirm that all cluster components started successfully. Pod initialization can take one to three minutes after deployment, so it is normal to see pods in a Pending or Init state briefly before they transition to Running.
Run the following command to check the current status of all pods in the slurm namespace:
# Check all pods (namespace: slurm by default, or your custom namespace)
oc get pods -n slurm
The expected output shows three running pods, one controller and two worker nodes:
pvuda@pvuda-mac slurm % oc get pods -n slurm
NAME READY STATUS RESTARTS AGE
slurm-controller-0 3/3 Running 0 31m
slurm-worker-slinky-0 2/2 Running 0 31m
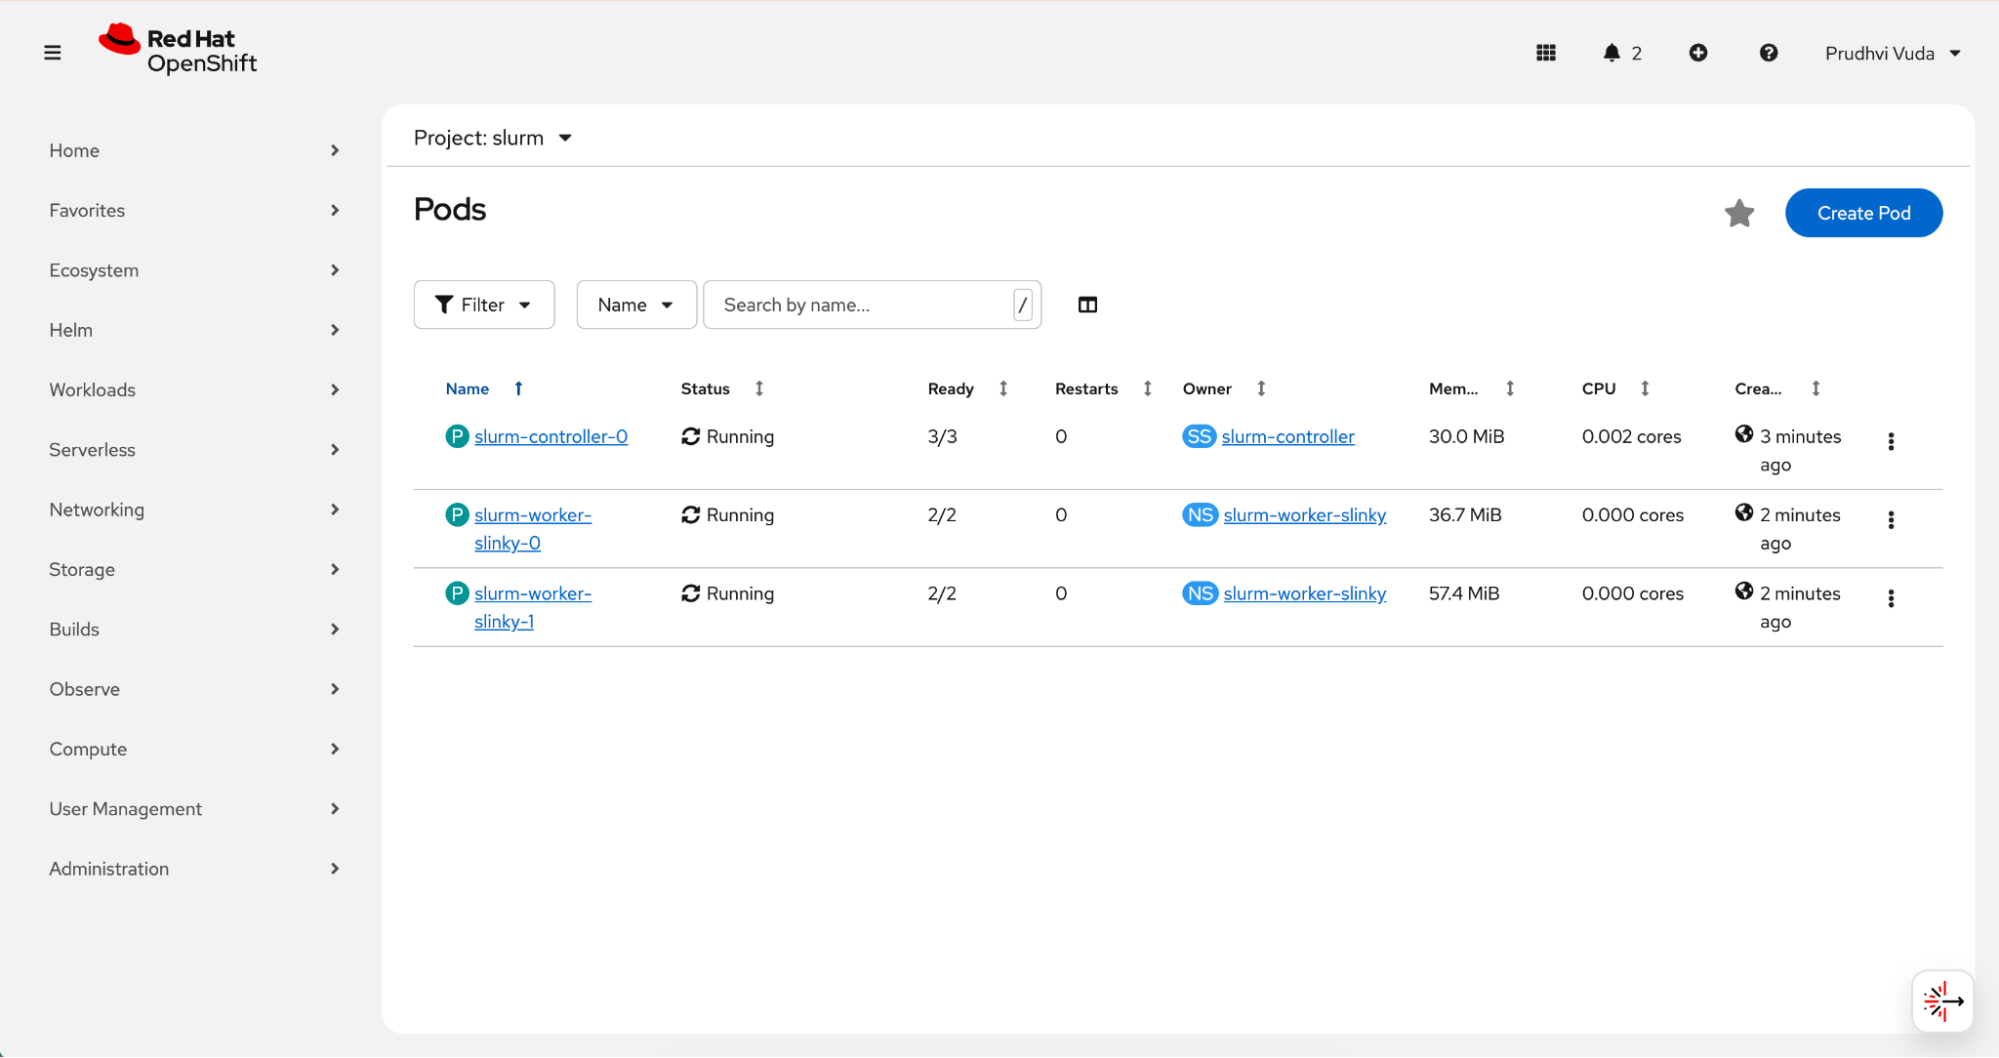
slurm-worker-slinky-1 2/2 Running 0 31mYou can also verify the pods from the OpenShift web console by navigating to Workloads → Pods and filtering by the slurm namespace. After deployment completes, both controller and worker pods should be visible as shown in Figure 8.
Check the services
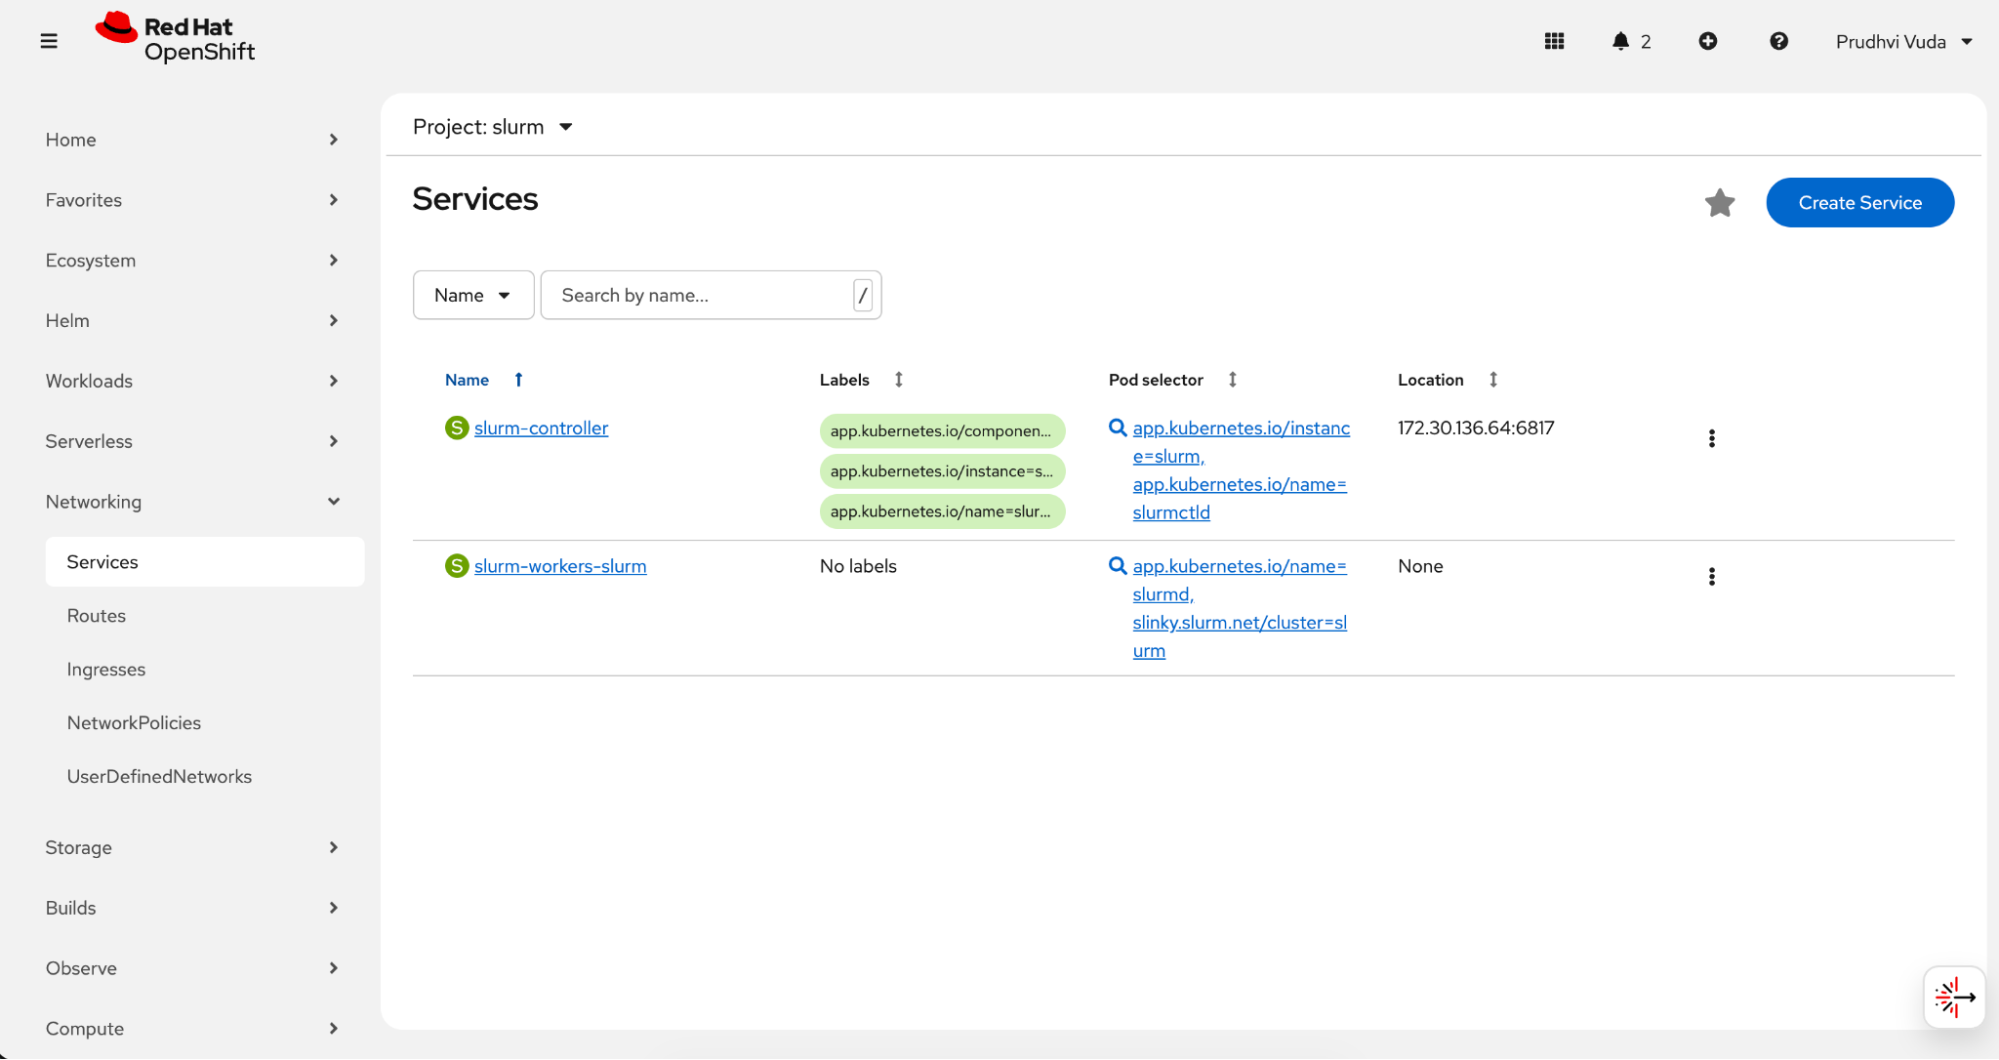
With the pods confirmed as running, the next check is to ensure that the Kubernetes Services backing the Slurm components were created correctly. These services provide stable network endpoints that allow the controller and compute pods to communicate with each other. Verify that the Slurm services were created by navigating to Networking → Services in the slurm namespace. You should see the slurm-controller and slurm-workers-slurm services listed.
The Slurm services created during deployment are shown in Figure 9.
Identify the controller pod
Confirming that pods and services exist is necessary but not sufficient. You also need to verify that Slurm's own scheduler is operational and that the compute nodes have registered successfully. The sinfo command queries the controller directly and returns partition and node status, giving you a Slurm-level view of cluster health rather than just a Kubernetes-level view.
Identify the controller pod and run sinfo using the following command:
CONTROLLER_POD=$(oc get pods -n slurm -l app.kubernetes.io/name=slurmctld -o jsonpath='{.items[0].metadata.name}')
oc exec -n slurm $CONTROLLER_POD -c slurmctld -- sinfo
The expected output shows the partitions and their available nodes in an idle state, confirming the cluster is ready to accept jobs.
PARTITION AVAIL TIMELIMIT NODES STATE NODELIST
slurm-worker-slinky up infinite 2 idle slurm-worker-slinky-[0-1]
al1* up infinite 2 down* slinky-[0-1]
all* up infinite 2 idle slurm-worker-slinky-[0-1]
Troubleshooting
Most issues encountered when deploying Slurm on OpenShift fall into a few common categories related to security context, certificates, image versions, or network connectivity between components. The following guidance covers the most frequent problems and their resolutions.
- Pending pods: Ensure the
anyuidSCC was applied correctly so pods can run with the required Slurm UID (401). - Certificate errors: Verify that all
cert-managerpods are running in thecert-managernamespace. - Version mismatch: If using OperatorHub, ensure your YAML API version matches
v1alpha1orv1beta1as required by the installed version. - "container not found (slurmctld)" The controller pod may still be in Init 0/1 or Init:0/2. Wait until the pod is running and 1/1 (or 3/3). Check it using this command:
oc get pods -n slurm -l app.kubernetes.io/name=slurmctld. - "container not found (slurmd)" The slurmd container may not be running (e.g., pod still initializing or slurmd crashing). Check the following:
Check the pod status and ensure it's running and ready:
oc get pods -n slurm -l app.kubernetes.io/name=slurmdList container names and use that name with -c:
oc get pod <slurmd-pod> -n slurm -o jsonpath='{.spec.containers[*].name}'- If the controller is in
CrashLoopBackOff, fix the controller first. Worker pods often wait or fail until the controller is ready.
Image pull error (manifest unknown): Override the image in the controller or NodeSet to one that exists (e.g., ghcr.io/slinkyproject/slurmctld:25.11-ubuntu24.04). Edit it using this command:
oc edit controller slurm -n slurm and set spec.slurmctld.image- Slurmd: "Unable to contact slurm controller (connect failure)" Compute nodes reach the controller at slurm-controller.slurm:6817. Check the following:
- Controller pod is running and ready first.
- Service exists:
oc get svc -n slurmLook for slurm-controller or similar with port 6817. - From a compute pod:
oc exec -n slurm <slurmd-pod> -c slurmd -- getent hosts slurm-controller.slurmand test port 6817. If the service name is different (e.g., slurm-controller-controller), the image may expect a different hostname. Fix it by creating a service that matches what slurmd uses, or restart compute pods after the controller is ready so they retry. - Restart compute pods once the controller is ready:
oc delete pod -n slurm -l app.kubernetes.io/name=slurmd
- "Unable to contact slurm controller" or "Insane message length" (controller logs: on_data returned rc: Insane message length): This is usually a version or protocol mismatch between slurmctld and the connecting slurmd, or auth key mismatch (slurm.key). Fix the following:
- Match images: Set
spec.slurmctld.imageandspec.slurmd.imageto the same tag in the controller and NodeSet CRs (e.g.,ghcr.io/slinkyproject/slurmctld:25.11-ubuntu24.04andghcr.io/slinkyproject/slurmd:25.11-ubuntu24.04). Verify what's running: If the NodeSet has no image, the operator default may differ. Add the image to the NodeSet and re-apply.
oc get controller slurm -n slurm -o jsonpath='{.spec.slurmctld.image}'and
oc get nodeset slurm-worker-slinky -n slurm -o jsonpath='{.spec.slurmd.image}'- Controller and workers must use the same slurm.key (from slurm-auth-slurm). The operator copies from the controller's slurmKeyRef to workers. Do not recreate the secret without redeploying.
- Do a clean restart by deleting worker pods so they stop connecting. Let the controller become ready; then it will recreate workers and reconnect. Enter:
oc delete pod -n slurm -l app.kubernetes.io/name=slurmdand wait for the controller to show a ready status. Then check it using this command:oc get pods -n slurm.
- Match images: Set
Running jobs
To run jobs on your newly deployed Slurm cluster, execute the Slurm client commands, such as sbatch, srun, sinfo, and squeue from within the running slurmctld controller pod using oc exec. This is functionally equivalent to logging into a traditional HPC login node. The same commands, flags, and job scripts work without modification because the containerized environment behaves identically to a bare-metal cluster (from Slurm's perspective).
The following examples cover four common job patterns: a basic test job to confirm end-to-end functionality, a resource-constrained job to validate CPU and memory allocation, a long-running job to exercise queue monitoring, and a Python batch script to demonstrate how to embed application code directly in a submission.
Submit a simple test job
Enter the following command in the terminal which will submit a basic job that prints a hostname and timestamp to a file, then confirms it completed successfully.
oc exec -n slurm slurm-controller-0 -c slurmctld -- sbatch --output=/tmp/test-job.out --wrap="echo 'Hello from Slurm!' && hostname && date && echo 'Job completed successfully'"The following is the expected output of the command. After the job is submitted, Slurm will print the job ID.
Submitted batch job 11Check the job status using the following command. You can check the job's status with the scontrol command.
oc exec -n slurm slurm-controller-0 -c slurmctld -- scontrol show job <JOB_ID>This is the expected output of the command:
JobId=11 JobName=wrap
UserId=slurm(401) GroupId=s1urm(401) MCS_label=N/A
Priority=1 Nice=0 Account=(nu1l) QOS=(null)
JobState-COMPLETED Reason-None Dependency=(nu11)
Requeue=1 Restarts=0 BatchFlag=1 Reboot=0 ExitCode=0:0
RunTime=00:00:01 TimeLimit=UNLIMITED TimeMin=N/A
SubmitTime=2026-02-05T01:02:20 EligibleTime=2026-02-05T01:02:20
AccrueTime=2026-02-05T01:02:20
StartTime=2026-02-05T01:02:20 EndTime=2026-02-05T01:02:21 Deadline=N/A
SuspendTime=None SecsPreSuspend=0 LastSchedEval=2026-02-05T01:02:20 Scheduler=Main
Partition=all AllocNode:Sid=slurm-controller-0:2208
ReqNodeList=(null) ExcNodeList=(null)
NodeList=slurm-worker-slinky-0
BatchHost=slurm-worker-slinky-@
StepMgrEnabled=Yes
NumNodes=1 NumCPUs=2 NumTasks=1 CPUs/Task=1 ReqB:S:C:T=0:0:*:*
ReqTRES=cpu=1, mem=63274M, node=1, billing=1
AllocTRES=cpu=2, mem=63274M, node=1, billing=2
Socks/Node=* NtasksPerN:B:S:C=0:0:*:* CoreSpec=*
MinCPUsNode=1 MinMemoryNode=0 MinTmpDiskNode=0
Features=(null) DelayBoot=00:00:00
OverSubscribe=OK Contiguous=0 Licenses=(null) LicensesAlloc=(null) Network=(nu11)
Command=(null)
SubmitLine=sbatch —-output=/tmp/test-job.out —-wrap=echo 'Hello from Slurm!' && hostname && dat
e && echo 'Job completed successfully'
WorkDir=/tmp
StdErI=
StdIn=/dev/null
StdOut=/tmp/test-job.out
Check which worker node ran the job and see the job output using the following command.
# Find which compute node ran the job
oc exec -n slurm slurm-controller-0 -c slurmctld -- scontrol show job <JOB_ID> | grep NodeList
oc exec -n slurm slurm-worker-slinky-0 -c slurmd -- cat /tmp/test-job.out
The expected output confirms the job ran on a worker node and completed successfully.
pvuda@pvuda-mac slurm % oc exec -n slurm slurm-controller-0 -c slurmctld -- scontrol show job 11 |1
grep NodeList
ReqNodeList=(null) ExcNodeList=(null)
NodeList=slurm-worker-slinky-ø

[pvuda@pvuda-mac slurm % oc exec -n slurm slurm-worker-slinky-0 -c slurmd - cat /tmp/test-job.out
Hello from Slurm! slurm-worker-slinky-0
Thu Feb 5 01:02:21 UTC 2026
Job completed
Submit a job requesting specific resource requirements
Slurm allows you to request specific CPU and memory allocations for each job. The following example requests one CPU and 1 GB of memory:
# submit job requesting 1 CPU and 1GB memory
oc exec -n slurm slurm-controller-0 -c slurmctld -- sbatch --cpus-per-task=1 --mem=1G --output=/tmp/resource-job.out --wrap="echo 'CPU: ' && nproc && echo 'Memory: ' && free -h && echo 'Job with resource requirements completed'"
This is the expected output of the command:
Submitted batch job 12Check the job details to verify resources were allocated.
oc exec -n slurm slurm-controller-0 -c slurmctld -- scontrol show job <JOB_ID> | grep -E "(ReqTRES|AllocTRES|NumCPUs|NodeList)"The following is the expected output of that command:
ReqNodeList=(nul1) ExcNodeList=(null)
NodeList=slurm-worker-slinky-0
NumNodes=1 NumCPUs=2 NumTasks=1 CPUs/Task=1 ReqB:S:C:T=0:0:*:*
ReqTRES=cpu=1, mem=1G, node=1, billing=1
A11ocTRES=cpu=2, mem=1G, node=1, billing=2
Check the job output using the following command:
oc exec -n slurm slurm-worker-slinky-0 -c slurmd -- cat /tmp/resource-job.outThis is the expected output of the command:
CPU:
2
Memory:
    total used free shared buff/cache available
Mem: 61Gi 14Gi 2.1Gi 145Mi 45Gi 46Gi
Swap: 0B 0B 0B

Job with resource requirements completed
Submit a long-running job for monitoring
To test job monitoring, you can submit a job that runs for 30 seconds, then watch it progress through the queue. The sequence of the following commands submits the job, polls the queue as it runs, and reads the output when complete.
# Submit a job that runs for 30 seconds
oc exec -n slurm slurm-controller-0 -c slurmctld -- sbatch --output=/tmp/long-job.out --wrap='for i in $(seq 1 30); do echo "Iteration $i at $(date)"; sleep 1; done'
# Monitor the job while it's running
oc exec -n slurm slurm-controller-0 -c slurmctld -- squeue
# Check job status and find which node ran it
oc exec -n slurm slurm-controller-0 -c slurmctld -- scontrol show job <JOB_ID> | grep -E "(JobState|ExitCode|NodeList|StdOut)"
# View output (try both nodes)
oc exec -n slurm slurm-worker-slinky-0 -c slurmd -- cat /tmp/long-job.out 2>/dev/null
The following is the expected output of that command.
pvuda@pvuda-mac slurm % oc exec -n slurm slurm-controller-0 -c slurmctld - sbatch --output=/tmp/1 long-job.out -wrap='for i in $(seq 1 30); do echo "Iteration $i at $(date)"; sleep 1; done' oc exec -n slurm slurm-controller-0 -c slurmctld - squeueSubmitted batch job 8

pvuda@pvuda-mac slurm % oc exec -n slurm slurm-controller-0 -c slurmctid - squeue
JOBID PARTITION NAME USER ST TIME NODES NODELIST (REASON)
8 all wrap slurm R 0:03 1 slinky-0

pvuda@pvuda-mac slurm % oc exec -n slurm slurm-controller-0 -c slurmetld - squeue
JOBID PARTITION NAME USER ST TIME NODES NODELIST (REASON)
8 all wrap slum R 0:07 1 slinky-0

pvuda@pvuda-mac slurm % oc exec -n slurm slurm-controller-0 -c slurmctld - squeue
JOBID PARTITION NAME USER ST TIME NODES NODELIST (REASON)
8 all wrap slurm R 0:17 1 slinky-0

pvuda@pvuda-mac slurm % oc exec -n slurm slurm-controller-0 -c slurmctld -- squeue
JOBID PARTITION NAME USER ST TIME NODES NODELIST (REASON)

pvuda@pvuda-mac slurm % oc exec -n slurm slurm-controller-0 -c slurmctld - scontrol show job 8 | grep -E "(JobState|ExitCode|NodeList|StdOut)"
	JobState=COMPLETED Reason=None Dependency=(nul1)
	Requeue=1 Restarts=0 BatchFlag=1 Reboot=0 ExitCode=0:0
	ReqNodeList=(nu11) ExcNodeList=(null)
	NodeList=slinky-0
	StdOut=/tmp/long-job.out

pvuda@pvuda-mac slurm % oc exec -n slurm slurm-worker-slinky-0 -c slurmd - cat /tmp/long-job.out
2>/dev/null
Iteration 1 at Fri Jan 21:39:33 UTC 2026
Iteration 2 at Fri Jan 30 21:39:34 UTC 2026
Iteration 3 at Fri Jan 30 21:39:35 UTC 2026
.
.
.
Iteration 29 at Fri Jan 30 21:40:01 UTC 2026
Iteration 30 at Fri Jan 30 21:40:02 UTC 2026
Run a Python script via batch submission
You can embed a Python script directly in a batch job using a heredoc. The job runs on a worker node, which writes the Python file locally and then executes it. The following example runs a basic statistics calculation.
oc exec -n slurm slurm-controller-0 -c slurmctld -- bash -c 'cat > /tmp/run_myscript.sh << '\''BATCHEOF'\''
#!/bin/bash
#SBATCH --output=/tmp/myscript.out
#SBATCH --job-name=pyjob
cat > /tmp/myscript.py << '\''PYEOF'\''
import statistics
data = [i % 10 for i in range(1000)]
print("Mean:", statistics.mean(data))
print("Stdev:", statistics.stdev(data))
PYEOF
python3 /tmp/myscript.py
BATCHEOF
'
Submit the batch script. The job runs on a worker, and that worker creates /tmp/myscript.py and runs python3 /tmp/myscript.py.
oc exec -n slurm slurm-controller-0 -c slurmctld -- sbatch /tmp/run_myscript.shThis is the expected output:
Submitted batch job 14Check the output for the following command:
oc exec -n slurm slurm-worker-slinky-0 -c slurmd -- cat /tmp/myscript.outThe expected output from the job confirms the Python script ran correctly on the worker.
Mean: 4.5
Stdev: 2.8737185419345193
Therefore, Slurm is pointing at a Python file that exists on the worker as /tmp/myscript.py, and you change the job by editing the batch script (the part between PYEOF and PYEOF).
Scale workloads
The replicas field in the NodeSet resource controls the compute capacity in a Slinky-based cluster. When you change this value, the Slurm operator reconciles the change by adding or removing slurmd pods, and Slurm automatically detects the new or removed nodes once they register. This makes manual scaling straightforward and non-disruptive to running jobs.
Scale up means adding more compute pods. To add more compute capacity, increase the replica count in the NodeSet using the oc scale command. The Slurm operator detects the change and provisions new slurmd pods automatically, and Slurm registers the new nodes as soon as they come online.
oc scale nodeset slurm-worker-slinky --replicas=4 -n slurmScale down means removing compute pods. To reduce the number of compute nodes, use the same command with a lower replica count. Slurm will drain any running jobs from the affected nodes before the pods are terminated, so in-flight work is not lost.
oc scale nodeset slurm-worker-slinky --replicas=2 -n slurmAfter scaling in either direction, confirm that Kubernetes and Slurm reflect the updated node count. The sinfo command provides a Slurm-level inventory that should match the number of running pods.
oc exec -n slurm slurm-controller-0 -c slurmctld -- sinfo -N -lThe following is the expected output of that command:
pvuda@pvuda-mac slurm % oc scale nodeset slurm-worker-slinky —replicas=4 -n slurm

nodeset.slinky.slurm.net/slurm-worker-slinky scaled

pvuda@pvuda-mac slurm % oc exec -n slurm slurm-controller-0 -c slurmctld -- sinfo -N -1

Fri Jan 30 21:45:48 2026
NODELIST NODES PARTITION STATE CPUS S:C:T MEMORY TMP_DISK WEIGHT AVAIL_FE REASON
slinky-0 1 slinky idle 16 1:8:2 63274 0 1 slinky none
slinky-0 1 all* idle 16 1:8:2 63274 0 1 slinky none
slinky-1 1 slinky idle 16 1:8:2 63274 0 1 slinky none
slinky-1 1 all* idle 16 1:8:2 63274 0 1 slinky none
slinky-2 1 slinky idle 16 1:8:2 63274 0 1 slinky none
slinky-2 1 all* idle 16 1:8:2 63274 1 slinky none
slinky-3 1 slinky idle 16 1:8:2 63274 1 slinky none
slinky-3 1 all* idle 16 1:8:2 63274 0 1 slinky none

pvuda@pvuda-mac slurm % oc scale nodeset slurm-worker-slinky —replicas=2 -n slurm
nodeset.slinky.slurm.net/slurm-worker-slinky scaled

pvuda@pvuda-mac slurm % oc exec -n slurm slurm-controller-0 -c slurmctld -- sinfo -N -1

Fri Jan 30 21:46:06 2026
NODELIST NODES PARTITION STATE CPUS S:C:T MEMORY TMP_DISK WEIGHT AVAIL_FE REASON
slinky-0 1 slinky idle 16 1:8:2 63274 0 1 slinky none
slinky-0 1 all* idle 16 1:8:2 63274 0 1 slinky none
slinky-1 1 slinky idle 16 1:8:2 63274 0 1 slinky none
slinky-1 1 all* idle 16 1:8:2 63274 0 1 slinky none
If we deploy via Helm with a values file that enables autoscaling, we can set autoscaling.enabled: true and tune minReplicas / maxReplicas so the operator (or cluster autoscaler) adjusts the number of compute pods based on load.
For a YAML-based deployment, change spec.replicas in the NodeSet and re-apply, or use oc scale for manual scaling.
Final thoughts
Deploying Slurm on OpenShift with the Slinky operator provides a practical path for running HPC workloads inside a Kubernetes-native environment. By encapsulating Slurm components as Kubernetes-managed resources, organizations can modernize infrastructure without abandoning established scheduling models.
This approach allows infrastructure teams to manage cluster lifecycle through declarative configuration while enabling users to continue submitting jobs using familiar Slurm commands. As container platforms increasingly become the default deployment model, integrating HPC schedulers like Slurm into OpenShift helps bridge traditional and cloud-native computing paradigms. For production deployments, administrators should also consider resource tuning, persistent storage configuration, monitoring integration, and high-availability design to ensure operational resilience.
