Red Hat OpenShift 4.19 introduces a new Custom Logos feature. This feature replaces the deprecated Custom Logo feature to better align with the theming needs created by the PatternFly 6 upgrade in the web console. This enhancement provides a more customized web console experience for users with specific branding requirements.
The Custom Logos feature lets users specify different logos for the masthead and favicon, based on the light and dark themes in the web console. You can configure each of the supported theme modes individually by setting either the Light or Dark theme mode. If you don’t specify a theme, the console will revert to using the default OpenShift logo. Users who don’t want to change the branding can set custom favicons independently.
Prerequisites
- You must have administrator privileges.
- Create a file for the logo you want to use. The logo can be in any common image format, including GIF, JPG, PNG, or SVG, and has a
max-heightof60px. SVG files must have a definedheightandwidthin order to display properly.
Adding Custom Logos via CLI
- Prepare the logo files: Create the logo files you want to use for the web console. SVG is the recommended file format, but other file formats are allowed if your browser supports them. The logo image size must be less than 1 MB due to ConfigMap size constraints. For more information, see the OpenShift documentation.
Create a ConfigMap: Create a ConfigMap in
openshift-confignamespace with the logo files. If the total size of logos files exceeds the ConfigMap limit, use multiple ConfigMaps to specify each logo accordingly.The following is an example of using a single ConfigMap for all theme mode logos. Import the logos files into a ConfigMap in the
openshift-confignamespace:oc create configmap custom-logos-config-name \ --namespace=openshift-config \ --from-file /path/to/<masthead-light.svg> \ --from-file /path/to/<masthead-dark.svg> \ --from-file /path/to/<favicon-light.svg> \ --from-file /path/to/<favicon-dark.svg>Edit the console operator to include
logosconfiguration for the theme mode logos specified in step 2:$ oc edit console.operator.openshift.io clustercustomization: logos: - themes: - source: from: ConfigMap configMap: key: masthead-dark.svg name: custom-logos-config-name mode: Dark - source: from: ConfigMap configMap: key: masthead-light.svg name: custom-logos-config-name mode: Light type: Masthead - themes: - source: from: ConfigMap configMap: key: favicon-dark.svg name: custom-logos-config-name mode: Dark - source: from: ConfigMap configMap: key: favicon-light.svg name: custom-logos-config-name mode: Light type: FaviconOnce you update the console operator configuration, it will sync the custom logo ConfigMap into the console namespace. Mount it to the console pod and redeploy.
Verify the configuration and conditions of the console operator. If there are any issues, the console operator will report the cause of the error. The following commands will verify that the changes were made successfully.
To check the cluster operator, run:
$ oc get clusteroperator console -o yamlTo check the console operator configuration, run:
$ oc get console.operator.openshift.io -o yamlRefresh the web console to see the final result. After refreshing, you will now see the logo customization reflects the selected theme preference in the web console. See Figures 1 and 2.
Figure 1: Custom logo light theme mode. 
Figure 2: Custom logo dark theme mode.


Adding Custom Logos via the OpenShift web console
- Get your logo files ready: Just like with the CLI setup, make sure you have the logo files prepared and stored on your computer. The file constraints mentioned in the previous section also apply here.
Create a ConfigMap with the logo files: Head over to the Workloads tab in the left navigation bar and click ConfigMaps. Change your active Project via the drop-down menu at the top of the main page container to the
openshift-confignamespace/project. Then click Create ConfigMap and fill in your logo files (Figure 3).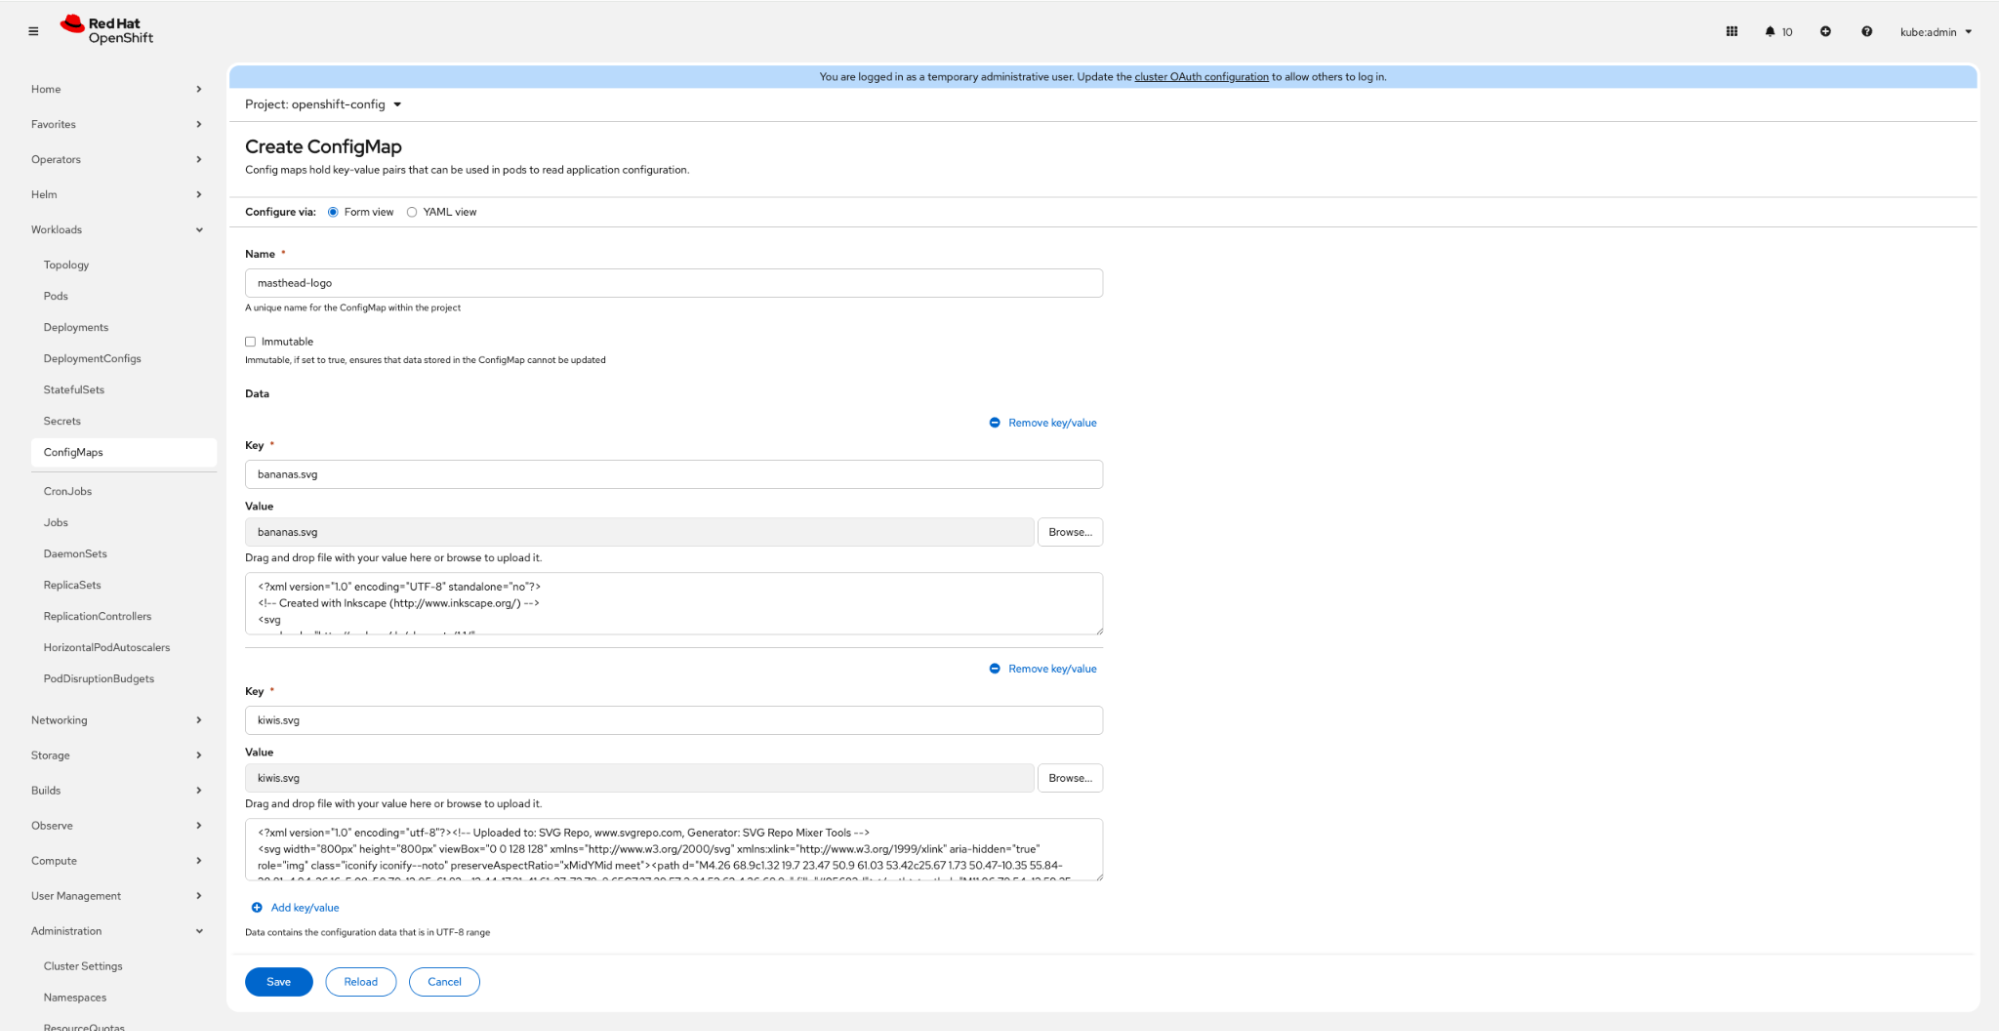
Figure 3: Create ConfigMap form editor. When you upload your logo files, keep in mind the existing 1 MB limit per ConfigMap. If needed, you can split your custom logos into multiple ConfigMaps.
Configure the logos in Cluster Settings: After creating your custom logo ConfigMaps, the console operator won't be aware of their existence. To fix that, you’ll need to change the console operator configuration. Navigate to the Administration section and click the Cluster Settings tab (Figure 4).

Figure 4: Cluster Settings tab. Then, switch to the Configuration tab (Figure 5). Search for a Console (operator.openshift.io) entry, click on it, and open the YAML tab.
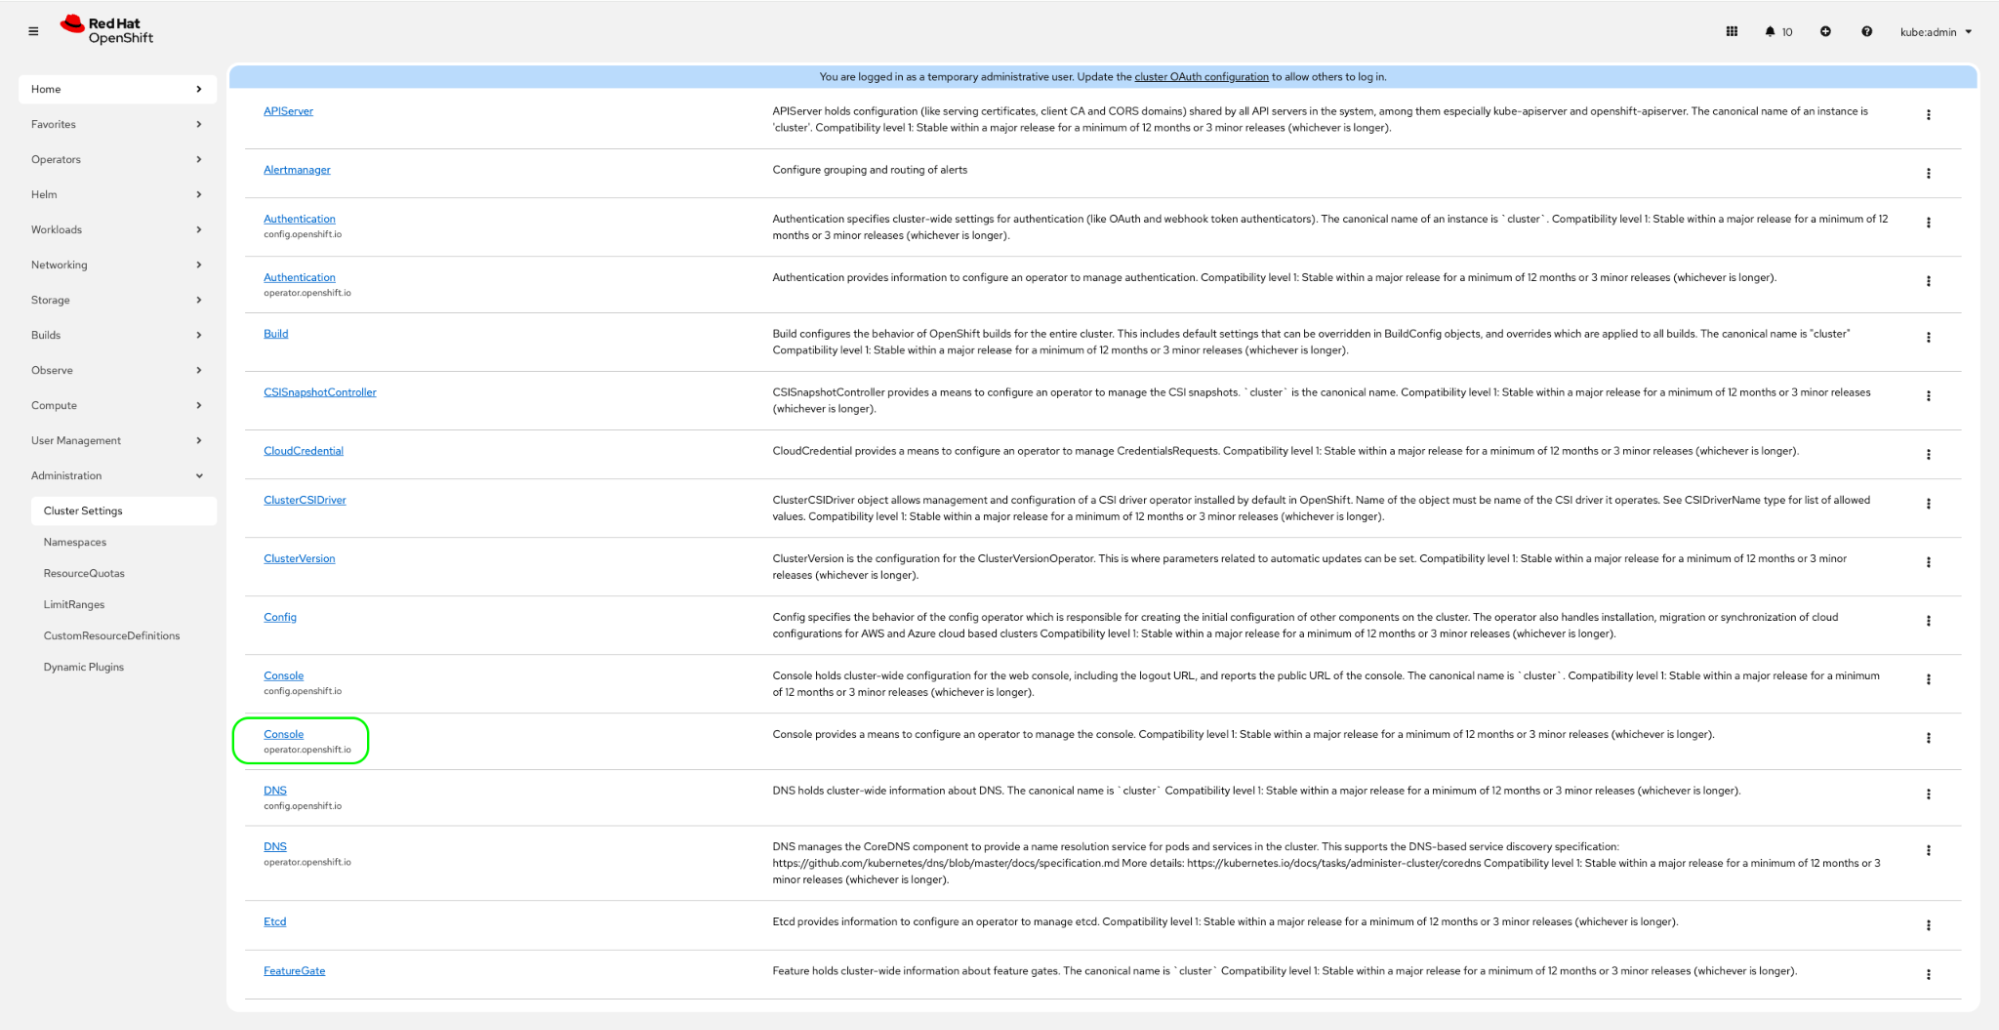
Figure 5: Configuration tab. In the YAML tab, we have to add a new
logosfield under thespec.customization, as shown in Figure 6. This field specifies which logo should display for a given theme and logo type (FaviconandMasthead).The
logosfield cannot be used alongside thecustomLogoFileconfiguration, so make sure you specify only one. (The web console still supports the deprecatedcustomLogoFileconfiguration for backward compatibility).
Figure 6: console-config YAML editor. The
logosfield’s structure consists of a list of themes for each logo type:MastheadorFavicon. Each entry within the list specifies the theme mode and source that points to the ConfigMap resources created in the previous step.Here is an example of
logosconfiguration that configures all logo types for all theme modes, which you can use as an entry point for your configurations:logos: - themes: - source: from: ConfigMap configMap: key: dark-theme-logo.png name: masthead-logo mode: Dark - source: from: ConfigMap configMap: key: light-theme-logo.png name: masthead-logo mode: Light type: Masthead - themes: - source: from: ConfigMap configMap: key: dark.png name: favicon mode: Dark - source: from: ConfigMap configMap: key: light.png name: favicon mode: Light type: FaviconVerify the correct configuration: After saving the
logosconfiguration in the console’s operator settings, you can verify the setup by visiting theopenshift-consolenamespace, as shown in Figure 7. The console operator should have already created a copy of the logo ConfigMaps from theopenshift-confignamespace, and theconsole-configConfigMap should be updated to include thelogosfield as well.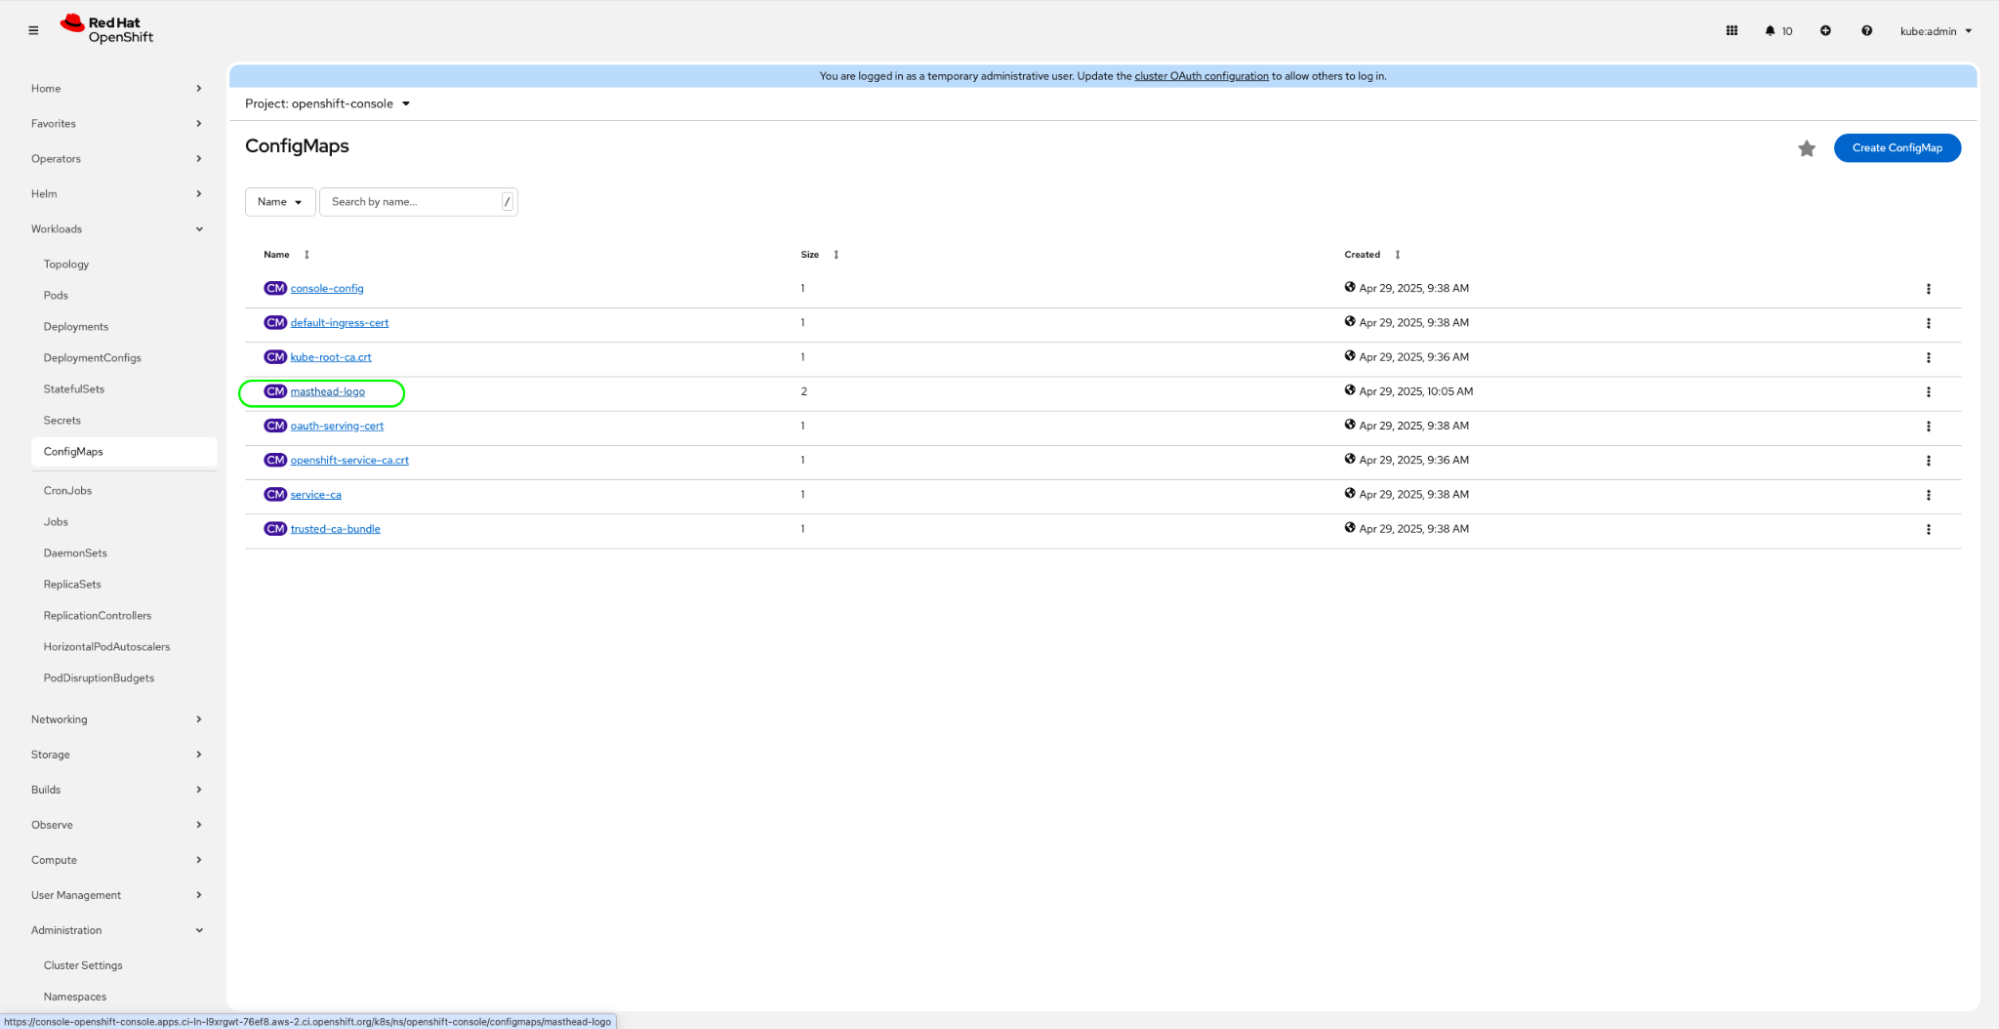
Figure 7: Configuration tab. Now, for our grand finale: Refresh the console and switch between themes in the web console. You should now see your customized logo! See Figures 8 and 9.

Figure 8: Custom logo light theme mode. 
Figure 9: Custom logo dark theme mode.


Get started today with Red Hat OpenShift 4.19
To find out more about Red Hat OpenShift 4.19, including a list of new features and fixes, read the blog post What’s new for developers in Red Hat OpenShift 4.19 or check out the release notes.
Ready to try Red Hat OpenShift?
- Start your OpenShift journey: Start your Developer Sandbox.
- Explore resources for getting started with OpenShift.
- Discover more ways to try OpenShift: Red Hat OpenShift download
- Check out the interactive learning content.
- Visit the Red Hat OpenShift product page.
- Stay up-to-date with the Red Hat Developer community on our YouTube channel.