Redhat Developers  Logo
  • Products

    Featured

    • Red Hat Enterprise Linux
      Red Hat Enterprise Linux Icon
    • Red Hat OpenShift AI
      Red Hat OpenShift AI
    • Red Hat Enterprise Linux AI
      Linux icon inside of a brain
    • Image mode for Red Hat Enterprise Linux
      RHEL image mode
    • Red Hat OpenShift
      Openshift icon
    • Red Hat Ansible Automation Platform
      Ansible icon
    • Red Hat Developer Hub
      Developer Hub
    • View All Red Hat Products
    • Linux

      • Red Hat Enterprise Linux
      • Image mode for Red Hat Enterprise Linux
      • Red Hat Universal Base Images (UBI)
    • Java runtimes & frameworks

      • JBoss Enterprise Application Platform
      • Red Hat build of OpenJDK
    • Kubernetes

      • Red Hat OpenShift
      • Microsoft Azure Red Hat OpenShift
      • Red Hat OpenShift Virtualization
      • Red Hat OpenShift Lightspeed
    • Integration & App Connectivity

      • Red Hat Build of Apache Camel
      • Red Hat Service Interconnect
      • Red Hat Connectivity Link
    • AI/ML

      • Red Hat OpenShift AI
      • Red Hat Enterprise Linux AI
    • Automation

      • Red Hat Ansible Automation Platform
      • Red Hat Ansible Lightspeed
    • Developer tools

      • Red Hat Trusted Software Supply Chain
      • Podman Desktop
      • Red Hat OpenShift Dev Spaces
    • Developer Sandbox

      Developer Sandbox
      Try Red Hat products and technologies without setup or configuration fees for 30 days with this shared Openshift and Kubernetes cluster.
    • Try at no cost
  • Technologies

    Featured

    • AI/ML
      AI/ML Icon
    • Linux
      Linux Icon
    • Kubernetes
      Cloud icon
    • Automation
      Automation Icon showing arrows moving in a circle around a gear
    • View All Technologies
    • Programming Languages & Frameworks

      • Java
      • Python
      • JavaScript
    • System Design & Architecture

      • Red Hat architecture and design patterns
      • Microservices
      • Event-Driven Architecture
      • Databases
    • Developer Productivity

      • Developer productivity
      • Developer Tools
      • GitOps
    • Secure Development & Architectures

      • Security
      • Secure coding
    • Platform Engineering

      • DevOps
      • DevSecOps
      • Ansible automation for applications and services
    • Automated Data Processing

      • AI/ML
      • Data Science
      • Apache Kafka on Kubernetes
      • View All Technologies
    • Start exploring in the Developer Sandbox for free

      sandbox graphic
      Try Red Hat's products and technologies without setup or configuration.
    • Try at no cost
  • Learn

    Featured

    • Kubernetes & Cloud Native
      Openshift icon
    • Linux
      Rhel icon
    • Automation
      Ansible cloud icon
    • Java
      Java icon
    • AI/ML
      AI/ML Icon
    • View All Learning Resources

    E-Books

    • GitOps Cookbook
    • Podman in Action
    • Kubernetes Operators
    • The Path to GitOps
    • View All E-books

    Cheat Sheets

    • Linux Commands
    • Bash Commands
    • Git
    • systemd Commands
    • View All Cheat Sheets

    Documentation

    • API Catalog
    • Product Documentation
    • Legacy Documentation
    • Red Hat Learning

      Learning image
      Boost your technical skills to expert-level with the help of interactive lessons offered by various Red Hat Learning programs.
    • Explore Red Hat Learning
  • Developer Sandbox

    Developer Sandbox

    • Access Red Hat’s products and technologies without setup or configuration, and start developing quicker than ever before with our new, no-cost sandbox environments.
    • Explore Developer Sandbox

    Featured Developer Sandbox activities

    • Get started with your Developer Sandbox
    • OpenShift virtualization and application modernization using the Developer Sandbox
    • Explore all Developer Sandbox activities

    Ready to start developing apps?

    • Try at no cost
  • Blog
  • Events
  • Videos

Automate Skupper networks seamlessly with Ansible

June 2, 2025
Fernando Giorgetti
Related topics:
Automation and managementHybrid CloudIntegrationKubernetes
Related products:
Red Hat Service Interconnect

Share:

    Skupper version 2.0 has landed and it's bringing a shiny new Ansible collection with it, now available on Ansible Galaxy.

    This isn't just another update, it's a toolkit that empowers you to define and manage Skupper networks with ease, no matter where they run—Kubernetes, Podman, Docker, or bare-metal Linux.

    Declarative power at your fingertips

    Skupper 2.0 redefines how virtual application networks (VANs) come to life. At its core is a sleek, declarative approach powered by a fresh set of Kubernetes Custom Resource Definitions (CRDs). Think of it as a blueprint for your network: you describe what you want, and Skupper makes it happen.

    These CRDs aren't just for Kubernetes users. They work just as seamlessly outside the Kubernetes ecosystem, delivering a unified, platform-agnostic way to declare and deploy your Skupper network.

    Linking sites

    To build a VAN across multiple Skupper sites, you have to generate an AccessToken from one site—ideally a public or accessible hub—and share it with another.

    That token is the golden key that locks the sites into the same network, forging a secure, reliable mutual transport layer security (mTLS) Skupper link to the VAN.

    Although this process is quite simple and easy to perform manually, when your environment scales, you will need some sort of automation to help you keep your VAN linked and resources updated.

    New Ansible collection

    The skupper.v2 Ansible collection introduces the final components needed to define your entire VAN in a scalable and streamlined way, saving significant time and ensuring reliable, consistent VAN configurations across all your sites.

    Hands-on with a Skupper VAN

    In order to demonstrate its power, we are going to create a VAN that connects a simple front-end application that runs on a local minikube cluster with a back-end microservice running on another namespace within the same minikube cluster.

    Note

    This is just a minimal scenario for an easy and local evaluation, which is why we are running the two applications within the same cluster. It is based on Skupper's Hello World Example, shown in Figure 1. But these workloads can also be deployed across multiple, independent clusters.
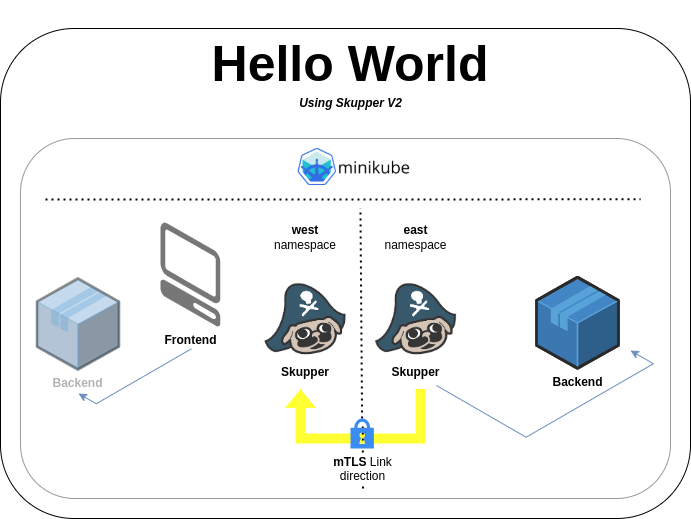
    Hello World scenario used in this example
    Figure 1: Skupper Hello World Example configuration.

    Prerequisites

    For this scenario, you will need:

    • A minikube cluster.
    • A running minikube tunnel.
    • Red Hat Ansible Automation Platform (>= 2.15.0).
    • The skupper.v2 Ansible collection installed as well as its dependent Python modules. See below:
    ansible-galaxy collection install skupper.v2
    python -m pip install kubernetes PyYAML

    How it works

    The goal here is to demonstrate how to set up a Skupper network using Ansible in order to connect Kubernetes applications that are initially unable to reach each other.

    Here is the playbook.yaml content that we will use for that:

    ---
    - name: Skupper V2 Hello World Example using Ansible
      hosts: localhost
      connection: local
      tasks:
        - name: Create Kubernetes namespaces west and east
          kubernetes.core.k8s:
            name: "{{ item }}"
            api_version: v1
            kind: Namespace
            state: present
            kubeconfig: "{{ lookup('env', 'KUBECONFIG') }}"
          loop:
            - west
            - east
        - name: Install cluster scoped Skupper 2.0.0 into Kubernetes
          kubernetes.core.k8s:
            state: present
            definition: "{{ lookup('url', 'https://github.com/skupperproject/skupper/releases/download/2.0.0/skupper-cluster-scope.yaml', split_lines=False) }}"
            kubeconfig: "{{ lookup('env', 'KUBECONFIG') }}"
        - name: Create resources on west namespace
          skupper.v2.resource:
            path: "{{ item }}"
            namespace: west
            kubeconfig: "{{ lookup('env', 'KUBECONFIG') }}"
          loop:
            - https://raw.githubusercontent.com/skupperproject/skupper-example-yaml/refs/heads/v2/west/site.yaml
            - https://raw.githubusercontent.com/skupperproject/skupper-example-yaml/refs/heads/v2/west/listener.yaml
            - https://raw.githubusercontent.com/skupperproject/skupper-example-yaml/refs/heads/v2/west/frontend.yaml
        - name: Create resources on east namespace
          skupper.v2.resource:
            path: "{{ item }}"
            namespace: east
            kubeconfig: "{{ lookup('env', 'KUBECONFIG') }}"
          loop:
            - https://raw.githubusercontent.com/skupperproject/skupper-example-yaml/refs/heads/v2/east/site.yaml
            - https://raw.githubusercontent.com/skupperproject/skupper-example-yaml/refs/heads/v2/east/connector.yaml
            - https://raw.githubusercontent.com/skupperproject/skupper-example-yaml/refs/heads/v2/east/backend.yaml
        - name: Generate an AccessToken to the west namespace
          skupper.v2.token:
            name: west-grant
            namespace: west
            kubeconfig: "{{ lookup('env', 'KUBECONFIG') }}"
          register: result
        
        - name: Create AccessToken on east namespace to establish a link to the west site
          skupper.v2.resource:
            def: "{{ result.token }}"
            namespace: east
            kubeconfig: "{{ lookup('env', 'KUBECONFIG') }}"

    Important

    This playbook relies on the KUBECONFIG environment variable to be properly set.

    Here is a breakdown of the tasks performed by the playbook.yaml:

    1. Create west and east namespaces.
    2. Install Skupper 2.0.0 at cluster scope (the operator runs in the skupper namespace).
    3. Create the Skupper and workload resources on west namespace.
    4. Create the Skupper and workload resources on east namespace.
    5. Generate an AccessToken to the west namespace.
    6. Create AccessToken on east namespace to establish a Link to the west site.

    Important

    Steps 5 and 6 solve the scalability issue mentioned above when linking sites to form your VAN.

    Note

    In this example, we're using a single playbook, assuming the Ansible control node can access both the west and east sites. However, this won't always be the case. You can adapt it as needed for flexibility, such as by using inventory files to define the hosts (representing your clusters or namespaces) or groups you’ll manage through your playbooks from a specific control node.


    Run the example

    Follow these steps to run the example scenario:

    1. Open a terminal and set the KUBECONFIG environment variable to make sure you’re using the appropriate Kubernetes cluster.

    Warning

    This example will create and update workloads within 3 namespaces on your Kubernetes cluster:

    • skupper
    • west
    • east

    In case any of these namespaces exist in your cluster, do not proceed to avoid impacts to running applications.

    1. Save the playbook.yaml above to an appropriate location in your file system.
    2. Run the Ansible playbook:

      ansible-playbook -i localhost, playbook.yaml
    3. Verify that the front-end application is working:

      kubectl -n west port-forward deployment/frontend 8080
    4. Open your browser and go to http://localhost:8080.
    5. Test the front-end application.

    To clean things up, you can delete the: west, east, and skupper namespaces:

    kubectl delete namespace west east skupper

    Summary

    Skupper simplifies the connection of your applications using secure mTLS links between Skupper sites, eliminating the need for network modifications.

    This new version standardizes the virtual application network definition, enabling you to declare your VAN in advance, precisely specifying what is exposed internally within the VAN and where each workload will be consumed.

    The skupper.v2 Ansible collection streamlines the definition of Skupper resources, regardless of the target platform for your Skupper site, offering a highly convenient mechanism to link sites—regardless of VAN size— while reducing significant effort and maintaining consistency across your VAN.

    Related Posts

    • Why Red Hat Service Interconnect version 2?

    • Kubernetes and the hybrid cloud with Skupper

    • How to use Skupper to expose services over TLS

    • How to deploy applications using Ansible Automation Platform

    • How to install and configure Ansible on Red Hat Enterprise Linux

    • How to connect Kubernetes clusters with Service Interconnect

    Recent Posts

    • GuideLLM: Evaluate LLM deployments for real-world inference

    • Unleashing multimodal magic with RamaLama

    • Integrate Red Hat AI Inference Server & LangChain in agentic workflows

    • Streamline multi-cloud operations with Ansible and ServiceNow

    • Automate dynamic application security testing with RapiDAST

    What’s up next?

    The Network Border Gateway Protocol (BGP) validated content collection focuses on platform-agnostic network automation and supports the BGP management experience by providing production-ready content. This cheat sheet covers basic commands and tasks for using Network BGP-validated content so you can automate faster and more efficiently.

    Get the cheat sheet
    Red Hat Developers logo LinkedIn YouTube Twitter Facebook

    Products

    • Red Hat Enterprise Linux
    • Red Hat OpenShift
    • Red Hat Ansible Automation Platform

    Build

    • Developer Sandbox
    • Developer Tools
    • Interactive Tutorials
    • API Catalog

    Quicklinks

    • Learning Resources
    • E-books
    • Cheat Sheets
    • Blog
    • Events
    • Newsletter

    Communicate

    • About us
    • Contact sales
    • Find a partner
    • Report a website issue
    • Site Status Dashboard
    • Report a security problem

    RED HAT DEVELOPER

    Build here. Go anywhere.

    We serve the builders. The problem solvers who create careers with code.

    Join us if you’re a developer, software engineer, web designer, front-end designer, UX designer, computer scientist, architect, tester, product manager, project manager or team lead.

    Sign me up

    Red Hat legal and privacy links

    • About Red Hat
    • Jobs
    • Events
    • Locations
    • Contact Red Hat
    • Red Hat Blog
    • Inclusion at Red Hat
    • Cool Stuff Store
    • Red Hat Summit

    Red Hat legal and privacy links

    • Privacy statement
    • Terms of use
    • All policies and guidelines
    • Digital accessibility

    Report a website issue