Image mode for Red Hat Enterprise Linux (RHEL), introduced as a tech preview in RHEL 9.4, offers a streamlined way to build, deploy, and maintain your operating system using container images. In this article, we will explore how to create and deploy a RHEL image mode web server on Red Hat OpenShift Virtualization.
Build your web server
First, we will build the RHEL image to provide access to an Apache httpd webserver based on a Containerfile that contains the following customizations:
- A
bootc-userwith passwordredhat - The Apache
httpdpackage installed - The Apache
httpdservice enabled - A custom
index.htmlfile serving our home page
The final Containerfile is as follows:
FROM registry.redhat.io/rhel9/rhel-bootc:9.4
RUN dnf -y update && dnf -y install tmux mkpasswd
RUN pass=$(mkpasswd --method=SHA-512 --rounds=4096 redhat) && useradd -m -G wheel bootc-user -p $pass
RUN echo "%wheel        ALL=(ALL)       NOPASSWD: ALL" > /etc/sudoers.d/wheel-sudo
RUN dnf -y install httpd && \
    systemctl enable httpd && \
    mv /var/www /usr/share/www && \
    sed -ie 's,/var/www,/usr/share/www,' /etc/httpd/conf/httpd.conf
RUN echo "Welcome to the bootc-http instance!" > /usr/share/www/html/index.html
EXPOSE 80
All you need to do now is to log in to your registry; you can use a self-hosted registry or a public registry like quay.io:
podman login $REGISTRY_URLYou can now build and push the image using Podman:
podman build -t $REGISTRY_URL/$USERNAME/awesome-webserver:v1.0podman push $REGISTRY_URL/$USERNAME/awesome-webserver:v1.0Once the image is ready, you can proceed to the next step, converting the image to the KVM QCOW2 format using bootc-image-builder.
Convert your container image to QCOW2
Red Hat OpenShift Virtualization can use QCOW2 images as a disk image source to deploy a virtual machine; hence, we will convert the previously built image to the required format.
We can leverage the official Red Hat bootc-image-builder image to perform this task.
First, create a folder named output where the final image will be stored:
mkdir -p outputThen run (as a privileged container) the image conversion:
sudo podman run \
   --rm \
   -it \
   --privileged \
   --pull=newer \
   --security-opt label=type:unconfined_t \
   -v $(pwd)/output:/output \
   -v /var/lib/containers/storage:/var/lib/containers/storage \
   registry.redhat.io/rhel9/bootc-image-builder:latest \
   --type qcow2 \
   $REGISTRY_URL/$USERNAME/awesome-webserver:v1.0
It will take some time to generate the final image, but after the process, we will have our image at this path: output/qcow2/disk.qcow2
Create the necessary resources for the VM
OpenShift Virtualization supports using a container image as a source for importing QCOW2 disks and converting them to bootable disks for the VMs. In this step, we will take the output of the previous process and embed it into a new container image, which will then be imported into OpenShift Virtualization to use for creating our brand new VM.
FROM registry.access.redhat.com/ubi9/ubi-minimal:latest AS builder
ADD --chown=107:107 output/qcow2/disk.qcow2 /disk/
RUN chmod 0440 /disk/*
FROM scratch
COPY --from=builder /disk/* /disk/
As you can see, all this Containerfile does is to place the QCOW2 image into the default disk/path where OpenShift Virtualization expects the disk image to be for importing.
As usual, we will build and push the image, this time with a dedicated tag:
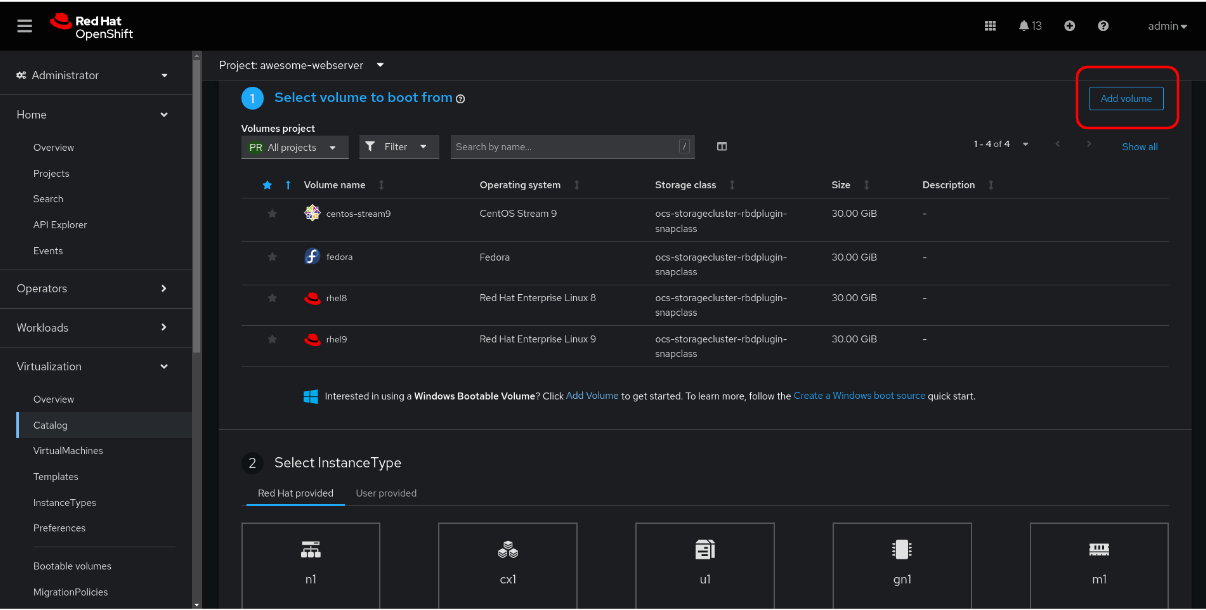
podman build -t $REGISTRY_URL/$USERNAME/awesome-webserver:v1.0-ocpvpodman push $REGISTRY_URL/$USERNAME/awesome-webserver:v1.0-ocpvThe next step is where the magic happens. We will create a volume resource (Figure 1) that will take care of configuring the necessary jobs to fetch the image and create a bootable source for the VM we will create.
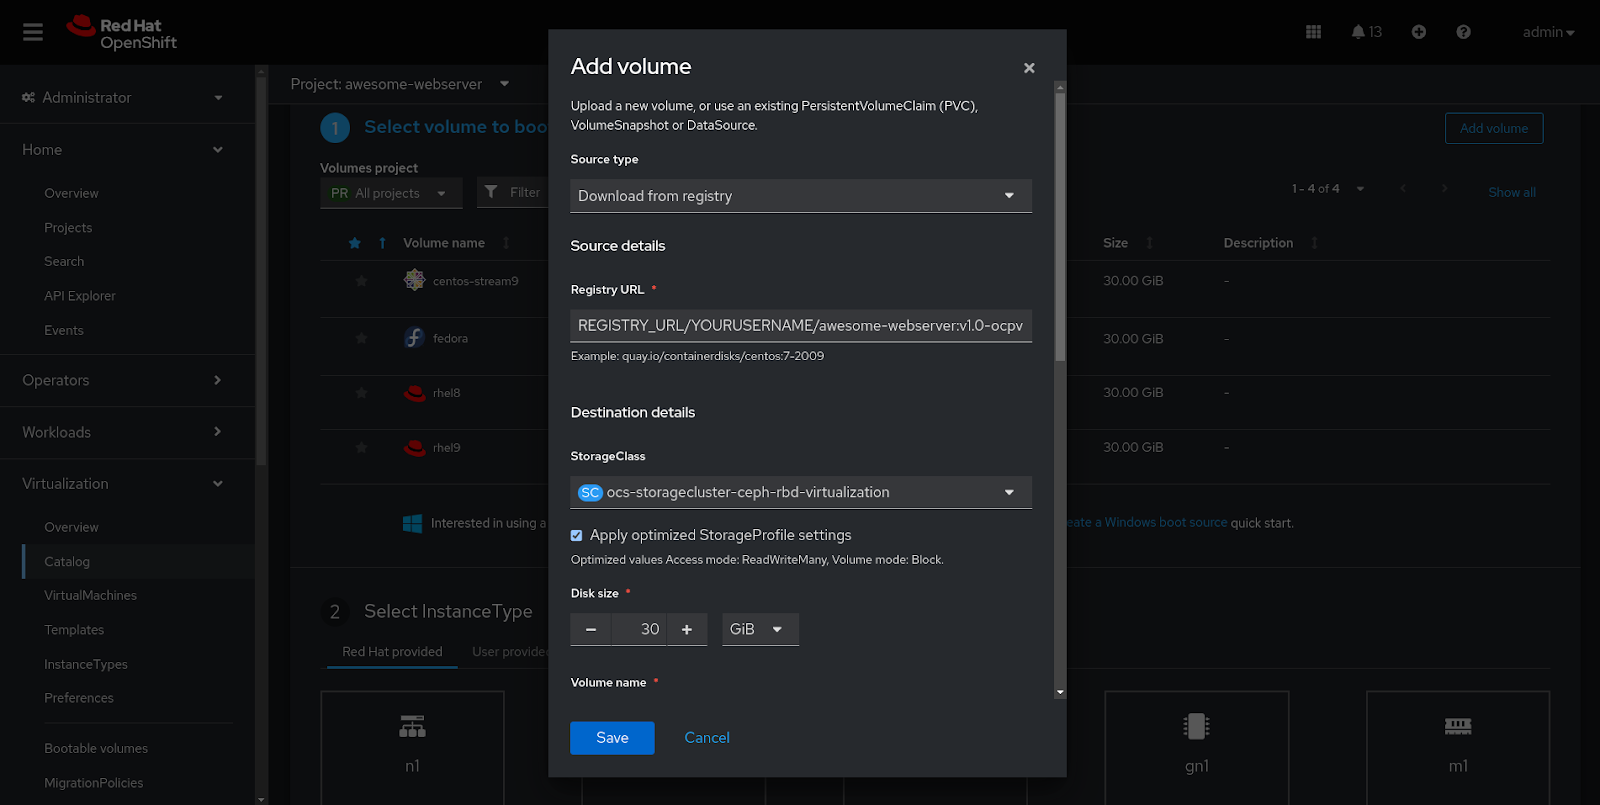
Configure the input as follows (see Figure 2):
- Registry URL: Replace
REGISTRY_URLandYOURUSERNAMEwith the registry you are using and your username - Volume name:
awesome-webserver - Cron:
*/2 * * * * - Preference:
rhel.9 - InstanceType:
u1.small
We can verify that after a couple of minutes, the volume resource will appear in the OpenShift Virtualization catalog (Figure 3).
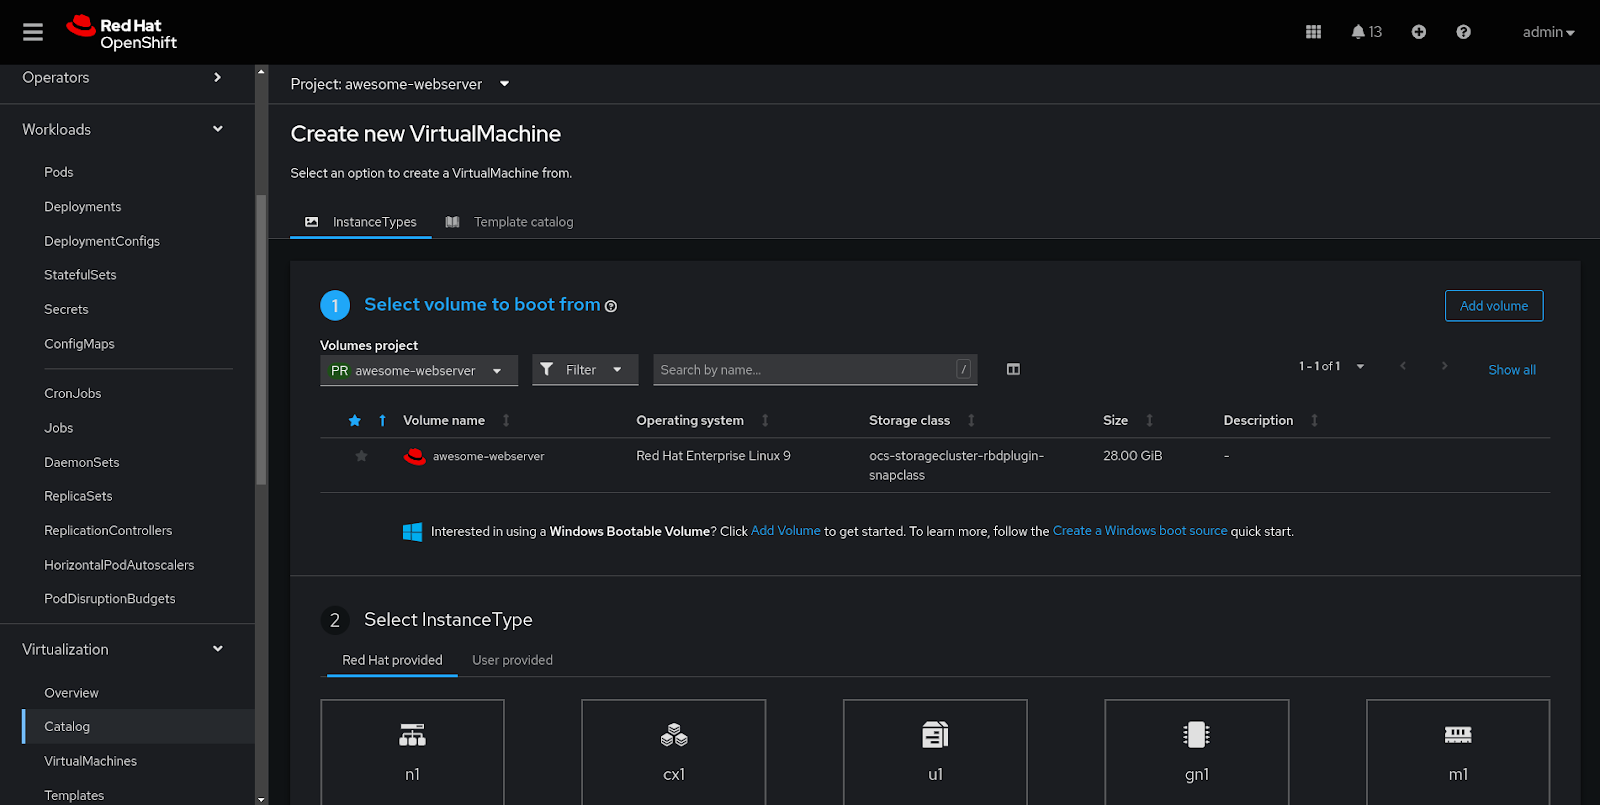
You can select the new boot volume, an instance type u1 Small, and proceed to the creation of the VM.
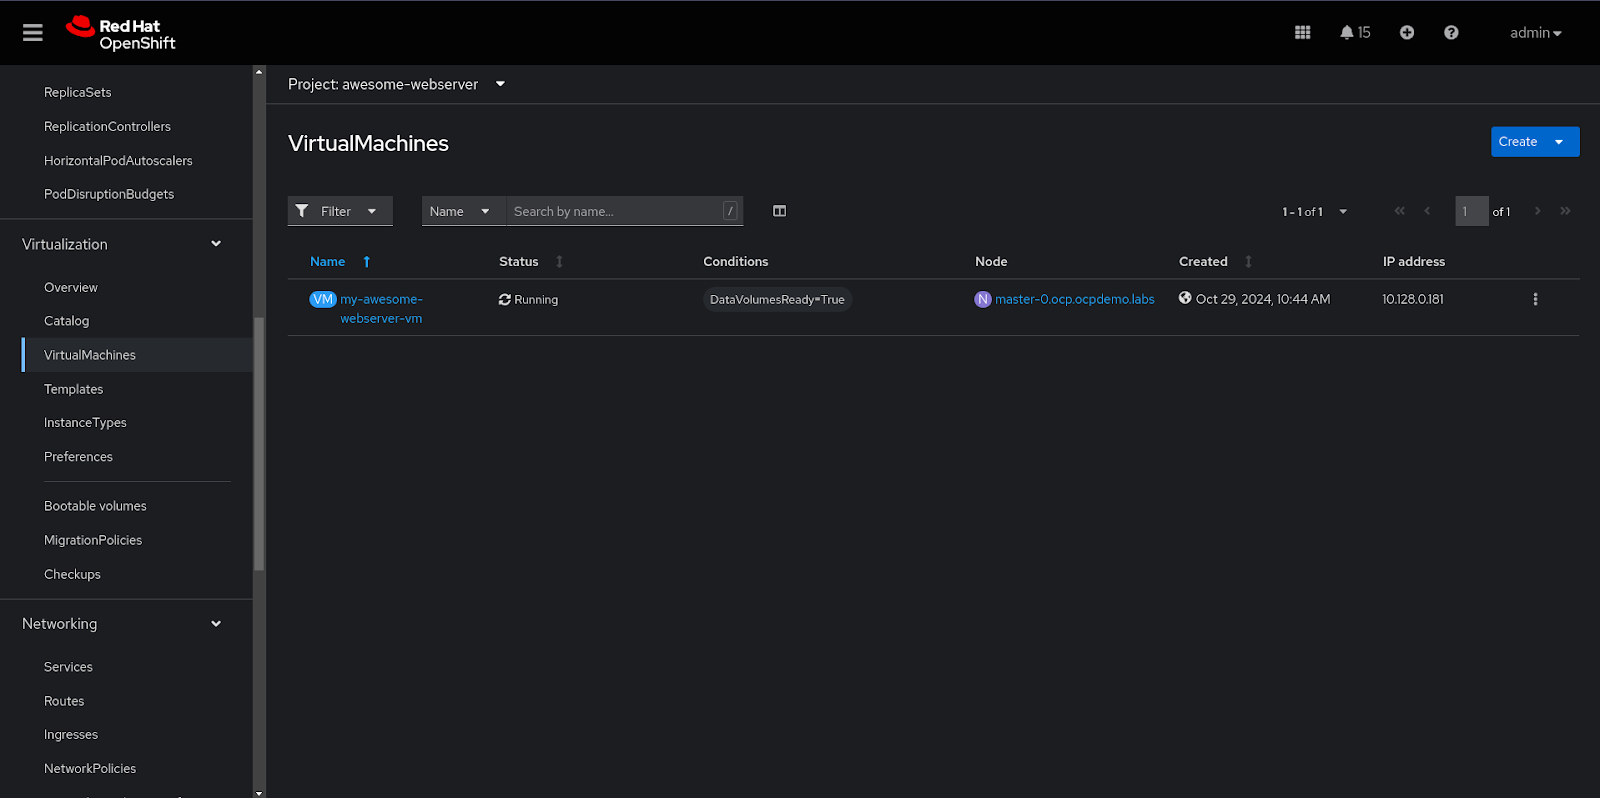
After a few seconds, the VM will be up and running! Figure 4 shows the result.
Expose and test the web server
Now that our VM is running, let's access our web server and verify that it is serving our index page.
To do so, we need to first create a service for the VM. In the Networking → Services tab, click Create Service (Figure 5) and paste the following YAML definition to ensure that the service is selecting the VM pod and exposing the port 80, where our server is listening:
kind: Service
apiVersion: v1
metadata:
  name: http-server
  namespace: awesome-webserver
spec:
  ports:
    - protocol: TCP
      port: 80
      targetPort: 80
  selector:
    vm.kubevirt.io/name: my-awesome-webserver-vm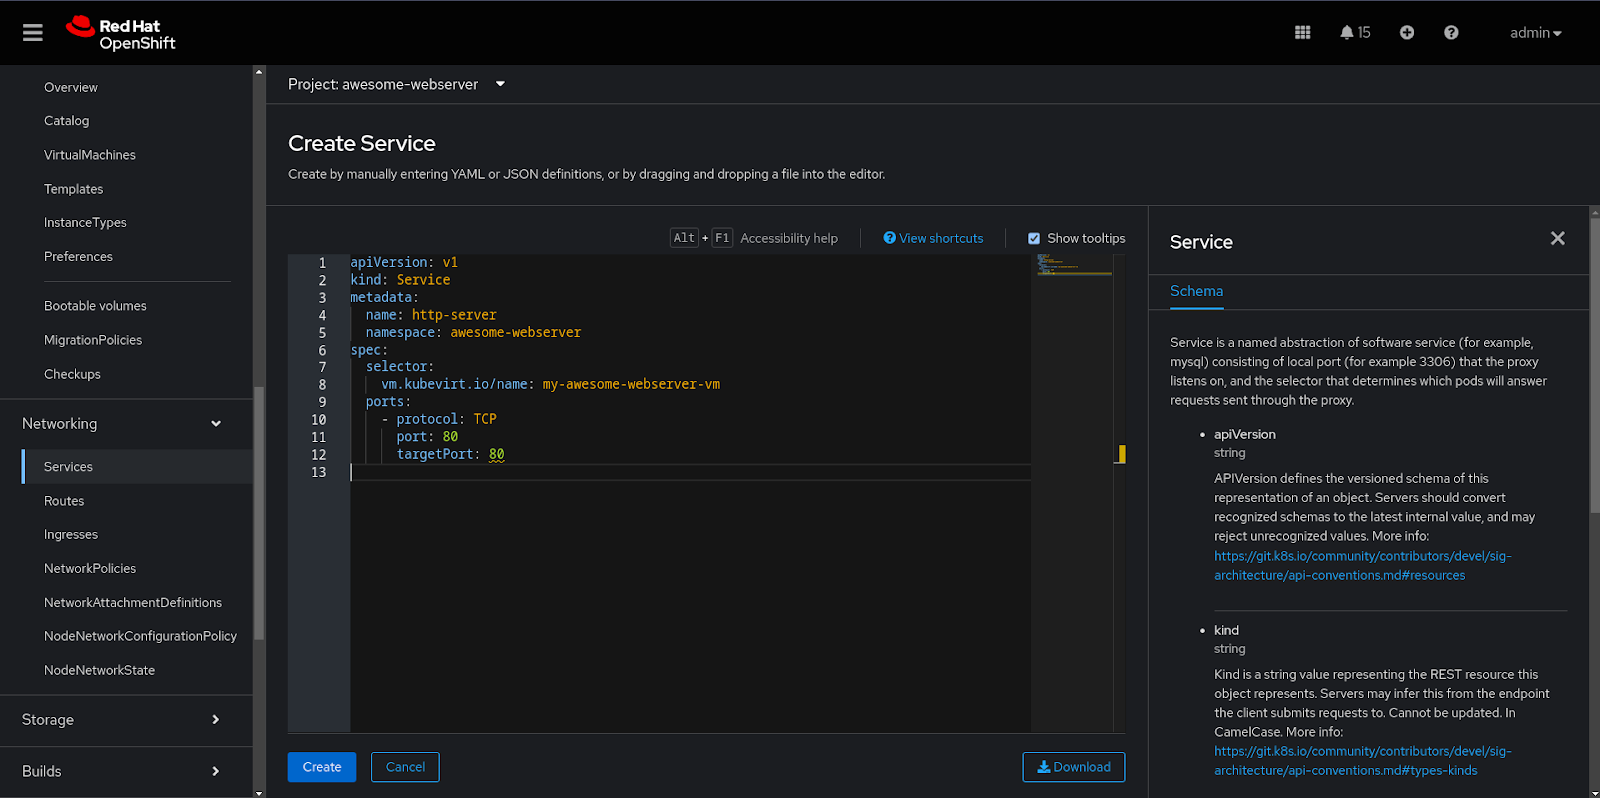
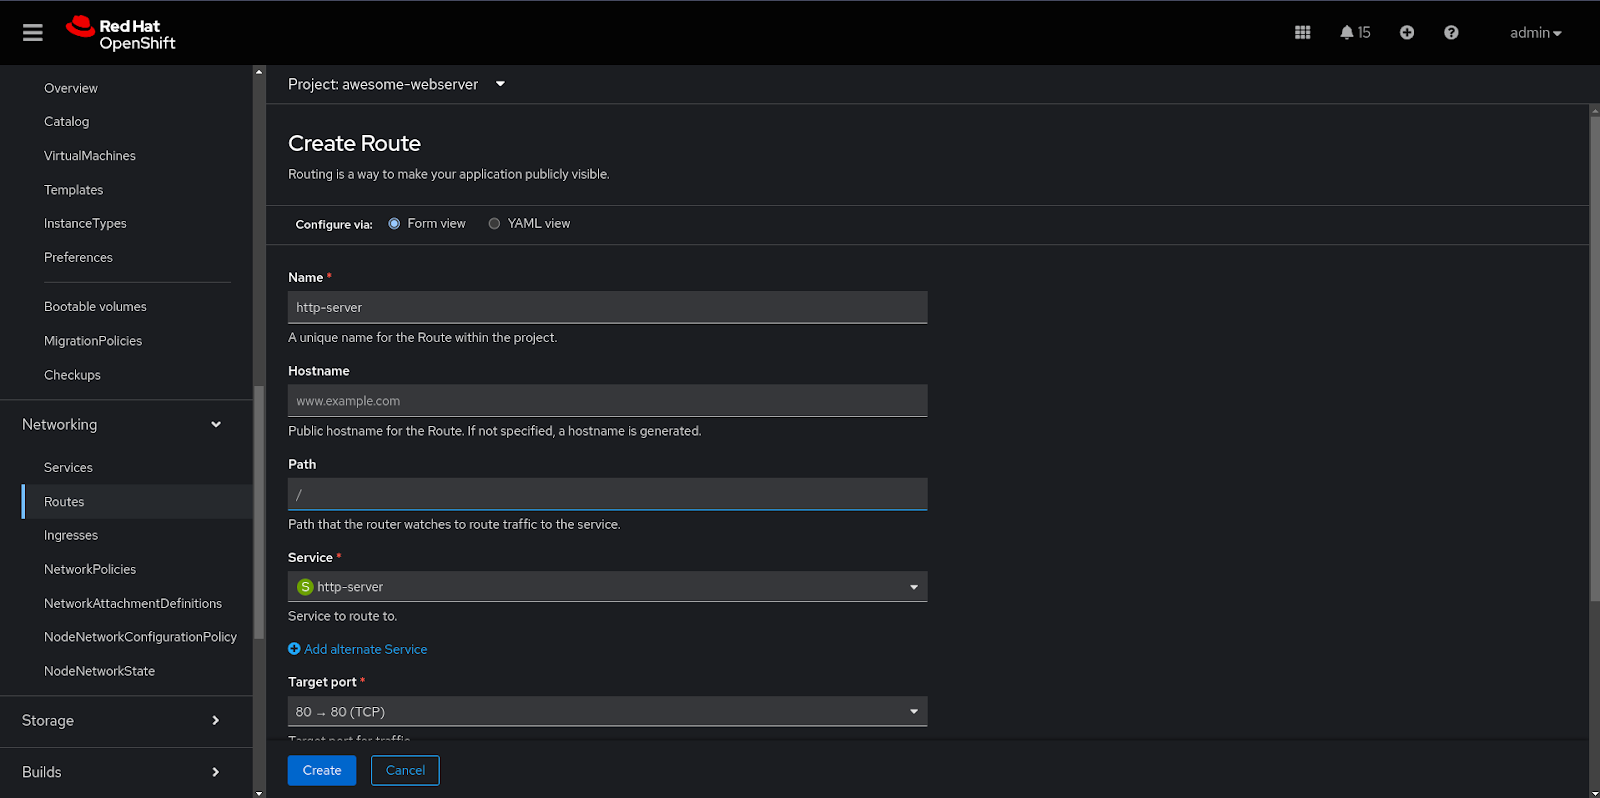
Once the service is in place, we can go into Networking → Routes to create an HTTP route to connect to our web server, as shown in Figure 6.
In your browser, navigate to the URL that was provided when you created the route to verify that the server is properly running. You should see a welcome message as illustrated in Figure 7.

Wrap up
In this article, we demonstrated how easy it is to build a RHEL image mode container and use Red Hat OpenShift Virtualization to deploy it in a few minutes without any additional tools or modifications. You can also automate this to enable deployment at scale for multiple instances and different hypervisors, cloud providers, or bare metal instances.
Get started with image mode for Red Hat Enterprise Linux and learn more about bringing your virtual machines to OpenShift Virtualization.
