The surge in networking demands and cost has piqued interest in data processing units (DPUs). The Marvell Octeon 10 DPU addresses these challenges with their hardware solution. Red Hat Enterprise Linux (RHEL) excels at running everywhere from the public cloud to the edge. Bringing RHEL onto the Marvell Octeon 10 DPU is the first step in realizing and building a vibrant ecosystem for open source collaboration in solving these challenges. Red Hat along with its ecosystem partners can plan and bring their solutions onto the Marvell Octeon 10 DPU.
Installing RHEL on Marvell Octeon 10
Welcome to this guide to installing Red Hat Enterprise Linux on the Marvell Octeon 10 DPU. This article will guide you through the process of setting up RHEL on the Marvell Octeon 10 using the 10G management interface and a PXE server on the host machine.
Info alert: Note
Important: Please note that it is assumed that the UEFI Bootloader is flashed correctly onto the secondary SPI memory device. If not, please contact your Marvell FAE to be given the instructions to do so. You only need to flash the UEFI Bootloader once unless there are bug fixes or improvements provided by Marvell.
Overview of the setup
When it comes to installing RHEL on the Marvell Octeon 10, a PXE server can be set up either on the network or on the host machine itself. The advantage of choosing the latter is that the management network is looped back to the host itself. Also the host will have access to the serial terminal via USB. This self-contained approach simplifies the provisioning process, making it more accessible and user-friendly for small scale deployments (typically one node). Figure 1 shows the setup.
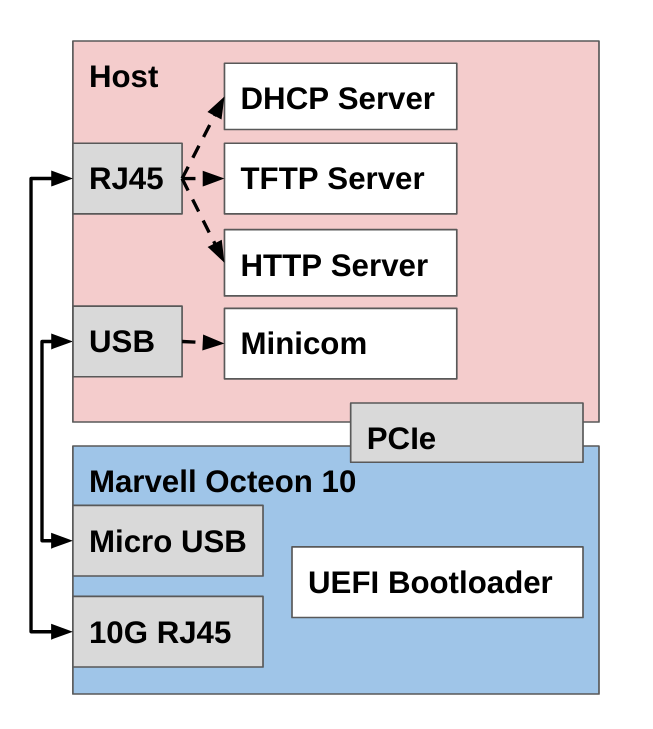
Components of the setup:
- UEFI Bootloader flashed on the Marvell Octeon 10
- RHEL installation on x86 host with minicom
- RHEL iso (downloaded through your Red Hat subscription)
- Custom GRUB configuration
- Custom kickstart configuration
- TFTP server
- DHCP server
- HTTP server
Setting up DHCP
The DHCP server for the purposes of this document of installing RHEL will be used to give the UEFI bootloader an IP address when attempting to PXE boot the ISO image through TFTP. (Note: This DHCP server can also be used by U-Boot to burn the UEFI bootloader onto the secondary SPI memory device on the Marvell Octeon 10).
Start by installing the DHCP server for RHEL on the host:
dnf install -y dhcp-server
For the interface directly connected to the 10G management port on the Marvell Octeon 10, assign the ip address "172.131.100.1/24" to it
# E.g. $IF_NAME = eno4

ip addr add 172.131.100.1/24 dev $IF_NAME
Create/change the dhcpd config at /etc/dhcp/dhcpd.conf to the following. Please replace the DNS servers and domain with your own:
option space pxelinux;
option pxelinux.magic code 208 = string;
option pxelinux.configfile code 209 = text;
option pxelinux.pathprefix code 210 = text;
option pxelinux.reboottime code 211 = unsigned integer 32;
option architecture-type code 93 = unsigned integer 16;

allow booting;
allow bootp;

next-server 172.131.100.1;
always-broadcast on;

subnet 172.131.100.0 netmask 255.255.255.0 {
    range 172.131.100.10 172.131.100.20;
    option broadcast-address 172.131.100.255;
    option routers 172.131.100.1;
    option domain-name-servers <INSERT COMMA SEPARATED LIST OF DNS SERVERS HERE>;
    option domain-search "<INSERT DOMAIN HERE>";
    option dhcp-client-identifier = option dhcp-client-identifier;
    class "pxeclients" {
        match if substring (option vendor-class-identifier, 0, 9) = "PXEClient";
        filename "/grubaa64.efi";
    }
}
Restart DHCPD with the following command:
systemctl restart dhcpd
After restarting, make sure that DHCPD is running properly:
systemctl status dhcpd
Setting up TFTP
The DHCP server for the purposes of this document of installing RHEL will be used to provide the Linux kernel, Init RAM disk, GRUB EFI, and the custom GRUB config to the UEFI Bootloader.
Start by installing the TFTP server for RHEL on the host:
dnf -y install tftp tftp-server
systemctl enable tftp.service --now
firewall-cmd --permanent --add-service=tftp
firewall-cmd --reload
mkdir -p /etc/systemd/system/tftp.service.d
Unfortunately the TFTP client in the UEFI bootloader does not support options properly thus we need to modify the TFTP server on the host with the -B option in the file /usr/lib/systemd/system/tftp.service:
Change the ExecStart line from:
ExecStart=/usr/sbin/in.tftpd -s /var/lib/tftpboot
To:
ExecStart=/usr/sbin/in.tftpd -B 1468 -s /var/lib/tftpboot
Then restart the TFTP server service file:
systemctl daemon-reload
systemctl restart tftp
After restarting, make sure that TFTP is running properly:
systemctl status tftp
Setting up the mandatory PXE files
Please make sure that the DHCP and TFTP servers are running correctly. Following the steps above.
Firstly, download the RHEL iso from your RH subscription. Note that you need the AARCH version of the RHEL ISO since the Marvell Octeon 10 uses the ARM architecture. Mount the ISO:
# E.g. $ISO_PATH = ~/RHEL-9.2.0-aarch64-dvd1.iso
#      $MNT_ISO_PATH = /mnt/rhel
mount -t iso9660 -o loop $ISO_PATH $MNT_ISO_PATH
Create a TFTP boot directory and copy the necessary files:
mkdir /var/lib/tftpboot/
mkdir /var/lib/tftpboot/pxelinux
cp $MNT_ISO_PATH/images/pxeboot/vmlinuz /var/lib/tftpboot/pxelinux
cp $MNT_ISO_PATH/images/pxeboot/initrd.img /var/lib/tftpboot/pxelinux
cp $MNT_ISO_PATH/EFI/BOOT/grubaa64.efi /var/lib/tftpboot/
chmod 744 /var/lib/tftpboot/grubaa64.efi
Create a custom GRUB configuration at /var/lib/tftpboot/grub.cfg where 172.131.100.1 is the IP of the host interface connected to the 10G management port of the Octeon 10 DPU. Firstly the Grub EFI (grubaa64.efi) is loaded via the PXE options from DHCP. Then the GRUB config is read and the Linux kernel (vmlinuz) and Init RAM disk (initrd.img) is loaded from TFTP.
set timeout=10

menuentry 'Install' {
    linux pxelinux/vmlinuz ip=dhcp inst.repo=http://172.131.100.1/rhel_iso/ inst.ks=http://172.131.100.1/kickstart.ks
    initrd pxelinux/initrd.img
}
This GRUB configuration references where the repo and kickstart files would be found via an HTTP webserver. The vmlinuz and initrd.img are made available already from the TFTP boot directory (/var/lib/tftpboot/pxelinux).
We will be using Python's HTTP server for convenient start and stop of the webserver. Please make sure Python is installed:
dnf -y install python
Now let's prepare the files for HTTP. We will create a /www webserver directory and statically link the mounted ISO to the webserver directory. The mounted ISO being statically linked to the webserver will provide the RHEL installer with additional packages.
mkdir /www
ln -s $MNT_ISO_PATH /www
Create a new kickstart file under /www/kickstart.ks:
# Root Password
rootpw myrootpassword

# System language
lang en_US.UTF-8

# System timezone
timezone America/New_York --utc

# Use text mode install
text

# Accept the license
eula --agreed

# Disable firewall
firewall --disabled

# Do not configure the X Window System
skipx

# Disable the Setup Agent on first boot
firstboot --disabled

# Network information
network --bootproto=dhcp --hostname=marvell-soc.redhat --device=enP2p6s0 --activate

ignoredisk --only-use=nvme0n1
# System bootloader configuration
bootloader --append="crashkernel=1G-4G:256M,4G-64G:320M,64G-:576M" --location=mbr --boot-drive=nvme0n1
autopart
# Partition clearing information
clearpart --all --initlabel --drives=nvme0n1

# Reboot after installation
reboot

%packages --ignoremissing
@base
@core
@Development Tools
python3-devel
atk
cairo
dhclient
tcl
tk
nfs-utils
chrony
vim
ethtool
git
grubby
xterm
NetworkManager-config-server
%end
Note that the interface enP2p6s0 should be the 10G management port. Change myrootpassword with your own desired root password. Also this will install on the NVME drive. This must be populated prior to the card being seated into the server.
Info alert: Note
Optional: A useful tool called ksvalidator can be used to validate the kickstart.ks file:
dnf install pykickstart
ksvalidator /www/kickstart.ks
Now we can start the HTTP server.
cd /www
python -m http.server 80
Installing via UEFI PXE boot on the 10G management port
The steps above should have prepared the necessary files and servers running to PXE boot. Make sure all the steps above are performed and the DHCP, TFTP, and HTTP servers are running.
First, you should install minicom:
dnf install -y minicom
Find which USB devices from the Marvell Octeon 10 are connected to the HOST:
dmesg | grep ttyU
[1033246.599230] usb 1-13: cp210x converter now attached to ttyUSB0
[1033246.617773] usb 1-13: cp210x converter now attached to ttyUSB1
From this output, ttyUSB0 and ttyUSB1 are associated with the Marvell Octeon 10. The ttyUSB1 device is used to reset the Marvell Octeon 10 in the case of failure. The ttyUSB0 device is the serial terminal to the Marvell Octeon 10. This will be the device we will use to launch PXE Boot from UEFI.
minicom -D /dev/ttyUSB0
Warning alert: Warning
Important: The Marvell Octeon 10 has issues with the Hardware Flow Control. Make sure this option is set to No via “O - cOnfigure Minicom -> Serial port setup -> F - Hardware Flow Control : No”. Also make sure the baud rate “E - Bps/Par/Bits : 115200 8N1” is set correctly.
Reboot the Marvell Octeon 10 via ttyUSB1 or by typing reboot in the BuildRoot OS.
When you see Press 'B' within 10 seconds for boot menu, press the B key immediately.
Then choose 2) Boot from Secondary Boot Device:
=================================
Boot Options
=================================
1) Boot from Primary Boot Device
2) Boot from Secondary Boot Device
N) Boot Normally
S) Enter Setup
D) Enter DRAM Diagnostics
K) Burn boot flash using Kermit
U) Change baud rate and flow control
R) Reboot

Choice: 2
When the UEFI Bootloader is running, hit the <ESC> key when you see the following message:
Press ESCAPE for boot options ..
The following menu should now be visible:
 crb106-pcie
 A8                                                  2.50 GHz
 SDK12.23.10                                         40960 MB RAM


   Select Language            <Standard English>         This is the option
                                                         one adjusts to change
 > Device Manager                                        the language for the
 > Boot Manager                                          current system
 > Boot Maintenance Manager

   Continue
   Reset


  ^v=Move Highlight       <Enter>=Select Entry
Move to the Boot Manager and press <ENTER>. Then move through the menu until you hit an interface with the MAC address 80AA9988776A and the UEFI PXEv4 option.
/------------------------------------------------------------------------------\
|                                Boot Manager                                  |
\------------------------------------------------------------------------------/
                                                       ^
   UEFI HTTPv6 (MAC:80AA99887767)                        Device Path :
   UEFI PXEv4 (MAC:80AA99887768)                         PciRoot(0x2)/Pci(0x5,0
   UEFI PXEv6 (MAC:80AA99887768)                         x0)/Pci(0x0,0x0)/MAC(8
   UEFI HTTPv4 (MAC:80AA99887768)                        0AA9988776A,0x1)/IPv4(
   UEFI HTTPv6 (MAC:80AA99887768)                        0.0.0.0,0x0,DHCP,0.0.0
   UEFI PXEv4 (MAC:80AA99887769)                         .0,0.0.0.0,0.0.0.0)
   UEFI PXEv6 (MAC:80AA99887769)
   UEFI HTTPv4 (MAC:80AA99887769)
   UEFI HTTPv6 (MAC:80AA99887769)
   UEFI PXEv4 (MAC:80AA9988776A)
   UEFI PXEv6 (MAC:80AA9988776A)
   UEFI HTTPv4 (MAC:80AA9988776A)
   UEFI HTTPv6 (MAC:80AA9988776A)
   UEFI Shell

                                                       v
/------------------------------------------------------------------------------\
|                                                                              |
| ^v=Move Highlight       <Enter>=Select Entry      Esc=Exit                   |
\------------------------------------------------------------------------------/
When this option is selected by pressing <ENTER>, the installation of RHEL should start.
Conclusion
The Marvell Octeon 10 will reboot into the fresh RHEL environment after the installation completes.
Demo of RHEL running on the DPU
Showing the CPU information:
lscpu
Architecture:          aarch64
  CPU op-mode(s):      32-bit, 64-bit
  Byte Order:          Little Endian
CPU(s):                24
  On-line CPU(s) list: 0-23
Vendor ID:             ARM
  BIOS Vendor ID:      Marvell
  BIOS Model name:     A8
  Model:               0
  Thread(s) per core:  1
  Core(s) per socket:  1
  Socket(s):           24
  Stepping:            r0p0
  BogoMIPS:            2000.00
  Flags:               fp asimd evtstrm aes pmull sha1 sha2 crc32 atomics fphp a
                       simdhp cpuid asimdrdm jscvt fcma lrcpc dcpop sha3 sm3 sm4
                        asimddp sha512 sve asimdfhm dit uscat ilrcpc flagm ssbs
                       sb dcpodp sve2 sveaes svepmull svebitperm svesha3 svesm4
                       flagm2 frint svei8mm svebf16 i8mm bf16 dgh rng
Caches (sum of all):
  L1d:                 1.5 MiB (24 instances)
  L1i:                 1.5 MiB (24 instances)
  L2:                  24 MiB (24 instances)
NUMA:
  NUMA node(s):        1
  NUMA node0 CPU(s):   0-23
Vulnerabilities:
  Itlb multihit:       Not affected
  L1tf:                Not affected
  Mds:                 Not affected
  Meltdown:            Not affected
  Mmio stale data:     Not affected
  Retbleed:            Not affected
  Spec store bypass:   Mitigation; Speculative Store Bypass disabled via prctl
  Spectre v1:          Mitigation; __user pointer sanitization
  Spectre v2:          Mitigation; CSV2, BHB
  Srbds:               Not affected
  Tsx async abort:     Not affected
We can install ARM packages using dnf:
dnf install dhclient
Updating Subscription Management repositories.
Waiting for process with pid 6150 to finish.
Red Hat Enterprise Linux 9 for ARM 64 - AppStre  13 MB/s |  25 MB     00:01
Red Hat Enterprise Linux 9 for ARM 64 - BaseOS  8.6 MB/s |  15 MB     00:01
Red Hat Enterprise Linux 9 for ARM 64 - BaseOS  7.4 MB/s |  15 MB     00:01
Red Hat Enterprise Linux 9 for ARM 64 - AppStre  11 MB/s |  25 MB     00:02
Dependencies resolved.
========================================================================================
 Package            Arch     Version            Repository                          Size
========================================================================================
Installing:
 dhcp-client        aarch64  12:4.4.2-19.b1.el9 rhel-9-for-aarch64-baseos-rpms     770 k
Installing dependencies:
 dhcp-common        noarch   12:4.4.2-19.b1.el9 rhel-9-for-aarch64-baseos-rpms     131 k
 ipcalc             aarch64  1.0.0-5.el9        rhel-9-for-aarch64-baseos-rpms      43 k
Installing weak dependencies:
 geolite2-city      noarch   20191217-6.el9     rhel-9-for-aarch64-appstream-rpms   23 M
 geolite2-country   noarch   20191217-6.el9     rhel-9-for-aarch64-appstream-rpms  1.6 M

Transaction Summary
========================================================================================
Install  5 Packages

Total download size: 25 M
Installed size: 66 M
Is this ok [y/N]: y
Downloading Packages:
(1/5): ipcalc-1.0.0-5.el9.aarch64.rpm            58 kB/s |  43 kB     00:00
(2/5): geolite2-country-20191217-6.el9.noarch.r 1.6 MB/s | 1.6 MB     00:00
(3/5): dhcp-common-4.4.2-19.b1.el9.noarch.rpm   179 kB/s | 131 kB     00:00
(4/5): dhcp-client-4.4.2-19.b1.el9.aarch64.rpm  779 kB/s | 770 kB     00:00
(5/5): geolite2-city-20191217-6.el9.noarch.rpm   11 MB/s |  23 MB     00:02
--------------------------------------------------------------------------------
Total                                            12 MB/s |  25 MB     00:02
Red Hat Enterprise Linux 9 for ARM 64 - AppStre 3.5 MB/s | 3.6 kB     00:00
...
Running transaction check
Transaction check succeeded.
Running transaction test
Transaction test succeeded.
Running transaction
  Preparing        :                                                        1/1
  Installing       : dhcp-common-12:4.4.2-19.b1.el9.noarch                  1/5
  Installing       : geolite2-country-20191217-6.el9.noarch                 2/5
  Installing       : geolite2-city-20191217-6.el9.noarch                    3/5
  Installing       : ipcalc-1.0.0-5.el9.aarch64                             4/5
  Installing       : dhcp-client-12:4.4.2-19.b1.el9.aarch64                 5/5
  Running scriptlet: dhcp-client-12:4.4.2-19.b1.el9.aarch64                 5/5
  Verifying        : geolite2-city-20191217-6.el9.noarch                    1/5
  Verifying        : geolite2-country-20191217-6.el9.noarch                 2/5
  Verifying        : ipcalc-1.0.0-5.el9.aarch64                             3/5
  Verifying        : dhcp-client-12:4.4.2-19.b1.el9.aarch64                 4/5
  Verifying        : dhcp-common-12:4.4.2-19.b1.el9.noarch                  5/5
Installed products updated.

Installed:
  dhcp-client-12:4.4.2-19.b1.el9.aarch64 dhcp-common-12:4.4.2-19.b1.el9.noarch
  geolite2-city-20191217-6.el9.noarch    geolite2-country-20191217-6.el9.noarch
  ipcalc-1.0.0-5.el9.aarch64

Complete!
We can see the available interfaces (including PF and VF) on the DPU:
ip link show
1: lo: <LOOPBACK,UP,LOWER_UP> mtu 65536 qdisc noqueue state UNKNOWN mode DEFAULT group default qlen 1000
    link/loopback 00:00:00:00:00:00 brd 00:00:00:00:00:00
2: enP2p1s0v0: <BROADCAST,MULTICAST,UP,LOWER_UP> mtu 1500 qdisc mq state UP mode DEFAULT group default qlen 1000
    link/ether 0e:09:6f:36:73:59 brd ff:ff:ff:ff:ff:ff
3: enP2p1s0v4: <BROADCAST,MULTICAST,UP,LOWER_UP> mtu 1500 qdisc mq state UP mode DEFAULT group default qlen 1000
    link/ether 42:d3:57:af:16:04 brd ff:ff:ff:ff:ff:ff
4: enP2p5s0: <NO-CARRIER,BROADCAST,MULTICAST,UP> mtu 1500 qdisc mq state DOWN mode DEFAULT group default qlen 1000
    link/ether 06:af:ab:c5:1b:10 brd ff:ff:ff:ff:ff:ff
5: enP2p1s0v1: <BROADCAST,MULTICAST,UP,LOWER_UP> mtu 1500 qdisc mq state UP mode DEFAULT group default qlen 1000
    link/ether 4e:57:77:1f:48:13 brd ff:ff:ff:ff:ff:ff
6: enP2p6s0: <BROADCAST,MULTICAST,UP,LOWER_UP> mtu 1500 qdisc mq state UP mode DEFAULT group default qlen 1000
    link/ether ee:4f:3a:a6:da:76 brd ff:ff:ff:ff:ff:ff
7: enP2p1s0v5: <BROADCAST,MULTICAST,UP,LOWER_UP> mtu 1500 qdisc mq state UP mode DEFAULT group default qlen 1000
    link/ether 8e:96:75:71:d6:17 brd ff:ff:ff:ff:ff:ff
8: enP2p1s0v2: <BROADCAST,MULTICAST,UP,LOWER_UP> mtu 1500 qdisc mq state UP mode DEFAULT group default qlen 1000
    link/ether 52:08:cb:d6:91:66 brd ff:ff:ff:ff:ff:ff
9: enP2p1s0v6: <BROADCAST,MULTICAST,UP,LOWER_UP> mtu 1500 qdisc mq state UP mode DEFAULT group default qlen 1000
    link/ether be:d3:df:42:65:23 brd ff:ff:ff:ff:ff:ff
10: enP2p1s0v3: <BROADCAST,MULTICAST,UP,LOWER_UP> mtu 1500 qdisc mq state UP mode DEFAULT group default qlen 1000
    link/ether 26:9f:7e:1f:09:11 brd ff:ff:ff:ff:ff:ff
11: enP2p1s0v7: <BROADCAST,MULTICAST,UP,LOWER_UP> mtu 1500 qdisc mq state UP mode DEFAULT group default qlen 1000
    link/ether 9e:79:bf:4f:22:7b brd ff:ff:ff:ff:ff:ff
12: enP2p1s0v8: <BROADCAST,MULTICAST,UP,LOWER_UP> mtu 1500 qdisc mq state UP mode DEFAULT group default qlen 1000
    link/ether 4e:f9:62:f2:05:95 brd ff:ff:ff:ff:ff:ff
13: enP2p1s0v9: <BROADCAST,MULTICAST,UP,LOWER_UP> mtu 1500 qdisc mq state UP mode DEFAULT group default qlen 1000
    link/ether 22:a9:e6:1a:20:11 brd ff:ff:ff:ff:ff:ff
14: enP2p2s0: <NO-CARRIER,BROADCAST,MULTICAST,UP> mtu 1500 qdisc mq state DOWN mode DEFAULT group default qlen 1000
    link/ether b6:76:37:b3:b9:dc brd ff:ff:ff:ff:ff:ff
15: enP2p3s0: <NO-CARRIER,BROADCAST,MULTICAST,UP> mtu 1500 qdisc mq state DOWN mode DEFAULT group default qlen 1000
    link/ether 02:23:d8:58:41:7c brd ff:ff:ff:ff:ff:ff
16: enP2p1s0v10: <BROADCAST,MULTICAST,UP,LOWER_UP> mtu 1500 qdisc mq state UP mode DEFAULT group default qlen 1000
    link/ether 52:ac:78:34:cd:b3 brd ff:ff:ff:ff:ff:ff
17: enP2p4s0: <NO-CARRIER,BROADCAST,MULTICAST,UP> mtu 1500 qdisc mq state DOWN mode DEFAULT group default qlen 1000
    link/ether 7e:ca:a9:5f:a5:5a brd ff:ff:ff:ff:ff:ff
18: enP2p1s0v11: <BROADCAST,MULTICAST,UP,LOWER_UP> mtu 1500 qdisc mq state UP mode DEFAULT group default qlen 1000
    link/ether 66:a6:76:5e:e5:9f brd ff:ff:ff:ff:ff:ff
19: enP2p1s0v12: <BROADCAST,MULTICAST,UP,LOWER_UP> mtu 1500 qdisc mq state UP mode DEFAULT group default qlen 1000
    link/ether 5a:ca:c8:50:65:2a brd ff:ff:ff:ff:ff:ff
20: enP2p1s0v13: <BROADCAST,MULTICAST,UP,LOWER_UP> mtu 1500 qdisc mq state UP mode DEFAULT group default qlen 1000
    link/ether 0e:d5:9b:6d:92:4d brd ff:ff:ff:ff:ff:ff
21: enP2p1s0v14: <BROADCAST,MULTICAST,UP,LOWER_UP> mtu 1500 qdisc mq state UP mode DEFAULT group default qlen 1000
    link/ether e2:69:8d:9a:7e:76 brd ff:ff:ff:ff:ff:ff
22: enP2p1s0v15: <BROADCAST,MULTICAST,UP,LOWER_UP> mtu 1500 qdisc mq state UP mode DEFAULT group default qlen 1000
    link/ether 5a:9a:51:6c:ab:46 brd ff:ff:ff:ff:ff:ff
Running ethtool on some interfaces to show PFs and VFs available on the DPU:
ethtool -i enP2p6s0
driver: rvu-nicpf
version: 5.14.0-284.11.1.el9_2.aarch64
firmware-version:
expansion-rom-version:
bus-info: 0002:06:00.0
supports-statistics: yes
supports-test: no
supports-eeprom-access: no
supports-register-dump: no
supports-priv-flags: no

ethtool -i enP2p2s0
driver: rvu-nicpf
version: 5.14.0-284.11.1.el9_2.aarch64
firmware-version:
expansion-rom-version:
bus-info: 0002:02:00.0
supports-statistics: yes
supports-test: no
supports-eeprom-access: no
supports-register-dump: no
supports-priv-flags: no

ethtool -i enP2p1s0v0
driver: rvu-nicvf
version: 5.14.0-284.11.1.el9_2.aarch64
firmware-version:
expansion-rom-version:
bus-info: 0002:01:00.1
supports-statistics: yes
supports-test: no
supports-eeprom-access: no
supports-register-dump: no
supports-priv-flags: no
Appendix 1: Resetting the Marvell Octeon 10 DPU
Enter the other USB device for the Marvell Octeon 10 DPU:
minicom -D /dev/ttyUSB1
Warning alert: Warning
Important: The Marvell Octeon 10 has issues with the Hardware Flow Control. Make sure this option is set to No via “O - cOnfigure Minicom -> Serial port setup -> F - Hardware Flow Control : No”. Also make sure the baud rate “E - Bps/Par/Bits : 115200 8N1” is set correctly.
Enter the M) Management commands:
===================================
SCP Main Menu
===================================
P) Power Control commands
M) Management commands

Choice:  M
Enter the r) Chip reset to reset the Marvell Octeon 10 DPU.
===================================
SCP Management Menu
===================================
r) Chip reset
(blank line returns to Main Menu)

Choice:  r