Onboarding devices at the edge differs from doing so in a data center and presents some unique challenges. Among other requirements, the device onboarding process must:
- Be secure and reduce the risk of a malicious party tempering with a device or a rogue device being connected to the system.
- Minimize manual intervention in order to make the process cheaper, faster, more scalable, and more secure. A zero-touch or low-touch approach also allows personnel without specialized skills to onboard devices.
The FIDO Device Onboard (FDO) specification addresses both of these requirements. Red Hat Enterprise Linux (RHEL) offers FDO packages starting with version 8.6, based on the Fedora IoT implementation of FDO. You can follow How to onboard edge devices at scale with FDO and Linux to set up an FDO environment manually.
However, as with any manual procedure, it is error prone and not scalable. This article, on the other hand, introduces the Ansible Community FDO collection, which allows you to automate setting up FDO servers and device onboarding with ease.
The flow
We will be using virtual machines (VMs) to simulate a typical FDO flow (Figure 1), but as far as FDO goes, the sequence and technology is no different from onboarding a physical device.
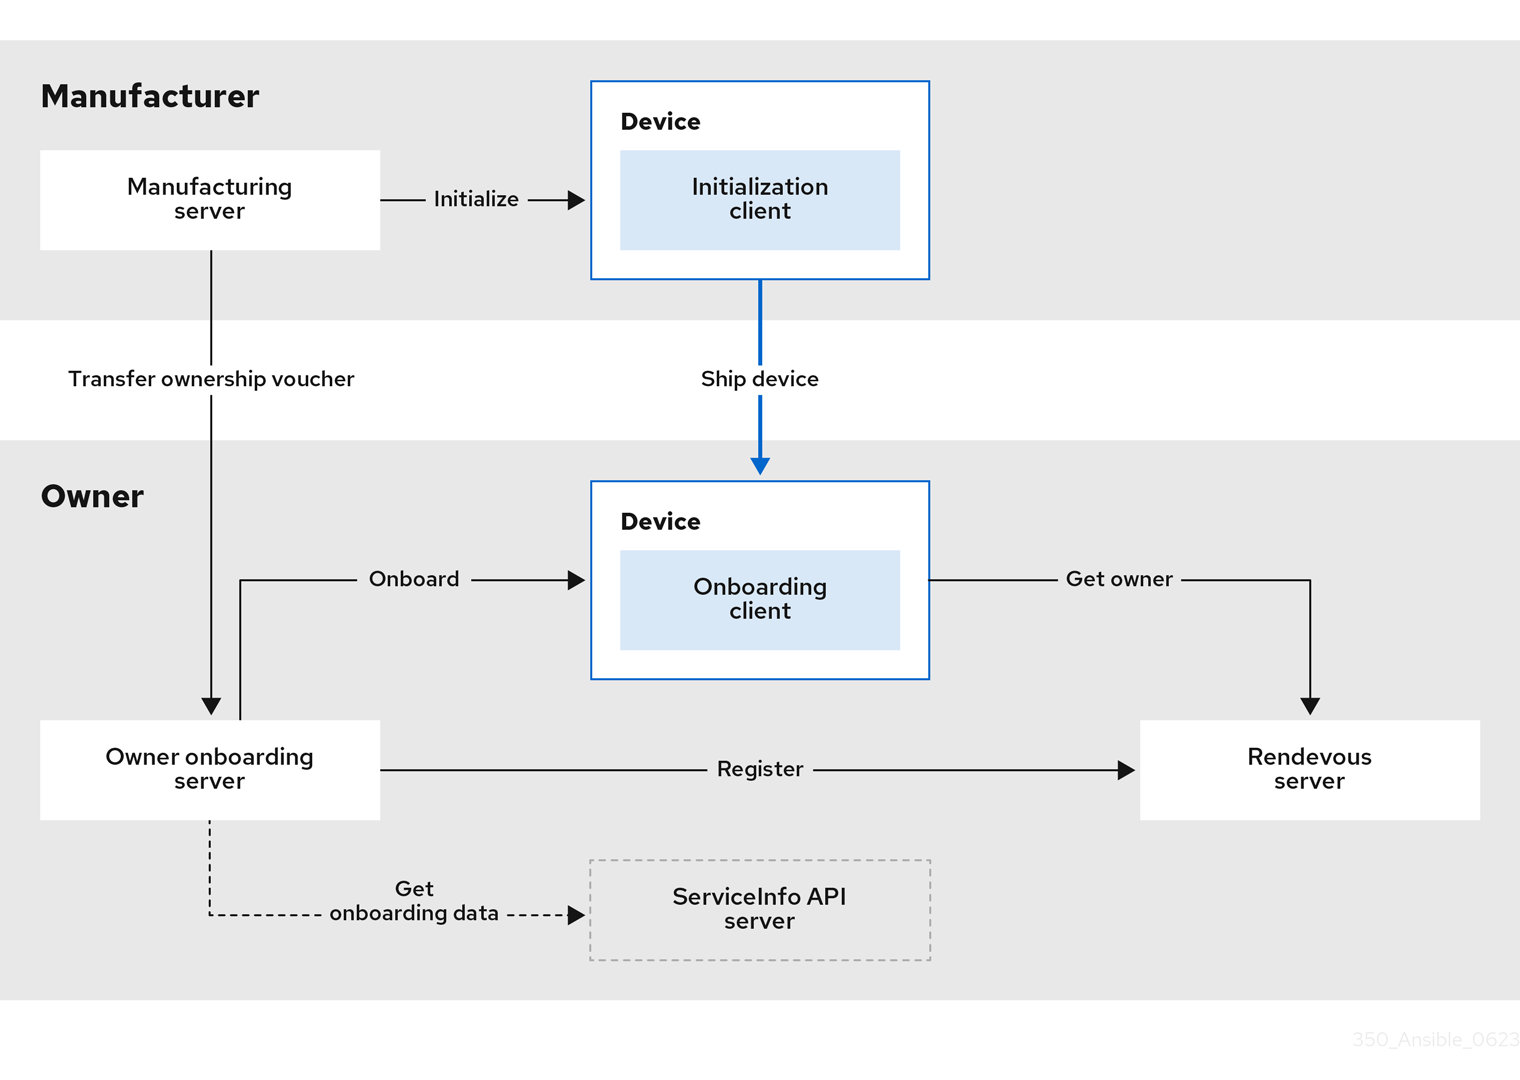
Note: Ideally, you will need two networks to isolate the device manufacturer from the device owner, as will be the case in a real-life scenario. You will also need enough disk and compute power to run multiple VMs. Although it is possible to host all of the FDO servers on a single VM, separating them can help you better understand their roles and responsibilities.
Let us outline the steps and then show each step's commands and Ansible code:
- Deploy an FDO manufacturing server.
- Deploy an OSBuild server.
- Build an FDO-enabled installer image.
- Boot and initialize a device.
- Deploy an FDO rendezvous server.
- Deploy an FDO owner server.
- Move the device from the manufacturer to the owner.
- Transfer the device's ownership voucher from the manufacturer to the owner.
- Boot the device and watch it being automatically onboarded.
Keys and certificates
But first, you will need a set of cryptographic keys and CA certificates. FDO uses a set of certificates and private keys to sign and verify documents exchanged between the parties to establish mutual trust. You can easily generate FDO key-certificate pairs using an Ansible role. You can either run it locally or delegate generating the certificates to a remote host if it is not possible to install FDO packages on your local system.
Specify a destination directory from where the keys and certificates can be easily transferred to the respective FDO servers:
---
- name: Generate FDO keys and certificates
  hosts: localhost
  become: true
  gather_facts: true

  tasks:
    - name: Generate FDO keys and certificates on localhost
      ansible.builtin.import_role:
        name: community.fdo.generate_keys_and_certificates
      vars:
        generated_certs_dir: "{{ playbook_dir }}/keys/"
Here, we will create all the required cryptographic files in a single command for the sake of simplicity. In reality, though,:
- The owner will share their certificate with the manufacturer while keeping the private key to themselves.
- The manufacturer will share their manufacturer certificate with the rendezvous server and the device CA certificate with the owner.
Types of the key-certificate pairs that will be generated, depending on the role (owner or manufacturer), can be controlled via the generate_certificate_types variable.
generate_certificate_types:
  - manufacturer
  - device-ca
  - diun
or
generate_certificate_types:
  - owner
Manufacturing server
Next, deploy and configure an FDO manufacturing server on a RHEL host in the manufacturing network. The server will be used to initialize devices.
Note: As already mentioned, we are using the Ansible Community FDO collection for setting up FDO servers. Although the collection is functional, it is still in development and breaking changes are possible.
- name: Deploy the manufacturing server
  hosts: manufacturing_server
  become: true
  gather_facts: true

  tasks:
    - name: Set up the manufacturing server
      ansible.builtin.import_role:
         name:  community.fdo.setup_manufacturing_server
      vars:
        manufacturing_server_generate_keys_and_certificates: false
This will prepare the manufacturing server software for running—install the required packages, open firewall ports, create directories, etc.
Next, copy all required keys and certificates to the manufacturing host:
    - name: Copy manufacturing server certificates
      ansible.builtin.import_role:
        name:  community.fdo.copy_manufacturing_server_certs_to_manufacturing_server
      vars:
        localhost_manufacturing_server_certs_dir: "{{ playbook_dir }}/keys"
Finally, generate configuration files and start the server:
    - name: Configure the manufacturing server
      ansible.builtin.include_role:
        name:  community.fdo.configure_manufacturing_server
      vars:
        manufacturing_server_rendezvous_info_ip_address: "{{ rendezvous_server_ip_address }}"
Device initialization
Now it is time to initialize a device against the manufacturing server.
In order to do that, install an FDO-enabled operating system on the device. During the installation, a special client will automatically contact the manufacturing server and initialize the device. As mentioned, RHEL already includes an FDO initialization client by default, so we will use an RHEL for Edge Simplified Installer as an .iso image.
There are multiple ways to tell the FDO client where to find the manufacturing server (e.g., via kickstart). Still, as you will likely customize the OS image anyway, we will include the required FDO configuration while building that image.
You can build an image using osbuild manually, or better yet, use the specialized Ansible collection for that. In order to do that, create an image builder VM in the manufacturing network, or use the same host that runs the FDO manufacturing server.
---
- name: Generate an FDO-enabled RHEL for Edge simplified installer
  hosts: image_builder
  become: true
  gather_facts: true

  tasks:
    - name: Set up osbuild server
      ansible.builtin.import_role:
        name: infra.osbuild.setup_server

    - name: Build FDO-enabled simplified installer image
      ansible.builtin.include_role:
        name: infra.osbuild.builder
      vars:
        builder_compose_type: edge-simplified-installer
        builder_blueprint_name: fdo-demo
        builder_compose_customizations:
          installation_device: /dev/vda
          fdo:
            manufacturing_server_url: "http://{{ manufacturing_server_host }}:8080"
            diun_pub_key_insecure: true
        builder_compose_pkgs: []
As we will use the demo image with a VM, the installation device is /dev/vda. Refer to the documentation for applying additional customizations.
Note: Keep in mind that building an installer image might take a while.
When finished, the installer image (fdo-demo_edge-simplified-installer.iso in our case) can be found at {{ builder_image_path }} on the image builder host, and used to boot a VM, e.g., on KVM:
sudo virt-install \
  --boot uefi --network <fdo-manufacturing-net> \
  --name fdo-device --memory 2048 --vcpus 2 \
  --disk size=20,path=fdo-demo-device.qcow2 \
  --os-variant rhel9.2 \
  --tpm backend.type=emulator,backend.version=2.0,model=tpm-tis \
  --cdrom fdo-demo_edge-simplified-installer.iso
Let the RHEL installer do its job and shut down the VM. It is ready to be "shipped."
Rendezvous server
A rendezvous server is a mediator between a device and its owner—it serves as a meeting point and performs primary verification of the device, checking its manufacturer's CA. The location of the rendezvous server is embedded by a manufacturing server (see above) in a credentials file on the device and in an ownership voucher intended for the owner onboarding server. We deploy the rendezvous server to a host in the owner network. You should now be familiar with the steps, as they follow the manufacturing server pattern.
- name: Deploy the rendezvous server
  hosts: rendezvous_server
  become: true
  gather_facts: true

  tasks:
    - name: Set up the rendezvous sever
      ansible.builtin.import_role:
        name: community.fdo.setup_rendezvous_server
      vars:
        copy_manufacturer_certs: false

    - name: Copy rendezvous server certificates
      ansible.builtin.import_role:
        name: community.fdo.copy_manufacturing_server_certs_to_rendezvous_server
      vars:
        localhost_manufacturing_server_certs_dir: "{{ playbook_dir }}/keys"

    - name: Configure the rendezvous server
      ansible.builtin.import_role:
        - name: community.fdo.configure_rendezvous_server
      vars:
        update_cert: false
Owner server
Finally, we will deploy the owner server that will claim ownership of the device, create a secure communication channel with it (or rather with its FDO onboarding client), and use the channel to send custom onboarding steps to the device:
- name: Deploy the owner server
  hosts: owner_server
  become: true
  gather_facts: true

  tasks:
    - name: Set up the owner server
      ansible.builtin.import_role:
        name: community.fdo.setup_owner_server
      vars:
        copy_manufacturer_certs: false

    - name: Copy manufacturing certificates to the owner server
      ansible.builtin.import_role:
        name: community.fdo.copy_manufacturing_server_certs_to_owner_server
      vars:
        localhost_manufacturing_server_certs_dir: "{{ playbook_dir }}/keys"

    - name: Configure the owner server
      ansible.builtin.import_role:
        name: community.fdo.configure_owner_server
      vars:
        update_keys_certs: false
        owner_onboarding_server_owner_addresses_ip_address: "{{ owner_server_ip_address }}"
        serviceinfo_api_server_config: |-
          initial_user:
            username: admin
            password: "{{ fdo_admin_password }}"
            sshkeys:
            - "{{ fdo_admin_ssh_key }}"
          commands:
          - command: touch
            args:
            - /var/tmp/fdo-onboard-success
            return_stdout: true
            return_stderr: true
          diskencryption_clevis:
          - disk_label: /dev/vda4
            binding:
              pin: tpm2
              config: "{}"
            reencrypt: true
          additional_serviceinfo: ~
Here, the onboarding will create an initial admin user with SSH access, run the touch command and re-encrypt the disk with the label /dev/vda4. However, serviceinfo_api_server_config is fully customizable. Refer to the FDO implementation documentation for a full list of supported onboarding directives.
Device onboarding
Finally, everything is (almost) ready for device onboarding. "Ship" the device from the manufacturer to the owner by detaching the device VM from the manufacturing network and attaching it to the owner network.
Then, transfer the device's ownership voucher from the manufacturing server to the owner server and boot the VM. It does not matter which you do first. An Ansible role will help you copy the ownership vouchers between the servers via localhost (the Ansible controller):
---
- name: Fetch Ownership Vouchers from Manufacturer server to localhost
  hosts: manufacturing_server
  become: true
  gather_facts: true
  tasks:
    - ansible.builtin.import_role:
        name: community.fdo.fetch_ownership_vouchers_to_localhost

- name: Copy Ownership Vouchers from localhost to Owner server
  hosts: owner_server
  become: true
  gather_facts: true
  tasks:
    - ansible.builtin.import_role:
        name: community.fdo.copy_ownership_vouchers_from_localhost
Note: In reality, you will probably use a different mechanism for transferring ownership vouchers from the manufacturer to an owner.
Conclusion
In this article, we have shown the most basic but common usage of the Ansible Community FDO Collection. However, the collection's roles allow for a great deal of flexibility and customization. We encourage you to take a closer look at the collection and the FDO specification and discover how to use them to meet your edge onboarding needs. For instance, FDO supports transfer of ownership so that you do not need to know the final owner of a device in advance and can bind it to a distributor instead.
Try it yourself!
Whether you are beginning your automation journey or are a seasoned veteran, there are a variety of resources to enhance your automation knowledge:
- Explore resources at Using Red Hat Ansible Automation Platform for edge computing.
- Trial subscription: Are you ready to install on-premises? Get your own trial subscription for unlimited access to all the components of Red Hat Ansible Automation Platform.
- The full playbooks of this demo can be found at https://github.com/empovit/fido-device-onboard-demo/tree/official-collections.
- The FDO collection lives at https://github.com/ansible-collections/community.fdo, where you might find the examples page especially useful.
