This article is the second in a series about implementing a multitenant, containerized SaaS application. The first article, How to convert a web application to Software-as-a-Service, discussed from a conceptual point of view how to convert a standalone web application into generic code that powers a SaaS platform. This article demonstrates in a concrete manner how to implement a multitenant SaaS in a Kubernetes cluster.
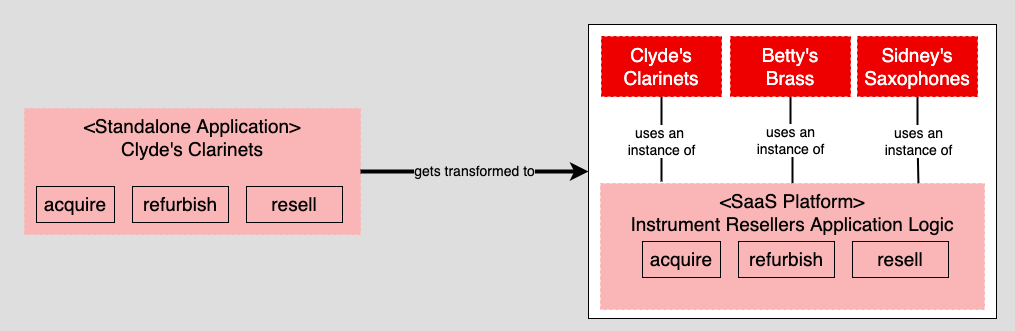
The example in the previous article converted a fictitious standalone application named Clyde's Clarinets into a SaaS platform named Instrument Resellers. The purpose of Clyde's Clarinets was to acquire, refurbish, and resell used clarinets. Clyde's Clarinets evolved into the Instrument Resellers SaaS platform so that any business could acquire, refurbish, and resell a particular type of instrument. Thus, Instrument Resellers has the capability to support tenants such as Betty's Brass and Sidney's Saxophones as well as Clyde's Clarinets. (See Figure 1.)
Implementing SaaS on Kubernetes
This article describes how to use standard Kubernetes resources—namespaces, deployments, and services—to create different tenants using a common code base. In addition to the standard Kubernetes resources, we use the route resource provided by Red Hat OpenShift to create a public URL that enables access to the internal Kubernetes service representing the particular tenant application instance.
The demonstration code runs on the Red Hat OpenShift Container Platform because its route resource provides an easy way to create a domain name that provides access to a tenant running within the Kubernetes cluster.
This article refers to demonstration code for implementing the Instrument Reseller SaaS platform. A subsequent article in this series will describe the code in the demonstration project in detail. For now, you can use the demonstration project as a supporting reference for this article.
Be advised that in order to get the full benefit from reading this article, you need to have an understanding of containers and Kubernetes, particularly around the purpose and use of Kubernetes pods, deployments, Secrets, and services. Also, you need to have experience working with the kubectl client for Kubernetes. In addition, you should be comfortable creating Kubernetes resources using manifest (a.k.a. configuration) files.
The following sections describe how to:
- Use Kubernetes namespaces to isolate tenants in a SaaS platform.
- Configure Kubernetes deployments to dedicate application logic to a specific tenant.
- Bind a database to a particular tenant using a Kubernetes Secret.
- Present a tenant's application logic to the internal network in the cluster using a Kubernetes service.
- Expose the tenant outside of the cluster using an OpenShift route.
- Deploy and update tenant application logic using a basic continuous integration/continuous deployment (CI/CD) process.
The role of Kubernetes namespaces in SaaS
Supporting multiple tenants in a single cluster has been a fundamental feature in Kubernetes since its initial release. Under Kubernetes, it is entirely possible for many tenants to share instances of a common code base while running in isolation from each other.
There are several possible approaches to multitenancy in a SaaS platform under Kubernetes:
- Build tenant isolation right into the logic of a single application.
- Run each tenant in its own cluster.
- Run each tenant in its own Kubernetes namespace.
The Instrument Reseller SaaS platform takes the third approach and uses namespaces to support multiple tenants in a single Kubernetes cluster. This section explains the details of the namespace concept.
Namespaces, as the name implies, create an operational boundary that can be imposed on other resources. For example, you can create a namespace named foo, and then create other resources such as pods and services under that foo namespace. Those resources know only about other resources in the foo namespace. Resources outside of that namespace have no access to resources inside the namespace.
In a multitenant service using namespace isolation, each tenant in the Kubernetes cluster is represented by a particular namespace. The deployment, service, and route resources for the particular tenant are created in that tenant's namespace. Figure 2 illustrates how Kubernetes namespaces isolate tenants in the Instrument Resellers SaaS platform.
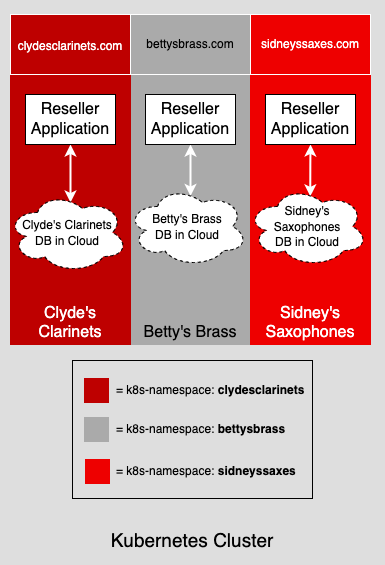
Although three tenants are shown in Figure 2, this article shows configurations just for Betty's Brass and Clyde's Clarinets because two tenants are enough to illustrate the concepts you need to know. Table 1 shows the manifest files that declare the Kubernetes namespaces for these tenants. The two manifests are the same except for the name properties.
| Betty's Brass | Clyde's Clarinets |
|---|---|
|
|
To create each namespace in the Kubernetes cluster, run the following command, where <tenant_namespace> is the filename of the manifest file particular to the tenant:
$ kubectl apply -f <tenant_namespace>.yaml
Creating and configuring tenants within a SaaS using a Kubernetes deployment
Once the namespaces are created, the next task is to implement the logic for the given tenant according to its assigned namespace. This task uses the Kubernetes deployment resource.
As mentioned previously, a key feature of the Instrument Reseller SaaS is that a single code base can support any number of tenants that want to acquire and resell musical instruments. Application logic for each instrument reseller is represented in the SaaS by a Kubernetes deployment resource.
A deployment controls one or many pod replicas. The number of pods running under a deployment is determined by the replicas property in the deployment resource's manifest file.
Therefore, you can change the number of replicas a deployment supports while the application is running. For example, an instrument reseller might start by running three pods. But, after a while, the load on the tenant is such that more pods are needed. To create more pods in the deployment, increase the value assigned to the replicas property in the manifest file—from three to five, for example. Then re-apply the deployment's manifest file to the cluster. When loads decrease, you can reduce the number of pods in the deployment by changing the replicas setting in the manifest file and reapplying the changed file to the cluster in the same way.
Should a pod go offline, the deployment resource will create a replacement if possible.
Customizing deployments
In our architecture, each deployment should be dedicated to a single instrument reseller. You create the deployment in that instrument reseller's namespace and define the parameters needed by that reseller, such as the URL where it takes orders, through environment variables in the Kubernetes manifest.
For instance, Table 2 shows the manifests that configure the Kubernetes deployment for Betty's Brass and Clyde's Clarinets. The only differences are the values for names and instruments.
| Betty's Brass | Clyde's Clarinets |
|---|---|
|
|
A key point to understand about the previous examples is that both tenants are using the same container images. In every tenant, the init container uses the quay.io/rhdevelopers/instrumentresellerseeder image and the main container uses the quay.io/rhdevelopers/instrumentreseller image. Remember, an essential principle of multiple tenancy in a SaaS platform is that all tenants use the same code base. Having multiple tenants use the same container images supports this basic principle.
Each tenant in the SaaS platform binds to its own database. That database might exist within the Kubernetes cluster or be an external database service defined by a URL. Often, username and password information needed to access the database will be part of the URL.
Putting username and password information in a cluster is always a risky undertaking. A best practice for making username/password information available to pods in a Kubernetes cluster is to use a Kubernetes resource called a Secret. We will see how our application passes credentials to the database shortly.
Data seeding
As briefly mentioned earlier, the pods in the deployment use init containers in addition to standard containers. An init container is a container that runs before the main container. In the case of the Instrument Reseller SaaS, the init container does the work of implementing a special feature of the demonstration code: data seeding.
Because we're not working with real retailers in the demo, we use the init container to seed the tenant instance's database with randomized data that is particular to the instrument type sold by the instrument reseller. The purpose of data seeding in the demo is to provide some initial data to view when the application is used for the first time. Betty's Brass will be seeded with data about brass instruments. Clyde's Clarinets will be seeded with data about clarinets. Sidney's Saxophones will be seeded with data specific to saxophones.
Using the data seeding pattern in containers to prepopulate data for an application opens up the risk of redundant seeding. If one simply runs the init container in each pod replica, the deployment tries to seed data to the data source when each replica starts. Unless a precaution is made, unwarranted data seeding will occur.
Therefore, the data seeder is programmed to go out to the data source and check whether pre-existing seed data exists. If seed data is already in the data source, the seeder exits without adding more data.
Providing database credentials through Kubernetes Secrets
Secrets are a Kubernetes resource for providing sensitive information to other resources in a secure manner.
Table 3 shows configurations that declare a Secret named mongo-url in two different namespaces: one for Betty's Brass and the other for Clyde's Clarinets.
| Betty's Brass | Clyde's Clarinets |
|---|---|
|
|
Note that each Secret is assigned to its respective namespace. The Secret named mongo-url for Betty's Brass is assigned to the bettysbrass namespace. The Secret with the same mongo-url name for Clyde's Clarinets is assigned to the clydesclarinets namespace. Even though each Secret has the same name, they are distinct because they are assigned to different namespaces. Using the same name among resources is one of the benefits of using namespaces.
Exposing application logic using a Kubernetes service
Once the Secret is configured for each tenant, the next step is to create the Kubernetes service that exposes the application logic to the internal Kubernetes network within the SaaS platform. Table 4 shows configurations for the Kubernetes service in Betty's Brass using the bettysbrass namespace, and for Clyde's Clarinets using the clydesclarinets namespace. Once again, assigning each service to a different namespace keeps the tenants isolated.
| Betty's Brass | Clyde's Clarinets |
|---|---|
|
|
Exposing the tenant outside of the cluster using an OpenShift route
The last configuration step is to create the OpenShift route resource that publishes a domain name to expose the tenant outside of the Kubernetes cluster. The manifests in Table 5 declare the OpenShift routes for Betty's Brass and Clyde's Clarinets. Each manifest uses its tenant's namespace as well as a different host.
| Betty's Brass | Clyde's Clarinets |
|---|---|
|
|
The route knows which service to bind to through the to attribute at the bottom of each manifest file.
Declaring a set of manifest files for the Kubernetes namespace, deployment, Secret, service, and route are the first steps to getting a tenant up and running in a Kubernetes cluster. Once the manifest files are created, execute the following command to get each of the tenants running in the Kubernetes cluster, where <manifest_file> is the name of the manifest file for the given tenant:
$ kubectl apply -f <manifest_file>.yaml
Assuming proper configuration, you'll have a tenant up and running using nothing more than a few kubectl commands. However, as those of us who have spent a lot of time working with Kubernetes have come to understand, the words "proper configuration" can mean hours if not days of labor. In short, wiring everything up is hard. You have to be careful.
So to end this article, we'll devise a deployment process for our SaaS deployment that can be easily automated.
A CI/CD release process
Deploying tenants into a SaaS platform comes with varying degrees of complexity. You can do a manual deployment in which you create Linux container images for the SaaS platform's application logic and then push those images out to a container image registry such as Quay.io.
Then, once the required container images are on the registry, create manifest files that you'll use to realize the Kubernetes deployment resource in the Kubernetes cluster in which the SaaS platform is running. These manifest files declare the application container images that will be used.
Having created the manifest files, run the kubectl apply command shown near the end of the previous section to create the associated Kubernetes resource in the cluster.
The process just described is shown in Figure 3.

Manual deployment is a feasible way to work with a SaaS platform for research and experimentation. But it's not realistic for today's production releases, which call for automating the process.
Using automation is particularly appropriate for organizations that have a number of teams supporting a SaaS platform. Relying on email and word-of-mouth communication between teams can be risky. Automation helps bring formality to the release process.
Central to release automation is a CI/CD controller such as Jenkins or OpenShift Pipelines. The CI/CD controller automates many if not all of the tasks necessary to get an application's artifacts from a source code repository into production.
Figure 4 shows an example of a CI/CD process that updates a SaaS platform. The CI/CD controller does the work of packaging up code that's ready for release into a container image. Then it pushes that image to a container registry and updates the SaaS platform with the new version of the image.

The numbered steps in Figure 4 are:
- The developer updates the code and commits the updated work to the dev branch in the source code repository.
- The quality assurance (Q/A) team escalates code from the dev branch into the Q/A branch and runs unit tests. If the tests pass, Q/A executes integration testing. Upon successful execution, Q/A notifies the release management team that a new version of code is ready for escalation to the main branch of the source code repository.
- Release management merges the code into the main branch.
- Release management updates the Kubernetes manifest files with the new version tag of the container image associated with the intended release. Updated files are committed to the manifest file repository.
- Upon a successful merge of source code and manifest files, the CI/CD controller is notified via automation that the code is ready for packaging into a container image and deployment to a container image registry such as Quay.io.
- The CI/CD controller gets the updated code from the source code repository and makes an updated container image from the Containerfile stored in the repository along with the application source code.
- The CI/CD controller pushes the updated container image to a container image repository.
- The CI/CD controller gets the updated manifest files for the relevant tenants from the manifest file repository and runs the
kubectl applycommand discussed earlier to update the pods running in the Kubernetes cluster with the container image that has the latest version of the application code.
Keep in mind that release processes usually vary among organizations. There is rarely a one-size-fits-all approach to automated releases using a CI/CD controller. This example is one of many possibilities.
The important thing to understand is that when an automated CI/CD process is in place, it handles much of the detailed work of getting code from a release branch into a multitenant Kubernetes cluster in production. Release tasks vary, but in general many details are handled through scripted automation in the CI/CD controller. Release personnel don't fiddle around with manual tasks unless they're facing a mission-critical emergency. Rather, changes in the CI/CD process are implemented by altering automation scripts.
Kubernetes supports scalable multitenant SaaS
As this article has shown, hosting a multitenant SaaS platform on Kubernetes can be straightforward. As long as the common code base used by the platform's tenants is generic, implementation involves configuring and deploying the namespace, Secret, deployment, service, and route. All these resources except the route are built into Kubernetes. The route resource is provided by OpenShift.
The application logic common to all tenants is encapsulated into container images that are stored in a container registry. The image is downloaded to the cluster according to configuration information set in the manifest file of the deployment for the given tenant. Finally, production-level releases are automated using a CI/CD controller.
Most SaaS platforms are intended for a particular set of use cases. Each tends to be special. As a result, a platform will have its own set of complexities and exceptions that need to be accommodated. Still, implementing a SaaS platform using Kubernetes is a lot easier than building one from scratch. Kubernetes does most if not all of the heavy listing.
This article covered the fundamental concepts and techniques for implementing a multitenant SaaS platform in a Kubernetes cluster. The next article in this series will take a detailed look at the demonstration application used in this article. That article will describe how to program the generic logic used by all tenants in the demonstration SaaS platform. The article will also describe how to get the demonstration project up and running as a multitenant SaaS platform hosted in a Kubernetes cluster.
Last updated: September 19, 2023