Page
Prerequisites and step-by-step guide
Prerequisites
- Registration with Red Hat developer sandbox. Register here, if not already registered.
- Configure RHEL VM in developer sandbox and connect with VM. If you haven’t already done this, learn to set up and connect to the RHEL VM in the Red Hat Developer Sandbox.
Step-by-step guide
Before proceeding with the following steps, ensure you have configured the virtual machine in your Red Hat developer sandbox.
1. Connect to the virtual machine
To connect to a virtual machine, we typically use the SSH method. Here, we will attempt to interact with the virtual machine by switching to the Console tab and using the traditional CLI SSH method from the built-in Web Terminal.
1.1 Console method
- From the left menu, navigate to Virtualization > VirtualMachine.
- Select the recently created virtual machine.
- Switch from the Overview tab to the Console tab.
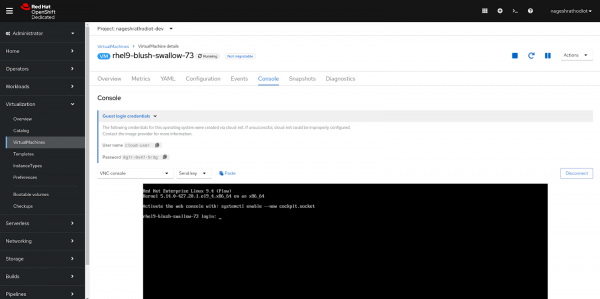
- Under Guest login credentials, you will find the username and password for the virtual machine.
- Copy and paste these credentials into the terminal to successfully log in to the VM as shown in Figure 1 below.
1.2 Connecting via SSH to the virtual machine
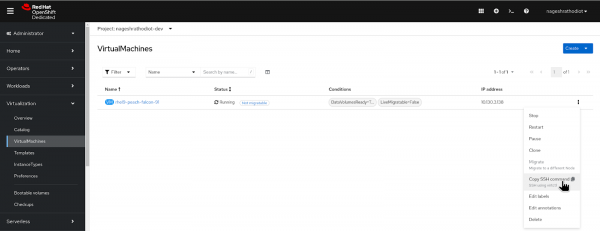
Figure 2: Connecting via SSH command. From the top right corner, you will get the >_ icon click on it and the terminal will appear from the bottom of the OpenShift console.
$ virtctl -n nageshrathodiot-dev ssh cloud-user@rhel9-peach-falcon-91 --identity-file=redhat
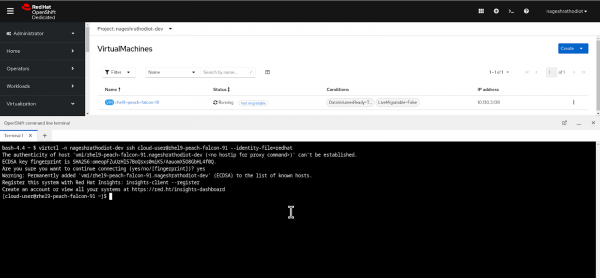
Figure 3: Executing SSH Command in OpenShift Web Terminal.
2. Explore SELinux modes
Before proceeding to SELinux modes, ensure that “subscription-manager” is installed. This client program registers a system with the Certificate-Based Red Hat Network, allowing Red Hat to provide content updates and support through issued subscriptions. If you do not have the Red Hat developer subscription, activate the free developer subscription here.
$ sudo subscription-manager statusRegister the host using the “subscription-manager” command, specifying the username and password of subscription-manager.
$ sudo subscription-manager registerAttach the subscription to the server using the command below.
$ sudo subscription-manager attachExplore SELinux modes
SELinux operates in three distinct modes: Enforcing, Permissive, and Disabled.
Enforcing: In this mode, SELinux actively enforces the defined security policies. Any violation triggers an immediate response, such as blocking unauthorized access or generating an alert.
Permissive: In permissive mode, SELinux logs violations while enforcing policies and without actively blocking them. This mode is useful for identifying policy gaps before transitioning to full enforcement.
Disabled: SELinux is turned off in disabled mode, and DAC becomes the primary access control mechanism. While this might be necessary for specific legacy applications, it's not recommended for systems requiring strong security.
To check the current SELinux status
$ sestatusYou will receive similar results on your terminal as shown below.
Expected output:
copy
SELinux status:                 enabled
SELinuxfs mount:                /sys/fs/selinux
SELinux root directory:         /etc/selinux
Loaded policy name:             targeted
Current mode:                   enforcing
Mode from config file:          enforcing
To make permanent changes, you have to configure the file located at /etc/selinux/config.
$ cat /etc/selinux/configBy default, SELinux in RHEL is set to enforcing mode, and the type is set to target, as shown below.
Expected output:
# This file controls the state of SELinux on the system.
# SELINUX= can take one of these three values:
#       enforcing - SELinux security policy is enforced.
#       permissive - SELinux prints warnings instead of enforcing.
#       disabled - No SELinux policy is loaded.
SELINUX=enforcing
# SELINUXTYPE= can take one of these two values:
#       targeted - Targeted processes are protected,
#       mls - Multi Level Security protection.
SELINUXTYPE=targeted
3. Deploy sample app
To assess how SELinux policies and contexts function, we need to deploy a sample application. This application is a basic httpd-hosted static webpage.
Install the "httpd" server on the RHEL system using the following command:
$ sudo dnf install httpd -yEnable the httpd server and verify the status to ensure it's running.
$ sudo systemctl start httpd && systemctl status httpdPress q to exit from status check mode on the terminal
Create a new index.html file in the following directory for the static website, effectively setting it up as a sample application.
$ cd /var/www/html/ && sudo suRun the following command to create an index.html file with required content.
$ cat << 'EOF' > index.html
<!DOCTYPE html>
<html lang="en">
<head>
    <meta charset="UTF-8">
    <meta name="viewport" content="width=device-width, initial-scale=1.0">
    <title>Red Hat Developers</title>
</head>
EOF                                                                        EOF
Visit the sample app tab beside the terminal tab to check the running app through httpd server.
Check the labels of the file using the following command.
ls -lZExpected output:
-rw-r--r--. 1 root root unconfined_u:object_r:httpd_sys_content_t:s0 913 Jul 12 05:42 index.htmlCheck the deployed application using the following command.
$ curl http://localhost4. Test SELinux security
In this challenge, we will replace index.html and demonstrate SELinux's ability to block unexpected changes from causing system malfunction.
Create a "new index.html" file and overwrite the existing one with it.
$ cd$ cat << 'EOF' > index.html
<!DOCTYPE html>
<html lang="en">
<head>
<meta charset="UTF-8">
<meta name="viewport" content="width=device-width, initial-scale=1.0">
<title>Red Hat Developers</title>
</head>
EOFReplace the existing "index.html" file with a duplicate "index.html" file using the following mv command.
$ mv index.html /var/www/html/It will ask you to overwrite it so press "y". To overwrite.
Now visit the sample app console tab again to check the app. This time the web page is not visible and a Forbidden ERROR or default page of Apache will be shown.
$ curl http://localhostThe issue is caused by the labels attached to the files. The label assigned to the previous "index.html" differs from the one assigned to the current "index.html" file.
$ cd /var/www/html/Check the labels of this file. You may notice that the labels of this file are different compared to the last "index.html".
$ ls -lZTo fix this issue we need to check with the "journalctl" command as shown below.
$ journalctl -b 0This command will show us the root cause and necessary remediation or solution to fix this issue.
Our issue is related to the "index.html", so search it using the following command in interactive mode of the terminal. To search your issue related to html type "/index.html".
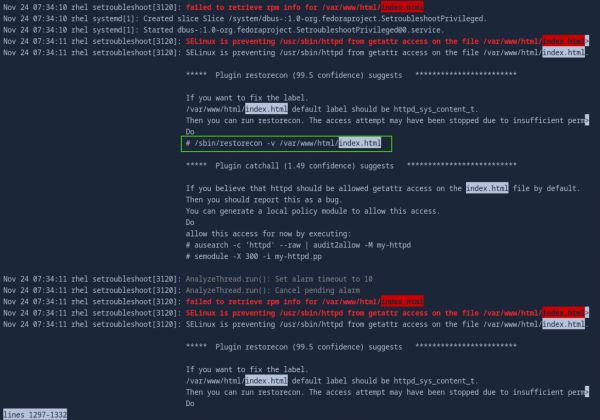
Press q to exit from interactive mode in the terminal.
To fix the labels use the following command. (The same command is recommended in the snapshot above).
$ sudo /sbin/restorecon -v /var/www/html/index.htmlExpected output:
Relabeled /var/www/html/index.html from
                                                                                     unconfined_u:object_r:admin_home_t:s0 to
                                                                                        unconfined_u:object_r:httpd_sys_content_t:s0
After fixing the labels with the above command, please visit the sample app tab and refresh it. You will be directed to the sample app webpage.
After fix once again check deployed web page using following command.
$ curl http://localhostYou will get the page which you replaced in /var/www/html/index.html location.
Summary
After completing this learning exercise, you will have a solid understanding of SELinux, its different modes, and the benefits it provides. You will also know how to configure and manage SELinux on RHEL servers and understand its impact on running web applications. This knowledge will enable you to enhance the security and performance of your RHEL environments effectively.
