Ansible is an engine and language for automating many different IT tasks, such as provisioning a physical device, creating a virtual machine, or configuring an application and its dependencies. Ansible organizes these tasks in playbook files, which run on one or more remote target hosts. Inventory files maintain lists of these hosts and are formatted as YAML or INI documents. For example, a simple inventory file in INI format follows:
[web]
web1.example.com
web2.example.com
Ansible inventories can be static (stored in a file and managed in a source code repository) or dynamic (retrieved from an external web resource, such as through a RESTful API). Dynamic inventories are generated on-demand using inventory scripts or inventory plugins, consisting of code that Ansible runs to get a list of hosts to target when executing playbooks.
Red Hat Ansible Tower, also known as AWX (the name of its upstream community project), is a front-end to Red Hat Ansible Engine that simplifies operations on large IT infrastructures. Operators can log into the Ansible Tower web interface and create single jobs or complex workflows using Ansible Engine building blocks such as tasks, roles, and playbooks. Enterprises typically manage assets in a configuration management database (CMDB), such as NetBox, which Ansible Tower connects to using a specially written script or plugin.
This article shows you how to use Ansible Tower to create dynamic inventories. We'll start with a sample inventory script, then transform the script into a plugin. As you'll see, inventory plugins can accept parameters, which gives them an advantage over plain scripts.
Note: Inventory scripts are deprecated in Ansible Tower, so they will be removed in a future version. There’s a good reason: Source code is properly managed in a version control system, where developers and operators can track and review changes to its corpus.
A sample inventory script
Inventory scripts are organized in a single executable file, written in a scripting language such as Python or Bash. The script must return its data in JSON format. For instance, the following output provides the Ansible playbook with a list of hosts and related data:
{
    "all": {
        "hosts": ["web1.example.com", "web2.example.com"]
    },
    "_meta": {
        "hostvars": {
            "web1.example.com": {
                "ansible_user": "root"
            },
            "web2.example.com": {
                "ansible_user": "root"
            }
        }
    }
}
The following Bash code is an inventory script that generates the output just shown:
#!/usr/bin/env bash
# id: scripts/trivial-inventory-script.sh

cat << EOF
{
    "all": {
        "hosts": ["web1.example.com", "web2.example.com"]
    },
    "_meta": {
        "hostvars": {
            "web1.example.com": {
                "ansible_user": "rdiscala"
            },
            "web2.example.com": {
                "ansible_user": "rdiscala"
            }
        }
    }
}
EOF
Here, an Ansible command runs the inventory script and compares the actual output to the expected output:
$ ansible -m ping -i scripts/trivial-inventory-script.sh all
web1.example.com | SUCCESS => {
    "ansible_facts": {
        "discovered_interpreter_python": "/usr/bin/python"
    },
    "changed": false,
    "ping": "pong"
}
web2.example.com | SUCCESS => {
    "ansible_facts": {
        "discovered_interpreter_python": "/usr/bin/python"
    },
    "changed": false,
    "ping": "pong"
}
The output shows that Ansible correctly interpreted the information given in the hostvars section and used my username rdiscala to connect via SSH to the server hosts.
Note: The sample script is intentionally brief and omits a detail: Ansible invokes these scripts with the --list option if a list of hosts needs to be produced, as it does in our case. Alternatively, Ansible provides the --host=NAME option when it needs the variables of a specific host, identified by its NAME. To make the script fully compliant, you would need to implement logic to handle these options.
Making scripts work in Ansible Tower
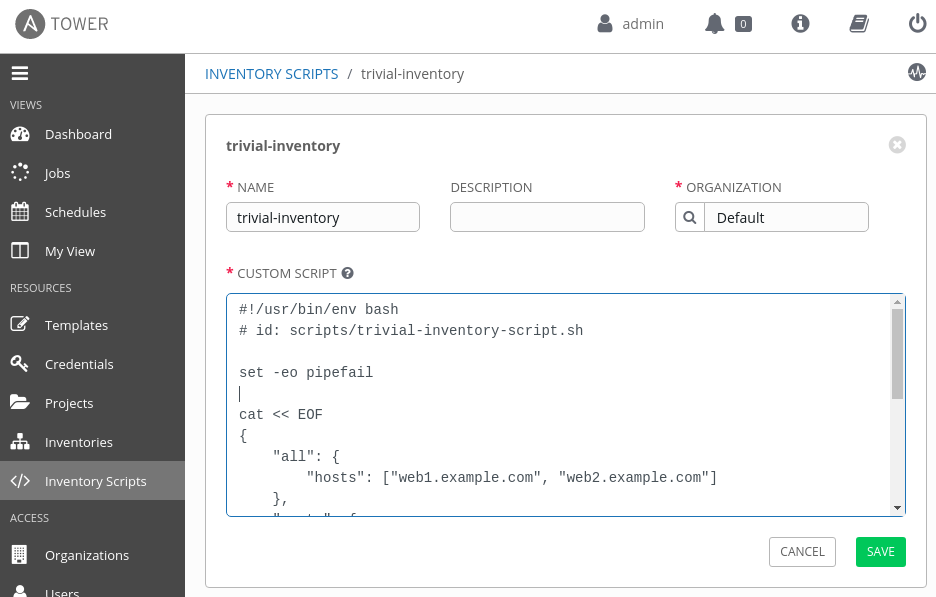
Scripts are defined in the Inventory Scripts section of Ansible Tower's web interface. Alternatively, you can write a script in any scripting language supported on the Ansible Tower host. As shown in Figure 1, you can paste the script we've just written directly into the CUSTOM SCRIPT field and use it to sync an inventory inside Ansible Tower.
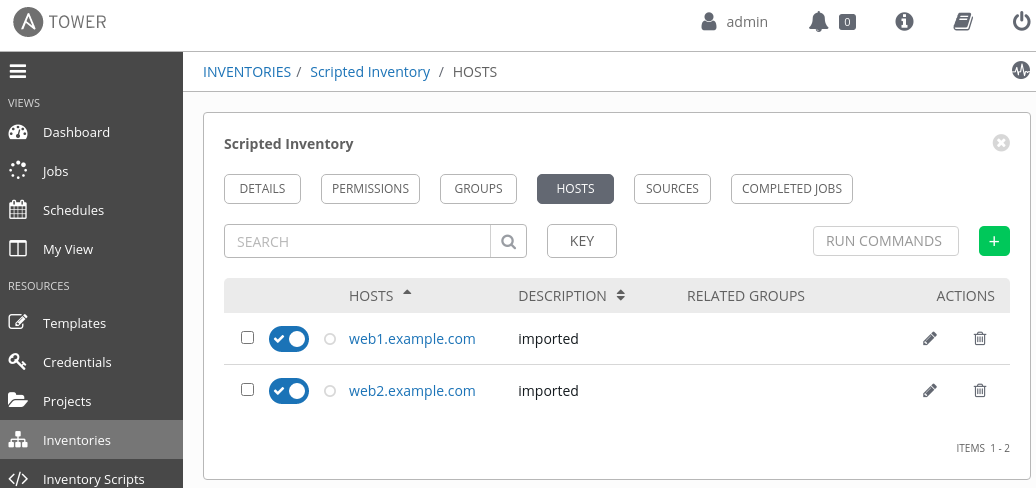
We can now use this new script as an inventory source in any Ansible Tower inventory. An inventory source provides information about hosts to Ansible Tower on demand. When the source syncs, the script will run, fetch the data, and format it as shown previously so that Ansible Tower can import it into its own host database. The complete list of hosts will show up in the HOSTS table, as shown in Figure 2.
Create an inventory plugin with Ansible Galaxy
The newer and recommended way to distribute and consume Ansible content is to create an inventory plugin and package it as an Ansible collection. An inventory plugin is considered a module when packaged in a collection.
You can kickstart your effort by using the Ansible Galaxy command-line program to create the basic structure for a collection:
$ ansible-galaxy collection init zedr.blog_examples
- Collection zedr.blog_examples was created successfully
$ tree .
.
└── zedr
    └── blog_examples
        ├── docs
        ├── galaxy.yml
        ├── plugins
        │   └── README.md
        ├── README.md
        └── roles
Let’s start with galaxy.yml, the manifest file describes this collection:
namespace: zedr
name: blog_examples
version: 1.0.0
readme: README.md
authors:
  - Rigel Di Scala <rigel@redhat.com>
We will create our plugin as a Python script named example_hosts.py inside the plugins/inventory folder. Placing the script in this location lets Ansible detect it as an inventory plugin. We can delete the docs and roles folders to focus on the minimum viable set of files needed to implement our collection. We should end up with a folder structure like this one:
$ tree .
.
└── zedr
    └── blog_examples
        ├── galaxy.yml
        ├── plugins
        │   └── inventory
        │       └── example_hosts.py
        └── README.md
Important: Always specify the full namespace of the collection (for instance, zedr.blog_examples) when referring to assets contained within it, such as roles and plugins.
We can now copy over, clean up, and populate the basic boilerplate code for an inventory plugin:
from ansible.plugins.inventory import BaseInventoryPlugin

ANSIBLE_METADATA = {
    'metadata_version': '',
    'status': [],
    'supported_by': ''
}

DOCUMENTATION = '''
---
module:
plugin_type:
short_description:
version_added: ""
description:
options:
author:
'''


class InventoryModule(BaseInventoryPlugin):
    """An example inventory plugin."""

    NAME = 'FQDN_OF_THE_PLUGIN_GOES_HERE'

    def verify_file(self, path):
        """Verify that the source file can be processed correctly.

        Parameters:
            path:AnyStr The path to the file that needs to be verified

        Returns:
            bool True if the file is valid, else False
        """

    def parse(self, inventory, loader, path, cache=True):
        """Parse and populate the inventory with data about hosts.

        Parameters:
            inventory The inventory to populate
        """
        # The following invocation supports Python 2 in case we are
        # still relying on it. Use the more convenient, pure Python 3 syntax
        # if you don't need it.
        super(InventoryModule, self).parse(inventory, loader, path, cache)
About the code
You'll note that this boilerplate defines two methods: verify_file() and parse(). Use verify_file() when the host list you want to process comes from a file, such as a CSV document, on a filesystem at a given path. This method is used to validate the file quickly before passing it to the more expensive parse() method. Normally, verify_file() ensures that the file is valid incoming JSON and matches a predefined schema. (Note that the verify_file() method is currently empty and must be filled in.)
Note: The verify_file() method can return True when input comes from a source other than a file, such as when calling a remote HTTP API. But it could also verify the incoming JSON.
The parse() method does most of the work of processing the source data to filter and format it correctly. However, instead of directly constructing the payload's dict namespace, as we did in the inventory script, we will rely on the instance attribute, self.inventory, which is a special object with its own methods. The attribute offers add_host() and set_variable() methods to construct a data object suitable for Ansible to consume. (The parse() method is currently empty except for a call to the superclass's function.)
Additionally, note that the module-level attributes ANSIBLE_METADATA and DOCUMENTATION are required, and that the NAME attribute must have the plugin's fully qualified domain name, including the namespace.
Invoking the plugin
When the plugin is invoked in Ansible from the command line, the following chain of events occurs:
- The conventional name
InventoryModuleis imported from the chosen inventory module (zedr.blog_example.example_hosts.py). - An instance of
InventoryModuleis created. - The instance method
InventoryModule.verify_file()is called to perform an initial validation of the file (when applicable) and is expected to return a truthy value to proceed. - The instance method
InventoryModule.parse()is called to populate theInventoryModule.inventoryobject. - The
InventoryModule.inventoryobject is introspected to retrieve the host data that Ansible will consume.
We can now rewrite the script logic as follows:
from ansible.plugins.inventory import BaseInventoryPlugin

ANSIBLE_METADATA = {
    'metadata_version': '1.0.0',
    'status': ['preview'],
    'supported_by': 'community'
}

DOCUMENTATION = '''
---
module: example_hosts
plugin_type: inventory
short_description: An example Ansible Inventory Plugin
version_added: "2.9.13"
description:
    - "A very simple Inventory Plugin created for demonstration purposes only."
options:
author:
    - Rigel Di Scala
'''

class InventoryModule(BaseInventoryPlugin):
    """An example inventory plugin."""

    NAME = 'zedr.blog_examples.example_hosts'

    def verify_file(self, path):
        """Verify that the source file can be processed correctly.

        Parameters:
            path:AnyStr The path to the file that needs to be verified

        Returns:
            bool True if the file is valid, else False
        """
        # Unused, always return True
        return True

    def _get_raw_host_data(self):
        """Get the raw static data for the inventory hosts

        Returns:
            dict The host data formatted as expected for an Inventory Script
        """
        return {
            "all": {
                "hosts": ["web1.example.com", "web2.example.com"]
            },
            "_meta": {
                "hostvars": {
                    "web1.example.com": {
                        "ansible_user": "rdiscala"
                    },
                    "web2.example.com": {
                        "ansible_user": "rdiscala"
                    }
                }
            }
        }

    def parse(self, inventory, *args, **kwargs):
        """Parse and populate the inventory with data about hosts.

        Parameters:
            inventory The inventory to populate

        We ignore the other parameters in the future signature, as we will
        not use them.

        Returns:
            None
        """
        # The following invocation supports Python 2 in case we are
        # still relying on it. Use the more convenient, pure Python 3 syntax
        # if you don't need it.
        super(InventoryModule, self).parse(inventory, *args, **kwargs)

        raw_data = self._get_raw_host_data()
        _meta = raw_data.pop('_meta')
        for group_name, group_data in raw_data.items():
            for host_name in group_data['hosts']:
                self.inventory.add_host(host_name)
                for var_key, var_val in _meta['hostvars'][host_name].items():
                    self.inventory.set_variable(host_name, var_key, var_val)
Note that we have ignored facilities related to grouping and caching to keep things simple. These facilities are worth looking into to organize the host list better and optimize the synchronization process's performance.
Build, install, and test the plugin
The next step is to build the Ansible collection package, install it locally, and test the plugin:
$ cd zedr/blog_examples
$ mkdir build
$ ansible-galaxy collection build -f --output-path build
Created collection for zedr.blog_examples at /home/rdiscala/blog/ansible-tower-inventory-plugin/collections/zedr/blog_examples/build/zedr-blog_examples-1.0.0.tar.gz
$ ansible-galaxy collection install build/zedr-blog_examples-1.0.0.tar.gz
Process install dependency map
Starting collection install process
Installing 'zedr.blog_examples:1.0.0' to '/home/rdiscala/.ansible/collections/ansible_collections/zedr/blog_examples'
Next, we need to enable our plugin by adding a local galaxy.cfg file in our current working directory. The contents are:
[inventory]
enable_plugins = zedr.blog_examples.example_hosts
To check whether the local installation was successful, we can attempt to display the documentation for our inventory plugin, using its fully qualified domain name:
$ ansible-doc -t inventory zedr.blog_examples.example_hosts
> INVENTORY    (/home/rdiscala/.ansible/collections/ansible_collections/zedr/blog_examples/plugins/inventory/example_hosts.py)

        An example Inventory Plugin created for demonstration purposes only.

  * This module is maintained by The Ansible Community
AUTHOR: Rigel Di Scala <rigel@redhat.com>
        METADATA:
          status:
          - preview
          supported_by: community

PLUGIN_TYPE: inventory
We can also list the available plugins to verify that ours is detected correctly. Note that for this to work with the Ansible collection, you will need Ansible version 3.0 or higher:
$ ansible-doc -t inventory -l
advanced_host_list                                 Parses a 'host list' with ranges
amazon.aws.aws_ec2                                 EC2 inventory source
amazon.aws.aws_rds                                 rds instance source
auto                                               Loads and executes an inventory plugin specified in a YAML config

(...)

zedr.blog_examples.example_hosts                   A trivial example of an Ansible Inventory Plugin
Finally, we can test the plugin locally by running it using an inventory configuration file. Create a file named inventory.yml with the following content:
plugin: "zedr.blog_examples.example_hosts"
Here is the command to invoke the plugin and generate the inventory data:
$ ansible-inventory --list -i inventory.yml
{
    "_meta": {
        "hostvars": {
            "web1.example.com": {
                "ansible_user": "rdiscala"
            },
            "web2.example.com": {
                "ansible_user": "rdiscala"
            }
        }
    },
    "all": {
        "children": [
            "ungrouped"
        ]
    },
    "ungrouped": {
        "hosts": [
            "web1.example.com",
            "web2.example.com"
        ]
    }
}
Ansible has generated two "virtual" groups: ungrouped, with our list of hosts, and all, which includes ungrouped. We have verified that the plugin is working correctly.
Making the plugin work in Ansible Tower
Ansible Tower can automate a collection's installation, making its roles and plugins available to projects and job templates. To make it work, we need the following:
- A place to provide the package file that we built for our collection. We'll use a Git repo hosted on GitHub, but it could also be published on Ansible Galaxy.
- A repo for the project files containing the
requirements.ymlfile that references our collection and theinventory.ymlconfiguration file we used previously. - An Ansible Tower project that points to the project files repo.
- An Ansible Tower inventory.
- An Ansible Tower inventory source for our inventory.
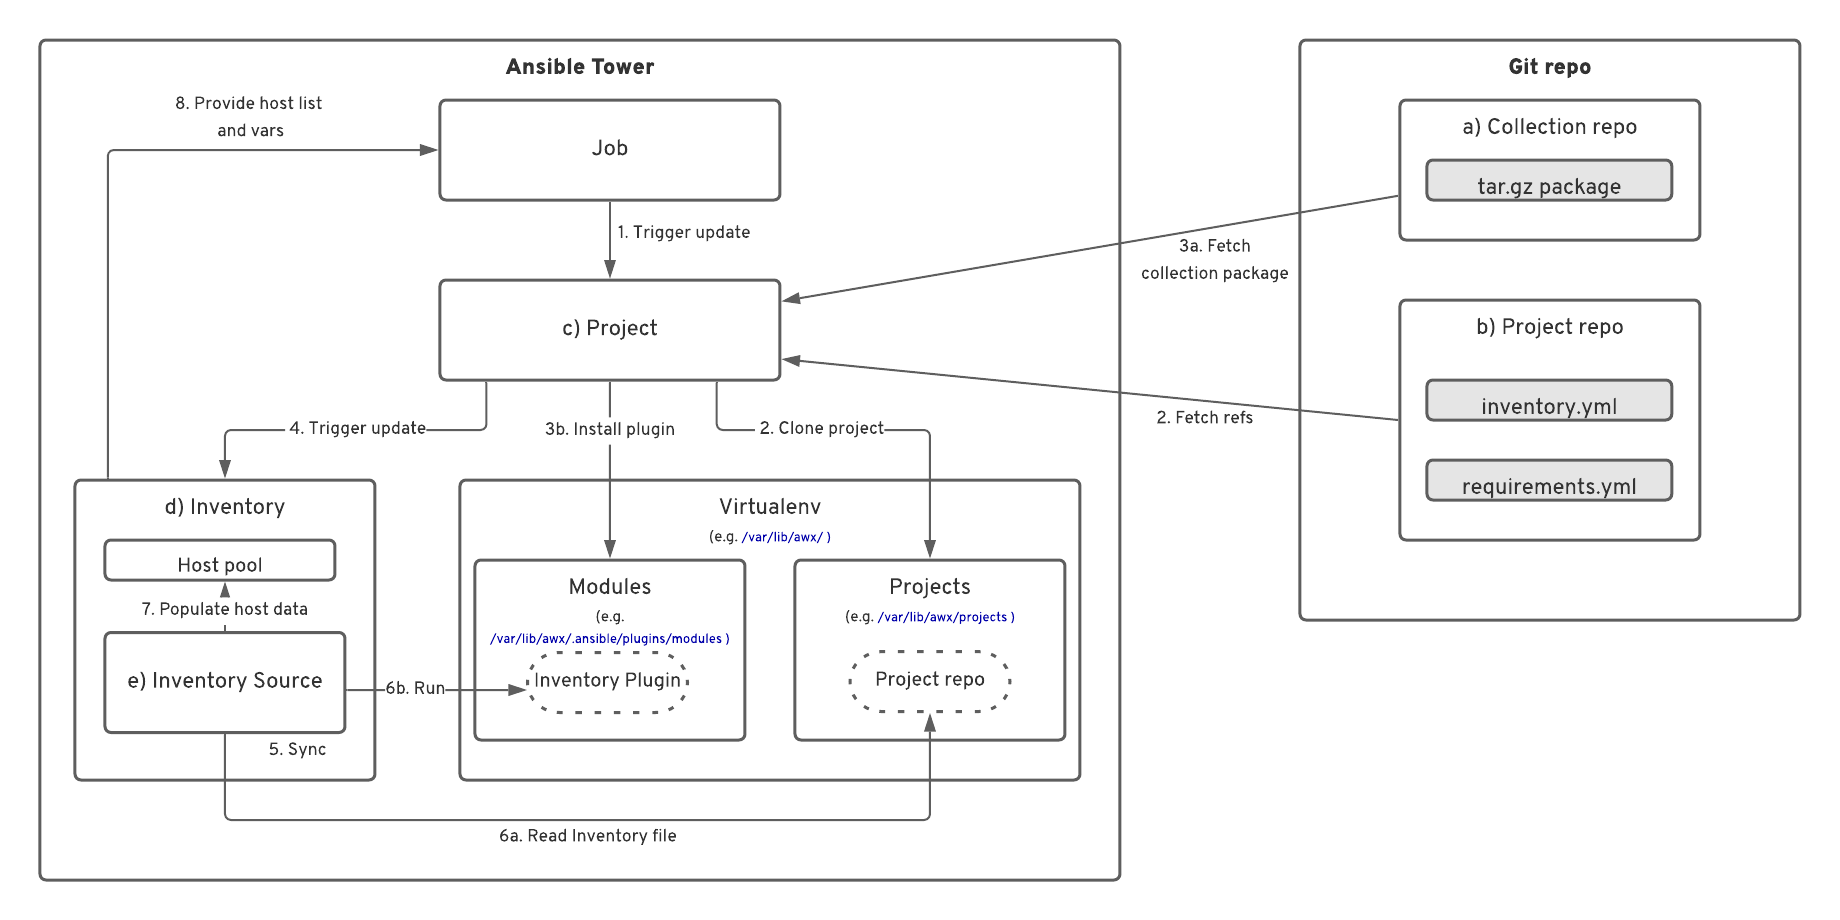
The following events will be triggered when Ansible Tower executes a job that uses this inventory:
- The job triggers a project update (the internal
project_update.ymlplaybook). - The project syncs with its associated Git repo.
- If necessary, the project installs any needed dependencies, which should be listed in the
collection/requirements.ymlfile. - The project update triggers an inventory update.
- The inventory update triggers an inventory source sync.
- The inventory source sync reads the inventory file
inventory.ymland runs our plugin to fetch the host data. - The host data populates the inventory.
- The job runs the associated playbook on the inventory host list using the provided hostnames and variables.
Figure 3 shows this workflow.
Now, let's create the components required to make the plugin work.
Note: The following example was tested on Ansible Tower 3.7.1.
Create a Git repo for the collection
To start, we'll create a new repo on Github and push the collection files we created earlier. A sample repo is available on GitHub.
Ansible cannot clone a repository and build the collection by itself, so we need to build the package and make it available as a downloadable tar.gz file. As an example, from the Releases page.
Note: At the time of writing, Ansible Tower cannot fetch the package as an authenticated user, so you will need to allow anonymous clients.
If you are using GitHub, you can set up a GitHub Actions workflow to fully automate this process:
# id: .github/workflows/main.yml

name: CI

# Only build releases when a new tag is pushed.
on:
  push:
    tags:
      - '*'

jobs:
  build:
    runs-on: ubuntu-latest

    steps:
      # Checks-out your repository under $GITHUB_WORKSPACE, so your job can access it
      - uses: actions/checkout@v2

      # Extract the version from the tag name so it can be used later.
      - name: Get the version
        id: get_version
        run: echo ::set-output name=VERSION::${GITHUB_REF#refs/tags/}

      # Install a recent version of Python 3
      - name: Setup Python
        uses: actions/setup-python@v2
        with:
          python-version: 3.7

      # Install our dependencies, e.g. Ansible
      - name: Install Python 3.7
        run: python3.7 -m pip install -r requirements.txt

      - name: Build the Ansible collection
        run: |
          mkdir -p build
          ansible-galaxy collection build -f --output-path build

      - name: Create a Release
        id: create_a_release
        uses: actions/create-release@v1
        env:
          GITHUB_TOKEN: ${{ secrets.GITHUB_TOKEN }}
        with:
          tag_name: ${{ steps.get_version.outputs.VERSION }}
          release_name: Release ${{ steps.get_version.outputs.VERSION }}
          draft: false

      - name: Upload a Release Asset
        uses: actions/upload-release-asset@v1.0.2
        env:
          GITHUB_TOKEN: ${{ secrets.GITHUB_TOKEN }}
        with:
          upload_url: ${{ steps.create_a_release.outputs.upload_url }}
          asset_path: build/zedr-blog_examples-${{ steps.get_version.outputs.VERSION }}.tar.gz
          asset_name: "zedr-blog_examples-${{ steps.get_version.outputs.VERSION }}.tar.gz"
          asset_content_type: "application/gzip"
Create a Git repo for project files
Next, we need another Git repo for the files that the Ansible Tower project will source. Here is the folder structure:
$ tree .
.
├── collections
│   └── requirements.yml
└── inventory.yml
Note that collections/requirements.yml will contain a reference to our Ansible collection package so that Ansible Tower can download, install, and use it when the inventory is synced. Additionally, the inventory.yml is the same file we created earlier, containing the plugin's fully qualified domain name. See the example repo for more details.
Create a new Ansible Tower project
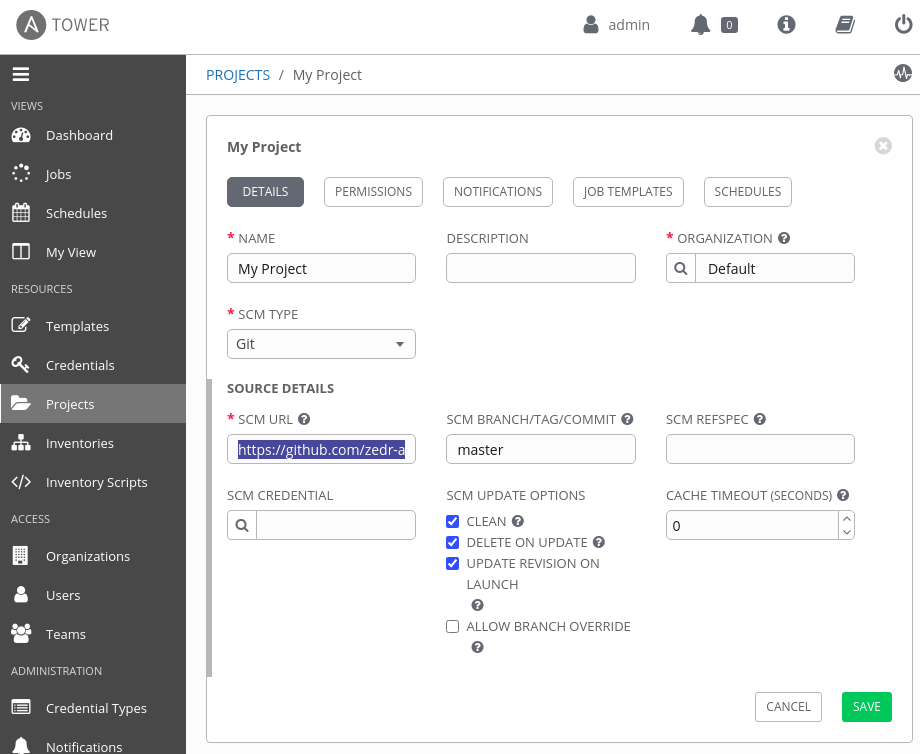
Next, sign in to your Ansible Tower instance, create a new project, and fill in the following fields and checkboxes:
- Name:
My Project. - Organization:
Default(or whatever you prefer). - SCM Type:
Git. - SCM URL:
https://github.com/zedr-automation/example_project.git(or the Git repo URL of your project). - SCM Branch/Tag/Commit:
master. - SCM Update Options: select Clean, Delete On Update, and Update Revision on Launch.
Figure 4 shows the resulting form.
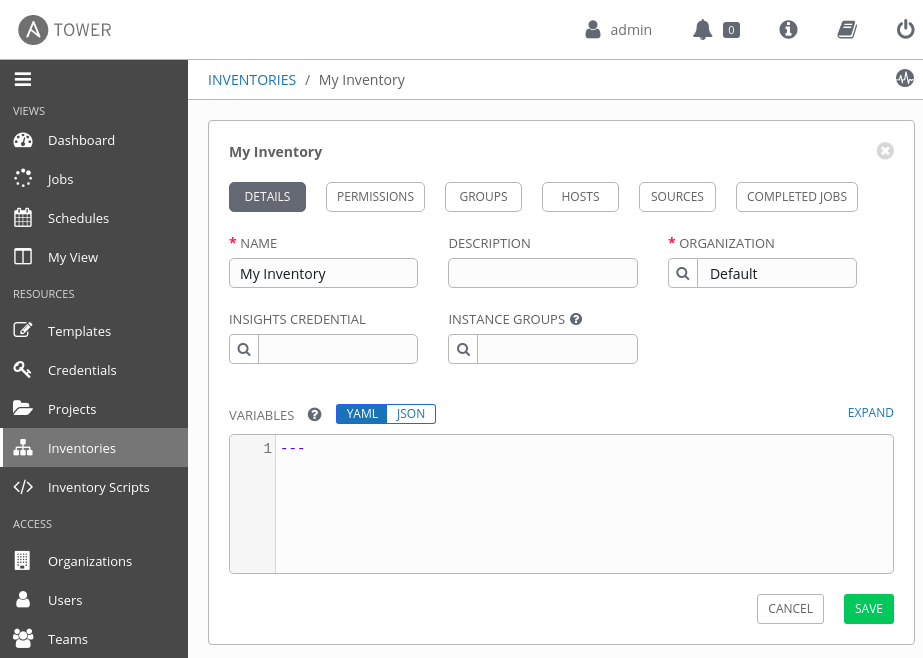
Create a new Ansible Tower inventory
There are just two fields to create a new inventory in Tower: For the Name field, enter My Inventory. For the Organization, you can select the default or whatever you previously entered. Figure 5 shows the resulting form.
Create a new inventory source for the inventory
Finally, create a new inventory source for the inventory. Fill in the fields and checkboxes as follows:
- Name:
My inventory source. - Source:
Sourced from a project. - Project:
My project. - Inventory File:
inventory.yml. - Update Options: Select Overwrite, Overwrite Variables, and Update on Project Update.
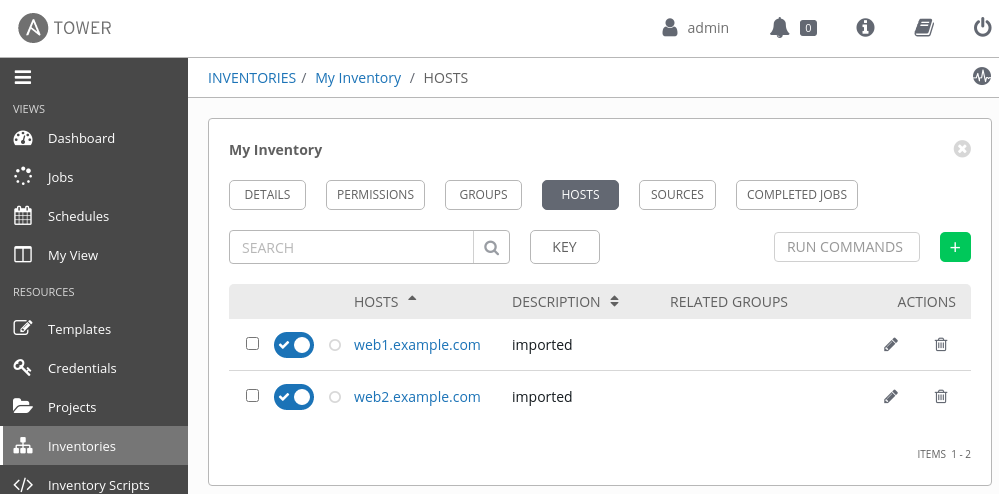
Save the form and then click the Start sync process button for the new inventory source you just created. If the process finishes correctly, your inventory's HOSTS page will display the two example hosts, as shown in Figure 6.
Final thoughts
The inventory plugin we've created is basic, but it’s a good foundation for implementing more complex ones that can query external sources of data, perhaps using third-party libraries. Being modules, inventory plugins can also accept parameters, giving them an advantage over plain scripts. For more information, see the official Ansible documentation on plugin configuration. Also, note that if you decide to use a third-party library not present in Python’s standard library, such as Requests, you will need to install it manually in the appropriate Python virtual environment inside Ansible Tower.
Happy developing!
Last updated: October 7, 2022