There are many ways to configure the cache in a microservices system. As a rule of thumb, you should use caching only in one place; for example, you should not use the cache in both the HTTP and application layers. Distributed caching both increases cloud-native application performance and minimizes the overhead of creating new microservices.
Infinispan is an open source, in-memory data grid that can run as a distributed cache or a NoSQL datastore. You could use it as a cache, such as for session clustering, or as a data grid in front of the database. Red Hat Data Grid builds on Infinispan with additional features and support for enterprise production environments.
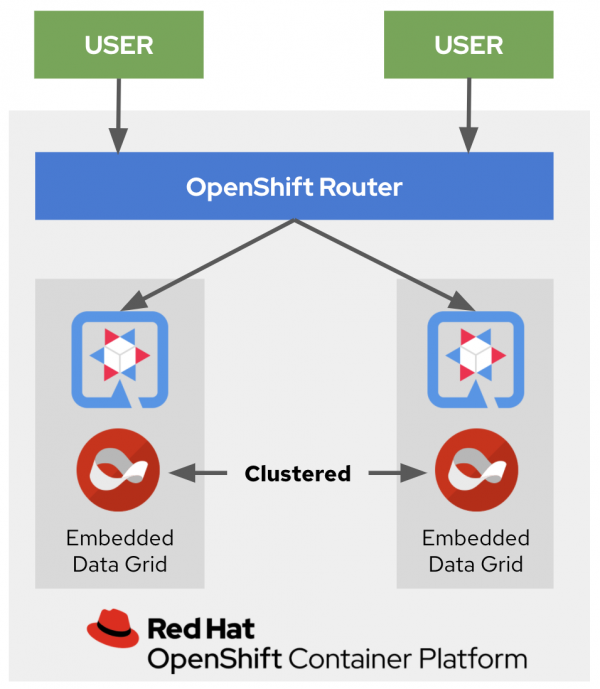
Data Grid lets you access a distributed cache via an embedded Java library or a language-independent remote service. The remote service works with protocols such as Hot Rod, REST, and Memcached. In this article, you will learn how to build a distributed cache system with Quarkus and Data Grid. We'll use Quarkus to integrate two clustered, embedded Data Grid caches deployed to Red Hat OpenShift Container Platform (RHOCP). Figure 1 shows the distributed cache architecture for this example.

Build a distributed cache system with Quarkus and Data Grid
In this example, we’ll create a simple ScoreCard application to store data in two clustered embedded caches. We'll go through the process step-by-step.
Step 1: Create and configure a Quarkus application
The first step is to set up the Quarkus application. You can use Quarkus Tools to generate a Quarkus project in your preferred IDE. See the complete source code for the example Quarkus application.
Step 2: Add the Infinispan-embedded and OpenShift extensions
After you've configured your Quarkus project with an artifactId (embedded-caches-quarkus), you will need to add the required Quarkus extensions. Add the following dependencies to your Maven pom.xml:
<dependency>
  <groupId>io.quarkus</groupId>
  <artifactId>quarkus-infinispan-embedded</artifactId>
</dependency>
<dependency>
  <groupId>org.infinispan.protostream</groupId>
  <artifactId>protostream-processor</artifactId>
</dependency>
<dependency>
  <groupId>io.quarkus</groupId>
  <artifactId>quarkus-openshift</artifactId>
</dependency>
As an alternative, run the following Maven plug-in command from your Quarkus project's base directory:
./mvnw quarkus:add-extension -Dextensions="infinispan-embedded,openshift"
Step 3: Create a caching service
Next, we'll create a caching service. Red Hat Data Grid provides an EmbeddedCacheManager interface for creating, modifying, and managing clustered caches. The CacheManager interface runs in the same Java virtual machine (JVM) as the client application. Create a new service named ScoreService.java in your Quarkus project, then add the following code to save, delete, and retrieve score data in the example application:
EmbeddedCacheManager cacheManager;
public List<Score> getAll() {
  return new ArrayList<>(scoreCache.values());
}

public void save(Score entry) {
  scoreCache.put(getKey(entry), entry);
}

public void delete(Score entry) {
  scoreCache.remove(getKey(entry));
}
Step 4: Initialize the cache nodes
Next, you’ll define a GlobalConfigurationBuilder to initialize all cache nodes at startup. The existing cache data will be replicated automatically when a new node is created. Add the following onStart method in ScoreService.java class:
void onStart(@Observes @Priority(value = 1) StartupEvent ev) {

   GlobalConfigurationBuilder global = GlobalConfigurationBuilder.defaultClusteredBuilder();
   global.transport().clusterName("ScoreCard");
   cacheManager = new DefaultCacheManager(global.build());

   ConfigurationBuilder config = new ConfigurationBuilder();
   config.expiration().lifespan(5, TimeUnit.MINUTES).clustering().cacheMode(CacheMode.REPL_SYNC);

   cacheManager.defineConfiguration("scoreboard", config.build());
   scoreCache = cacheManager.getCache("scoreboard");
   scoreCache.addListener(new CacheListener());

   log.info("Cache initialized");

}
Step 5: Configure the transport layer
Red Hat Data Grid uses a JGroups library to join clusters and replicate data over the transport layer. To deploy the Quarkus application with the embedded Infinispan caches, we need to add the following DNS_PING configuration in the resources/default-configs/jgroups-kubernetes.xml file:
<dns.DNS_PING dns_query="jcache-quarkus-ping" num_discovery_runs="3" />
Step 6: Add a CacheListener
Red Hat Data Grid provides CacheListener APIs for clients to get notifications about cache events, such as when a new cache entry is created. We can implement a listener by adding the @Listener annotation to a plain old Java object (POJO) class. Let’s create a new CacheListener.java class and add the following code to it:
@Listener
public class CacheListener {

   @CacheEntryCreated
   public void entryCreated(CacheEntryCreatedEvent<String, Score> event) {
       System.out.printf("-- Entry for %s created \n", event.getType());
   }

   @CacheEntryModified
   public void entryUpdated(CacheEntryModifiedEvent<String, Score> event){
       System.out.printf("-- Entry for %s modified\n", event.getType());
   }

}
Step 7: Build and deploy the Quarkus application to OpenShift
The OpenShift extension that we added earlier is a wrapper extension that combines the Kubernetes and container-image-s2i extensions with a default configuration. The extension makes it easy to get started with Quarkus on OpenShift.
Quarkus lets us automatically generate OpenShift resources based on a default or user-supplied configuration. To deploy our Quarkus application to OpenShift, we only need to add the following configuration to the application's application.properties file:
quarkus.openshift.expose=true
quarkus.kubernetes-client.trust-certs=true
quarkus.container-image.build=true
quarkus.kubernetes.deploy=true
Use the following command to log into the OpenShift cluster:
$ oc login --token=<YOUR_USERNAME_TOKEN> --server=<OPENSHIFT API URL>
Then, execute the following Maven plug-in command:
./mvnw clean package
Step 8: Scale-up to two pods
Assuming that we've successfully deployed the Quarkus application, our next step is to scale up to two pods. Run the following command:
oc scale dc/embedded-caches-quarkus --replicas=2
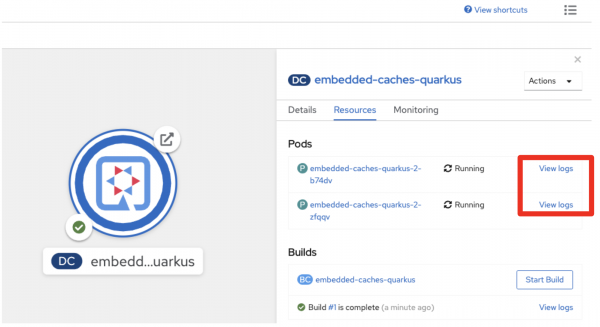
To verify the pods, go to OpenShift's topology view in your developer console. Check to see whether the two pods are running in the embedded-caches-quarkus project, as shown in Figure 2.

Step 9: Test the application
As a final step, let's test the application. We can start by using a RESTful API invocation to add a few scores in the clustered embedded caches:
curl --header "Content-Type: application/json" --request PATCH -d '{"card":[5,4,4,10,3,0,0,0,0,0,0,0,0,0,0,0,0,0],"course":"Bethpage","currentHole":4,"playerId":"4","playerName":"Daniel"}' <APP_ROUTE_URL>
If you are using the sample application, you need to run a predefined bash script (in this case, it's sh scripts/load.sh).
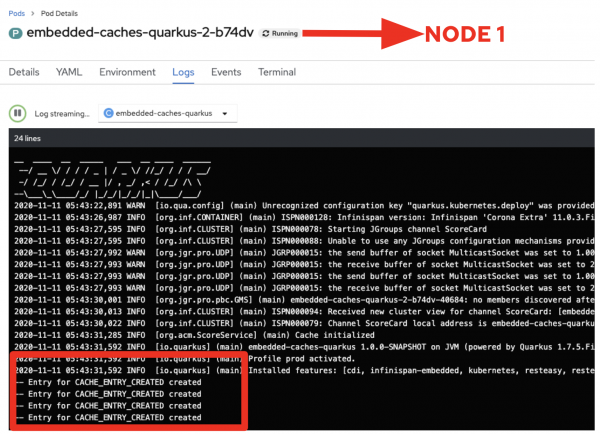
Return to the topology view and click View logs for each pod in its own web browser. This lets you monitor cache events from CacheListener. You should see the same cache entry logs in both Data Grid nodes. Figure 3 shows the output from Node 1.

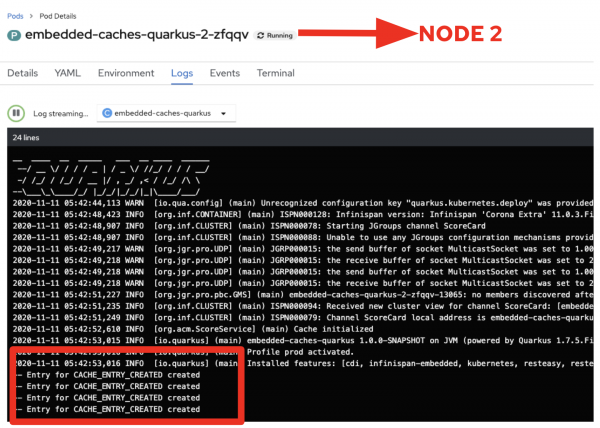
Figure 4 shows the output from Node 2.

What’s next for Quarkus and Red Hat Data Grid
Red Hat Data Grid increases application response times and lets developers dramatically improve performance while providing availability, reliability, and elastic scale. Using Quarkus' serverless function for the front end and external Red Hat Data Grid servers, you can integrate these benefits into a serverless architecture designed for high-performance, auto-scaling, and superfast response times.
Last updated: May 17, 2021