It's your first day as a Java programmer, right out of college. You have received your badge, a shiny new laptop, and all of your software requests have been approved. Everything seems to be going well.
You install Eclipse and set up the required Java Development Kit (JDK) in your new development environment. You clone a project from the company's GitHub repository, modify the code, and make your first commit. You are excited to be working on your first project.
But then, a few hours later, a senior programmer asks what version of the JDK you used. It seems that the pipeline is reporting a project failure. All you did was commit Java source code, not binary, and it worked perfectly on your local machine. What could possibly have gone wrong?
Coding in a restricted environment
The issue I described is well-known among programmers as the "It works on my computer, and I don't know why it doesn't work on your computer" problem. Fortunately, this is the type of problem Red Hat CodeReady Workspaces (CRW) can help you solve. CodeReady Workspaces is a cloud-based IDE based on Che. Whereas Che is an open source project, CRW is an enterprise-ready development environment that provides the security, stability, and consistency that many corporations require. All you have to do is open the CRW link in a web browser, sign in with your user credentials, and code inside the browser.
In this article, I show you how to install CodeReady Workspaces in a restricted Red Hat OpenShift 4 environment.
Example setup and prerequisites
Ideally, you should be able to pull images directly from the Red Hat Registry and use them for your installation. After all, images in the Red Hat Registry are secure and certified. In some cases, however, you will find that the company’s network is behind a firewall, or that the network policy does not allow you to pull images directly from the Red Hat Registry. For this article, I assume that you can neither pull images nor enable a proxy to pull images directly from the Red Hat Registry. Instead, I show you how to pull the required images and stash them in the company's private registry, such as Artifactory or Nexus. You can then use the privately stored images to install CodeReady Workspaces.
I assume the following about your environment and the installation process:
- The cloud platform is OpenShift 4: You should have a running OpenShift 4 environment, and you should know how to use the OpenShift user interface (UI) or command-line interface (CLI).
- We're installing CodeReady Workspaces version 2.0 or higher: Most of this tutorial is applicable to CRW 1.2, but I assume that you are using at least CodeReady Workspaces 2.0.
- We will use OpenShift 4's OperatorHub for installation: You could use another method to install CodeReady Workspaces, but I will demonstrate how to use OpenShift 4's built-in OperatorHub.
- The environment is a restricted network: Although you could set up the example in a non-restricted environment, I assume that you are working in a restricted network.
- You have access to the Red Hat Registry: You should be able to log in and retrieve container images from the Red Hat Registry.
- You have access to a private registry: After you pull container images from the Red Hat Registry, you need to store them in a private registry, such as Artifactory or Nexus.
Note that my example is also based on an air-gapped installation, which is a disconnected installation that supports working in a restricted environment.
Let's get started.
Step 1: Pull the required CRW images from the Red Hat Registry
Installing CRW 2.0 in a restricted environment requires pulling 13 images from the Red Hat Container Registry, which is shown in Figure 1.

The first five images have been required since CodeReady Workspaces 1.2, and the eight new images are required to deploy CRW 2.0:
codeready-workspaces/server-operator-rhel8:2.0: The CodeReady Workspaces Operator orchestrates and manages the installation process. It is especially important to have this Operator installed for OpenShift 4.x.codeready-workspaces/server-rhel8:2.0: This is the Che server. It provides the main platform to manage workspaces and aspects of the project, such as programming stacks, user groups, and the factory. You will also use the Che server to view your project dashboard.redhat-sso-7/sso73-openshift:latest: CRW uses Red Hat Single Sign-On (SSO), which is based on Keycloak. This enterprise implementation is compliant with SAML 2.0 and OpenID. You will need it to authenticate, authorize, and manage users in CodeReady Workspaces.
Note: Factory is JavaScript Object Notation (JSON) file that defines the elements, including where to find the source code for the workspace, what languages are used in the project, the commands to pre-populate in the IDE for the workspaces, as well as any post-load actions to be performed on the workspace automatically after it is built.
rhscl/postgresql-96-rhel7:latest: Keycloak writes to the PostgreSQL database. You will need this image to store user-related data.ubi8-minimal:latest: The universal base image (UBI) provides the persistent volume that you will use to store data for your workspace and anything else that is required for CRW.
You also need to import the following images:
registry.redhat.io/codeready-workspaces/pluginregistry-rhel8:2.0: Makes it possible to share a plug-in definition across all the users of the same instance of CodeReady Workspaces. Only plug-ins that are published in a registry can be used in a devfile.registry.redhat.io/codeready-workspaces/devfileregistry-rhel8:2.0: Holds the definitions of the CodeReady Workspaces stacks. These are available on the CodeReady Workspaces user dashboard when selecting Create Workspace. It contains the list of CodeReady Workspaces technological stack samples with example projects.registry.redhat.io/codeready-workspaces/pluginbroker-rhel8:2.0: Ensures via this Operator that all installed plug-ins are handled correctly.registry.redhat.io/codeready-workspaces/pluginbrokerinit:2.0: Runs as an init container to ensure that all installed plugins are handled correctly.registry.redhat.io/codeready-workspaces/jwtproxy-rhel8:2.0: Implements the self-signed per-workspace JWT token and its verification on a dedicated service based on JWT proxy.registry.redhat.io/codeready-workspaces/machineexec-rhel8:2.0: Runs Go-lang server-side creation for machine-execs for CRW workspaces.registry.redhat.io/codeready-workspaces/theia-rhel8:2.0: Defines the default web IDE for the workspace based on the Theia project.registry.redhat.io/codeready-workspaces/theia-endpoint-rhel8:2.0: Similar to the theia-rhel8 image above, this adds the Theia components for CRW's IDE look and feel.
From CRW 2.1, there seems to be significant updates to the required images listed above. For example:
codeready-workspaces/server-operator-rhel8:2.0is gone and replaced withcodeready-workspaces/crw-2-rhel8-operator:2.1.pluginbroker-rhel8andpluginbrokerinit:2.0are replaced withcodeready-workspaces/pluginbroker-artifacts-rhel8:2.1andcodeready-workspaces/pluginbroker-metadata-rhel8:2.1.theia-dev-rhel8:2.1was added to the list of images.
If you end up using CRW 2.1, please make the appropriate changes.
Download the images
When you locate a container image that you need, select the image, and click the Tags tab to see the image name and version information. You will specify this information later, to pull the images from the Red Hat Container Registry. As of this writing, the version number for the CodeReady Workspaces Operator is 2.0, as shown in Figure 2.
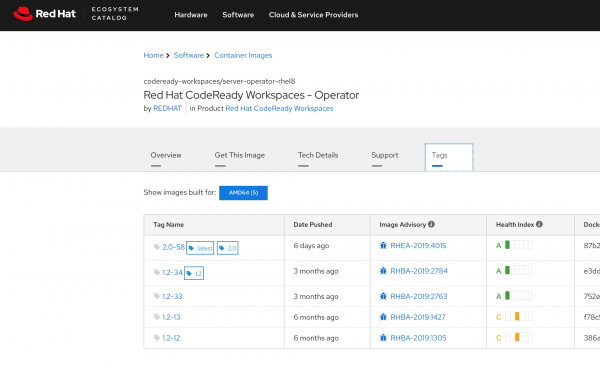
Unless you have access to a common service account or another authentication mechanism, you will need to create an account before you can download images from the registry. Open the Get This Image tab shown in Figure 3 and follow the detailed instructions.

Each private registry has its own approach to pulling images and storing them. For Artifactory, you could use something like the following curl command, which you would update with your own variable values:
$ curl -u JFROG_USERNAME:JFROG_PASSWORD ARTIFACTORY_URL/IMAGE_NAME/metadata/IMAGE_VERSION -k
Follow the instructions specified by your registry, as well as any requirements that are particular to your organization.
Verify the images
Once you pull the images from the Red Hat Registry, verify that they are stored in your private registry. Figure 4 is a screenshot of my Artifactory registry, where I stored the images required for my CodeReady Workspaces installation.
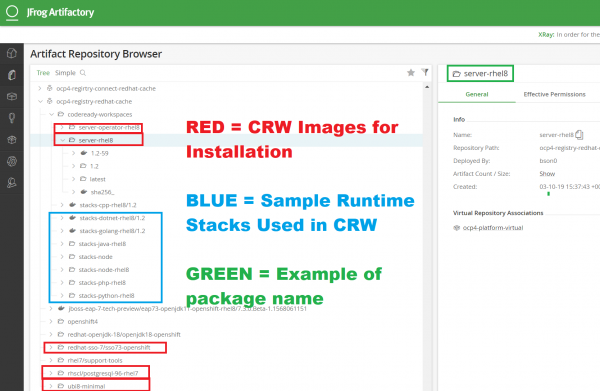
The images that I have outlined in red are required to install CodeReady Workspaces. Use the latest versions available from the Red Hat Registry. The images outlined in blue are stacks, which represent different programming runtimes. Stacks aren't required for your CRW installation, but you will use them in conjunction with a devfile to create new projects. I will introduce you to the process of importing stacks in Part 2. The image outlined in green (in the upper-right corner of the screenshot) is a package name.
Note: Currently, only OpenShift 4 supports the CodeReady Workspaces Operator, which is key to the installation described in this article. While you could theoretically install CodeReady Workspaces in Kubernetes, I assume that you are installing on OpenShift 4.
Step 2: Create a new OpenShift 4 project
Creating a new project in OpenShift is the same whether you are using OpenShift 3 or OpenShift 4. Either way, you can use the OpenShift user interface (UI) or the OpenShift command-line interface (CLI).
Creating a new project with the OpenShift UI
The OpenShift UI is easy to use. Click Create Project and enter your project information in the remaining fields. Note that you only need to specify the project name. OpenShift uses this information to create a namespace. In the project dialog shown in Figure 5, I entered the project name: crw-demo.

Creating a new project with the OpenShift CLI
Your other option is to use the OpenShift Container Platform (OCP) CLI. In this case, you would open the command line and enter the command oc new-project:
$ oc new-project crw-demo
Once again, I named my new project crw-demo.
When you create a new project, OpenShift creates new resources for the project, including two service accounts that you will use later. These are named default and builder.
Next, we'll generate an access token and add it to your OpenShift secrets. You will need this token to pull images from your private registry.
Step 3: Generate an access token and add it to OpenShift secrets
The diagram in Figure 6 shows the general process for generating an access token, which you'll use to authenticate your user ID and gain access to your private registry. The actual process will vary depending on the application, policy, and environment.
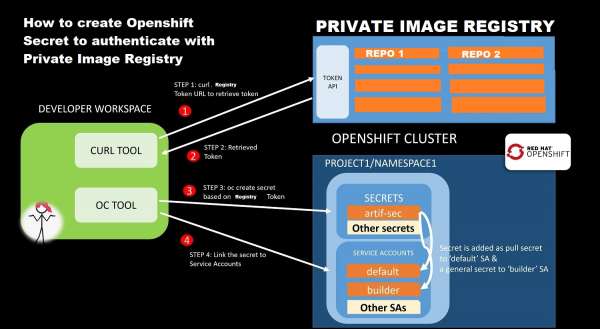
Authorization consists of four steps:
- Request an access token from a service such as OAuth. The service will generate the token and send it to the private registry. (In some cases you might use a proxy to request the token.)
- Call into the private registry and retrieve the token.
- Use the token to create an OpenShift secret as a Docker registry.
- Add the OpenShift secret containing the token to each of your service accounts in CodeReady Workspaces. (The CodeReady Workspaces Operator requires various service accounts for installation. I'll explain this further shortly.)
Note: In some environments, the process of generating and authenticating the token is done by a developer, whereas in others it is facilitated by a proxy. Either way, it is essential to select a token that does not expire. Another option would be to use a tool like Vault to rotate the token and refresh OpenShift's secret mechanism. Describing that process is beyond the scope of this article.
Generating the token manually
If you are manually generating the access token, you could use a curl command as simple as this:
$ curl -u PRIVATE_REGISTRY_USERNAME:PRIVATE_REGISTRY_PASSWORD -X POST PRIVATE_REGISTRY_TOKEN_URL
Where:
PRIVATE_REGISTRY_USERNAMEis your user name to log in to the private registry.PRIVATE_REGISTRY_PASSWORDis your password to log in to the private registry.PRIVATE_REGISTRY_URLis the web address to generate the access token from the private registry.
Again, the mechanism will vary depending on your environment and other factors. Check the documentation for your private registry or seek advice from your team before attempting to generate an access token.
Creating the OpenShift secret
Once you generate the token, you can create an OpenShift secret to store the token in a Docker registry. For this, you would use the create secret command on the OC CLI:
$ oc create secret docker-registry PULL_SECRET_NAME
    --docker-server=URL_IMAGE_PRIVATE_REGISTRY \
    --docker-username=USERNAME_PRIVATE_REGISTRY \
    --docker-password=TOKEN_PRIVATE_REGISTRY \
    --docker-email=EMAIL_PRIVATE_REGISTRY
Where:
PULL_SECRET_NAMEis the OpenShift secret name.URL_IMAGE_PRIVATE_REGISTRYis the private registry path containing the images you want to pull.USERNAME_PRIVATE_REGISTRYis your user name for accessing the private registry.TOKEN_PRIVATE_REGISTRYis the private registry token you have just generated.EMAIL_PRIVATE_REGISTRYis the email you have associated with the private registry.
In Figure 7, you can see that my token, artif-ocp4-sec, is stored as an OpenShift secret.

With that, you have now created an Openshift secret with the credentials necessary to pull the image from your private registry. You still need to link the OpenShift secret to your service accounts. Before I show you how to do that, you must install CodeReady Workspaces.
Step 4: Use the OpenShift OperatorHub to install CodeReady Workspaces
One way to install CodeReady Workspaces is to leverage chectl, which is Che's command-line interface. Another way, available starting with OpenShift 4, is to use the OpenShift OperatorHub. Figure 8 shows the dialog to locate and install the CodeReady Workspaces Operator from the OperatorHub. (Note that the OperatorHub also contains the Che Operator.)
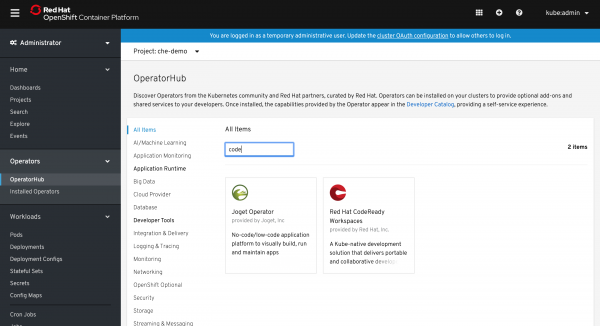
Note: If you don't see the CodeReady Workspaces Operator in your OperatorHub, check the Operator installation instructions in the Red Hat OpenShift 4.3 documentation.
Installing CRW from the OperatorHub
If you go to the OpenShift OperatorHub and select the CodeReady Workspaces Operator, you should see an option to install it. Before pressing the Install button, as shown in Figure 9, make a note of the CRW Operator version (currently 2.0) and the location of the container image. By default, the location points to registry.redhat.io. Later, you will change this location to point to your private registry.
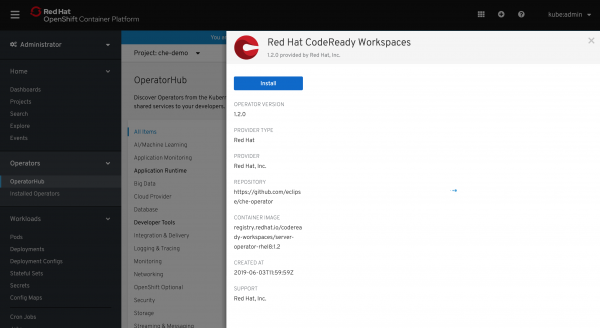
After clicking Install, you will be asked to create an Operator subscription. Make sure that you are in the correct namespace. Click the Subscribe button to subscribe to CodeReady Workspaces Operator, as shown in Figure 10.

The installation can take a while, so be patient. Once the installation is complete, click the CodeReady Workspaces Operator link to open your new CRW instance, which is shown in Figure 11.

Next, we'll set up a CRW cluster.
Step 5: Modify CRW's custom resource definition file
So far, you might wonder what about this CRW installation is unique to working in a restricted environment. That will change with this step, where we first create a new CodeReady Workspaces cluster, then modify CRW's custom resource definition (CRD) file.
From the CRW project namespace page shown in Figure 11, click the link for your new CodeReady Workspaces Operator. You will be presented with an option to create a new instance of a Red Hat CodeReady Workspaces cluster. Click the Create Instance option, which is shown in Figure 12.

Now, you will be provided with the custom resource definition file for your CodeReady Workspaces Operator. You will need to customize this file, shown in Figure 13, before installing CRW to OpenShift.

The CRD definition is in YAML format, but note that a section of the file is formatted using JSON. You will modify the properties to include the following seven images, which we pulled from the Red Hat Registry in Step 1:
codeready-workspaces/server-operator-rhel8:2.0
cheImage: codeready-workspaces/server-rhel8:2.0
identityProviderImage: redhat-sso-7/sso73-openshift:latest
postgresImage: rhscl/postgresql-96-rhel7:latest
pvcJobsImage: ubi8-minimal:latest
devfileRegistryImage: codeready-workspaces/devfileregistry-rhel8:2.0
pluginRegistryImage: codeready-workspaces/pluginregistry-rhel8:2.0
You can find the full CRD file for the Che Operator on the Che Operator's GitHub repository.
Updating the CRD file
Note that codeready-workspaces/server-operator-rhel8:2.0 is referenced twice in the CRD file. You will need to add the other images as new properties, as shown in this example:
"spec": {
  "server": {
    ... // Other Properties,
    # server image used in Che deployment
    "cheImage": ""
  },
  "database": {
    ... // Other Properties,
    "postgresImage": ""
  },
  "storage": {
    ... // Other Properties,
    "pvcJobsImage": ""
  },
  "auth": {
    ... // Other Properties,
    "identityProviderImage": ""
  }
You can also change other properties in this file. For example, I had to change the following two properties to true when I deployed my CRW.
tlsSupport: trueselfSignedCert: true
Dealing with pod failure
When you proceed with installing a new CRW instance, your pods will probably fail. To check this in the OpenShift console, go to Workloads -> Pods, then click the pod that you are interested in. As an example, you could click Log.
If you prefer to use the OpenShift CLI, enter oc get pods, then, oc logs -f po/POD_NAME. For POD_NAME, enter the pod you want to verify.
If you inspect the error, you will see that the image-pull event has failed with an error message: ErrImagePull. In the next section, I'll show you how to fix this error by adding your OpenShift secret to the service accounts you will need to run CodeReady Workspaces in a restricted environment.
Step 6: Add your OpenShift secret to new service accounts
A CodeReady Workspaces deployment uses the CRW Operator to install and manage all of CRW's life-cycle processes. These processes also require leveraging various service accounts. In overview, the flow looks something like this:
- The
codeready-operatorservice accounts are initialized and attempt to pull thecodeready-workspaces/server-operator-rhel8image. - The
deployerandbuilderservice accounts attempt to pull additional required images such asredhat-sso-7/sso73-openshift,rhscl/postgresql-96-rhel7, andubi8-minimal. - The
cheservice account is created to pull thecodeready-workspaces/server-rhel8image. - Once CRW is up, the
che-workspaceservice account is used to pull in stack images for various runtimes.
You can find the above service accounts in the OpenShift console by clicking Explore and browsing until you find the ServiceAccounts page, as shown in Figure 14.

Alternatively, on the command line, you could enter oc get sa.
Adding more service accounts
The first time that you try to install CRW, you should only see the codeready-operator service accounts, which are default, builder, and deployer. You will have to use your OpenShift secret to add the additional service accounts. In the custom resource definition file, create a new line under imagePullSecrets and add a new OpenShift secret there. Alternatively, you could override the previous OpenShift secret, as shown in Figure 15.

Repeat this step for all of the service accounts you need for your CodeReady Workspaces deployment.
Updating the deployment script
Simply modifying your service accounts will not automatically trigger the changes required to deploy a CRW application in a restricted environment. You also need to modify your deployment script, as shown in Figure 16.

After you've made these changes, check the pods and their logs to see whether you are able to successfully pull the images that are required for your deployment, as shown in Figure 17. Repeat the steps for any additional service accounts to pull the images that you need.

Step 7: Check your pods and deploy CodeReady Workspaces
Once everything is up and running, you should see all of your pods are in the Running state, as shown in Figure 18.

If you notice any issues with a running pod, check for log or event errors, as shown in Figure 19.

Assuming all of your pods are running smoothly, you can now deploy your CodeReady Workspaces instance in a restricted environment, as shown in Figure 20.

Conclusion
That should be it for installing and deploying CodeReady Workspaces. You might encounter additional challenges related to working in a restricted environment.
For now, you should at least have CodeReady Workspaces installed and ready to use in OpenShift 4. However, that is just a start with your journey to the world of CodeReady Workspaces. In my next articles, I will cover how you can further configure CRW after installation, how to try out various development options in CRW, and how to install the monitoring solutions like Prometheus and Grafana in CRW. Until then, see you next time, and feel free to leave comments.
Last updated: July 25, 2023