Months ago, a customer asked me about Red Hat OpenShift on OpenStack, especially regarding the network configuration options available in OpenShift at the node level. In order to give them an answer and increase my confidence on $topic, I've considered how to test this scenario.
At the same time, the Italian solution architect "Top Gun Team" was in charge of preparing speeches and demos for the Italian Red Hat Forum (also known as Open Source Day) for the Rome and Milan dates. Brainstorming led me to start my journey toward testing OpenShift 4.2 setup on OpenStack 13 in order to reply to the customer and leverage this effort to build a demo video for Red Hat Forum.
Note: If you want to skip the bits and bytes, skip ahead to the "Demo" section.
OpenShift 4.2 on OpenStack 13: Background
Why OpenShift on OpenStack? There are a number of advantages to combining these two solutions:
- OpenStack provides OpenShift with a top-class private cloud architecture to host OpenShift nodes, granting multi-tenancy, an as-a-service approach, and modularity at the Infrastructure-as-a-Service (IaaS) level.
- This combination provides a three-layer scaling architecture because OpenStack nodes, OpenShift nodes, and OpenShift pods can be scaled horizontally. This combination means that you can follow your business needs without constraints.
- OpenStack provides a programmatic API-driven approach for OpenShift. For instance, you can scale your OpenShift worker nodes via MachineSet by calling the OpenStack API with a single click.
- OpenShift on OpenStack is integrated with Nova, Cinder, Swift, Octavia, Kuryr, etc. For instance, with Kuryr you can avoid double encapsulation—i.e., OpenShift software-defined networking (SDN) on OpenStack SDN—by using Neutron networks at the pod level.
- OpenShift on OpenStack is co-engineered by Red Hat, which means having aligned product roadmaps and integration tests created by the Red Hat engineers working on these projects every single day.
OpenShift Installer Provisioned Infrastructure (IPI) was released with OpenShift 4.2. The objectives for the new installer are to provision and configure OpenShift 4.2 in a fully automated and opinionated way, making it easy to get started on day one and granting you more time to focus on your team on day two.
As you may know, IPI on OpenShift 4.2 also supports Red Hat OpenStack Platform 13 as a provider, leveraging OpenStack's virtualization capabilities to host OpenShift nodes. The main concern to me was that I didn't have enough bare-metal nodes to build my environment. A standard high-availability (HA) OpenStack environment is composed of:
- One director node
- Three controllers
- Three Ceph nodes
- At least two compute nodes
My goal was to build the following to host OpenShift 4.2 and simulate an HA environment at the control plane and storage level:
- One director node (undercloud)
- Three controllers
- Three Ceph nodes
- One compute node (overcloud)
Why? To simulate the existing customer environment.
How? Using VMs as OpenStack nodes.
I had an idea: To see if I can set up everything with just a single bare metal server. That effort pushed me to publish this article so I can share and explain how I tested an OpenShift 4.2 IPI setup on OpenStack 13 with a single Red Hat Enterprise Linux (RHEL) server. Doing this was possible because RHEL is properly tuned to use nested virtualization with KVM.
Warning: This article was written to help customers, partners, and community members test OpenShift 4.2 on OpenStack 13 only for demo/test purposes. This procedure and the resulting architecture are not supported (and not even suggested) by Red Hat.
I'd like to thank Daniel Bellantuono for sharing helpful tips about OpenStack's architecture.
Scenario
I used just a single bare-metal node (L0) and then, using KVM's nested virtualization features, created a deployment of OpenStack nodes (L1) with virtualized OpenShift nodes (L2) on top. Figure one shows a schema summarizing the whole setup.
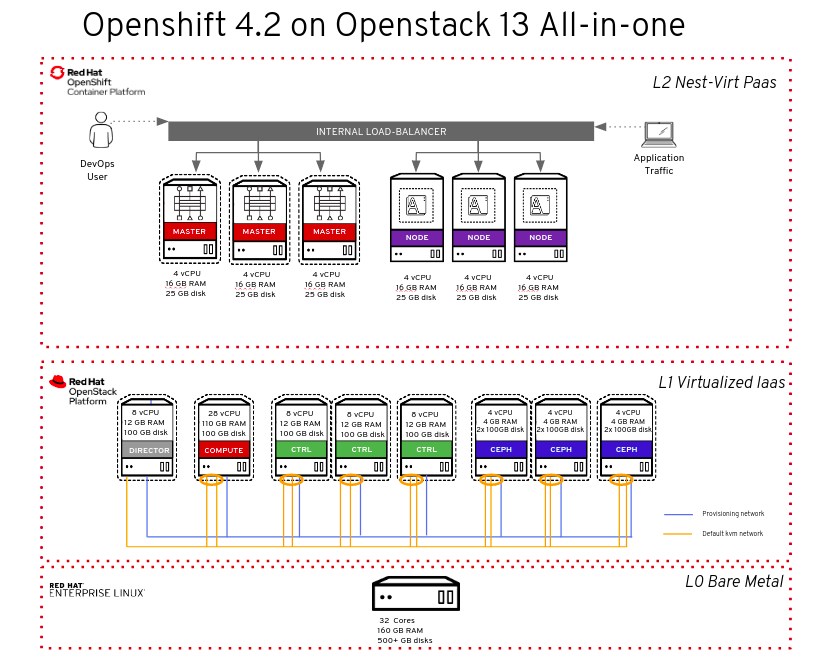
Now, let's dig into the different layers.
L0 bare metal
The L0 bare metal node was configured with Red Hat Enterprise Linux and KVM to act as a hypervisor. Its server requirements are:
- At least 32 cores
- 160 GB RAM
- 500 GB SSD disk (to host high-performance VM disks, namely the Ceph OSD disks, and the Nova compute disk)
- 200 GB SAS disk (to host medium-performance VM disks, namely the undercloud disk and the controller disks).
Note: You could use SSDs for every VM, but I had to balance my needs with hardware availability.
The virsh command shows the rest of the bare metal node's specs:
[root@newkvm ~]# virsh nodeinfo
CPU model: x86_64
CPU(s): 32
CPU frequency: 2099 MHz
CPU socket(s): 1
Core(s) per socket: 8
Thread(s) per core: 2
NUMA cell(s): 2
Memory size: 167676348 KiB
Next, I used the tuned command to perform network latency workload tuning at the L0 level:
[root@newkvm ~]# tuned-adm profile network-latency
In order to successfully configure and deploy your overcloud nodes, you need to do two things. First, you need to define a provisioning network on libvirt for the undercloud to use when installing our overcloud nodes via PXE. Second, you have to define your virtual machines.
Here is a snippet of network config at the L0 level:
[root@newkvm ~]# cat > /tmp/provisioning.xml <<EOF
<network>
<name>provisioning</name>
<ip address="172.16.0.254" netmask="255.255.255.0"/>
</network>
EOF
[root@newkvm ~]# echo "Defining provisioning network..."
[root@newkvm ~]# virsh net-define /tmp/provisioning.xml
[root@newkvm ~]# echo "Setting net-autostart to provisioning network..."
[root@newkvm ~]# virsh net-autostart provisioning
[root@newkvm ~]# echo "Starting provisioning network..."
[root@newkvm ~]# virsh net-start provisioning
[root@newkvm ~]# echo "Disabling DHCP on default network..."
[root@newkvm ~]# if(virsh net-dumpxml default | grep dhcp &>/dev/null); then
virsh net-update default delete ip-dhcp-range "<range start='192.168.122.2' end='192.168.122.254'/>" --live --config
echoinfo "DHCP already disabled, skipping"
The provisioning network is usually a pre-existing datacenter network in a native VLAN configuration. This configuration is used by the undercloud to perform node introspection and setup via PXE and TFTP. For this reason, I created a dedicated network called "provisioning" (Figure 1's blue section) to attach to all of my VMs.
As you may already know, the entire OS setup and configuration for OpenStack nodes (VMs in our case) is managed by the Red Hat OpenStack Platform director. In addition, DHCP was disabled on the default (pre-existing) libvirt network because the director assigns IPs during OpenStack setup. Last, but not least, we need to configure our hypervisor to use an Ironic project driver. My choice was to use VirtualBMC to simulate Intelligent Platform Management Interfaces (IPMIs) that are not available in a virtual machine environment.
Note: Read this Red Hat Knowledge Base article to learn more about how to configure VBMC and use it to import and introspect bare metal nodes.
I don't want to go deeper into the details of OpenStack setup because the process is long and difficult to summarize. This article assumes that you have a basic knowledge and understanding of OpenStack architecture. That being said, some basic steps are provided.
L1 virtual machines (OpenStack nodes)
VMs were defined using qemu-img, virt-customize, and virt-install starting from the Red Hat Enterprise Linux 7 KVM guest image downloadable from the Red Hat Customer Portal:
[root@newkvm ~]# echo "Downloading basic RHEL image"
[root@newkvm ~]# curl -o rhel7-guest-official.qcow2 $RHEL_IMAGE_U
[root@newkvm ~]# echo "Cloning RHEL image to a 100G sparse image..."
[root@newkvm ~]# qemu-img create -f qcow2 rhel7-guest.qcow2 100G
[root@newkvm ~]# echo "Extending file system..."
[root@newkvm ~]# virt-resize --expand /dev/sda1 rhel7-guest-official.qcow2 rhel7-guest.qcow2
[root@newkvm ~]# echo "Checking image filesystem size..."
[root@newkvm ~]# virt-filesystems --long -h -a rhel7-guest.qcow2 | grep 100G &> /dev/null
[root@newkvm ~]# echo "Deleting old image..."
[root@newkvm ~]# rm -f rhel7-guest-official.qcow2
[root@newkvm ~]# echo "Create undercloud qcow2 disk..."
[root@newkvm ~]# qemu-img create -f qcow2 -b rhel7-guest.qcow2 undercloud.qcow2
Director needs to have two NICs. The first one (eth0) is attached to the provisioning network in order to successfully deploy overcloud nodes, and the second (eth1) is attached to the default network in order to reach (via the NAT made by the L0 hypervisor) the internet to download the RPM packages needed for the setup:
[root@newkvm ~]# echo "Customizing VM..."
[root@newkvm ~]# virt-customize -a undercloud.qcow2 --root-password password:mypassword --ssh-inject "root:file:/root/.ssh/id_rsa.pub" --selinux-relabel --run-command 'yum remove cloud-init* -y && cp /etc/sysconfig/network-scripts/ifcfg-eth{0,1} && sed -i s/ONBOOT=.*/ONBOOT=no/g /etc/sysconfig/network-scripts/ifcfg-eth0 && cat << EOF > /etc/sysconfig/network-scripts/ifcfg-eth1
DEVICE=eth1
ONBOOT=yes
IPADDR=192.168.122.253
NETMASK=255.255.255.0
GATEWAY=192.168.122.1
NM_CONTROLLED=no
DNS1=192.168.122.1
EOF'
[root@newkvm ~]# echo "Creating undercloud VM"
[root@newkvm ~]# virt-install --ram 12288 --vcpus 8  --os-variant rhel7 \
--disk path=/var/lib/libvirt/images/undercloud.qcow2,device=disk,bus=virtio,format=qcow2 \
--import --noautoconsole --vnc --network network:provisioning \
--network network:default --name undercloud
[root@newkvm ~]# echo "Start undercloud VM now and on-boot"
[root@newkvm ~]# virsh start undercloud
[root@newkvm ~]# virsh autostart undercloud
The setup for other VMs is similar, with the only difference being the amount of resources involved (such as RAM and CPU) and the NIC configuration. For the overcloud nodes, I added two additional NICs (Figure 1's orange section) because I wanted a bond inside Open vSwitch. Within this bond, I configured the OpenStack networks (namely InternalApi, Tenant Network, Storage, and Storage Management) with the tag vlan and left the external network untagged. As a result, our external network on the OpenStack side will use the default network on the L0 hypervisor.
After this basic setup, I installed the undercloud, imported and introspected the OpenStack nodes, and then built my OSP templates to successfully deploy my overcloud:

I skipped the overcloud endpoint TLS configuration because, at the time of this writing, Red Hat OpenShift Container Platform 4.2 cannot be installed via Installer Provisioned Installation (IPI) on Red Hat OpenStack Platform when the endpoints are encrypted with self-signed certificates (as highlighted in this knowledge base entry). Therefore, the results are this:
[root@newkvm ~]# virsh list --all
Id Name State
----------------------------------------------------
17 undercloud running
18 overcloud-ceph01 running
19 overcloud-ceph02 running
20 overcloud-ceph03 running
21 overcloud-compute01 running
22 overcloud-ctrl01 running
23 overcloud-ctrl02 running
24 overcloud-ctrl03 running
Here is the resulting overcloud server list:
(undercloud) [stack@undercloud ~]$ openstack server list
+--------------------------------------+------------------+--------+----------------------+----------------+--------------+
| ID | Name | Status | Networks | Image | Flavor |
+--------------------------------------+------------------+--------+----------------------+----------------+--------------+
| 9c4d82fd-c37e-4341-9a24-ea6416751aa3 | lab-controller01 | ACTIVE | ctlplane=172.16.0.40 | overcloud-full | control |
| ae2431d5-ff70-4fd3-83e3-48c72fca626e | lab-controller03 | ACTIVE | ctlplane=172.16.0.21 | overcloud-full | control |
| 4176914d-23ef-4e5f-83cd-86a53d320fc4 | lab-controller02 | ACTIVE | ctlplane=172.16.0.29 | overcloud-full | control |
| 78e6d4b0-c3de-431d-b144-6aa19664818d | lab-ceph01 | ACTIVE | ctlplane=172.16.0.46 | overcloud-full | ceph-storage |
| b7bb7596-4bf7-45f7-bd3b-c6bb79304531 | lab-ceph02 | ACTIVE | ctlplane=172.16.0.22 | overcloud-full | ceph-storage |
| 35258a3a-ff8b-44d0-b68b-a55039c4451d | lab-compute01 | ACTIVE | ctlplane=172.16.0.26 | overcloud-full | compute |
| 93d7ff6c-4713-431e-9461-0303126eb7ad | lab-ceph03 | ACTIVE | ctlplane=172.16.0.37 | overcloud-full | ceph-storage |
+--------------------------------------+------------------+--------+----------------------+----------------+--------------+
Because of the limited hardware capabilities (and over-committing, too, given that we are talking about one single bare-metal server), I executed many tests in order to successfully deploy OpenShift on OpenStack. I ran into many timeout issues but finally, I found the right tuning to apply. What follows are a couple of tips and tricks regarding OpenStack compute node timeout tuning.
You probably had to make two edits in the nova_libvirt container configuration file (/var/lib/config-data/puppet-generated/nova_libvirt/etc/nova/nova.conf). The first is in the [neutron] section, setting a timeout value (in my case 300 seconds) big enough to avoid timeouts on the Neutron side when nova spawns a new instance:
[neutron]
url=http://172.17.1.150:9696
ovs_bridge=br-int
default_floating_pool=nova
extension_sync_interval=600
timeout=300
The second is in the [default] section, setting a timeout value (in my case 300 seconds) big enough to avoid timeouts on the Neutron side when nova tries to attach a Virtual Interface (VIF) to a new instance:
[default]
instance_usage_audit_period=hour
rootwrap_config=/etc/nova/rootwrap.conf
compute_driver=libvirt.LibvirtDriver
allow_resize_to_same_host=False
vif_plugging_is_fatal=True
vif_plugging_timeout=300
After these edits, you would restart the nova_libvirt container on the compute node.
Be aware that these changes are applied to the OpenStack Nova container after a container restart. If you want to redeploy your overcloud later, you'll have to customize nova.conf via a custom puppet configuration executed by OpenStack director.
L2 nested virtual machines (OpenShift nodes)
In addition to those nodes (VMs in my case), I of course had to consider the list of requirements needed by IPI in terms of vCPU, RAM, floating IPs, and the security groups to be available at the tenant level. The full prerequisites for OpenShift 4.2 IPI on OpenStack are available here.
Because I've tested the setup many times and I didn't want to worry about prerequisites every time I executed a setup, I made a simple bash script to prepare my tenant on OpenStack:
[stack@undercloud osd-ocp-demo]$ cat create_ocp_tenant.sh
#!/bin/bash
source ../overcloudrc
openstack project create ocp-tenant
openstack user create ocp-user --password mypassword
user=$(openstack user show ocp-user -f value -c id)
admin=$(openstack user show admin -f value -c id)
project=$(openstack project show ocp-tenant -f value -c id)
openstack role add --user $user --project $project _member_
openstack role add --user $user --project $project admin
openstack role add --user $admin --project $project admin
openstack role add --user $user --project $project swiftoperator
# show default quota and set new limits on project ocp-tenant
echo "compute quota"
openstack quota list --compute --project ocp-tenant -f yaml
openstack quota set --cores 40 --ram 102400 $project
echo "network quota"
openstack quota list --network --project ocp-tenant -f yaml
openstack quota set --secgroups 40 --secgroup-rules 500 $project
# create needed flavors
openstack flavor create --ram 16384 --vcpu 4 --disk 25 master
echo -e "working on $project"
source ocp-tenant-openrc
openstack object store account set --property Temp-URL-Key=superkey
# create rhcos image
curl --compressed -J -L -o rhcos-openstack.qcow2 https://mirror.openshift.com/pub/openshift-v4/dependencies/rhcos/pre-release/latest/rhcos-42.80.20191002.0-openstack.qcow2
openstack image create --container-format=bare --disk-format=qcow2 --file rhcos-openstack.qcow2 rhcos
mkdir -p /home/stack/osd-ocp-demo
cd /home/stack/osd-ocp-demo
cat <<EOF > clouds.yaml
clouds:
openstack:
auth:
auth_url: http://192.168.122.150:5000/v3
username: "ocp-user"
password: "mypassword"
project_id: $project
project_name: "ocp-tenant"
user_domain_name: "Default"
region_name: "regionOne"
interface: "public"
identity_api_version: 3
EOF
wget -r --no-parent -A 'openshift-install-linux*.tar.gz' https://mirror.openshift.com/pub/openshift-v4/clients/ocp/latest/
wget -r --no-parent -A 'openshift-client-linux*.tar.gz' https://mirror.openshift.com/pub/openshift-v4/clients/ocp/latest/
tar -xvzf mirror.openshift.com/pub/openshift-v4/clients/ocp/latest/openshift-install-linux-4.2.4.tar.gz -C .
tar -xvzf mirror.openshift.com/pub/openshift-v4/clients/ocp/latest/openshift-client-linux-4.2.0.tar.gz -C .
# openstack FIP for API lb
openstack floating ip create --floating-ip-address 192.168.122.164 --project ocp-tenant external
# openstack FIP for APPS lb
openstack floating ip create --floating-ip-address 192.168.122.180 --project ocp-tenant external
# add ssh key to ssh agent
eval "$(ssh-agent -s)"
ssh-add /home/stack/.ssh/id_rsa
# configure KUBECONFIG path
export KUBECONFIG='/home/stack/osd-ocp-demo/auth/kubeconfig'
Now that the prerequisites are here, let us look at our install-config.yam file, which will instruct the IPI installer about OpenShift configuration in terms of the number of nodes, flavor to be used, network CIDR, etc.
As you can see, I specified fields to:
- Build two worker nodes.
- Build three master nodes.
- Use OpenStack as the provider with the flavor "master" (created by the script
create_ocp_tenant.sh).
In addition, I included a floating IP (FIP) for the internal API load balancer (lbFloatingIP)—this FIP grants access to the internal LB (API load balancer):
(undercloud) [stack@undercloud osd-ocp-demo-static-nic]$ cat template/install-config.yaml
apiVersion: v1
clusterID: ocp4
baseDomain: osd2019.local
compute:
- hyperthreading: Enabled
name: worker
platform: {}
replicas: 2
type: worker
controlPlane:
hyperthreading: Enabled
name: master
platform: {}
replicas: 3
type: master
metadata:
name: ocp4
networking:
clusterNetwork:
- cidr: 10.128.0.0/14
hostPrefix: 23
machineCIDR: 10.0.0.0/16
networkType: OpenShiftSDN
serviceNetwork:
- 172.60.0.0/16
platform:
openstack:
cloud: openstack
computeFlavor: master
externalNetwork: external
lbFloatingIP: 192.168.122.164
octaviaSupport: false
region: regionOne
trunkSupport: false
pullSecret: 'mypull secret'
sshKey: ssh-rsa blablabla stack@undercloud.redhat.local
You may also notice that I didn't use Octavia (an OpenStack load balancer-as-a-service) because, in my own test, I specifically want to simulate a customer environment where Octavia is not used. Octavia is not a strict requirement unless you are using Kuryr.
We can now execute the installation with a simple command (if you want, you can specify the debug log level in order to have a better understanding of the installation process):
(overcloud) [stack@undercloud osd-ocp-demo]$ ./openshift-install create cluster --log-level debug
DEBUG OpenShift Installer v4.2.4
DEBUG Built from commit 425e4ff0037487e32571258640b39f56d5ee5572
DEBUG Fetching "Terraform Variables"...
DEBUG Loading "Terraform Variables"...
DEBUG Loading "Cluster ID"...
DEBUG Loading "Install Config"...
DEBUG Loading "SSH Key"...
DEBUG Loading "Base Domain"...
DEBUG Loading "Platform"...
DEBUG Loading "Cluster Name"...
DEBUG Loading "Base Domain"...
DEBUG Loading "Pull Secret"...
DEBUG Loading "Platform"...
DEBUG Using "Install Config" loaded from target directory
DEBUG Loading "Install Config"...
DEBUG Loading "Image"...
DEBUG Loading "Install Config"...
DEBUG Loading "BootstrapImage"...
DEBUG Loading "Install Config"...
DEBUG Loading "Bootstrap Ignition Config"...
DEBUG Loading "Install Config"...
DEBUG Loading "Kubeconfig Admin Client"...
DEBUG Loading "Certificate (admin-kubeconfig-client)"...
DEBUG Loading "Certificate (admin-kubeconfig-signer)"...
DEBUG Loading "Certificate (kube-apiserver-complete-server-ca-bundle)"...
DEBUG Loading "Certificate (kube-apiserver-localhost-ca-bundle)"...
OUTPUT TRUNCATED
During the installation, log into the OpenStack dashboard (shown in Figure 3) and you'll see that OpenShift IPI takes care of everything; from spawning new instances, to building a dedicated tenant network, configuring security groups, and so on so forth.

After a while (about 30 minutes) you'll have your Red Hat OpenShift 4.2 cluster up and running, as you can see here:
DEBUG Still waiting for the cluster to initialize: Working towards 4.2.4: 98% complete
DEBUG Still waiting for the cluster to initialize: Working towards 4.2.4: 99% complete
DEBUG Cluster is initialized
INFO Waiting up to 10m0s for the openshift-console route to be created...
DEBUG Route found in openshift-console namespace: console
DEBUG Route found in openshift-console namespace: downloads
DEBUG OpenShift console route is created
INFO Install complete!
INFO To access the cluster as the system:admin user when using 'oc', run 'export KUBECONFIG=/home/stack/osd-ocp-demo/auth/kubeconfig'
INFO Access the OpenShift web-console here: https://console-openshift-console.apps.ocp4.osd2019.local
INFO Login to the console with user: kubeadmin, password: YOURKUBEADMINRANDOMPASSWORD
Looking at OpenStack network topology in Figure 4, you'll see the resulting architecture.

You can also use the oc client from the client machine used to install OpenShift (in my case, it was my undercloud VM):
(undercloud) [stack@undercloud osd-ocp-demo$ oc get nodes
NAME STATUS ROLES AGE VERSION
ocp4-4p5fd-master-0 Ready master 9d v1.14.6+c7d2111b9
ocp4-4p5fd-master-1 Ready master 9d v1.14.6+c7d2111b9
ocp4-4p5fd-master-2 Ready master 9d v1.14.6+c7d2111b9
ocp4-4p5fd-worker-76gvc Ready worker 9d v1.14.6+c7d2111b9
ocp4-4p5fd-worker-n6jvq Ready worker 9d v1.14.6+c7d2111b9
There is only one post-deployment command required in order to attach a pre-allocated floating IP address (FIP) to the Ingress port. Details can be found in the official docs here. This step is needed because the IPI installer takes care of configuring a Keepalived pod on every master and worker, exposing the virtual IPs (VIPs) that route traffic to internal APIs, the Ingress, and DNS services.
Let's assign our FIP in order to reach the OpenShift console. We need to assign it to the ingress-port:
(overcloud) [stack@undercloud osd-ocp-demo]$ openstack port show c3c14e9d-750f-46fb-af9c-e9fd375719b2
+-----------------------+-------------------------------------------------------------------------+
| Field | Value |
+-----------------------+-------------------------------------------------------------------------+
| admin_state_up | UP |
| allowed_address_pairs | |
| binding_host_id | |
| binding_profile | |
| binding_vif_details | |
| binding_vif_type | unbound |
| binding_vnic_type | normal |
| created_at | 2019-11-01T00:49:21Z |
| data_plane_status | None |
| description | |
| device_id | |
| device_owner | |
| dns_assignment | None |
| dns_name | None |
| extra_dhcp_opts | |
| fixed_ips | ip_address='10.0.0.7', subnet_id='9cbfdd62-b1e5-4f01-b49c-db992b9afc8e' |
| id | c3c14e9d-750f-46fb-af9c-e9fd375719b2 |
| ip_address | None |
| mac_address | fa:16:3e:b8:39:8b |
| name | ocp4-ll4qz-ingress-port |
| network_id | ec5de4de-2f52-42c5-87bf-35c8d91bd1a7 |
| option_name | None |
| option_value | None |
| port_security_enabled | True |
| project_id | 699eeaefb7b84291a75d389ec0f10ea2 |
| qos_policy_id | None |
| revision_number | 7 |
| security_group_ids | 9e6ee5d9-fa19-418c-804e-f1c654d2e34b |
| status | DOWN |
| subnet_id | None |
| tags | openshiftClusterID=ocp4-ll4qz |
| trunk_details | None |
| updated_at | 2019-11-01T00:49:29Z |
+-----------------------+-------------------------------------------------------------------------+
openstack floating ip set --port c3c14e9d-750f-46fb-af9c-e9fd375719b2 192.168.122.180
Finally, I updated my host file in order to reach OpenShift via FQDN so I didn't have to configure a DNS service:
#ocp4
192.168.122.164 api.ocp4.osd2019.local
192.168.122.180 console-openshift-console.apps.ocp4.osd2019.local
192.168.122.180 integrated-oauth-server-openshift-authentication.apps.ocp4.osd2019.local
192.168.122.180 oauth-openshift.apps.ocp4.osd2019.local
192.168.122.180 prometheus-k8s-openshift-monitoring.apps.ocp4.osd2019.local
192.168.122.180 grafana-openshift-monitoring.apps.ocp4.osd2019.local
That's it. Thirty minutes later, you'll have your OpenShift cluster up and running on OpenStack. You can then start playing around to test the capabilities this environment can grant to your organization. See Figure 5 for the results in the Red Hat OpenShift Container Platform.

Networking deep dive
As you saw, we preallocated two FIPs within our tenant using the bash script I shared in the section "L2 nested virtual machines (OpenShift nodes)," in the lines:
lbFloatingIP: 192.168.122.164
ingress port floating: 192.168.122.180
These two FIPS are associated with two Neutron ports, namely api-port (internal IP 10.0.0.5) and the Ingress port (internal IP 10.0.0.7). The first FIP assignment (192.168.122.164 -> 10.0.0.5) was made automatically by IPI during setup. The second FIP association is, instead, managed by us as we saw previously in order to reach OpenShift console and other services:
overcloud) [stack@undercloud osd-ocp]$ openstack floating ip list
+--------------------------------------+---------------------+------------------+--------------------------------------+--------------------------------------+----------------------------------+
| ID | Floating IP Address | Fixed IP Address | Port | Floating Network | Project |
+--------------------------------------+---------------------+------------------+--------------------------------------+--------------------------------------+----------------------------------+
| 87295f6b-75ed-4420-9548-a37d4ae137fc | 192.168.122.164 | 10.0.0.5 | 4ca1d30d-9931-495b-a295-5eba2019293f | 2b122467-8cd0-4159-a176-2a4bc4c2f1e7 | 699eeaefb7b84291a75d389ec0f10ea2 |
| 8e47ae70-fb99-4a3b-ad66-314b9e1a5400 | 192.168.122.180 | 10.0.0.7 | a8d54ead-3283-4746-94d1-ef724fcd50f9 | 2b122467-8cd0-4159-a176-2a4bc4c2f1e7 | 699eeaefb7b84291a75d389ec0f10ea2 |
+--------------------------------------+---------------------+------------------+--------------------------------------+--------------------------
Looking at the Neutron ports, we can see that, as suspected, those ports are API and Ingress but they are down. So, how can load balancing work? Take a look at this:
(overcloud) [stack@undercloud osd-ocp-demo-static-nic]$ openstack port list | grep "api-port\|ingress"
| 4ca1d30d-9931-495b-a295-5eba2019293f | ocp4-4p5fd-api-port | fa:16:3e:5b:2b:eb | ip_address='10.0.0.5', subnet_id='c38b6eb3-0dc3-41ec-915e-e7c365bcb0a0' | DOWN |
| a8d54ead-3283-4746-94d1-ef724fcd50f9 | ocp4-4p5fd-ingress-port | fa:16:3e:dc:b7:1b | ip_address='10.0.0.7', subnet_id='c38b6eb3-0dc3-41ec-915e-e7c365bcb0a0' | DOWN |
Those ports are not attached to an instance. Instead, they are created on the tenant network to be used by OpenShift to allocate VIPs via Keepalived or the Virtual Router Redundancy Protocol (VRRP) in order to load balance the internal services (API and DNS) exposed by masters and the Ingress requests exposed by workers (ingress pod = OpenShift router).
Digging into our OpenShift setup, the project openshift-openstack-infra contains three haproxy and three keepalived pods running on masters plus two keepalived running on workers:
(overcloud) [stack@undercloud osd-ocp-demo-static-nic]$ oc get pods -n openshift-openstack-infra
NAME READY STATUS RESTARTS AGE
coredns-ocp4-4p5fd-master-0 1/1 Running 0 9d
coredns-ocp4-4p5fd-master-1 1/1 Running 0 9d
coredns-ocp4-4p5fd-master-2 1/1 Running 0 9d
coredns-ocp4-4p5fd-worker-76gvc 1/1 Running 1 9d
coredns-ocp4-4p5fd-worker-n6jvq 1/1 Running 0 9d
haproxy-ocp4-4p5fd-master-0 2/2 Running 2 9d
haproxy-ocp4-4p5fd-master-1 2/2 Running 0 9d
haproxy-ocp4-4p5fd-master-2 2/2 Running 0 9d
keepalived-ocp4-4p5fd-master-0 1/1 Running 0 9d
keepalived-ocp4-4p5fd-master-1 1/1 Running 0 9d
keepalived-ocp4-4p5fd-master-2 1/1 Running 0 9d
keepalived-ocp4-4p5fd-worker-76gvc 1/1 Running 1 9d
keepalived-ocp4-4p5fd-worker-n6jvq 1/1 Running 0 9d
mdns-publisher-ocp4-4p5fd-master-0 1/1 Running 0 9d
mdns-publisher-ocp4-4p5fd-master-1 1/1 Running 0 9d
mdns-publisher-ocp4-4p5fd-master-2 1/1 Running 0 9d
mdns-publisher-ocp4-4p5fd-worker-76gvc 1/1 Running 1 9d
mdns-publisher-ocp4-4p5fd-worker-n6jvq 1/1 Running 0 9d
Looking at one of these pods running on master nodes, we can see that Keepalived was configured to use the VRRP protocol to expose three VIPs:
(overcloud) [stack@undercloud osd-ocp-demo]$ oc rsh keepalived-ocp4-4p5fd-master-0
sh-4.2# cat /etc/keepalived/keepalived.conf | grep -A1 ipaddress
virtual_ipaddress {
10.0.0.5/16
--
virtual_ipaddress {
10.0.0.6/16
--
virtual_ipaddress {
10.0.0.7/16
For instance, in order to route Ingress traffic to internal API ports, there is a VRRP instance with a VIP assigned (10.0.0.5):
vrrp_instance ocp4_API {
state BACKUP
interface ens3
virtual_router_id 29
priority 40
advert_int 1
authentication {
auth_type PASS
auth_pass ocp4_api_vip
}
virtual_ipaddress {
10.0.0.5/16
}
track_script {
chk_ocp
}
}
Looking at the haproxy pod on the master, we can see that it listens on port 7443 on all IPs, and that it balances the API calls to the masters' nodes (section backend masters):
(overcloud) [stack@undercloud osd-ocp-demo]$ oc rsh haproxy-ocp4-4p5fd-master-0
sh-4.2$ cat /etc/haproxy/haproxy.cfg
defaults
maxconn 20000
mode tcp
log /var/run/haproxy/haproxy-log.sock local0
option dontlognull
retries 3
timeout http-keep-alive 10s
timeout http-request 1m
timeout queue 1m
timeout connect 10s
timeout client 86400s
timeout server 86400s
timeout tunnel 86400s
frontend main
bind :7443
default_backend masters
listen health_check_http_url
bind :50936
mode http
monitor-uri /healthz
option dontlognull
listen stats
bind 127.0.0.1:50000
mode http
stats enable
stats hide-version
stats uri /haproxy_stats
stats refresh 30s
stats auth Username:Password
backend masters
option httpchk GET /healthz HTTP/1.0
option log-health-checks
balance roundrobin
server etcd-0.ocp4.osd2019.local. 10.0.0.11:6443 weight 1 verify none check check-ssl inter 3s fall 2 rise 3
server etcd-2.ocp4.osd2019.local. 10.0.0.18:6443 weight 1 verify none check check-ssl inter 3s fall 2 rise 3
server etcd-1.ocp4.osd2019.local. 10.0.0.26:6443 weight 1 verify none check check-ssl inter 3s fall 2 rise 3
Logging via SSH to the CoresOS node (master-0) to double-check, we can see that haproxy is listening on port 7443:
root@ocp4-4p5fd-master-0 ~]# netstat -anop | grep 0.0.0.0:7443
tcp 0 0 0.0.0.0:7443 0.0.0.0:* LISTEN 336621/haproxy off (0.00/0/0)
The VIP (10.0.0.5) instead is assigned right now to master-2 node which is the master from a Keepalived perspective:
root@ocp4-4p5fd-master-1 /]# ip a | grep 10.0.0.5
inet 10.0.0.5/16 scope global secondary ens3
What is missing? If the API and Ingress port on Neutron are down, how does this setup work? It works because on the Neutron ports assigned to masters and workers, keepalive VIPs are allowed from a port security perspective.
Need to disable anti-MAC spoofing only for particular IPs/MACs? This setting allows incoming traffic from different IPs on the same Neutron port:
(overcloud) [stack@undercloud osd-ocp-demo-static-nic]$ neutron port-show e3c60257-1877-45c4-8cae-492ef953207f
neutron CLI is deprecated and will be removed in the future. Use openstack CLI instead.
+-----------------------+-----------------------------------------------------------------------------------+
| Field | Value |
+-----------------------+-----------------------------------------------------------------------------------+
| admin_state_up | True |
| allowed_address_pairs | {"ip_address": "10.0.0.5", "mac_address": "fa:16:3e:25:f2:fe"} |
| | {"ip_address": "10.0.0.6", "mac_address": "fa:16:3e:25:f2:fe"} |
| | {"ip_address": "10.0.0.7", "mac_address": "fa:16:3e:25:f2:fe"} |
Need to summarize the traffic flow for incoming API traffic? It looks like this:
192.168.122.164 -> MASTER-2 NODE (holding keepalived VIP) -> master-2 haproxy pod -> load balancing to other pods
To summarize Ingress traffic flow for incoming HTTP/HTTPS requests:
192.168.122.180 -> Worker-node (holding keepalived VIP for ingress) -> console pods, prometheus pods, etc
Note: This page explains IPI networking infrastructure with a good level of detail.
In addition, I have also tried adding OpenStack Neutron ports to OpenShift nodes and attaching a provider network in order to have a dedicated management network with static IP/routes. Unfortunately, I was not able to accomplish this goal because IPI's goal is to provide an opinionated setup. Instead, when User-Provisioned Infrastructure (UPI) is available for Red Hat OpenStack, this addition will give us this option.
Demo
Here is the demo video we recorded with my colleague Rinaldo Bergamini. It shows OpenShift IPI installation, in a practical way.
