Redhat Developers  Logo
  • Products

    Featured

    • Red Hat Enterprise Linux
      Red Hat Enterprise Linux Icon
    • Red Hat OpenShift AI
      Red Hat OpenShift AI
    • Red Hat Enterprise Linux AI
      Linux icon inside of a brain
    • Image mode for Red Hat Enterprise Linux
      RHEL image mode
    • Red Hat OpenShift
      Openshift icon
    • Red Hat Ansible Automation Platform
      Ansible icon
    • Red Hat Developer Hub
      Developer Hub
    • View All Red Hat Products
    • Linux

      • Red Hat Enterprise Linux
      • Image mode for Red Hat Enterprise Linux
      • Red Hat Universal Base Images (UBI)
    • Java runtimes & frameworks

      • JBoss Enterprise Application Platform
      • Red Hat build of OpenJDK
    • Kubernetes

      • Red Hat OpenShift
      • Microsoft Azure Red Hat OpenShift
      • Red Hat OpenShift Virtualization
      • Red Hat OpenShift Lightspeed
    • Integration & App Connectivity

      • Red Hat Build of Apache Camel
      • Red Hat Service Interconnect
      • Red Hat Connectivity Link
    • AI/ML

      • Red Hat OpenShift AI
      • Red Hat Enterprise Linux AI
    • Automation

      • Red Hat Ansible Automation Platform
      • Red Hat Ansible Lightspeed
    • Developer tools

      • Red Hat Trusted Software Supply Chain
      • Podman Desktop
      • Red Hat OpenShift Dev Spaces
    • Developer Sandbox

      Developer Sandbox
      Try Red Hat products and technologies without setup or configuration fees for 30 days with this shared Openshift and Kubernetes cluster.
    • Try at no cost
  • Technologies

    Featured

    • AI/ML
      AI/ML Icon
    • Linux
      Linux Icon
    • Kubernetes
      Cloud icon
    • Automation
      Automation Icon showing arrows moving in a circle around a gear
    • View All Technologies
    • Programming Languages & Frameworks

      • Java
      • Python
      • JavaScript
    • System Design & Architecture

      • Red Hat architecture and design patterns
      • Microservices
      • Event-Driven Architecture
      • Databases
    • Developer Productivity

      • Developer productivity
      • Developer Tools
      • GitOps
    • Secure Development & Architectures

      • Security
      • Secure coding
    • Platform Engineering

      • DevOps
      • DevSecOps
      • Ansible automation for applications and services
    • Automated Data Processing

      • AI/ML
      • Data Science
      • Apache Kafka on Kubernetes
      • View All Technologies
    • Start exploring in the Developer Sandbox for free

      sandbox graphic
      Try Red Hat's products and technologies without setup or configuration.
    • Try at no cost
  • Learn

    Featured

    • Kubernetes & Cloud Native
      Openshift icon
    • Linux
      Rhel icon
    • Automation
      Ansible cloud icon
    • Java
      Java icon
    • AI/ML
      AI/ML Icon
    • View All Learning Resources

    E-Books

    • GitOps Cookbook
    • Podman in Action
    • Kubernetes Operators
    • The Path to GitOps
    • View All E-books

    Cheat Sheets

    • Linux Commands
    • Bash Commands
    • Git
    • systemd Commands
    • View All Cheat Sheets

    Documentation

    • API Catalog
    • Product Documentation
    • Legacy Documentation
    • Red Hat Learning

      Learning image
      Boost your technical skills to expert-level with the help of interactive lessons offered by various Red Hat Learning programs.
    • Explore Red Hat Learning
  • Developer Sandbox

    Developer Sandbox

    • Access Red Hat’s products and technologies without setup or configuration, and start developing quicker than ever before with our new, no-cost sandbox environments.
    • Explore Developer Sandbox

    Featured Developer Sandbox activities

    • Get started with your Developer Sandbox
    • OpenShift virtualization and application modernization using the Developer Sandbox
    • Explore all Developer Sandbox activities

    Ready to start developing apps?

    • Try at no cost
  • Blog
  • Events
  • Videos

Configuring NGINX for OAuth/OpenID Connect SSO with Keycloak/Red Hat SSO

October 8, 2018
Siddhartha De
Related topics:
Security
Related products:
Red Hat Single sign-on

Share:

    In this article I cover configuring NGINX for OAuth-based Single Sign-On (SSO) using Keycloak/Red Hat SSO. This allows the use of OpenID Connect (OIDC) for federated identity. This configuration is helpful when NGINX is acting as a reverse-proxy server for a backend application server, for example, Tomcat or JBoss, where the authentication is to be performed by the web server.

    In this setup, Keycloak will act as an authorization server in OAuth-based SSO and NGINX will be the relaying party.  We will be using lua-resty-openidc, which is a library for NGINX implementing the OpenID Connect relying party (RP) and/or the OAuth 2.0 resource server (RS) functionality.

    Here's a diagram of an An OIDC-based authentication flow:

    OAuth-based authentication flow

    In order to install lua-resty-oidc, you need to install several other dependent modules on the NGINX server:

    • ngx_devel_kit
    • Lua
    • lua-nginx-module
    • lua-cjson.php
    • lua-resty-string

    Installation instructions

    1. First, we create a directory for keeping all the required packages and then we change the current working directory to the newly created directory. Here, I will execute all the commands as the root user; it is possible to execute them as a non-root user too, but some commands, for example, yum will not work for a non-root user and require additional steps to perform.
      # mkdir /tmp/nginx-lua
      # cd /tmp/nginx-lua
    2. Now, download the packages that are required:
      a. Download NGINX version 1.13.6 and extract it:


      # wget http://nginx.org/download/nginx-1.13.6.tar.gz
      # tar -zxvf nginx-1.13.6.tar.gz

      b. Download OpenSSL and extract it:

      # wget https://github.com/openssl/openssl/archive/OpenSSL_1_0_2g.tar.gz 
      # wget OpenSSL_1_1_0g.tar.gz

      c. Download lua-nginx-module and extract it:

      # wget https://github.com/openresty/lua-nginx-module/archive/v0.10.13.tar.gz 
      # tar -zxvf v0.10.13.tar.gz

      d. Download ngx_devel_kit and extract it:

      # wget https://github.com/simplresty/ngx_devel_kit/archive/v0.3.0.tar.gz
      # tar -zxvf v0.3.0.tar.gz

      e. Download Lua and extract it:

      # wget http://www.lua.org/ftp/lua-5.1.5.tar.gz
      # tar -zxvf lua-5.1.5.tar.gz

      f. Clone luaffib and install it using luarocks:

      # git clone https://github.com/facebookarchive/luaffifb
      # cd luaffifb
      # luarocks make
    3. Install the dependencies and packages required for lua-resty-oidc:
      a. We will first install Lua, so change the current working directory to lua-5.1.5 and then execute the installation:


      # cd lua-5.1.5
      # make linux test
      # make install
      # cd ..

      b. Install luarocks:

      # yum install luarocks

      c. Install all the Lua modules using luarocks:

      # luarocks install lua-cjson
      # luarocks install lua-resty-openidc

      d. After the Lua installation, export the PATH for LUA_LIB and LUA_INC:

      # export LUA_LIB=/usr/local/lib/lua/5.1/
      # export LUA_INC=/usr/local/include/

      e. Now, we need to install the development tools, for example, gcc, c++, etc.

      # yum group install "Development Tools"
      # yum install readline-devel

      f. Because we are going to do a binary installation of NGINX, we need to install pcre and zlib:

      # yum install pcre
      # yum install pcre-devel
      # yum install zlib
      # yum install zlib-devel
    4. Now, we can execute the installation of NGINX navigating into NGINX binary directory:
      # cd nginx-1.13.6
      # ./configure --prefix=/opt/nginx --with-http_ssl_module --with-ld-opt="-Wl,-rpath,/usr/local/lib/lua/5.1/" --add-module=/tmp/lua/ngx_devel_kit-0.3.0 --add-module=/tmp/lua/lua-nginx-module-0.10.13 --with-openssl=/tmp/lua/openssl-OpenSSL_1_0_2g
      # make -j2
      # make install
    5. After the successful execution of the installation command, NGINX will be installed in /opt/nginx.
    6. Create a directory called ssl in the directory /opt/nginx and generate a self-signed certificate:


      # mkdir /opt/nginx/ssl
      # cd /opt/nginx/ssl
      # openssl req -nodes -newkey rsa:2048 -keyout private.pem -out certificate.csr -subj "/C=IN/ST=WestBengal/L=Kolkata/O=Red Hat/OU=APS/CN=www.example.com"
      # openssl x509 -req -in certificate.csr -out certificate.pem -signkey private.pem

      Note: certificate.csr can be submitted to a CA vendor to get the certificate signed.

    7. Download Keycloak and extract it. Keycloak will be working as an Identity Provider and NGINX will act as a service provider.
      # wget https://downloads.jboss.org/keycloak/4.4.0.Final/keycloak-4.4.0.Final.zip
      # unzip  keycloak-4.4.0.Final.zip -d /opt/keycloak

    Configuring Keycloak and NGINX

    1. Create a user in the master realm and start Keycloak:
      # cd /opt/keycloak/keycloak-4.4.0.Final/bin
      # ./add-user-keycloak.sh -u admin -p admin@123 -r master      
      # ./standalone.sh -b www.example.com
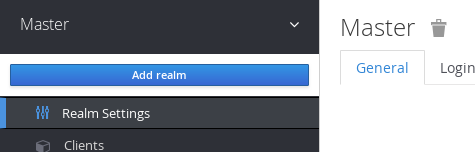
    2. Create a new realm:
      a. Move the cursor near Master and click Add Realm.
      b. Provide a name for your realm and click Create.


      |

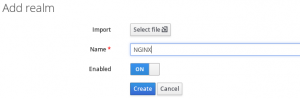
      Note: Creation of a new realm is not necessary; it possible to create a client in the master realm.

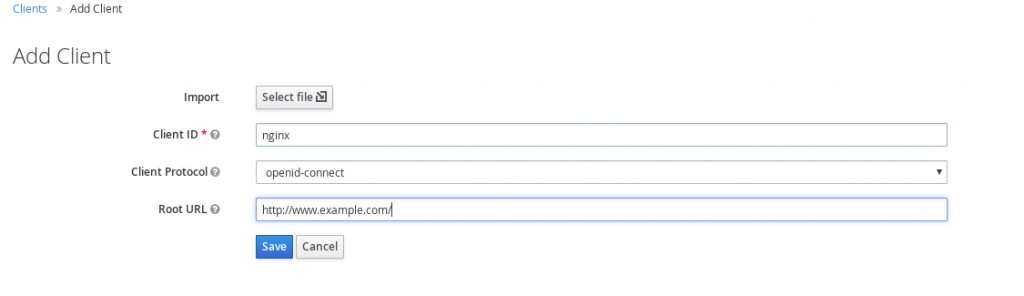
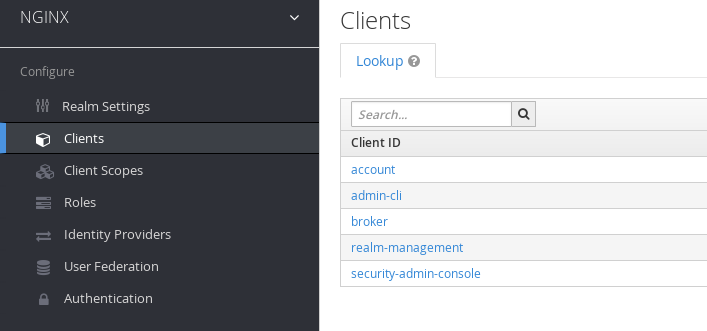
    3. Now, we need to create a client for NGINX. Click Client in the left panel and click the Create button:

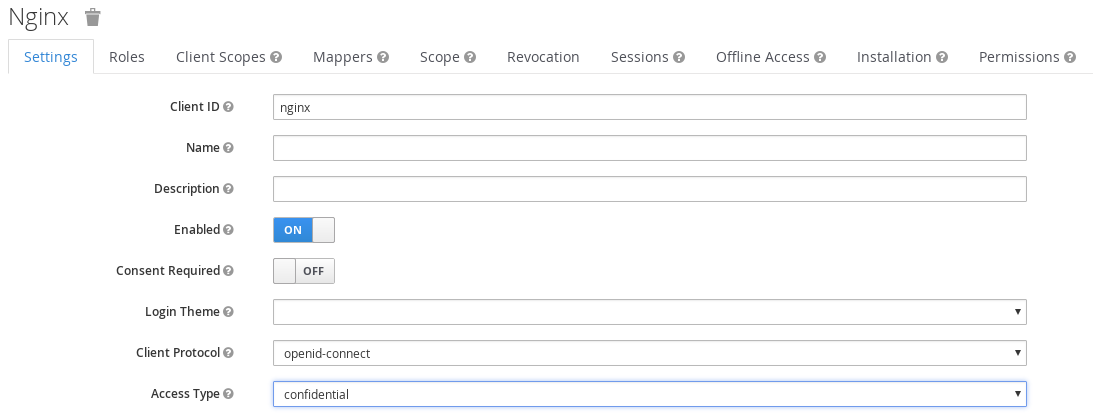
    4. Select openid-connect as the client protocol and place the NGINX URL in the Root URL field:
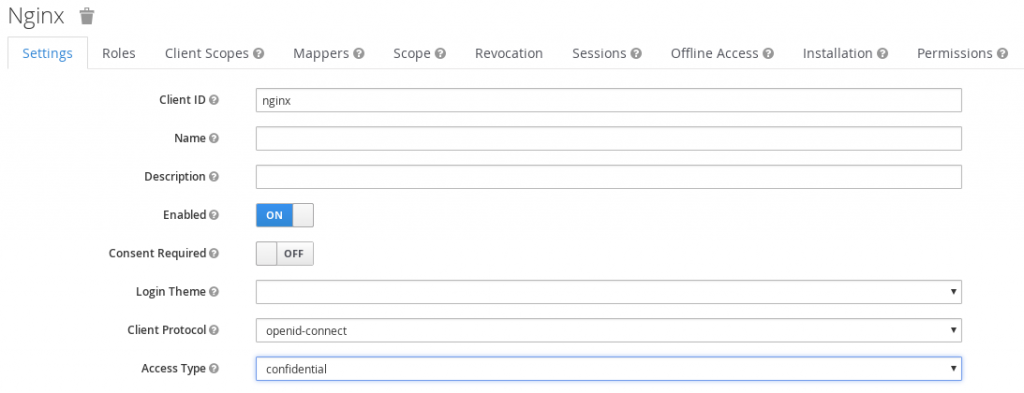
    5. Set Access Type to confidential and click Save:
    6. Click Credentials and copy the secret for configuring NGINX later:
    7. Add the following line under the http block in nginx.conf:
      lua_package_path '~/lua/?.lua;;';
      resolver 8.8.8.8;
      # cache for discovery metadata documents
      lua_shared_dict discovery 1m;
      # cache for JWKs
      lua_shared_dict jwks 1m;
    8. Create the server in NGINX using something like the following:
       server {
             listen     80 default_server;
             server_name  www.example.com;
             root     /opt/nginx/html;
             access_by_lua '
               local opts = {
                 redirect_uri_path = "/redirect_uri",
                 accept_none_alg = true,
                 discovery = "http://www.example.com:8080/auth/realms/NGINX/.well-known/openid-configuration",
                 client_id = "nginx",
                 client_secret = "62d3b835-e3d1-4cec-a2f2-612f496bc6c3",
                 redirect_uri_scheme = "http",
                 logout_path = "/logout",
                 redirect_after_logout_uri = "http://www.example.com:8080/auth/realms/NGINX/protocol/openid-connect/logout?redirect_uri=http://www.example.com/",
                 redirect_after_logout_with_id_token_hint = false,
                 session_contents = {id_token=true}
               }
               -- call introspect for OAuth 2.0 Bearer Access Token validation
               local res, err = require("resty.openidc").authenticate(opts)
               if err then
                 ngx.status = 403
                 ngx.say(err)
                 ngx.exit(ngx.HTTP_FORBIDDEN)
               end
            ';
            # I disabled caching so the browser won't cache the site.
            expires           0;
            add_header        Cache-Control private;
            location / {
            }
            # redirect server error pages to the static page /40x.html
            #
            error_page 404 /404.html;
                location = /40x.html {
            }
            # redirect server error pages to the static page /50x.html
            #
            error_page 500 502 503 504 /50x.html;
                location = /50x.html {
            }
        }
    9. Validate the NGINX configuration:
      # cd /opt/nginx/sbin/
      # ./nginx -t
    10. After successful validation of the NGINX configuration, start the NGINX server:
      #./nginx

    Now, when you access the protected URL (www.example.com), you will be redirected to Keycloak at http://www.example.com:8080/auth/realms/NGINX/. After successful authentication, you will redirected back to the NGINX welcome page.

    Last updated: January 12, 2024

    Recent Posts

    • How to run AI models in cloud development environments

    • How Trilio secures OpenShift virtual machines and containers

    • How to implement observability with Node.js and Llama Stack

    • How to encrypt RHEL images for Azure confidential VMs

    • How to manage RHEL virtual machines with Podman Desktop

    Red Hat Developers logo LinkedIn YouTube Twitter Facebook

    Products

    • Red Hat Enterprise Linux
    • Red Hat OpenShift
    • Red Hat Ansible Automation Platform

    Build

    • Developer Sandbox
    • Developer Tools
    • Interactive Tutorials
    • API Catalog

    Quicklinks

    • Learning Resources
    • E-books
    • Cheat Sheets
    • Blog
    • Events
    • Newsletter

    Communicate

    • About us
    • Contact sales
    • Find a partner
    • Report a website issue
    • Site Status Dashboard
    • Report a security problem

    RED HAT DEVELOPER

    Build here. Go anywhere.

    We serve the builders. The problem solvers who create careers with code.

    Join us if you’re a developer, software engineer, web designer, front-end designer, UX designer, computer scientist, architect, tester, product manager, project manager or team lead.

    Sign me up

    Red Hat legal and privacy links

    • About Red Hat
    • Jobs
    • Events
    • Locations
    • Contact Red Hat
    • Red Hat Blog
    • Inclusion at Red Hat
    • Cool Stuff Store
    • Red Hat Summit

    Red Hat legal and privacy links

    • Privacy statement
    • Terms of use
    • All policies and guidelines
    • Digital accessibility

    Report a website issue