Redhat Developers  Logo
  • Products

    Featured

    • Red Hat Enterprise Linux
      Red Hat Enterprise Linux Icon
    • Red Hat OpenShift AI
      Red Hat OpenShift AI
    • Red Hat Enterprise Linux AI
      Linux icon inside of a brain
    • Image mode for Red Hat Enterprise Linux
      RHEL image mode
    • Red Hat OpenShift
      Openshift icon
    • Red Hat Ansible Automation Platform
      Ansible icon
    • Red Hat Developer Hub
      Developer Hub
    • View All Red Hat Products
    • Linux

      • Red Hat Enterprise Linux
      • Image mode for Red Hat Enterprise Linux
      • Red Hat Universal Base Images (UBI)
    • Java runtimes & frameworks

      • JBoss Enterprise Application Platform
      • Red Hat build of OpenJDK
    • Kubernetes

      • Red Hat OpenShift
      • Microsoft Azure Red Hat OpenShift
      • Red Hat OpenShift Virtualization
      • Red Hat OpenShift Lightspeed
    • Integration & App Connectivity

      • Red Hat Build of Apache Camel
      • Red Hat Service Interconnect
      • Red Hat Connectivity Link
    • AI/ML

      • Red Hat OpenShift AI
      • Red Hat Enterprise Linux AI
    • Automation

      • Red Hat Ansible Automation Platform
      • Red Hat Ansible Lightspeed
    • Developer tools

      • Red Hat Trusted Software Supply Chain
      • Podman Desktop
      • Red Hat OpenShift Dev Spaces
    • Developer Sandbox

      Developer Sandbox
      Try Red Hat products and technologies without setup or configuration fees for 30 days with this shared Openshift and Kubernetes cluster.
    • Try at no cost
  • Technologies

    Featured

    • AI/ML
      AI/ML Icon
    • Linux
      Linux Icon
    • Kubernetes
      Cloud icon
    • Automation
      Automation Icon showing arrows moving in a circle around a gear
    • View All Technologies
    • Programming Languages & Frameworks

      • Java
      • Python
      • JavaScript
    • System Design & Architecture

      • Red Hat architecture and design patterns
      • Microservices
      • Event-Driven Architecture
      • Databases
    • Developer Productivity

      • Developer productivity
      • Developer Tools
      • GitOps
    • Secure Development & Architectures

      • Security
      • Secure coding
    • Platform Engineering

      • DevOps
      • DevSecOps
      • Ansible automation for applications and services
    • Automated Data Processing

      • AI/ML
      • Data Science
      • Apache Kafka on Kubernetes
      • View All Technologies
    • Start exploring in the Developer Sandbox for free

      sandbox graphic
      Try Red Hat's products and technologies without setup or configuration.
    • Try at no cost
  • Learn

    Featured

    • Kubernetes & Cloud Native
      Openshift icon
    • Linux
      Rhel icon
    • Automation
      Ansible cloud icon
    • Java
      Java icon
    • AI/ML
      AI/ML Icon
    • View All Learning Resources

    E-Books

    • GitOps Cookbook
    • Podman in Action
    • Kubernetes Operators
    • The Path to GitOps
    • View All E-books

    Cheat Sheets

    • Linux Commands
    • Bash Commands
    • Git
    • systemd Commands
    • View All Cheat Sheets

    Documentation

    • API Catalog
    • Product Documentation
    • Legacy Documentation
    • Red Hat Learning

      Learning image
      Boost your technical skills to expert-level with the help of interactive lessons offered by various Red Hat Learning programs.
    • Explore Red Hat Learning
  • Developer Sandbox

    Developer Sandbox

    • Access Red Hat’s products and technologies without setup or configuration, and start developing quicker than ever before with our new, no-cost sandbox environments.
    • Explore Developer Sandbox

    Featured Developer Sandbox activities

    • Get started with your Developer Sandbox
    • OpenShift virtualization and application modernization using the Developer Sandbox
    • Explore all Developer Sandbox activities

    Ready to start developing apps?

    • Try at no cost
  • Blog
  • Events
  • Videos

Developing .NET Core 2.0 Web Applications on OpenShift


November 22, 2017
Roland Grunberg
Related topics:
.NETDeveloper ToolsKubernetes
Related products:
Developer ToolsRed Hat OpenShift Container Platform

Share:

    Today we're going to create a .NET Core 2.0 Web Application using the JBoss Developer Studio and the aCute plugin (C# application development). We'll deploy our application onto an OpenShift instance and continue to modify it while viewing the changes almost instantly. Although the initial setup will be quite involved, it will only need to be done once.


    You might imagine that the normal workflow for this would be:
    1. Make local changes.
    2. Commit + push them to version control.
    3. Either re-trigger a build manually or ensure web-hooks are set up so that OpenShift detects the new changes.

    In these cases, the image containing our build/runtime and project sources must be rebuilt and started on every single change. Not only does this take a while, but also in a development environment, who wants to be committing and pushing every tiny change they make just to see what it looks like? Luckily, there's an easier way that better reflects this "development" workflow.

    We'll start by getting our prerequisites. We will download JBDS from https://developers.redhat.com/products/devstudio/download/ and the .NET Core SDK from https://dotnet.microsoft.com/en-us/download.

    Once those are installed, you'll also need to install the 'aCute' plugin from the Eclipse Marketplace, https://marketplace.eclipse.org/content/acute-c-edition-eclipse-ide-experimental . It's always possible to install things using software sites, but many will find it easier to drag and drop the 'Install' button from the marketplace into the Eclipse IDE workbench.

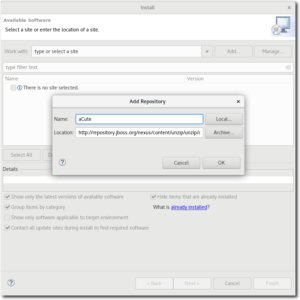
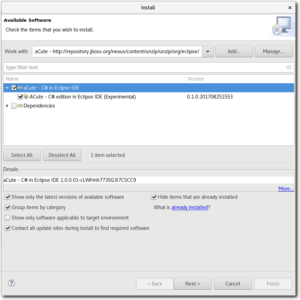
    If we do end up using a software site to install the content, we'll want to install the 'ACute - C# edition in Eclipse IDE (Experimental)'. Once that's complete, and after a restart, we'll be ready to create our first project.


    We're going to create a very simple .NET Core 2.0 Web Application project that we'll push to our GitHub repository so that it can be referenced when deploying our application on OpenShift.
     
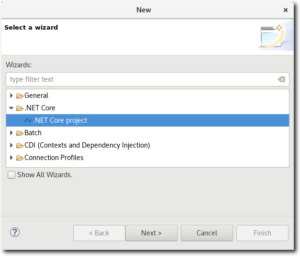
    In JBoss Developer Studio, click on File -> New -> Other. Expand the '.Net Core' category from the selection wizard, and select '.NET Core Project'. Now Click 'Next'.


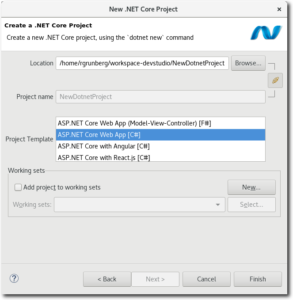
    We will be creating the project in our workspace so we'll leave the location option as is. Once the project templates load, select the 'ASP .NET Core Web App [C#]' template and click 'Finish'.
     
    Note: If there are no templates from which to select, it is likely that the .NET Core 2.0 SDK was not installed correctly.


    Next, we need to push our new project to a publicly accessible Git repository. In our case, we're using GitHub, but any publicly available location (accessible over https) will do.
     
    Right-click on the project, and go to 'Team' -> 'Share Project...'. Select 'Git' and click 'Next'. Select the option to 'Use or create repository in parent folder of the project' and then click the 'Create Repository' button. When the process is completed, click 'Finish'.


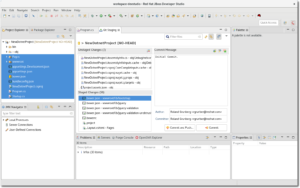
    Now let's add the project files to version control by right-clicking our project, going to 'Team' -> 'Commit'. Make sure to stage all files but the contents of the 'obj' folder, provide a commit message and then click 'Commit and Push'.


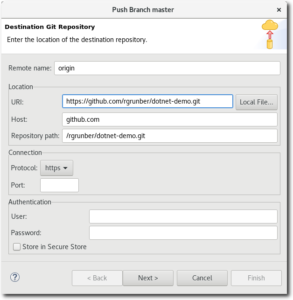
    A new dialog should now appear asking us to specify the destination git repository. We'll use 'git@github.com:rgrunber/dotnet-demo.git' in the URI and that should auto-complete the remaining necessary fields.


    Click Next, and once again as we will be using default settings. Finally, click 'Finish'. We have successfully pushed to our newly created repository. Now we can finally go ahead and deploy the application on OpenShift.
     
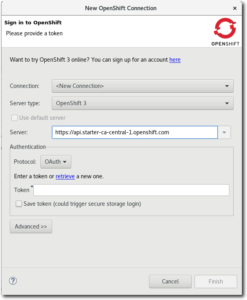
    First, we need to connect to our OpenShift instance. I'm using one from OpenShift Online, and we'll connect to it by clicking on the 'New Connection Wizard...' link in the OpenShift Explorer view.
     
    Now we fill in the relevant connection information for our OpenShift instance.


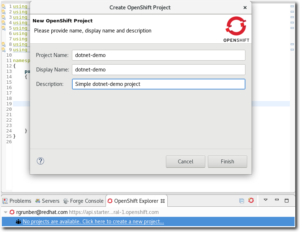
    We'll have to create a project if none exist, or if we want to keep this work separated from other existing projects.


    From the OpenShift Explorer view, right-click 'dotnet-demo', and go to New -> Application... in the context menu. This should bring up the New OpenShift Application wizard.
     
    Note: It may be necessary to import the JSON image stream template for dotnetcore-2.0 images from https://github.com/redhat-developer/s2i-dotnetcore/blob/master/dotnet_imagestreams.json if none are available from the Server application source list.
     
    Here we'll just click the 'Browse...' button, and select our project. From the Server application source list, we'll select 'dotnet:2.0' and click Next. Make sure that the 'dotnet:2.0' image selected exists in the context of the 'dotnet-demo' project, and not just the default 'openshift' context. This is to ensure we're using the newer image.
     
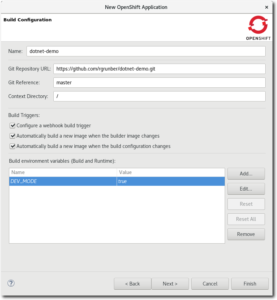
    For the configuration, we'll name our project 'dotnet-demo', using https://github.com/rgrunber/dotnet-demo.git as the git repository url, 'master' for the branch to reference, and '/' as the context directory. We'll also add an environment variable called 'DEV_MODE' and set its value to 'true'.


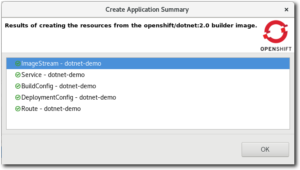
    Click 'Finish', and we should see the necessary image stream, service, build config, deployment config and routes being created. Our application is being built and deployed.


    The final step we need to perform involves, right clicking on our newly created dotnet-demo service from under our project, in the OpenShift Explorer view, and selecting the 'Server Adapter...' option from the context menu. From here, click 'Finish', confirming that the 'dotnet-demo' service is selected. Now we're finally ready to make changes to our application.
     
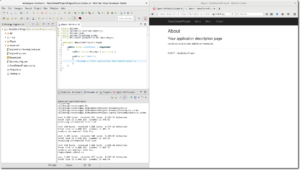
    First, let's view what our application actually looks like. In the OpenShift Explorer view, right-click the 'dotnet-demo' service from within our project and select Show In -> Browser. Click the 'About' link from the top to see what that page looks like.


    Now let's try modifying this page's contents. Open up 'About.cshtml.cs' from our local copy of the project and change the message string. Now save the changes, then go back to our web browser and simply refresh the about page. It's that easy.

    The Red Hat OpenShift Container Platform is available for download.

    Last updated: November 9, 2023

    Recent Posts

    • Why Models-as-a-Service architecture is ideal for AI models

    • How to run MicroShift as a container using MINC

    • OpenShift 4.19 brings a unified console for developers and admins

    • 3 steps to secure network segmentation with Ansible and AWS

    • Integrate vLLM inference on macOS/iOS using OpenAI APIs

    Red Hat Developers logo LinkedIn YouTube Twitter Facebook

    Products

    • Red Hat Enterprise Linux
    • Red Hat OpenShift
    • Red Hat Ansible Automation Platform

    Build

    • Developer Sandbox
    • Developer Tools
    • Interactive Tutorials
    • API Catalog

    Quicklinks

    • Learning Resources
    • E-books
    • Cheat Sheets
    • Blog
    • Events
    • Newsletter

    Communicate

    • About us
    • Contact sales
    • Find a partner
    • Report a website issue
    • Site Status Dashboard
    • Report a security problem

    RED HAT DEVELOPER

    Build here. Go anywhere.

    We serve the builders. The problem solvers who create careers with code.

    Join us if you’re a developer, software engineer, web designer, front-end designer, UX designer, computer scientist, architect, tester, product manager, project manager or team lead.

    Sign me up

    Red Hat legal and privacy links

    • About Red Hat
    • Jobs
    • Events
    • Locations
    • Contact Red Hat
    • Red Hat Blog
    • Inclusion at Red Hat
    • Cool Stuff Store
    • Red Hat Summit

    Red Hat legal and privacy links

    • Privacy statement
    • Terms of use
    • All policies and guidelines
    • Digital accessibility

    Report a website issue