In the first part of this series, we explored the architectural trade-offs between storage protocols and access modes for cloud development environments (CDEs). We examined how volumeMode, PVC strategies, and resilience requirements shape your storage strategy.
Now, we turn strategy into action. This post walks you through deploying a high-availability storage backend on Red Hat OpenShift Service on AWS (ROSA) using Amazon FSx for NetApp ONTAP. Whether you chose the performance of iSCSI (RWO) or the flexibility of NFS (RWX), these steps will help you configure the NetApp Trident CSI operator and prepare your cluster for a robust Eclipse Che deployment.
Prerequisites
The steps described in this post were performed with the use of:
- Administrative access to your ROSA cluster. The cluster should consist of worker nodes distributed across two availability zones within a region.
- Administrative access to the AWS Management Console.
- Access to the Red Hat OpenShift web console.
- Access to the OpenShift CLI (
oc).
Deploy FSx
Create an FSx for NetApp ONTAP file system. You will create the FSx file system in your existing VPC, spanning at least two of your private subnets across different AZs.
- Log in to the AWS Management Console and navigate to FSx → Create file system.
- Choose Amazon FSx for NetApp ONTAP.
- For Creation method, select Standard Create.
- Select Multi-AZ 2 (Recommended).
- Specify the SSD storage capacity.
- Select the existing VPC and the default security group.
- Configure the storage capacity, throughput capacity, and other settings.
- Select at least two private subnets (for example, the original
us-east-2asubnet and the newus-east-2bsubnet). These subnets are used for the preferred and standby file servers. - For VPC route tables, click Select one or more VPC route tables and select the same routing table used by the worker node private subnet.
- For File system administrative password, select Specify a password for the
fsxadminuser. You will need this password later to create a secret for iSCSI. In the SVM administrative password section, select Specify a password for the
vsadminSVM user. You will need this password later to create a secret for NFS.Optional: In Default volume configuration, size the volume accordingly if you plan to use iSCSI and do not want the default volume to consume the entire storage space. This is important if you plan to deploy multiple workspaces.
- Leave all other options as is.
- On the Review and Create page, note the VPC security group ID. You will need this ID later to open inbound and outbound rules.
- Click Create file system.
The file system takes 15 to 30 minutes to create. The procedure differs depending on whether you configure FSx for NFS or iSCSI:
- To configure an NFS file system for backend storage, continue on to the next section.
- To configure an iSCSI file system, proceed to Configure FSx for iSCSI.
Configure FSx for NFS
If you selected the NFS protocol, follow these steps to configure security groups and the CSI driver.
Configure security group rules for NFS:
- Navigate to EC2 → Security Groups in the AWS Management Console.
- Locate and select the security group ID recorded in the last step of the FSx file system creation.
- Click the Inbound rules tab.
- Click Edit inbound rules.
- Add the following rules:
- Rule 1 (HTTPS for Management LIF):
- Type: Custom TCP
- Port range:
443 - Source: Select Custom and enter the worker node security group ID.
- Description:
Allow HTTPS from Workers for FSx ONTAP Management
- Rule 2 (NFS for Data LIF):
- Type: Custom TCP
- Port range:
2049 - Source: Select Custom and enter the worker node security group ID.
- Description:
Allow NFS from Workers for FSx ONTAP Data
- Rule 1 (HTTPS for Management LIF):
- Click Save rules.
Install the certified NetApp Trident Operator (using the OpenShift web console)
Use the OpenShift web console to install the necessary storage operator:
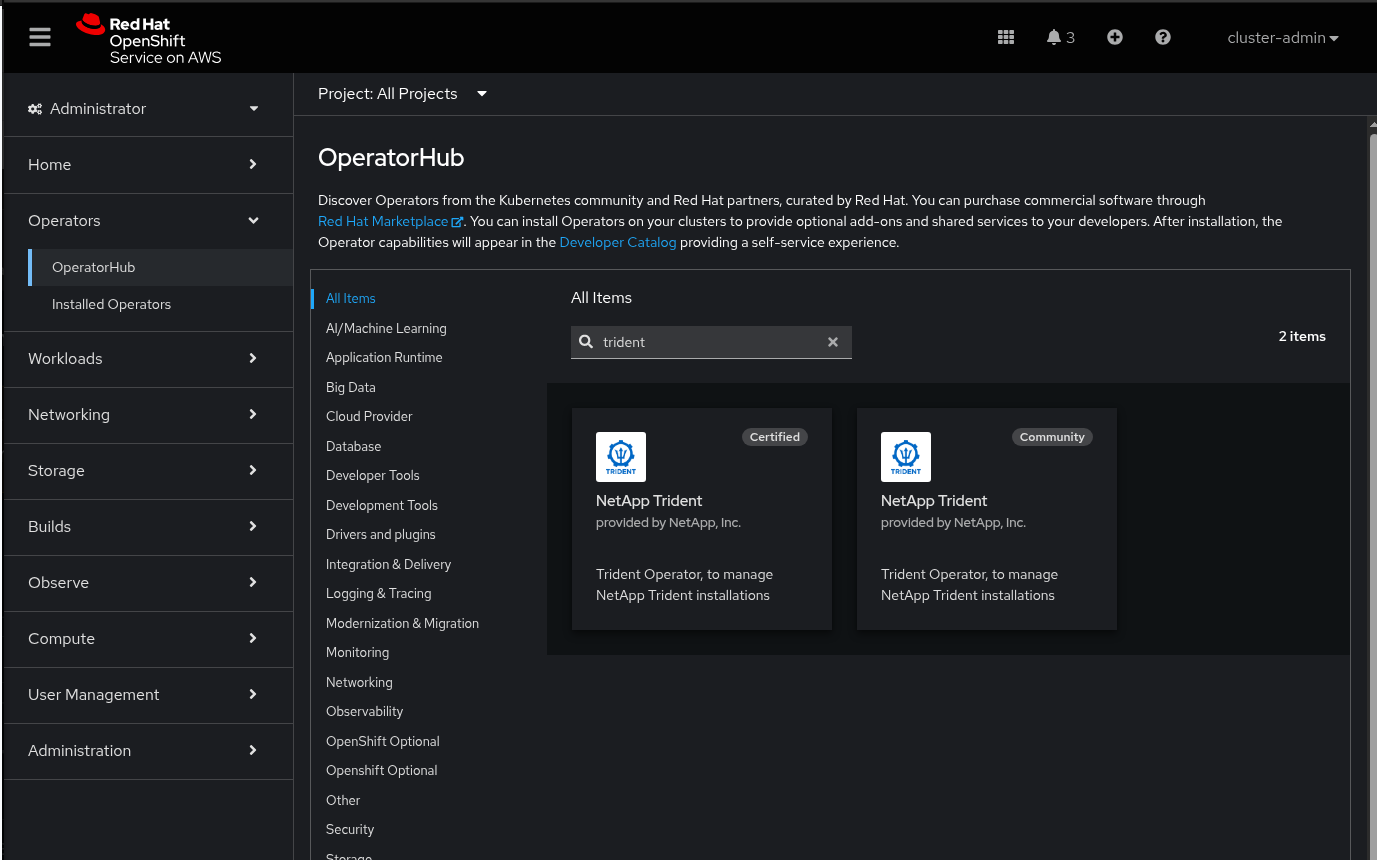
- Navigate to Operators → OperatorHub in the OpenShift web console.
- Search for
NetApp Tridentand select the Certified Operator, as shown in Figure 1. - Click Install.
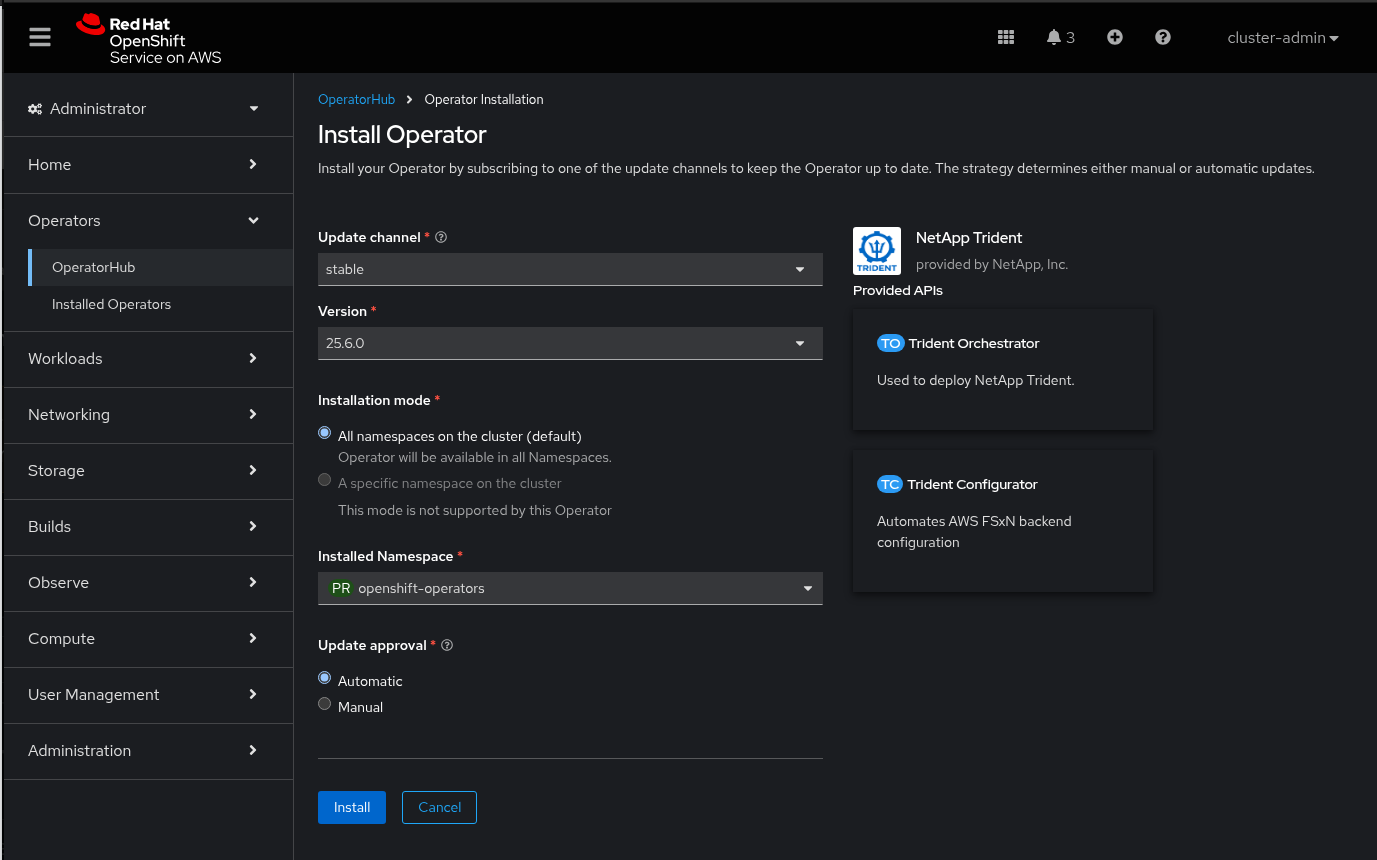
- For Installation Mode, select All namespaces on the cluster (default).
- For Installed Namespace, ensure the value is
openshift-operators. The Operator runs in this namespace. - Keep the other default options (such as the
Automaticapproval strategy) and click Install. See Figure 2. - Wait for the Operator Status to report Succeeded in Operators → Installed Operators.
Create a trident project
Although the Operator is installed in openshift-operators, you need a trident project to host the Trident CSI driver pods.
oc new-project tridentCreate a TridentOrchestrator custom resource
This resource instructs the Operator (in openshift-operators) to deploy the Trident CSI driver components into the trident namespace.
Create a file named trident-orchestrator.yaml with the following content:
# trident-orchestrator.yaml
apiVersion: trident.netapp.io/v1
kind: TridentOrchestrator
metadata:
  name: trident
  namespace: openshift-operators # The namespace where the Trident Operator is installed
spec:
  debug: false # Set to true for more verbose logging if needed
  namespace: trident # This is the namespace where Trident CSI pods
Apply the manifest:
oc apply -f trident-orchestrator.yamlCreate a Kubernetes secret for FSx credentials
This secret holds the vsadmin credentials for the FSx ONTAP SVM and must exist in the same namespace as the Trident CSI driver pods (trident).
Create a file named fsx-ontap-secret.yaml with the following content:
# fsx-ontap-secret.yaml
apiVersion: v1
kind: Secret
metadata:
  name: fsx-ontap-secret
  namespace: trident # Must be in the same namespace as Trident CSI pods
type: Opaque
stringData:
  username: vsadmin
  password: <vsadmin_password> # This was defined during the File System creation step.
Apply the manifest:
oc apply -f fsx-ontap-secret.yamlCreate a TridentBackendConfig for FSx for NetApp ONTAP
This configuration defines the connection to the FSx ONTAP SVM and must exist in the same namespace as the Trident CSI driver pods (trident).
Create a file named fsx-ontap-backend.yaml with the following content:
apiVersion: trident.netapp.io/v1
kind: TridentBackendConfig
metadata:
  name: fsx-ontap-backend
  namespace: trident
spec:
  version: 1
  storageDriverName: ontap-nas
  manager: ontap
  credentials:
    name: fsx-ontap-secret
  managementLIF: "svm_management_dns_name_endpoint" # Look under your SVM endpoints in the AWS console
  dataLIF: "svm_nfs_dns_name_endpoint" # Look under your SVM endpoints in the AWS console
  svm: "fsx" # SVM name, not SVM ID
  nfsMountOptions: "vers=4"
Apply the manifest:
oc apply -f fsx-ontap-backend.yamlVerify the backend status:
oc get tbc -n tridentLocate the fsx-ontap-backend. The PHASE should transition to Bound and the STATUS to Success. This confirms that Trident can communicate and provision storage on the FSx ONTAP SVM.
oc get tbc -n trident
NAME                BACKEND NAME        BACKEND UUID                        PHASE   STATUS
fsx-ontap-backend   fsx-ontap-backend   4e1ad3e9-f995-480f-bd1b-2765901cb8d6   Bound   Success
For more details on Trident configuration, see the NetApp documentation.
Create a StorageClass resource
Create a manifest file named fsx-ontap-sc.yaml with the following content:
# fsx-ontap-sc.yaml
apiVersion: storage.k8s.io/v1
kind: StorageClass
metadata:
  name: fsx-ontap-sc
provisioner: csi.trident.netapp.io
parameters:
  backendType: "ontap-nas"
  fsType: "nfs"
reclaimPolicy: Retain
volumeBindingMode: Immediate
allowVolumeExpansion: true
Create the StorageClass:
oc apply -f fsx-ontap-sc.yamlConfigure FSx for iSCSI
If you selected the iSCSI protocol, follow these steps to configure network access and the CSI driver.
Edit the FSx for NetApp ONTAP security group:
- Navigate to EC2 → Security Groups in the AWS Management Console.
- Locate and select the security group ID associated with the FSx file system.
- Click the Inbound rules tab.
- Click Edit inbound rules and add the following rules:
- Rule 1 (HTTPS for Management LIF):
- Type: Custom TCP
- Port range:
443 - Source: Select Custom and enter the worker node security group ID.
- Description:
Allow HTTPS from Workers for FSx ONTAP Management
- Rule 2 (iSCSI Management):
- Type: Custom TCP
- Port range:
860 - Source: Select Custom and enter the worker node security group ID.
- Description:
Allow iSCSI Management from Workers
- Rule 3 (iSCSI for Data LIF):
- Type: Custom TCP
- Port range:
3260 - Source: Select Custom and enter the worker node security group ID.
- Description:
Allow iSCSI from Workers for FSx ONTAP Data
- Rule 1 (HTTPS for Management LIF):
- Click Save rules.
Install the certified NetApp Trident Operator (using the OpenShift web console)
Use the OpenShift web console to install the operator that manages NetApp storage.
- Navigate to Operators → OperatorHub in the OpenShift web console.
- Search for
NetApp Tridentand select the Certified Operator, as shown in Figure 1. - Click Install.
- For Installation Mode, select All namespaces on the cluster (default).
- For Installed Namespace, ensure the value is
openshift-operators. The Operator runs in this namespace. - Keep the other default options (such as the
Automaticapproval strategy) and click Install. - Wait for the Operator Status to report Succeeded in Operators → Installed Operators.
Create a trident project
Although the Operator is installed in openshift-operators, you need a trident project to host the Trident CSI driver pods.
oc new-project tridentCreate a TridentOrchestrator custom resource
This resource instructs the Operator (in openshift-operators) to deploy the Trident CSI driver components into the trident namespace.
Create a file named trident-orchestrator.yaml with the following content:
apiVersion: trident.netapp.io/v1
kind: TridentOrchestrator
metadata:
  name: trident
  namespace: openshift-operators
spec:
  IPv6: false
  debug: true
  nodePrep:
  - iscsi
  imagePullSecrets: []
  imageRegistry: ''
  namespace: trident
  silenceAutosupport: false
Apply the manifest:
oc apply -f trident-orchestrator.yamlCreate a Kubernetes secret for FSx credentials
This secret holds the vsadmin credentials for the FSx ONTAP SVM and must exist in the same namespace as the Trident CSI driver pods (trident).
Create a file named fsx-ontap-secret.yaml with the following content:
# fsx-ontap-secret.yaml
apiVersion: v1
kind: Secret
metadata:
  name: tbc-fsx-san-secret
  namespace: trident
type: Opaque
stringData:
  username: fsxadmin
  password: <fsxadmin_password> # This was defined during the File System creation step.
Apply the manifest:
oc apply -f fsx-ontap-secret.yamlCreate a TridentBackendConfig for FSx for NetApp ONTAP
This configuration defines the connection to the FSx ONTAP SVM and must exist in the same namespace as the Trident CSI driver pods (trident).
Create a file named fsx-ontap-backend.yaml with the following content:
apiVersion: trident.netapp.io/v1
kind: TridentBackendConfig
metadata:
  name: tbc-fsx-san
  namespace: trident
spec:
  version: 1
  storageDriverName: ontap-san
  managementLIF: <your-file-system-management-endpoint-dns-name>
  backendName: tbc-fsx-san
  svm: fsx
  defaults:
    storagePrefix: demo
    nameTemplate: "{{ .config.StoragePrefix }}_{{ .volume.Namespace }}_{{ .volume.RequestName }}"
  credentials:
    name: tbc-fsx-san-secret
Apply the manifest:
oc apply -f fsx-ontap-backend.yamlVerify the backend status:
oc get tbc -n tridentLocate the fsx-ontap-backend. The PHASE should transition to Bound and the STATUS to Success. This confirms that Trident can communicate and provision storage on the FSx ONTAP SVM.
oc get tbc -n trident
NAME          BACKEND NAME   BACKEND UUID                        PHASE   STATUS
tbc-fsx-san   tbc-fsx-san    0db75fa4-879e-4826-9d74-1414d12e56ce   Bound   Success
For more details on Trident configuration, see the NetApp documentation.
Create a StorageClass resource
Create a manifest file named fsx-ontap-sc.yaml with the following content:
# fsx-ontap-sc.yaml
apiVersion: storage.k8s.io/v1
kind: StorageClass
metadata:
  name: sc-fsx-san
provisioner: csi.trident.netapp.io
parameters:
  backendType: "ontap-san"
  fsType: "ext4"
  media: "ssd"
  provisioningType: "thin"
  snapshots: "true"
  storagePools: "tbc-fsx-san:.*"
reclaimPolicy: Delete
volumeBindingMode: Immediate
allowVolumeExpansion: true
Create the StorageClass:
oc apply -f fsx-ontap-sc.yamlSection 3: Install and configure a CDE
With the storage backend configured, you can now deploy the development environment.
To install the Eclipse Che Operator from OperatorHub:
- Navigate to Operators → OperatorHub in the OpenShift web console.
- Search for
Eclipse Cheand select the Operator. - Click Install.
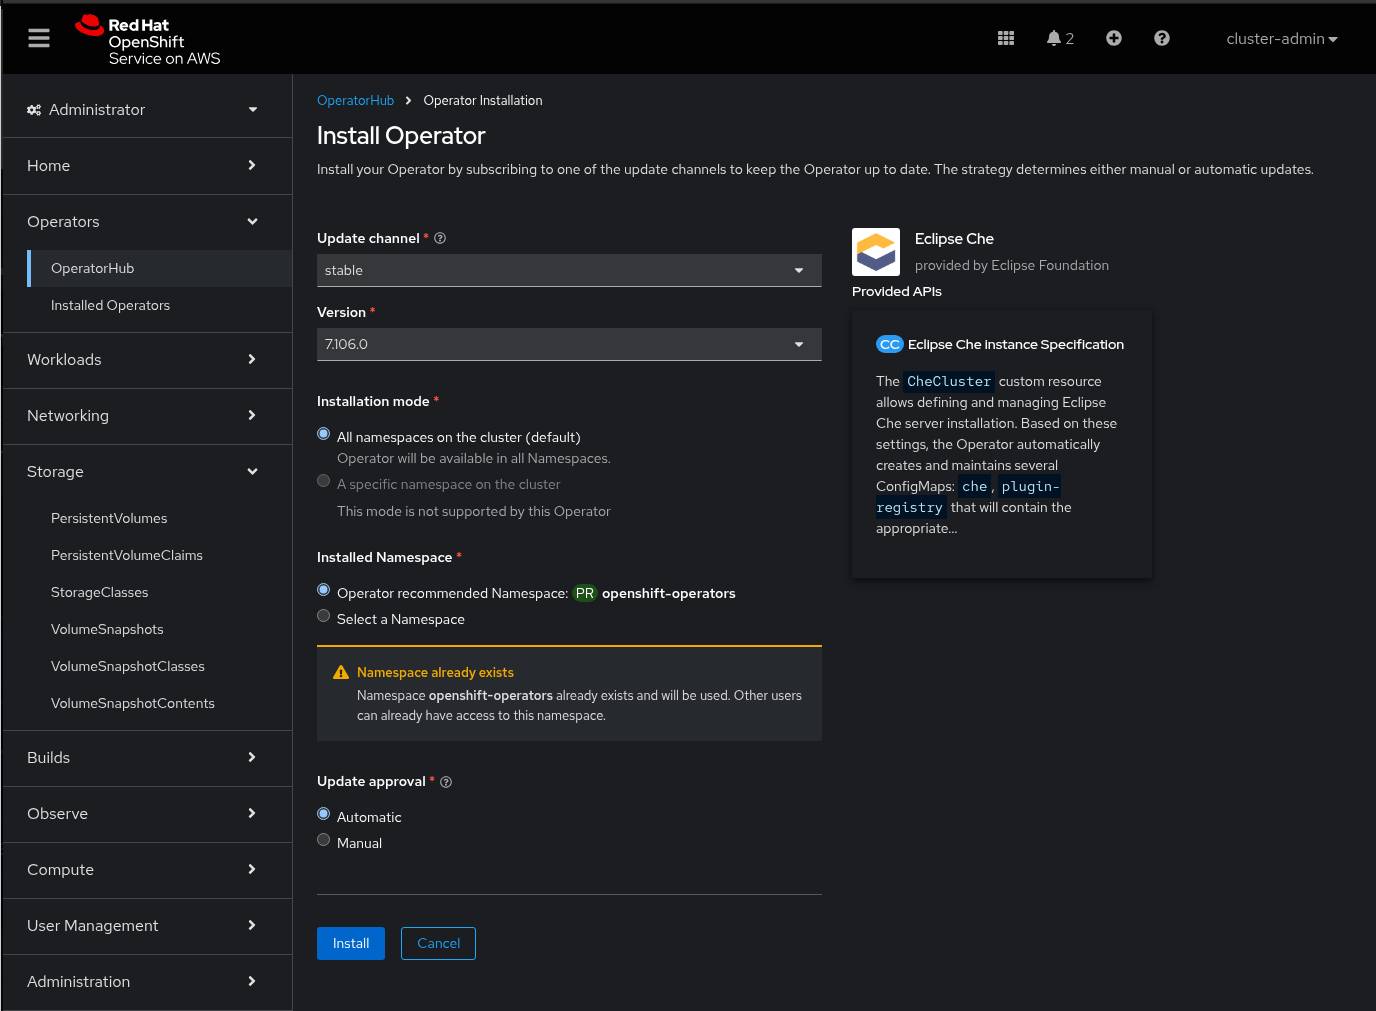
- Specify the following installation options as shown in Figure 3:
- Installation Mode:
All namespaces on the cluster (default) - Installed Namespace:
openshift-operators - Update Channel:
stable - Approval Strategy:
Automatic
- Installation Mode:
- Click Install and wait for the status to report Succeeded.
Create a project for Eclipse Che
Create a dedicated project to isolate the Eclipse Che resources:
oc new-project eclipse-cheCreate a CheCluster resource
Create the CheCluster custom resource (CR) to use fsx-ontap-sc. Create a manifest file named checluster-fsx.yaml:
apiVersion: org.eclipse.che/v2
kind: CheCluster
metadata:
  name: eclipse-che
  namespace: eclipse-che
spec:
  server: {}
  devEnvironments:
    maxNumberOfWorkspacesPerUser: -1 # add if deploying duplicates
    maxNumberOfRunningWorkspacesPerUser: -1 # add if deploying duplicates
    storage:
      pvcStrategy: per-user #<-- This sets the strategy
      perUserStrategyPvcConfig: #<-- or switch to perWorkspaceStrategyPvcConfig
        storageClass: fsx-ontap-sc
        claimSize: 10Gi
        storageAccessMode:
        - ReadWriteMany #<--Set to specify RWO or RWX
      persistUserHomeDirectoryConfig: #<--Required for shared /home persistence
        enabled: true
  components:
    pluginRegistry:
      openShiftRoute: true
    devfileRegistry:
      openShiftRoute: true
    cheServer:
      openShiftRoute: true
Create the custom resource:
oc apply -f checluster-fsx.yaml -n eclipse-cheMonitor the Eclipse Che deployment
Track the deployment progress and access your new workspace:
- Navigate to Operators → Installed Operators → Eclipse Che → CheCluster.
- Click
eclipse-cheand monitor the Status until it reports Available. Obtain the route associated with the workspace:
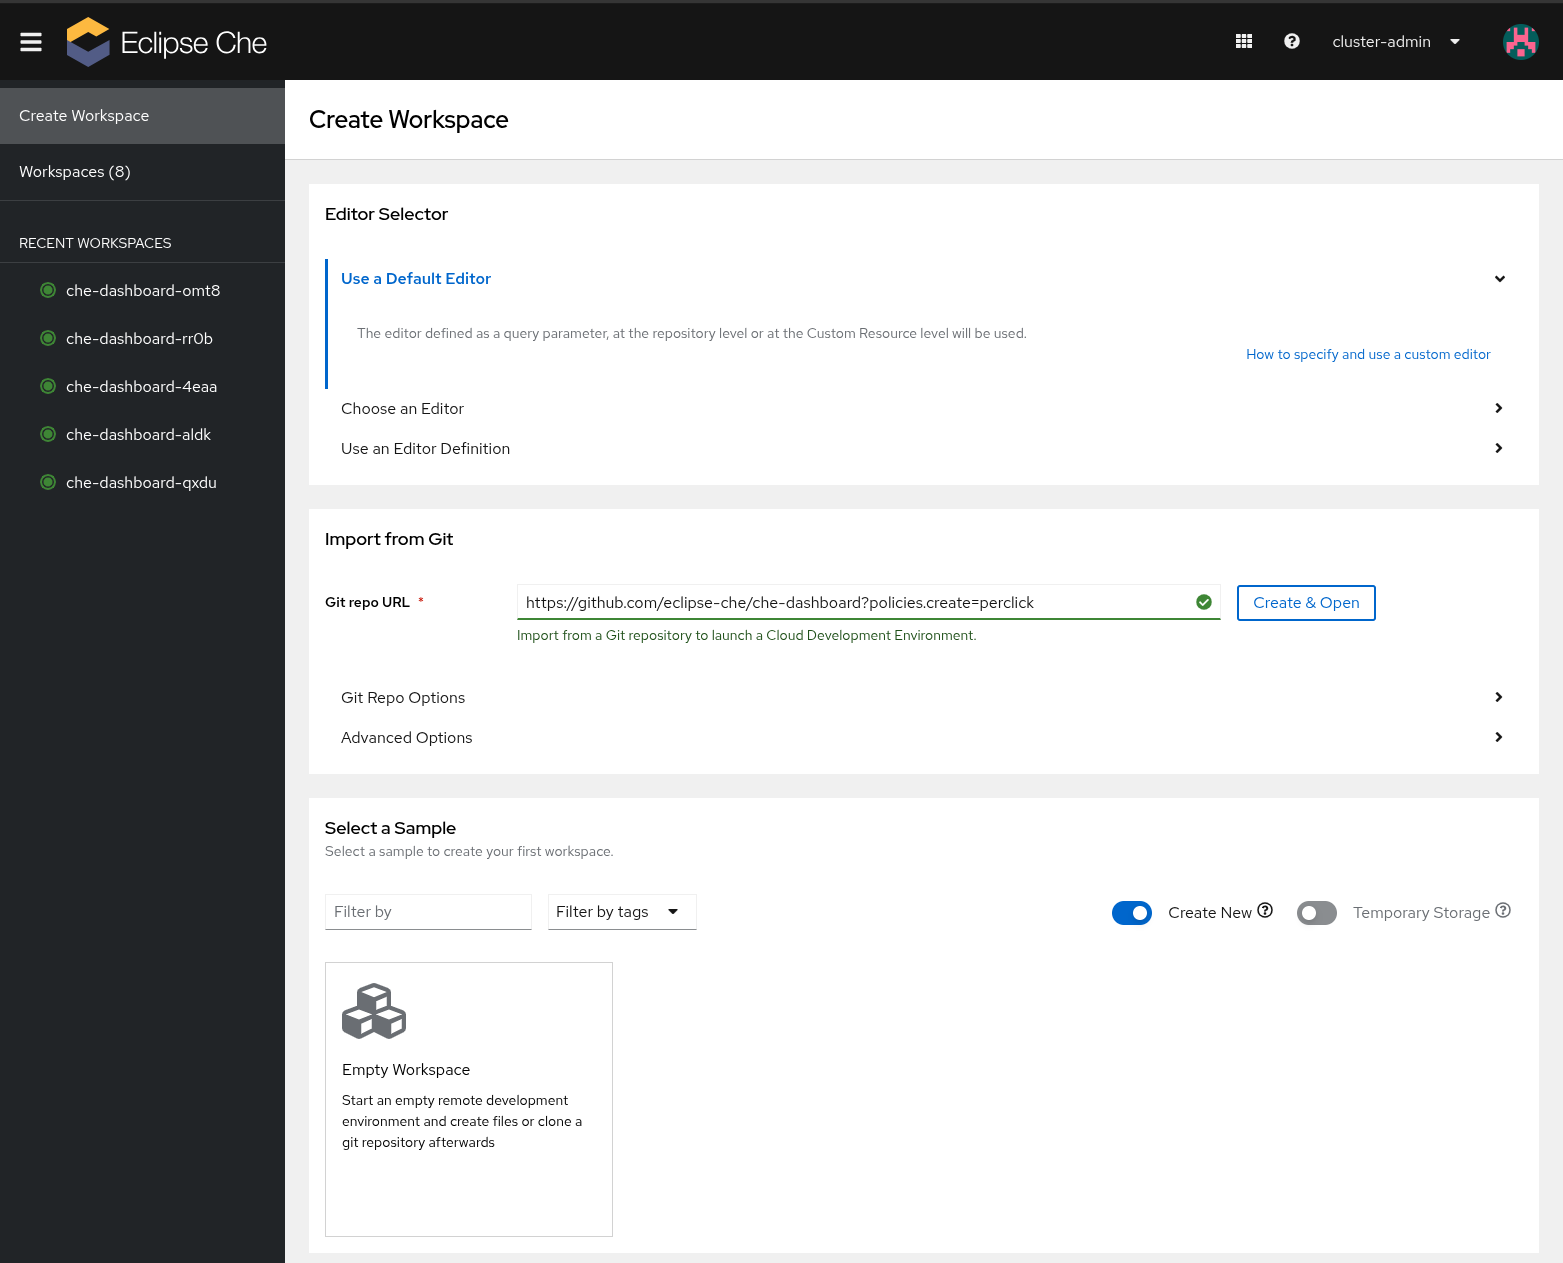
oc get routes -n eclipse-che- Open the route URL in a web browser.
- Create a workspace. This example uses
https://github.com/eclipse-che/che-dashboard(Figure 4).
Verify that the workspace uses the FSx file system. Locate the persistent volume claim (PVC) associated with the Che workspace (identified by the storage class). Inspect the manifest to verify it uses the correct StorageClass and that the accessMode matches the CheCluster resource definition. For example, in an NFS with RWX scenario, the output should resemble the following:
oc get pvc claim-devworkspace -n cluster-admin-che -o json
{
    "apiVersion": "v1",
    "kind": "PersistentVolumeClaim",
    "metadata": {
        "annotations": {
            "pv.kubernetes.io/bind-completed": "yes",
            "pv.kubernetes.io/bound-by-controller": "yes",
            "volume.beta.kubernetes.io/storage-provisioner": "csi.trident.netapp.io",
            "volume.kubernetes.io/storage-provisioner": "csi.trident.netapp.io"
        },
        "creationTimestamp": "2025-10-02T17:59:00Z",
        "finalizers": [
            "kubernetes.io/pvc-protection"
        ],
        "labels": {
            "controller.devfile.io/devworkspace_pvc_type": "per-user"
        },
        "name": "claim-devworkspace",
        "namespace": "cluster-admin-che",
        "resourceVersion": "118634",
        "uid": "ed10dd6f-b992-46c4-b603-4ce51b4f6c19"
    },
    "spec": {
        "accessModes": [
            "ReadWriteMany"
        ],
        "resources": {
            "requests": {
                "storage": "20Gi"
            }
        },
        "storageClassName": "fsx-ontap-sc",
        "volumeMode": "Filesystem",
        "volumeName": "pvc-ed10dd6f-b992-46c4-b603-4ce51b4f6c19"
    },
    "status": {
        "accessModes": [
            "ReadWriteMany"
        ],
        "capacity": {
            "storage": "20Gi"
        },
        "phase": "Bound"
    }
}
[ ~]$
To ensure everything works correctly, run some Devfile tasks. From the IDE:
- Open the command palette (Figure 5).
- Type
Run Tasks. - Select Devfile from the options.
- Choose Run Tests or another task.
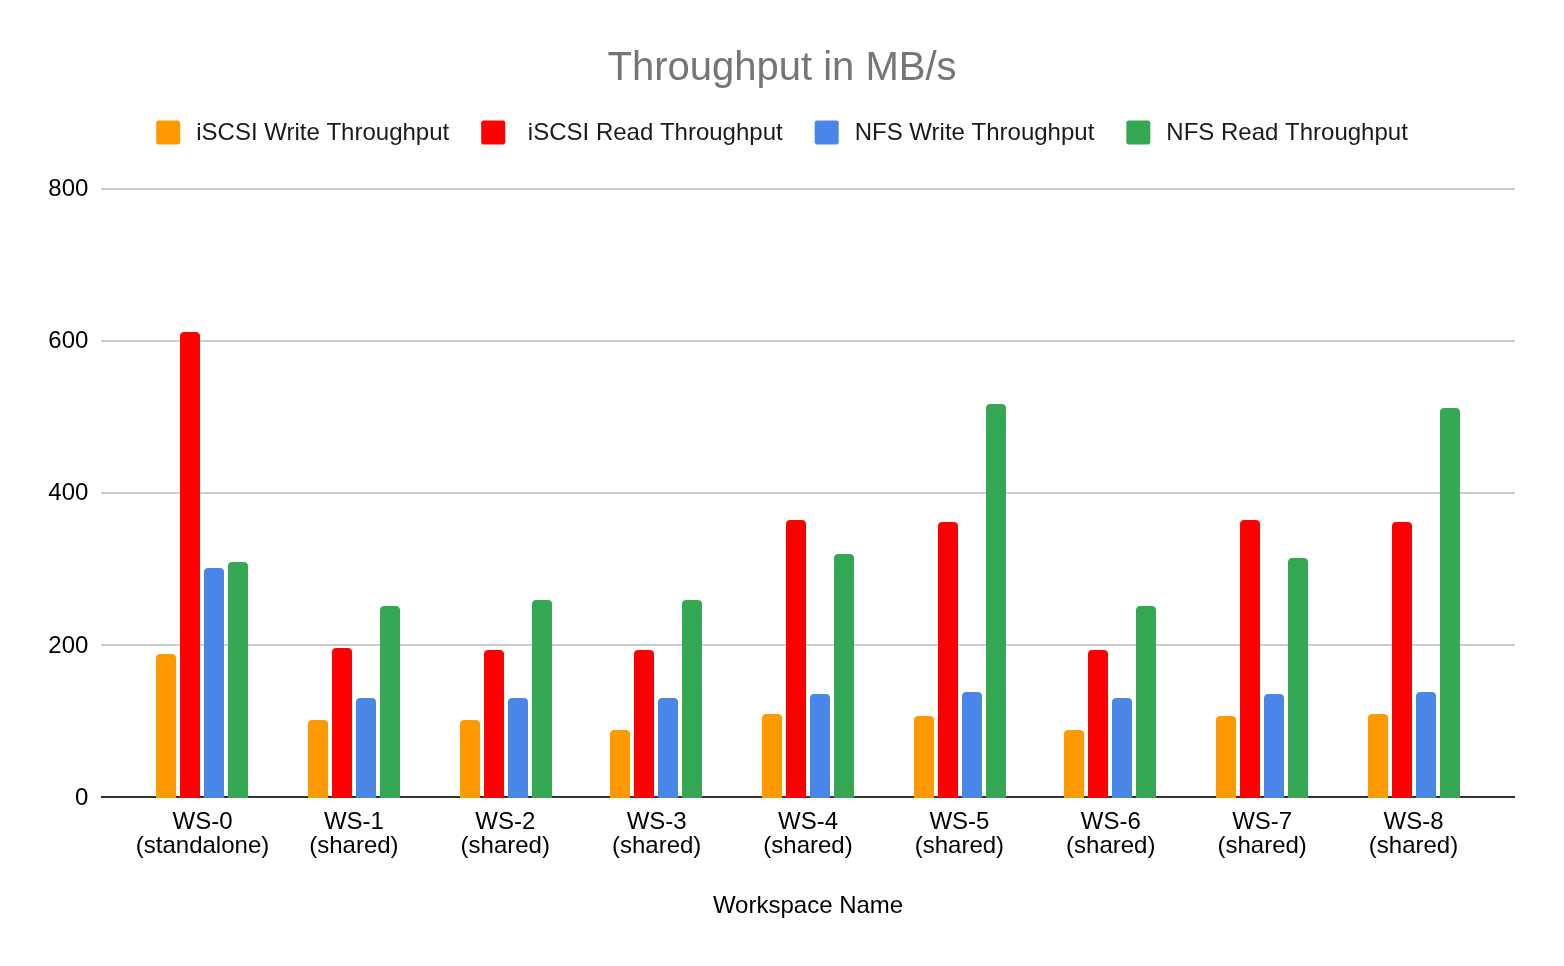
Performance benchmarks: Sequential I/O comparison
The following data summarizes the results from a sequential read/write stress test designed to benchmark the iSCSI/RWO and NFS/RWX configurations under load. The test used shell scripting to perform sequential 50 GB file transfers with 1 MB block sizes and was executed under two conditions: a stand-alone run (che-dashboard-0) to establish a baseline for single-workspace performance, and parallel runs (dashboards 1 through 8) to measure performance degradation and I/O consistency when the storage is under heavy, simultaneous load.
Figure 6 illustrates the resulting throughput in MB/s across these scenarios, while Figure 7 compares the total read and write completion times in seconds. Note that all created LUNs in this instance belong to the same storage pools and share the same underlying hardware, which could result in a noisy neighbor scenario.

Conclusion: Matching strategy to solution
The resilience and performance of your CDE on ROSA depends on making an informed architectural decision at the storage layer. Drawing from the evaluations of both NFS and iSCSI protocols conducted in CRW-9236, our practical architectural guidance for building a resilient, high-performance CDE backend is based on matching your consolidation strategy to the right FSx protocol:
- For per-workspace strategy (Isolation): We recommend iSCSI with ReadWriteOnce (RWO) access. This provides optimal dedicated performance (lowest latency) using block-level access, which is ideal for isolated, high-I/O CDE. Resilience is secured using Multi-AZ synchronous replication and iSCSI Multipathing.
- For per-user strategy (Consolidation): The necessary configuration for storage consolidation and sharing is NFS with ReadWriteMany (RWX) access. This setup is required to allow multiple workspaces to safely access a single volume simultaneously from different nodes. It provides the essential RWX capability and uses the robustness of NFS 4.1 to ensure continuous availability during storage failovers.
By applying these principles, you ensure your CDE delivers the precise performance profile needed for your developers while maintaining high availability and cost efficiency.