Upgrading a disconnected Red Hat OpenShift cluster is more complex than a standard upgrade, forcing you to run a local OpenShift Update Service (OSUS) to replicate Red Hat's public services. However, the real challenge often lies in certificate management. This handy guide addresses a common scenario in secure environments that lack an internal Certificate Authority (CA).
Upgrading steps
In secure environments without an internal CA, administrators must configure the cluster to trust its default self-signed ingress certificate used to secure internal services like OSUS. The following is a step-by-step solution for this problem, demonstrating how to establish a chain of trust and ensure a smooth upgrade.
Prerequisites:
- Update the operators to the latest versions. Operators must be upgraded first to ensure they are compatible with the target OpenShift version.
- Install the Cincinnati operator (this operator powers OSUS). The Cincinnati operator provides the graph data and policies required for controlled upgrades.
- Update the oc CLI to the latest version. The CLI tool must be up to date so it understands new cluster APIs and commands.
Workflow overview:
- Install the Cincinnati operator (provides the policy engine for upgrades).
- Apply mirrored release signatures to ensure payloads are trusted.
- Configure registry access so the cluster can pull mirrored images.
- Add the router CA to the trust bundle to allow the Cluster Version Operator (CVO) to communicate with OSUS via ingress.
- Create the OSUS application. This deploys a local “over-the-air” update service.
- Configure the CVO. Point your cluster at the local OSUS service.
- Upgrade the cluster. Re-use the same update service across multiple disconnected clusters.
Step 1: Install the Cincinnati operator
Install the Cincinnati operator (the operator that provides policy/graph functionality used by the OpenShift Update Service).
Cincinnati (the graph/policy engine) is the component that serves to upgrade graph data and policies that the Cluster Version Operator (CVO) consumes to determine valid upgrade paths. The operator must be installed and healthy before you point CVO at a local update service.
Install it via the operator lifecycle manager (OLM) / OperatorHub in your environment. You can subscribe to the Cincinnati operator from your mirrored operator catalog or apply the operator manifests from your mirrored operator bundle if you are not using the console. For more information about mirroring OpenShift images, refer to this article.
Verify the operator is installed and healthy (check subscription/CSV and operator pods).
The following are example verification commands.
# Check CSV / subscription state (replace namespace if different)
oc get subscription -n openshift-update-service
oc get csv -n openshift-update-service
# Check operator pods
oc get pods -n openshift-update-service --selector name=updateservice-operator
Step 2: Apply mirrored release image signatures
When you use the oc-mirror tool to upload mirrored OpenShift images to your private registry (i.e., Quay), the process creates more than just a copy of the container images. It also generates a set of crucial YAML configuration files designed to be applied directly to your disconnected cluster. One of the most important outputs is the release-signatures.
These signatures are the release verification artifacts that allow the Cluster Version Operator (CVO) to verify that the mirrored release payloads are authentic and have not been altered.
OpenShift verifies the authenticity of release payloads using release signatures. If signatures are missing or not applied to the cluster, CVO will refuse to verify the mirrored payload, and the upgrade will fail with verifier-public-key-redhat errors or messages like “The update cannot be verified."
# Example, From your oc-mirror output directory (example path from oc-mirror)
oc apply -f ./oc-mirror-workspace/results-1639608409/release-signatures/
Verify the creation of the new configmap containing the image signatures.
# Get the new created configmap
oc get cm -n openshift-config-managed|grep -i relea
mirrored-release-signatures                   1      2m2s
release-verification                          3      4d20h
The order matters, so install the Cincinnati operator (Step 1) first, then apply the release-signatures. Cincinnati/OSUS must be present so the graph and policy components can use the signatures when CVO queries them.
If you mirror multiple release versions, apply all corresponding signature files.
Step 3: Configure access to a secured registry
Disconnected clusters rely on your private registry mirror. The cluster must trust the registry’s TLS certificates before it can pull images.
You must first create a ConfigMap containing your private registry's CA certificate. In this ConfigMap, it's critical to use the key updateservice-registry as this allows the OpenShift Update Service (OSUS) pods to trust the registry. Reference this ConfigMap in the cluster-wide image configuration to complete the trust setup.
apiVersion: v1
kind: ConfigMap
metadata:
  name: my-registry-ca
data:
  updateservice-registry: |
    -----BEGIN CERTIFICATE-----
    ...
    -----END CERTIFICATE-----
  registry-with-port.example.com..5000: |
    -----BEGIN CERTIFICATE-----
    ...
    -----END CERTIFICATE-----
This is an alternative method:
oc create configmap my-registry-ca   --from-file=registry-with-port.example.com..5000=</path/to/example-ca.crt>   -n openshift-config
#Example
oc create configmap my-registry-ca   --from-file=updateservice-registry=/etc/pki/ca-trust/source/anchors/ssl.cert --from-file=ebdn-quay.disconnected.ebdn.com..8443=/etc/pki/ca-trust/source/anchors/ssl.cert   -n openshift-config
Edit the cluster image config as follows.
# Edit the Openshit cluster image config and update the additionalTrustedCA
oc edit image.config.openshift.io cluster
Update the additionalTrustedCA with the new configmap object.
spec:
  additionalTrustedCA:
    name: my-registry-ca
If the cluster does not trust your registry’s certificate, all image pulls will fail with TLS errors, such as x509: certificate signed by unknown authority.
Step 4: Add the router CA to the user CA bundle
The CVO must contact the OSUS service endpoint through your cluster’s ingress router. By default, the router issues its self-signed CA, which the CVO does not trust.
Extract the router CA certificate and decrypt it using the base64 tool:
oc get secret -n openshift-ingress-operator router-ca -o jsonpath='{.data.tls\.crt}' | base64 --decode# output
-----BEGIN CERTIFICATE-----
MIIDDDCCAfSgAwIBAgIBATANBgkqhkiG9w0BAQsFADAmMSQwIgYDVQQDDBtpbmdy
...
...
...
I3UEL2uCClCqUXScDXbsctpJnEYP3S+8z09fOPrPNbR7Kq2WSFb6cCpQPkLG59T
jwcBekYzVYzIrY8KSSEQkA==
-----END CERTIFICATE-----Update the cluster-wide proxy configuration to reference the user-ca-bundle ConfigMap in its trustedCA field.
# edit the config map and add the ingress certificate
# and add the user-ca-bundle under trustedCA
oc edit cm -n openshift-config user-ca-bundle
# Update the cluster-wide proxy
oc edit proxies.config.openshift.io cluster
apiVersion: config.openshift.io/v1
kind: Proxy
metadata:
  creationTimestamp: "2025-09-12T18:56:04Z"
  generation: 2
  name: cluster
  resourceVersion: "1148765"
  uid: 47362a5d-9122-49c7-9802-d023a82bc4a3
spec:
  trustedCA:
    name: user-ca-bundle
status: {}
Monitor and wait until all nodes reboot.
# Watch the mcp update
watch oc get mcp
# Output
NAME     CONFIG                                             UPDATED   UPDATING   DEGRADED   MACHINECOUNT   READYMACHINECOUNT   UPDATEDMACHINECOUNT   DEGRADEDMACHINECOUNT   AGE
master   rendered-master-c2bb43dfe570a5f69a3bfc373321f0e9   True      False      False      3              3                   3                     0                      4d23h
worker   rendered-worker-8bf5022547a0fb33a78bff7e0e4f634b   True      False      False      3              3                   3                     0                      4d23h
If the ingress CA is not trusted, the CVO cannot talk to the OSUS service. This results in errors like “CVO is showing x509: certificate is signed by unknown authority.”
Step 5: Create an OSUS application
As mentioned in Step 2, the oc-mirror tool generates several useful YAML configuration files in its output directory. You will now use one of these generated files, updateService.yaml, to deploy the OpenShift Update Service (OSUS).
Move under the new OpenShift platform mirror cluster resources folder and apply the updateService.yaml file.
# Move under the mirroring output folder, example:
cd ~/ocmirror/upload/platform/disk-418/working-dir/cluster-resources/
# Move under the good namespace
oc project openshift-update-service
# Create the object
oc apply -f updateService.yaml -n openshift-update-service
# Validate
oc get pods
NAME                                        READY   STATUS    RESTARTS   AGE
graph-data-tag-digest                       1/1     Running   0          75s
update-service-oc-mirror-56f99dff66-cfdnn   1/2     Running   0          63s
update-service-oc-mirror-56f99dff66-qkml6   1/2     Running   0          63s
update-service-oc-mirror-5889cfdfd-6wxr4    1/2     Running   0          76s
updateservice-operator-77d788d4-nh6jc       1/1     Running   0          3h57m
This application serves the upgrade graph that the CVO consumes. It replicates the “over-the-air updates” experience inside your disconnected environment.
Step 6: Configure the cluster version operator
You need to point the CVO at your local OSUS service instead of Red Hat’s public one as follows.
# Set the OpenShift Update Service target namespace, for example, openshift-update-service:
NAMESPACE=openshift-update-service
# Set the name of the OpenShift Update Service application, for example, service:
NAME=update-service-oc-mirror
# Obtain the policy engine route:
POLICY_ENGINE_GRAPH_URI="$(oc -n "${NAMESPACE}" get -o jsonpath='{.status.policyEngineURI}/api/upgrades_info/v1/graph{"\n"}' updateservice "${NAME}")"
# Set the patch for the pull graph data:
PATCH="{\"spec\":{\"upstream\":\"${POLICY_ENGINE_GRAPH_URI}\"}}"
# Patch the CVO to use the local OpenShift Update Service:
oc patch clusterversion version -p $PATCH --type merge
To prevent the cluster version operator (CVO) from failing to reach its default update source (api.openshift.com) in a disconnected cluster. This patch redirects it to your local registry.
Step 7: Upgrade the cluster
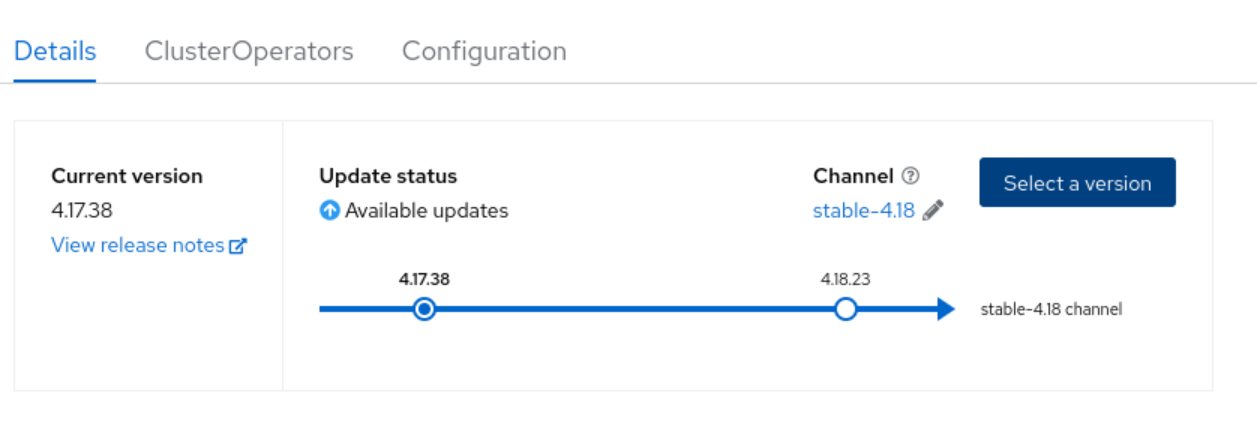
Follow these steps to initiate the upgrade from the web console:
- Log in to the OpenShift web console and navigate to the Administration > Cluster Settings section.
- On the Details tab, locate the Update status section, which shows the recommended upgrade path (Figure 1).
- Click the Select a version button.
- Choose the desired version from the dropdown menu and click Update to begin the process.
Wrap up
By following this guide, you have the tools required to complete the end-to-end process for upgrading a self-signed Red Hat OpenShift Container Platform cluster in a disconnected environment. The key to this successful upgrade lies in establishing a complete chain of trust. This involves configuring the cluster to trust your private registry’s certificates. This ensures the CVO can communicate with the local OSUS through the cluster's ingress and applies the mirrored signatures to verify the release payloads.
By deploying a local OSUS, you have replicated the "over-the-air" update experience inside your network, creating a robust platform for managing the lifecycle of your air-gapped clusters in a security-focused and controlled manner. You can reuse this same update service to manage upgrades across multiple disconnected clusters, providing a centralized and efficient solution for your environment.