For developers, having access to powerful, easy-to-use tools and platforms is crucial for building, testing, and deploying applications. Red Hat offers a no-cost developer subscription that allows individual developers to use up to 16 systems for demos, prototyping, QA, small production uses, and cloud access. In this article, we will explore using this subscription to leverage some of the new features of Red Hat Hybrid Cloud that are particularly suited for developers.
In the competitive environment of startup development, achieving efficiency and security while maintaining cost is essential, especially when venturing into the public cloud. The Red Hat Developer subscription stands out as a powerful ally in this journey at no cost. This subscription enables developers to craft custom Red Hat Enterprise Linux (RHEL) production-like images with specific content and packages, applying Security Content Automation Protocol (SCAP) policies, and utilize first-boot scripts. This article delves into how developers and early stage startups can utilize this invaluable resource to deploy these custom images to the public cloud, ensuring optimized and secure systems while keeping costs in check.
Let's explore a practical example of creating a custom RHEL image and deploying it in the cloud with minimal effort. We'll demonstrate how to deploy a complete containerized environment using the Compose Specification. This is just an example of the many types of deployments you can achieve using Red Hat Hybrid Cloud.
Deploy your containerized environments
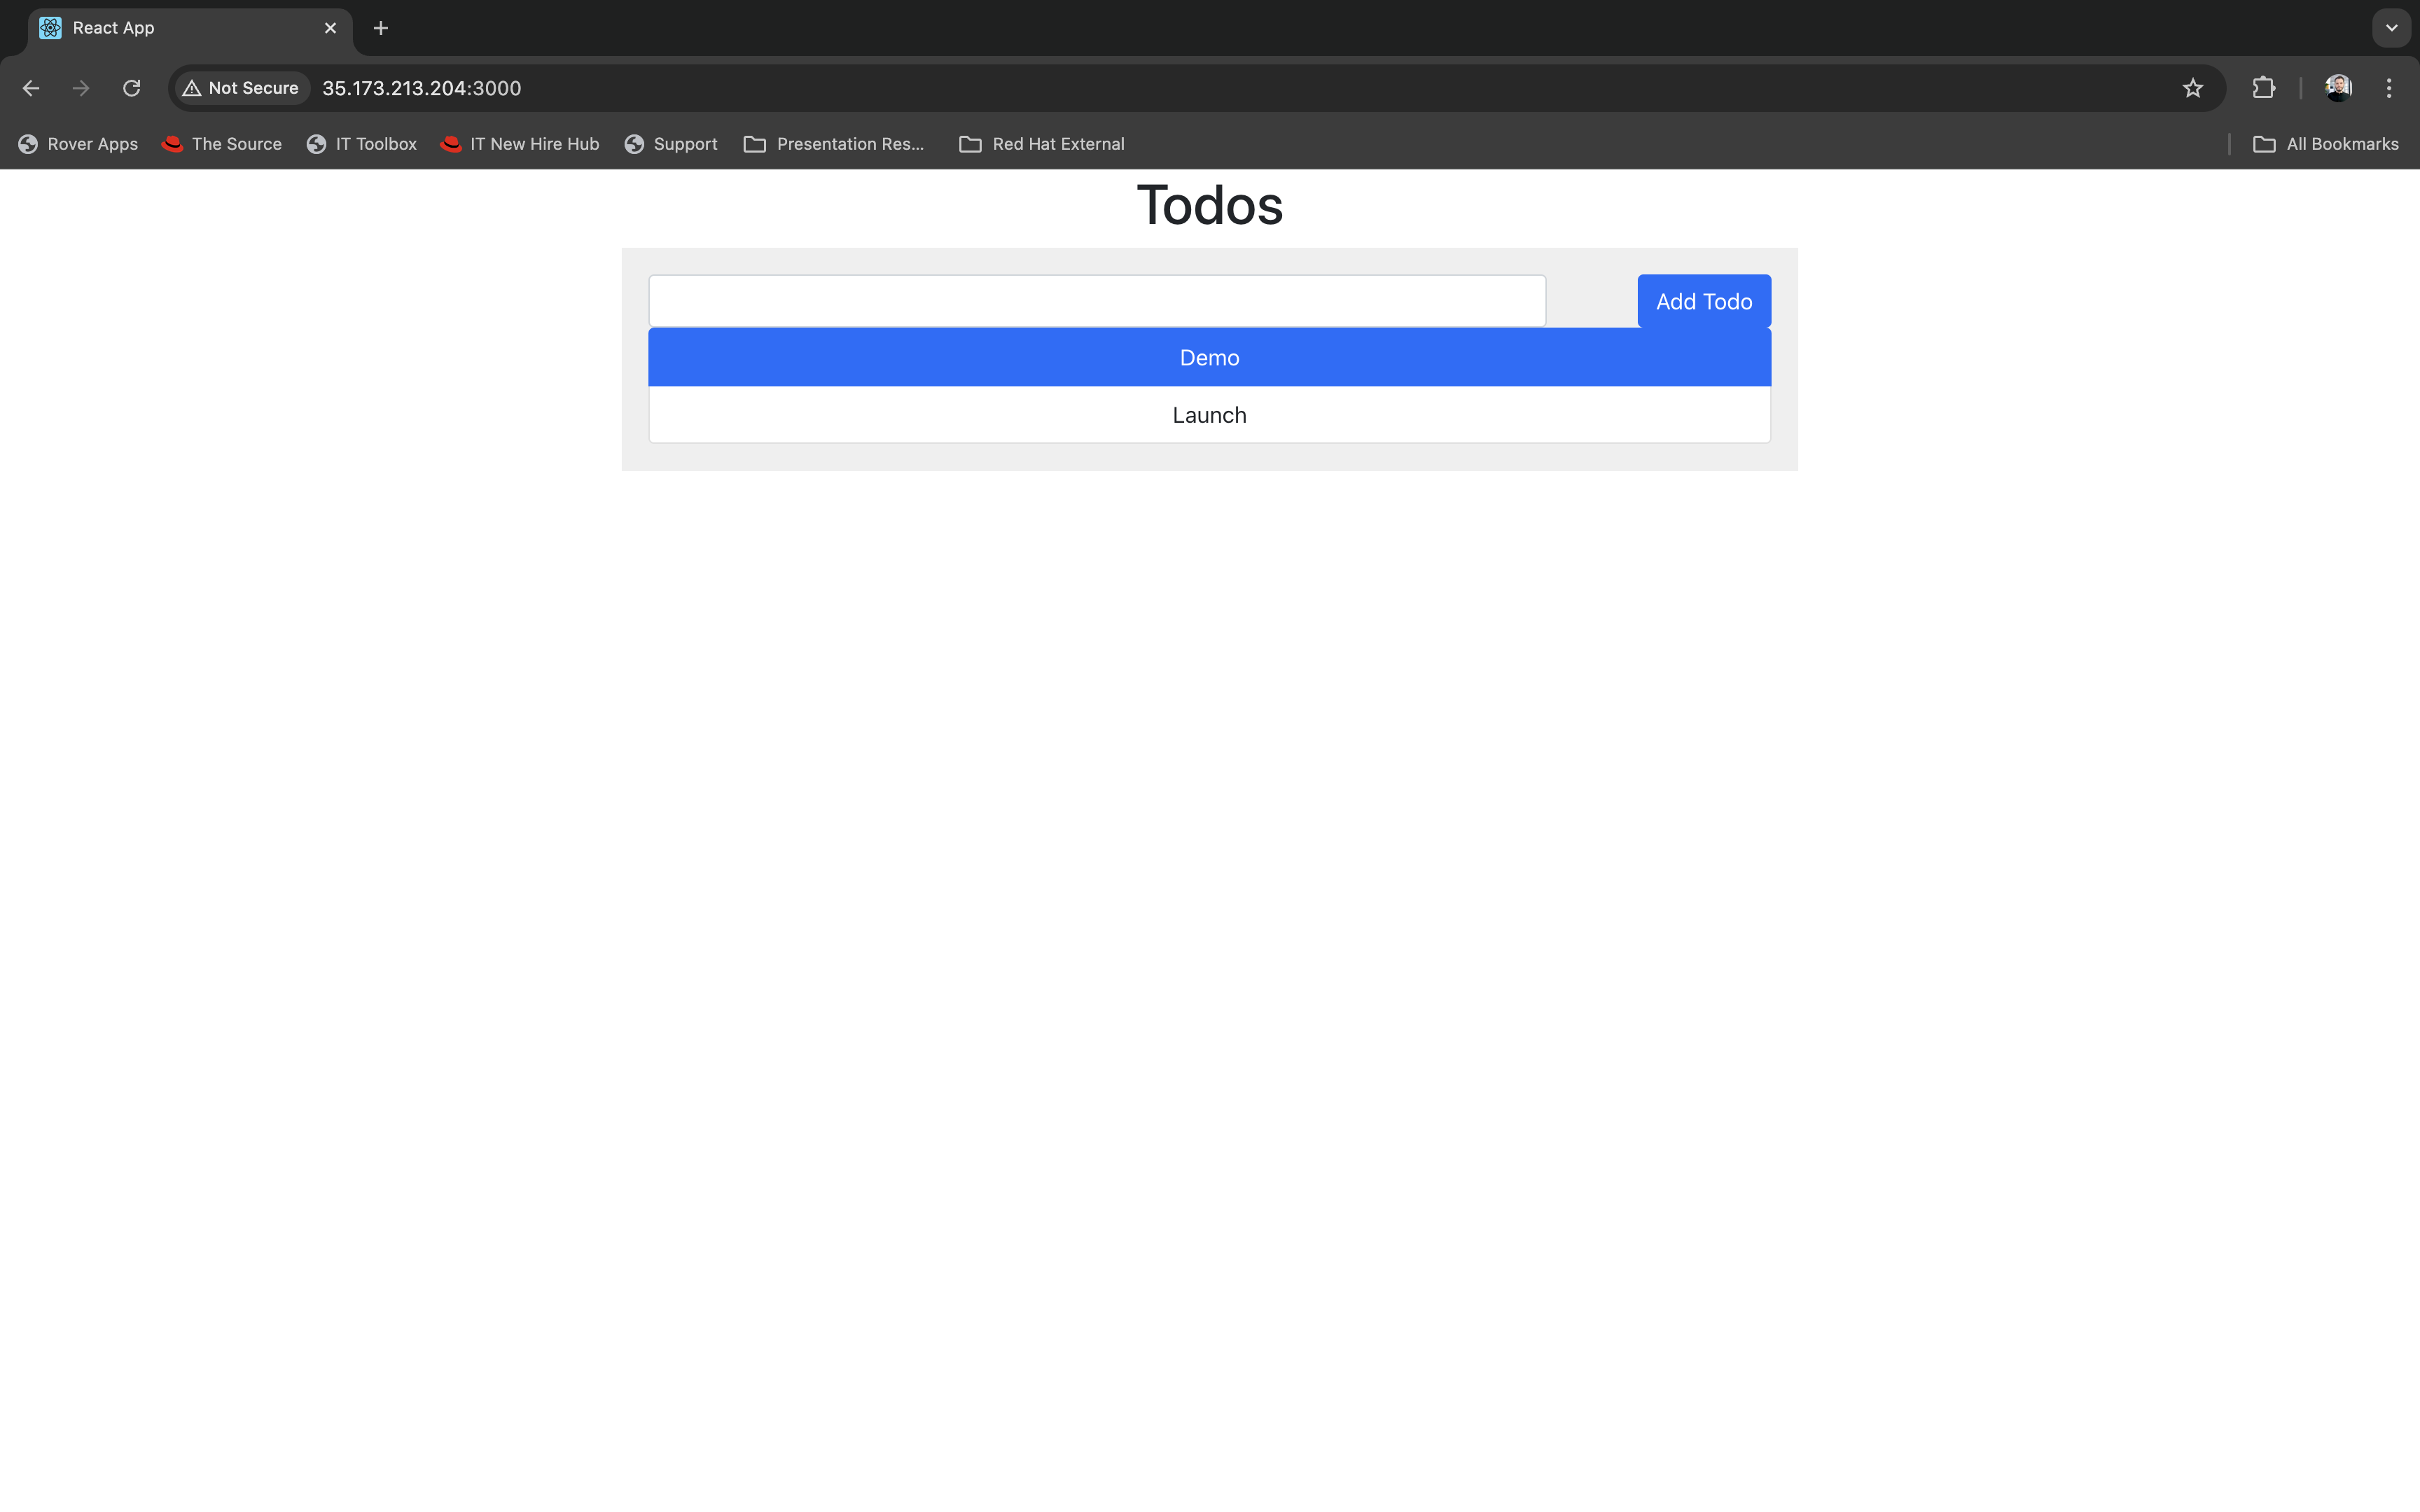
Containerized environments using Docker or Podman have become standard practice during development. Developers frequently seek efficient and secure ways to deploy these environments to the public cloud for demos, MVPs, testing, or prototyping. While solutions like Kubernetes or Red Hat OpenShift are excellent for production at scale, they can be too heavy for smaller, development-focused tasks. Here, we’ll walk through a more lightweight approach by deploying a containerized application from the awesome-compose repository, a todo app based on MERN (MongoDB, Express, React, and Node) popular stack. While we’ll focus on Amazon Web Services (AWS), you can easily adapt this guidance to another cloud provider and to your containerized application.
Red Hat Hybrid Cloud
Red Hat Hybrid Cloud offers a robust ecosystem for monitoring and managing your deployment’s security and stability posture. It serves as a central platform for managing your systems and enables optimization of your RHEL deployments in the cloud. This comprehensive toolset includes:
- RHEL security features: Monitor and manage your deployments' security posture, with real-time alerts and vulnerability management.
- Insights advisor: Offers tailored recommendations for enhancing system performance and security. By analyzing specific configurations and usage patterns, it suggests improvements based on a vast repository of best practices.
- Ansible playbooks automation: Facilitates the application of fixes, addresses Common Vulnerabilities and Exposures (CVEs), and ensures SCAP compliance. Automating these tasks through Ansible playbooks significantly reduces manual efforts, allowing teams to concentrate on development and innovation.
Register for the no-cost Developer Subscription
To get started, follow these steps to register for the Red Hat Developer Subscription:
- Visit the Red Hat Developer Subscription page.
- Sign up for a Red Hat account if you don't already have one.
- Log in and navigate to the subscription management page.
- Activate your no-cost developer subscription.
- Verify your new user and try to log in to Red Hat Console.
Use Red Hat Hybrid Cloud
Next, follow these steps to begin using Red Hat Hybrid Cloud.
1. Public cloud integration setup (AWS)
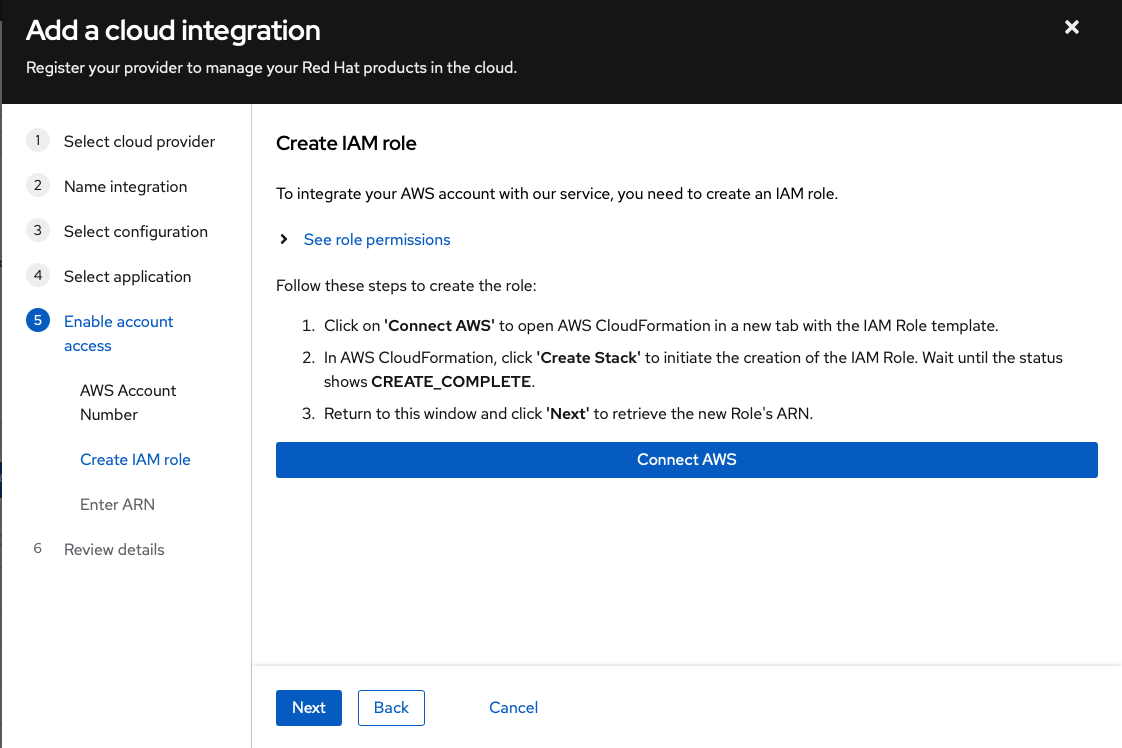
To deploy your new system to the public cloud, let's create a cloud integration. In this tutorial, we'll use AWS, but you can choose another cloud provider such as GCP or Azure. This step is optional; you may also create blueprints and build custom images as ISO installers and QCOW2 for virtual machines. Figure 1 depicts the cloud integration (AWS) wizard.
Complete the following steps:
- Visit the Red Hat Integrations page.
- Navigate to the Cloud tab and click Add Integration.
- Choose your cloud provider (in this example, AWS).
- Assign a name to this integration profile; we'll use this profile name in the following steps.
- Choose Manual configuration
- Select the Launch Images application.
- Enter your AWS account number.
- Click Connect AWS. This will open a new window and redirect you to the AWS CloudFormation stack creation page. Click Create Stack to generate the required policy and role for this integration.
- Return to the Red Hat wizard page, click Next, verify the created role's ARN, and add the new integration.
Your new cloud integration is now ready.
2. Create and customize a RHEL image via blueprints
Red Hat Hybrid Cloud allows you to create and customize RHEL images using blueprints. Create a blueprint for your golden image, modify it over time as your needs change, and use it to build and deploy images on demand. Here's how to do it:
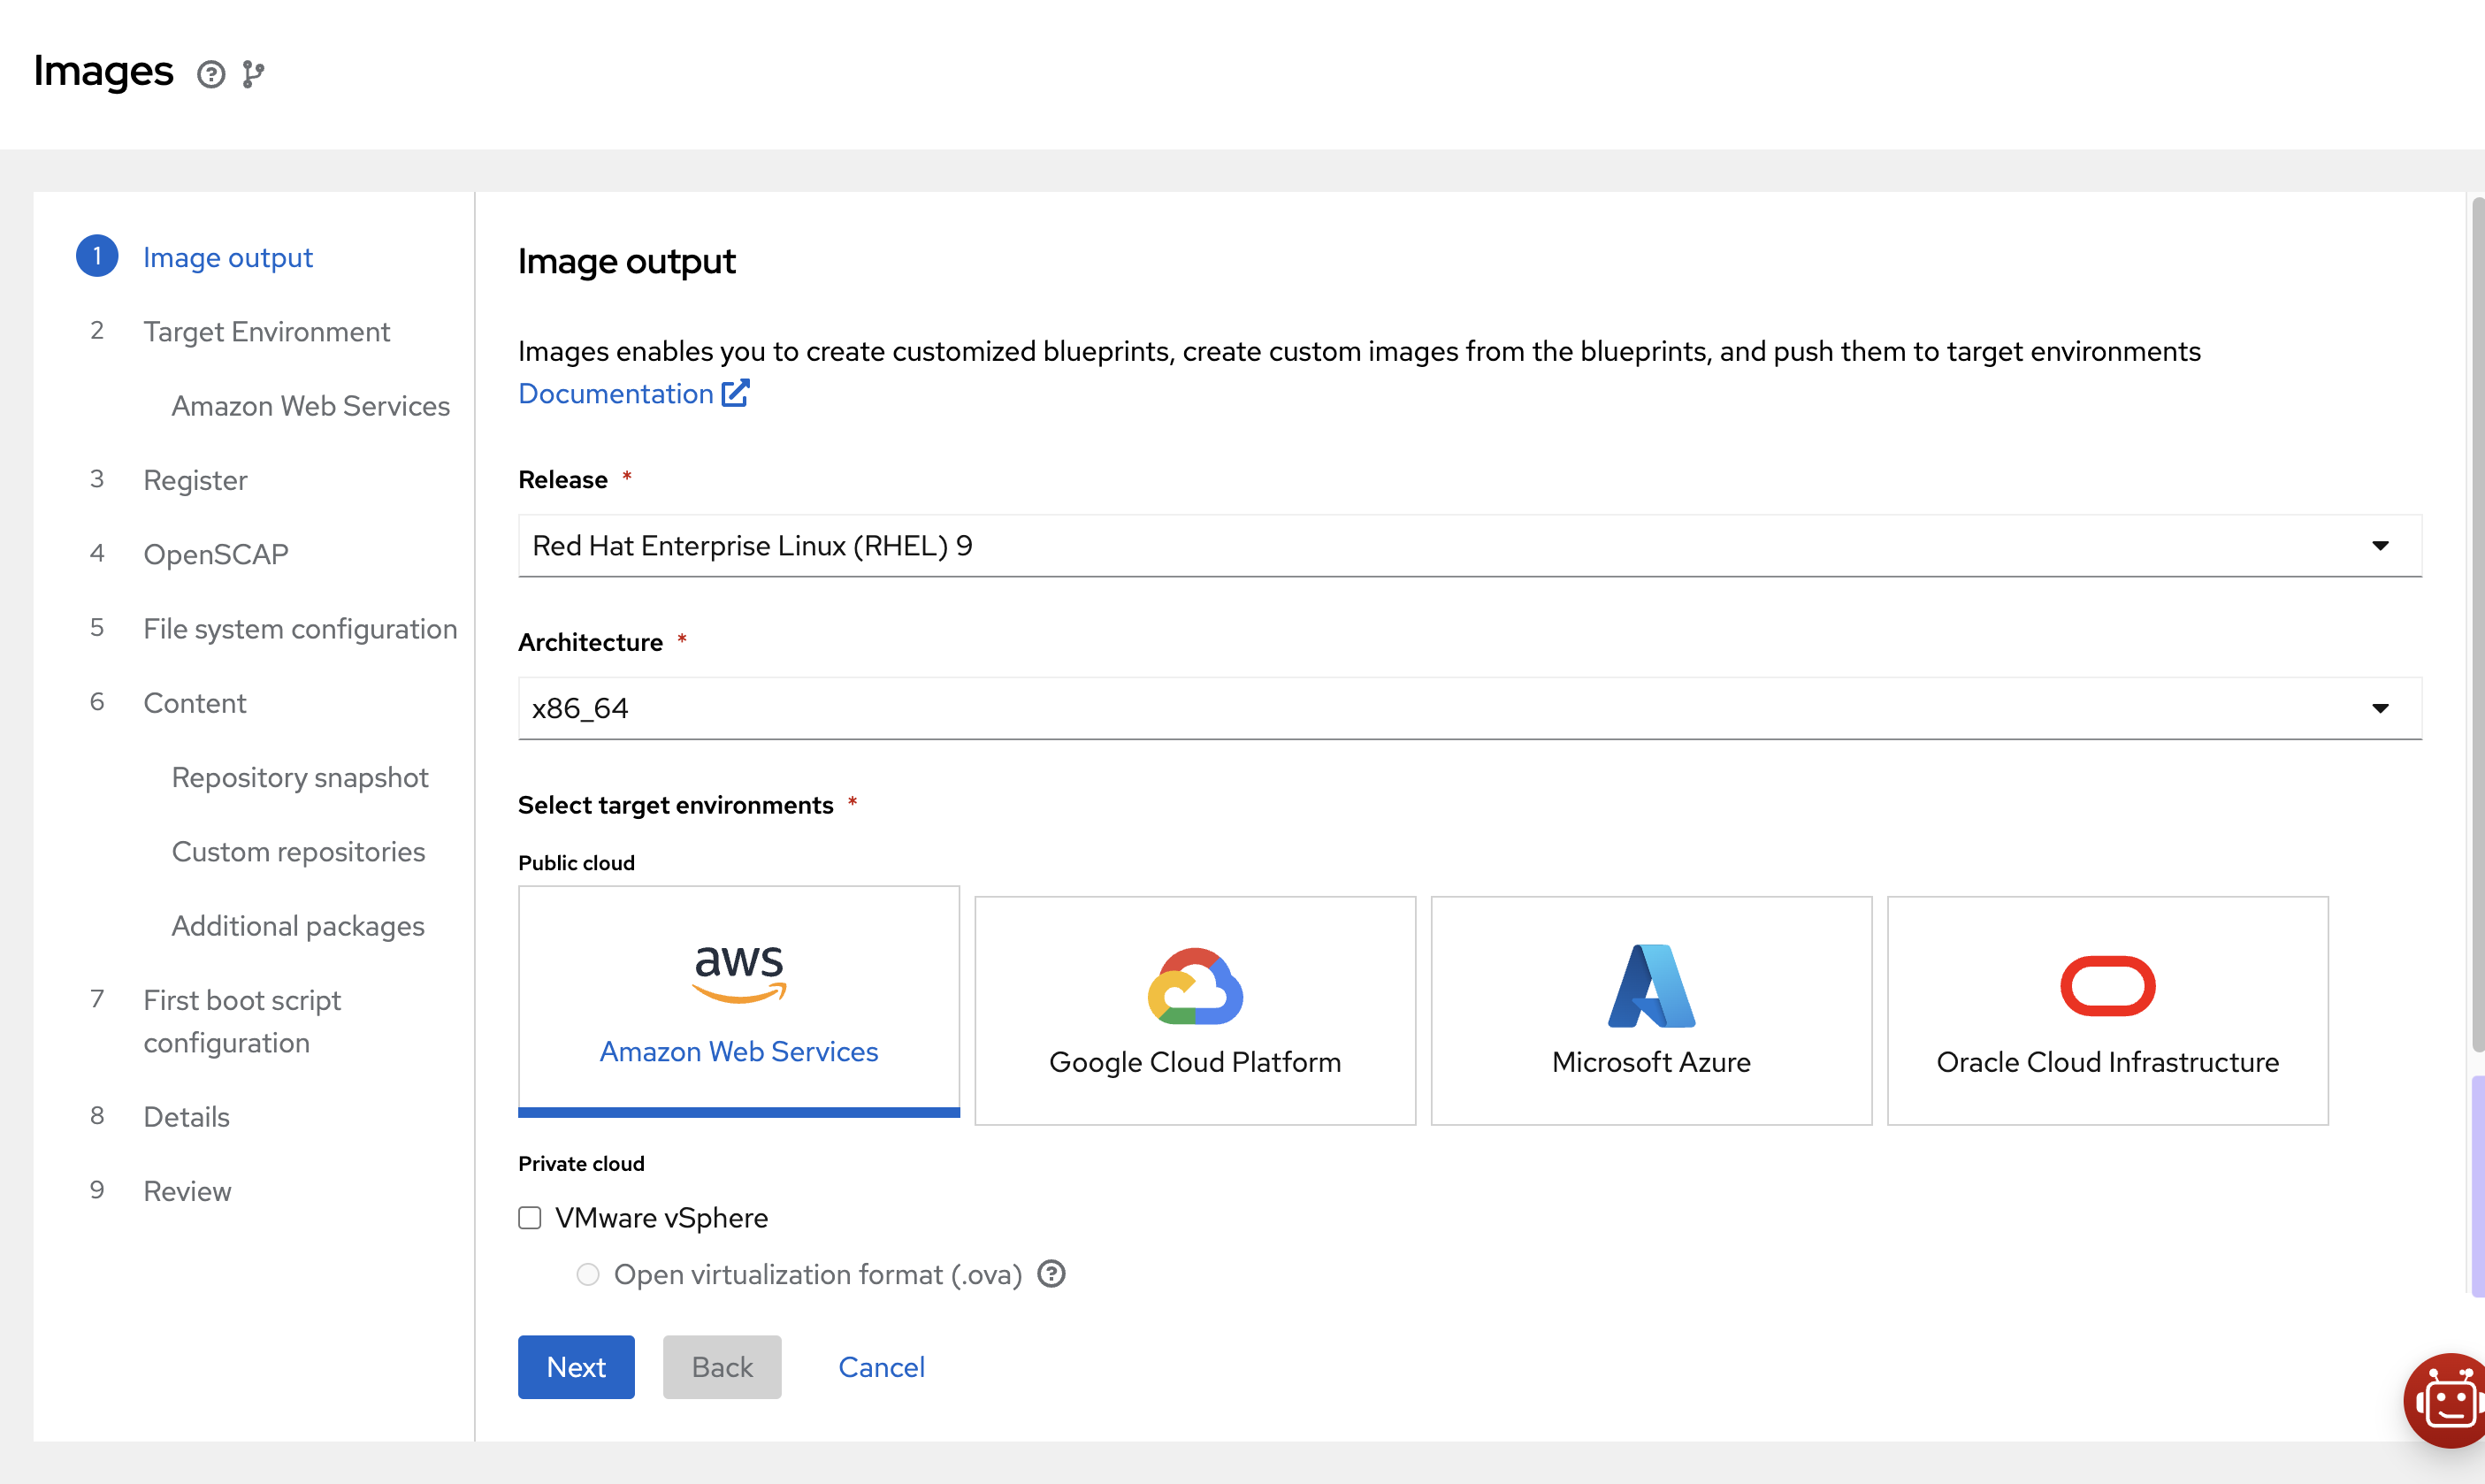
- Open the blueprint wizard, as shown in Figure 2.
- Log in to the Red Hat Hybrid Cloud Console.
- Navigate to the Image Builder service and create a new blueprint.
- Click the Create blueprint button.
- Choose your desired RHEL version, architecture, and target environments. For this article, we use RHEL 9, x86_64, and Google Cloud Platform, accordingly.
- Select AWS as the Target environment.
- Choose Share image with a Google account.
- Add your corresponding AWS integration source from the previous step.
- Register:
- Your no-cost subscription allows up to 16 systems.
- Keep checked the Automatically register and enable advanced capabilities option.
- Open the Activation key dropdown and pick one, if you haven't created any, pick the default one.
- OpenSCAP:
- This step allows you to add an openSCAP profile for your image, for this demo we can skip this step. Click next.
- File system configuration:
- This step configures the partitioning of the image.
- Keep the recommended automatic partitioning for this demo.
Content:
This step allows you to customize the repositories and packages. Go to Additional packages and add these packages:
gitpodmanpodman-composeaardvark-dns(used in Podman for DNS)
First boot:
This step configures the image with a custom script that executes on its first boot. The script can be shell, Python, Ansible playbook, and etc.
The following playbook clone the containerized application and build its containers using
podman-compose:
#!/usr/bin/env ansible-playbook
---
- name: Deploy Web Application with Podman on RHEL using RHEL System Roles
  hosts: localhost
  become: yes  # Adjust based on rootful or rootless Podman
  vars:
    repo_url: "https://github.com/amirfefer/awesome-compose.git"
    subdir_path: "react-express-mongodb"
    app_dir: "/opt/demo-app"
    podman_network_name: "demo_network"
    public_interface: "eth0"
  tasks:
    - name: Install required packages
      yum:
        name:
          - git
          - podman
        state: present
    - name: Clone the GitHub repository
      git:
        repo: "{{ repo_url }}"
        dest: "{{ app_dir }}"
        version: "master"
    - name: Ensure the subdirectory exists
      stat:
        path: "{{ app_dir }}/{{ subdir_path }}"
      register: subdir_exists
    - name: Fail if subdirectory does not exist
      fail:
        msg: "The specified subdirectory {{ subdir_path }} does not exist in the repository."
      when: not subdir_exists.stat.exists
    - name: Check if Podman network exists
      command: podman network inspect {{ podman_network_name }}
      register: podman_network_exists
      ignore_errors: true
    - name: Create Podman network if it does not exist
      command: podman network create {{ podman_network_name }}
      when: podman_network_exists.rc != 0
    - name: Run Podman Compose to start containers
      command: podman-compose -f {{ app_dir }}/{{ subdir_path }}/compose.yaml up -d
      args:
        chdir: "{{ app_dir }}/{{ subdir_path }}"
    - name: Display status of Podman containers
      command: podman ps
      register: podman_status
    - name: Show the Podman container status
      debug:
        msg: "{{ podman_status.stdout }}"
Save and build the blueprint:
After giving a name and description to our new blueprint, double check the review section and save your blueprint. Open the save button dropdown and click Save changes and build image this creates the blueprint and also builds the image. Red Hat makes it easy to manage your blueprints for future use.
Export and import blueprints:
Export blueprints for sharing with your team or importing into other projects. This feature is particularly useful for maintaining consistency across multiple workloads.
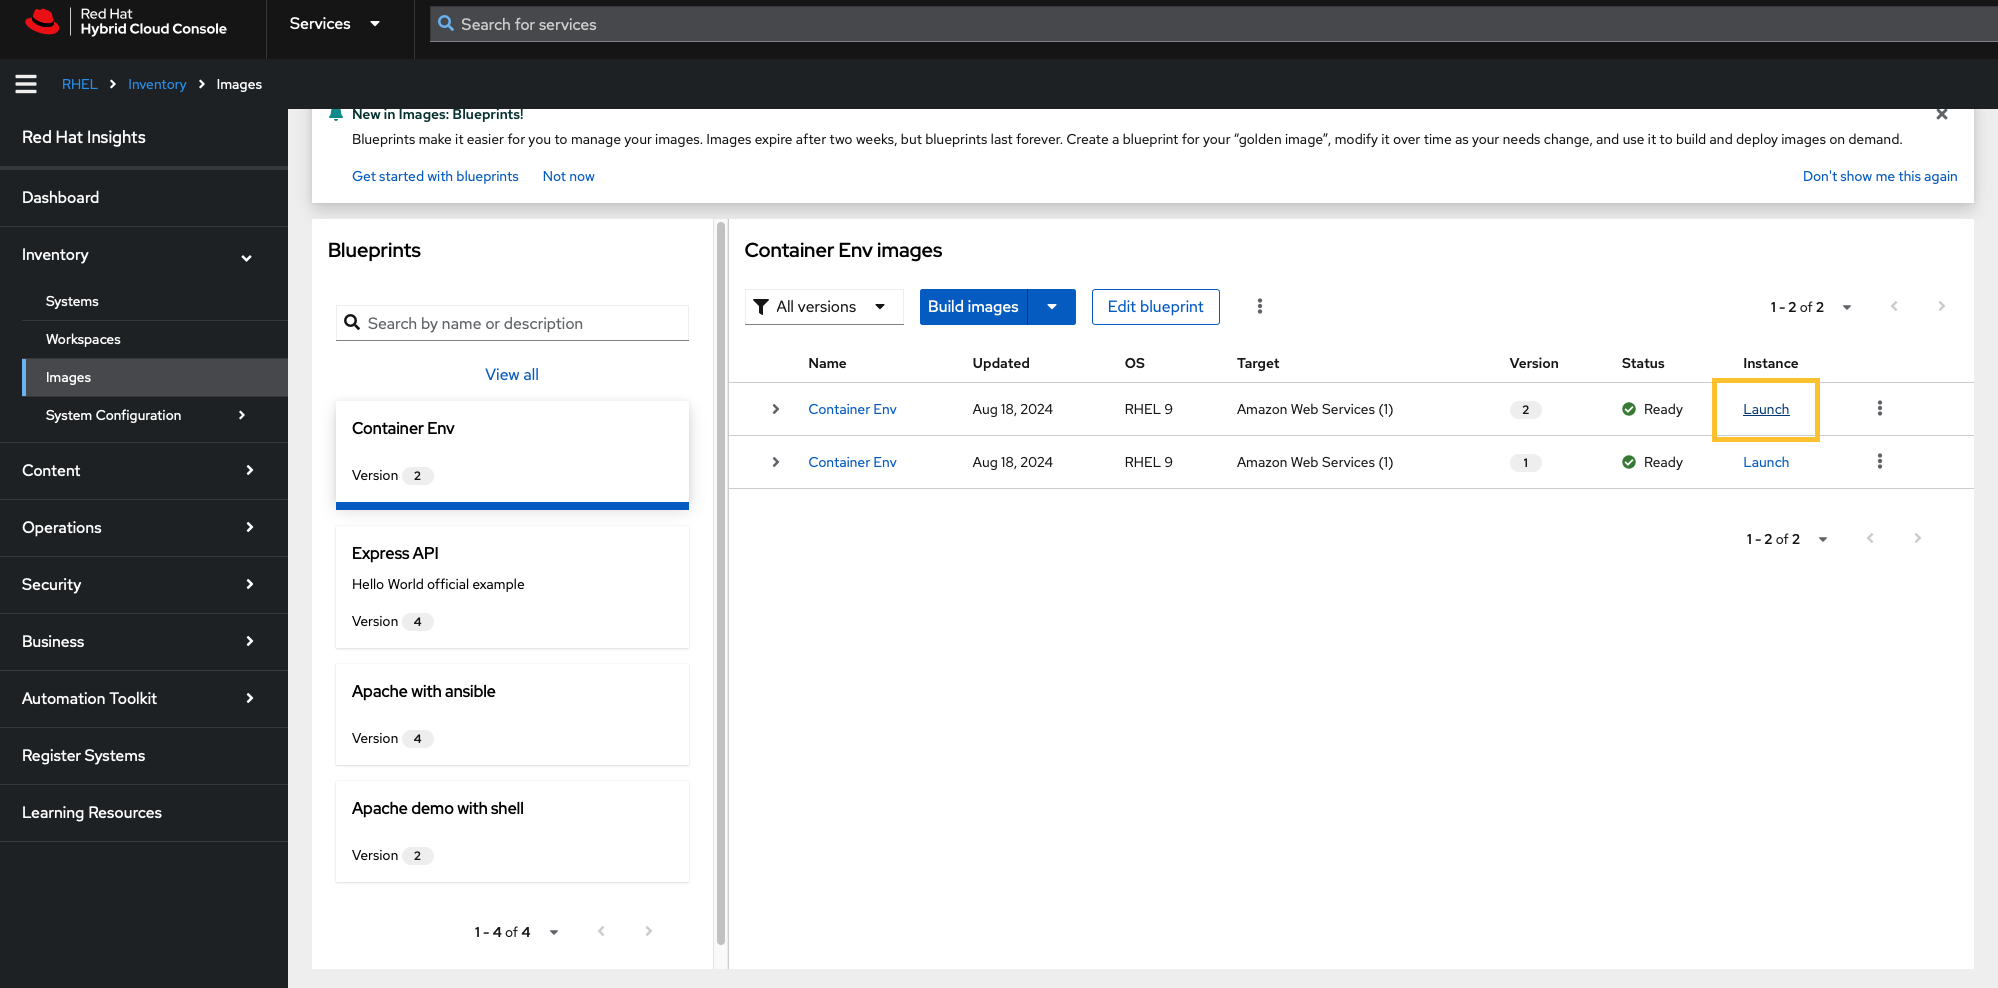
3. Deploying to the public cloud
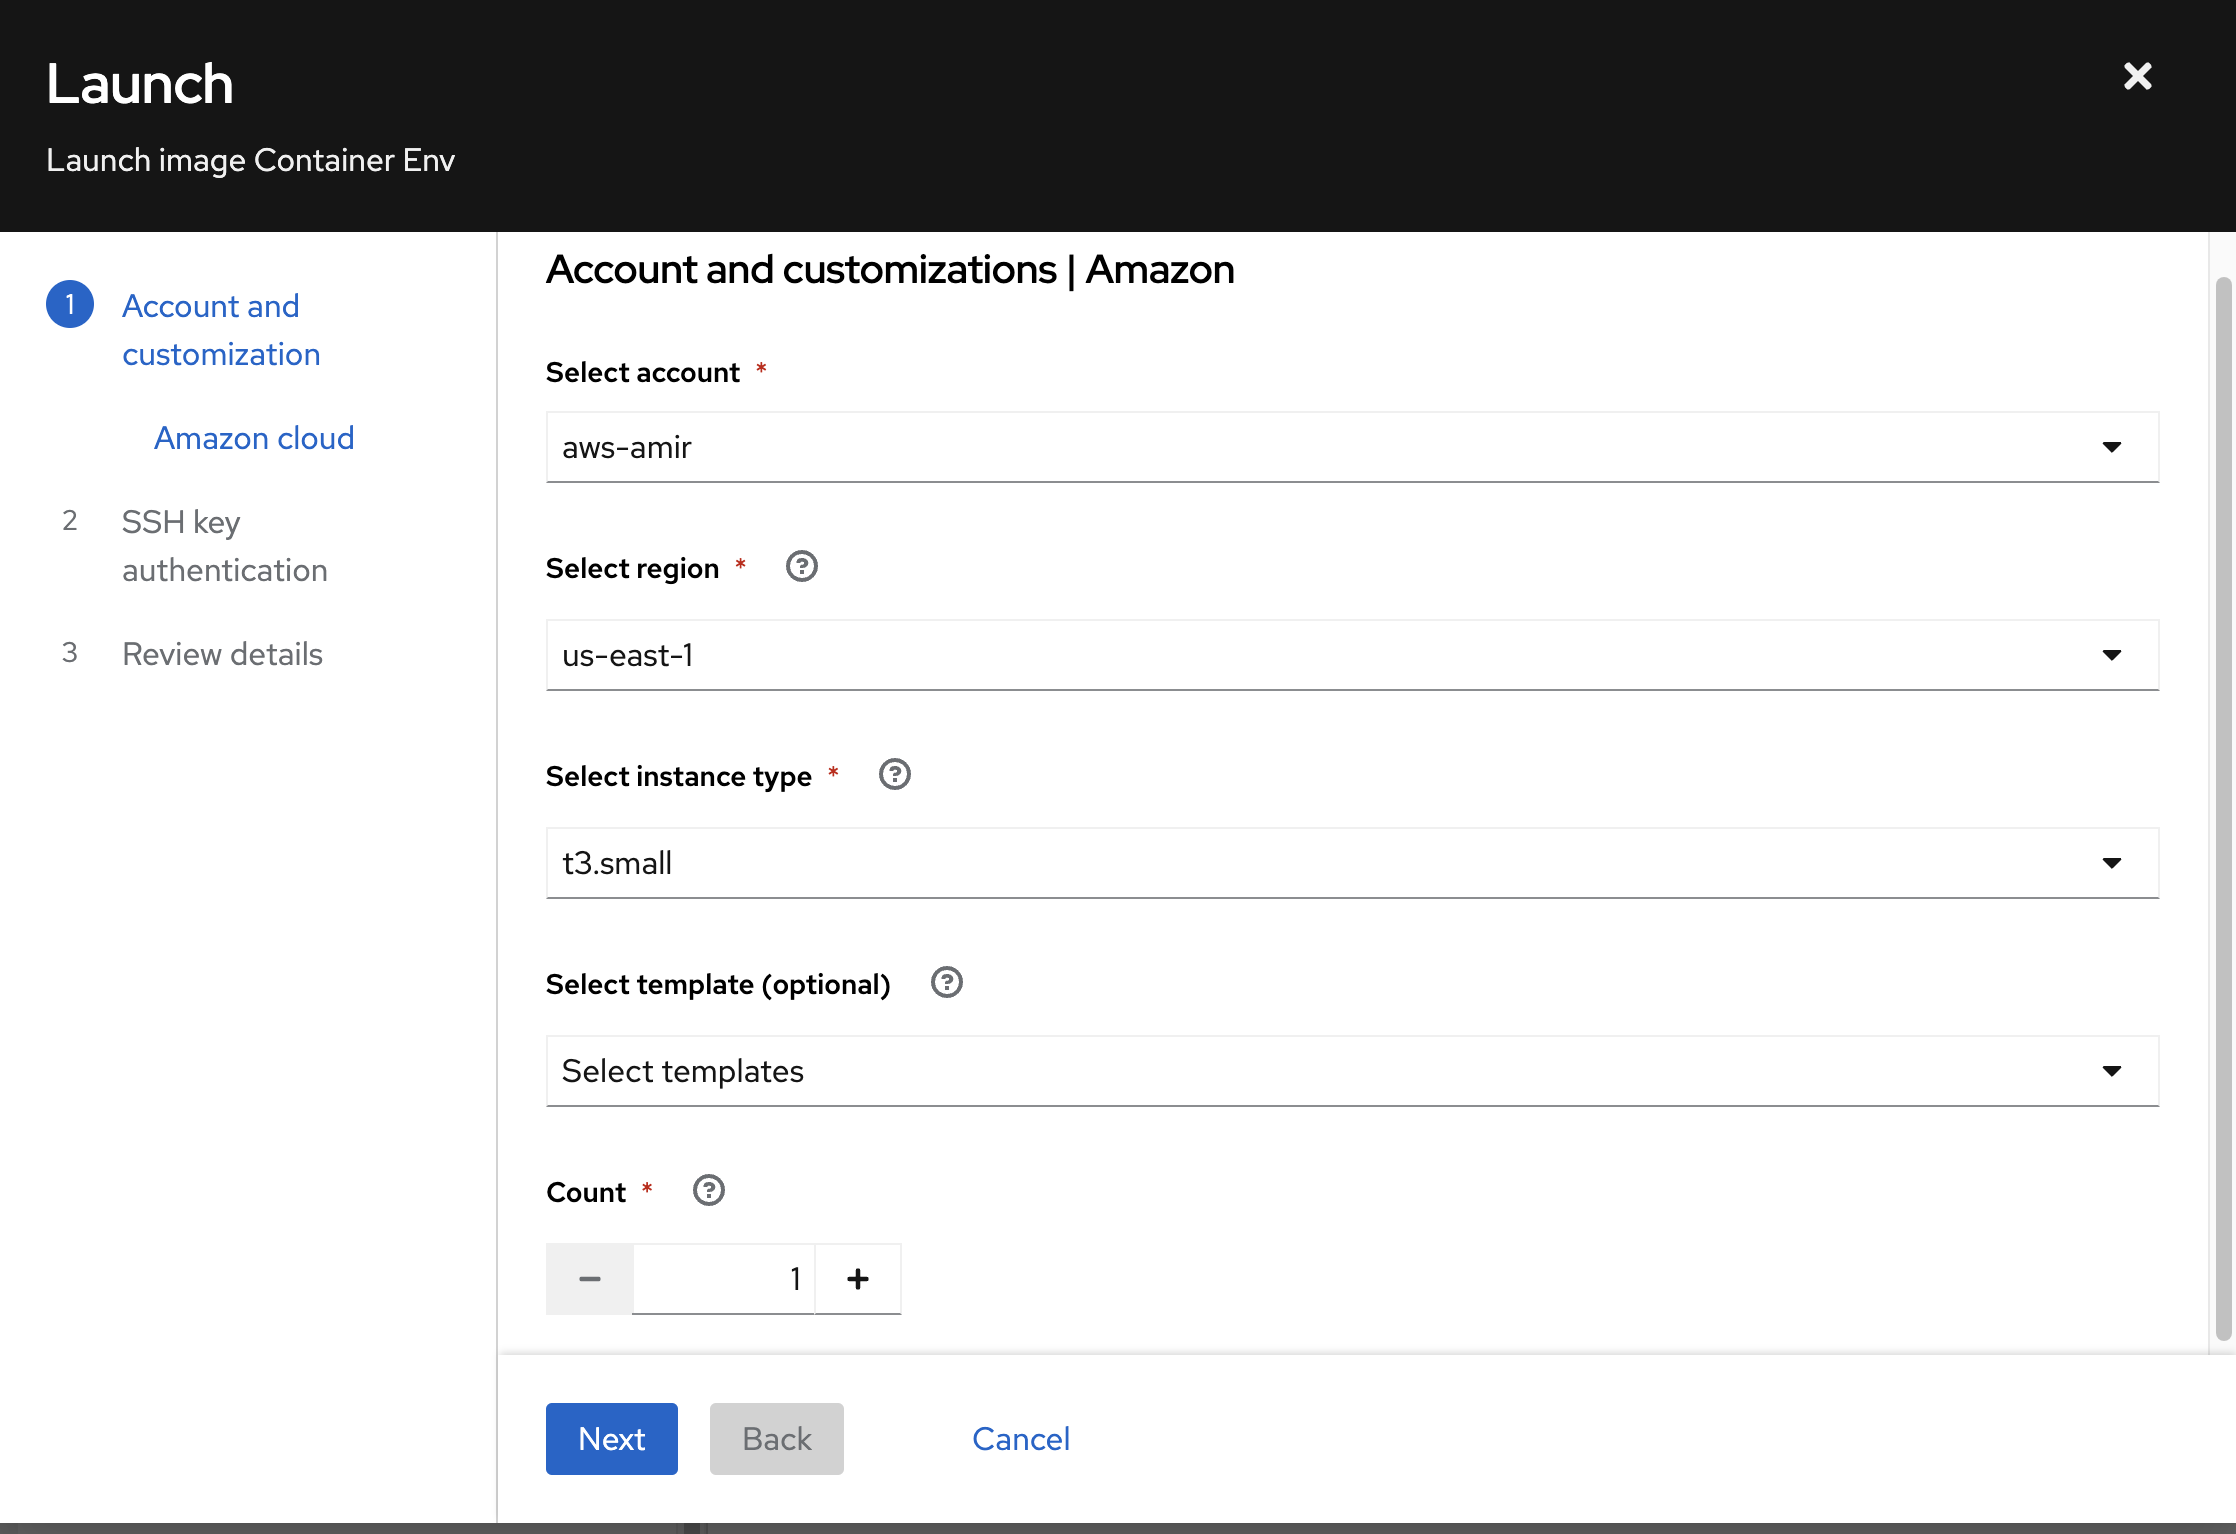
The build process takes a few minutes. Once the image has been built successfully, the Launch button appears—click it to open the launch wizard, just make sure that you configured the AWS integration source before. See Figure 3.
- Cloud provider configuration:
- Select your AWS integration.
- Select an instance type, you can filter by vCPUs, memory, and capacity, i.e., type
vcpus=2 and memory<2500and pick t3.small for this demo.
SSH key:
Keep in mind some cloud providers no longer support RSA SSH key types:
- You can create a new key by running
ssh-keygen -t ed25519on your terminal. - Upload your public SSH key file.
- Launch:
- Review and launch.
- This process might take a minute. Once the deployment is complete, you’ll be provided with instance details, including the SSH command for connecting to your server. See Figure 4.
4. Expose HTTP connection
To allow HTTP connections or any other inbound traffic, log in to your AWS console and add the desired rule in the created VM's associated VPC security group, it can be the default security group.
That’s it! Open your browser, enter the public IP or DNS of your instance, and your application should be up and running. See Figure 5.