Page
Build and run a bootable LAMP application disk image in Podman Desktop using image mode
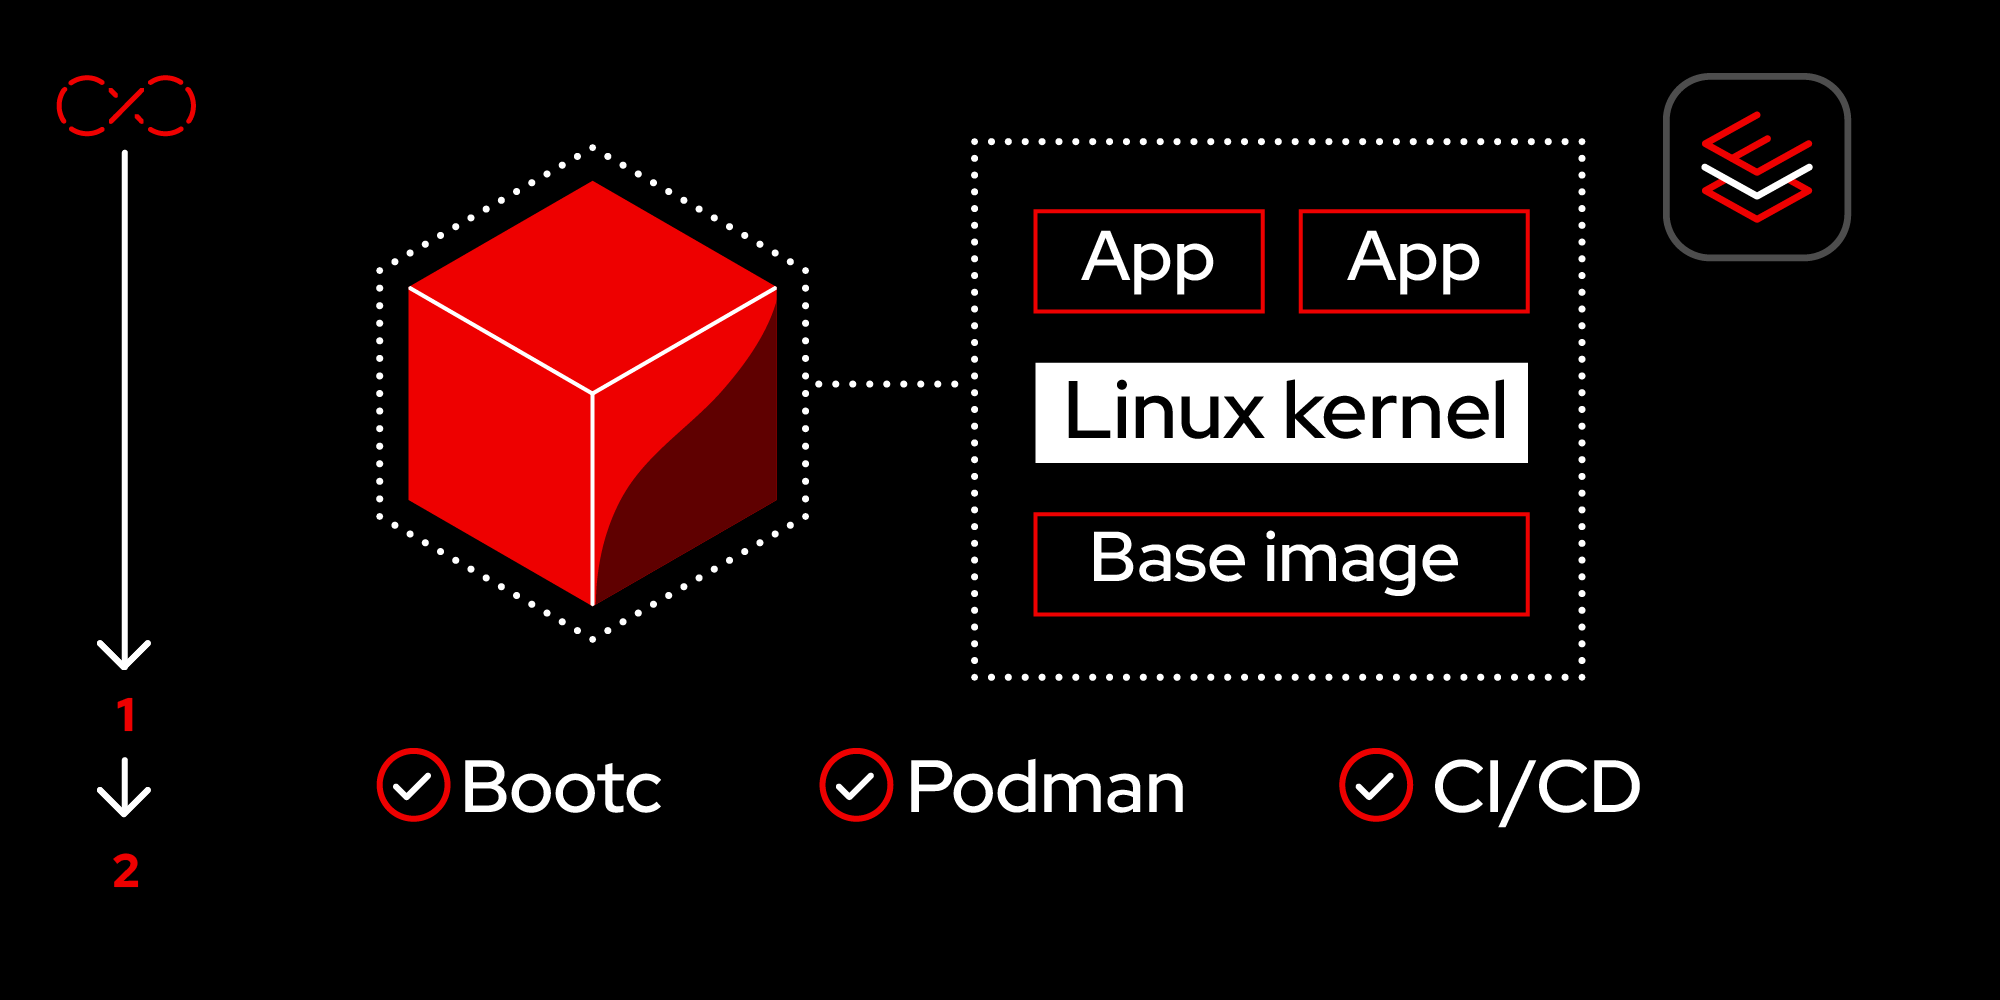
We’ve built our application, now we want to deploy it as a bootable RHEL image mode container. In this lesson, we’ll create a bootable version of our RHEL image mode-based LAMP application.
Prerequisites:
- A no-cost Red Hat Developer subscription.
- Register here if you do not already have a subscription.
- Podman Desktop.
- You can download Podman Desktop for Windows, MacOS, or Linux.
In this lesson, you will:
- Create a Containerfile to install the necessary components and configure a bootable container.
- Create your first disk image.
- Build an image from the Containerfile.
- Build a disk image.
- Set up a virtual machine (VM).
Create your container file to install the necessary components and configure a bootable container
In the last lesson, we created a development environment container with all the configuration files we need to do development and basic testing on our desktop. In this lesson, we’re going to create a bootable image that we can deploy as virtual or physical image on-premises or in our preferred cloud environment.
In this lesson, we are going to create a Containerfile to install the components and configure a bootable container.
Starting with the RHEL 10 bootable image, the sample container file performs the following steps:
- Installs the required RPM packages through DNF.
- Copies the files we’ve created into our container from our container directory (
lamp-dev/bootc). - Configures SELinux to allow Apache to communicate with MariaDB on the local host).
- Enables and starts our application services.
Since we’re now using a bootable image, we’ll have a full systemd environment, and we need a way to initialize our database automatically, plus we don’t want to leave passwords or user names around in our new image. This can remove our db-setup.sql script from the image before we publish it. Create the following file in our lamp-dev/bootc directory called mariadb-setup.service:
Description=MariaDB Initial Setup
After=mariadb.service
ConditionPathExists=/var/local/setup.sql

[Service]
Type=oneshot
# Make sure Mariadb is up an running before we load the database
ExecStartPre=/usr/bin/mysqladmin ping -u root --wait=30

# Load the database contents from the setup script
ExecStart=/usr/bin/mysql -u root --batch -e "source /var/local/setup.sql"

# Clean up the setup content
ExecStartPost=/bin/rm /var/local/setup.sql

[Install]
WantedBy=multi-user.target
Build your image
As our next step, we need to specify how to build our image for production use. Since image mode uses a bootable container methodology, our customization is done in a containerfile. Using the text editor of our choice, create this file and save it locally as Containerfile in the lamp-dev/bootc directory.
Later, you will upload this file to Podman Desktop and use it to package our bootable image mode RHEL-based application.
# Start from the RHEL 10 bootable base image
FROM registry.redhat.io/rhel10/rhel-bootc

LABEL maintainer="Your Name <youremail@example.com>" \
      description="Bootable LAMP server on RHEL 10."

# --- 1. Install System Dependencies ---
RUN dnf install -y \
        httpd \
        mariadb-server \
        php \
        php-mysqlnd \
        selinux-policy-devel \
        firewalld \
    && dnf clean all

# --- 2. Copy Application and Configuration Files ---
# This line copies your tested app code into the image
COPY app/index.php /var/www/html/index.php

# Copy the Apache, MariaDB, and systemd configurations
COPY app/myapp.conf /etc/httpd/conf.d/myapp.conf
COPY app/db-setup.sql /var/local/setup.sql
COPY app/mariadb-setup.service /etc/systemd/system/
# Copy the Apache, MariaDB, and systemd configurations
COPY app/myapp.conf /etc/httpd/conf.d/myapp.conf
COPY app/db-setup.sql /var/local/setup.sql
COPY app/mariadb-setup.service /etc/systemd/system/

# --- 3. Set Permissions and Ownership ---
RUN chown -R apache:apache /var/www/html && \
    chmod 644 /var/local/setup.sql && \
    chmod 644 /etc/systemd/system/mariadb-setup.service

# --- 4. Configure SELinux ---
RUN setsebool -P httpd_can_network_connect_db 1

# --- 5. Configure System Services ---
RUN systemctl enable httpd.service mariadb.service mariadb-setup.service firewalld.service

# --- 6. Configure Firewall ---
RUN firewall-offline-cmd --add-service=http
Create your first disk image
In Lesson 1, we installed the Red Hat Extension Pack, which includes the bootable containers extension used for image mode deployments. To pull your first bootable container, follow these steps:
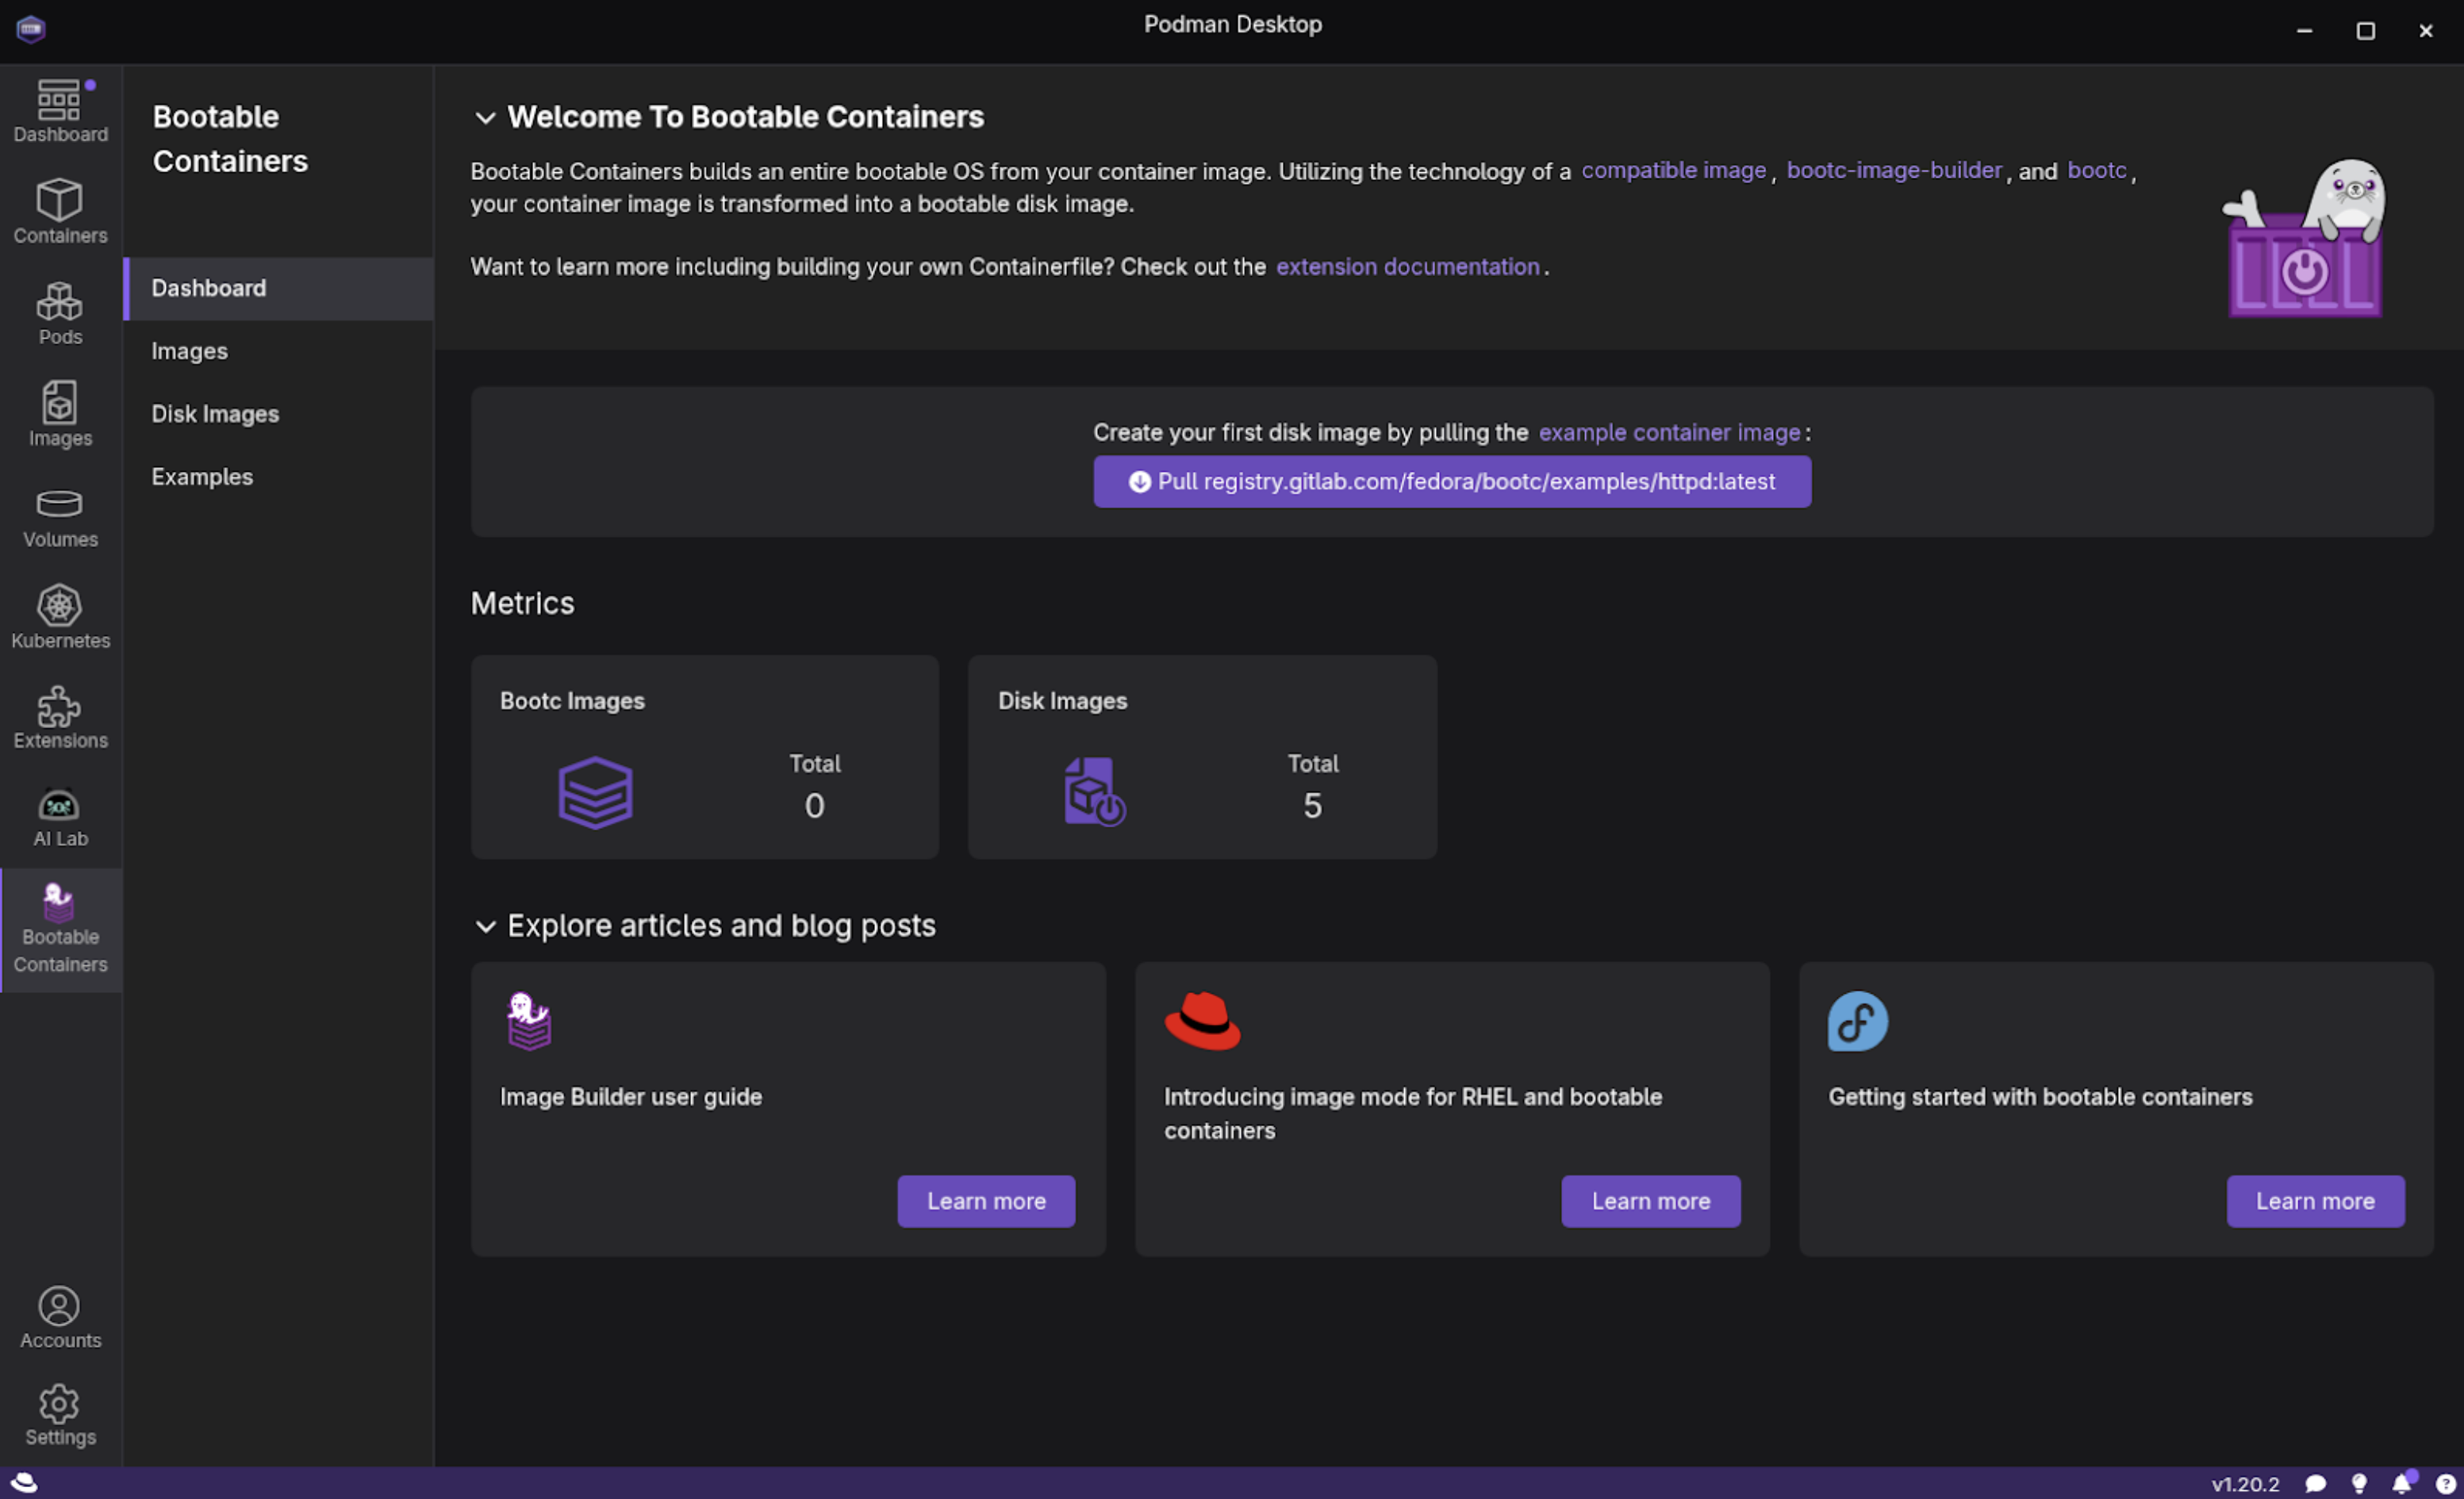
In Podman Desktop, select Bootable Containers from the side menu bar to access the Dashboard section (Figure 1).
Figure 1: The Welcome to Bootable Containers dashboard screen. - Within the Bootable Containers section, select Images from the left navigation.
- On the Images screen, select the option to pull the example container image from registry.gitlab.com (Figure 2).
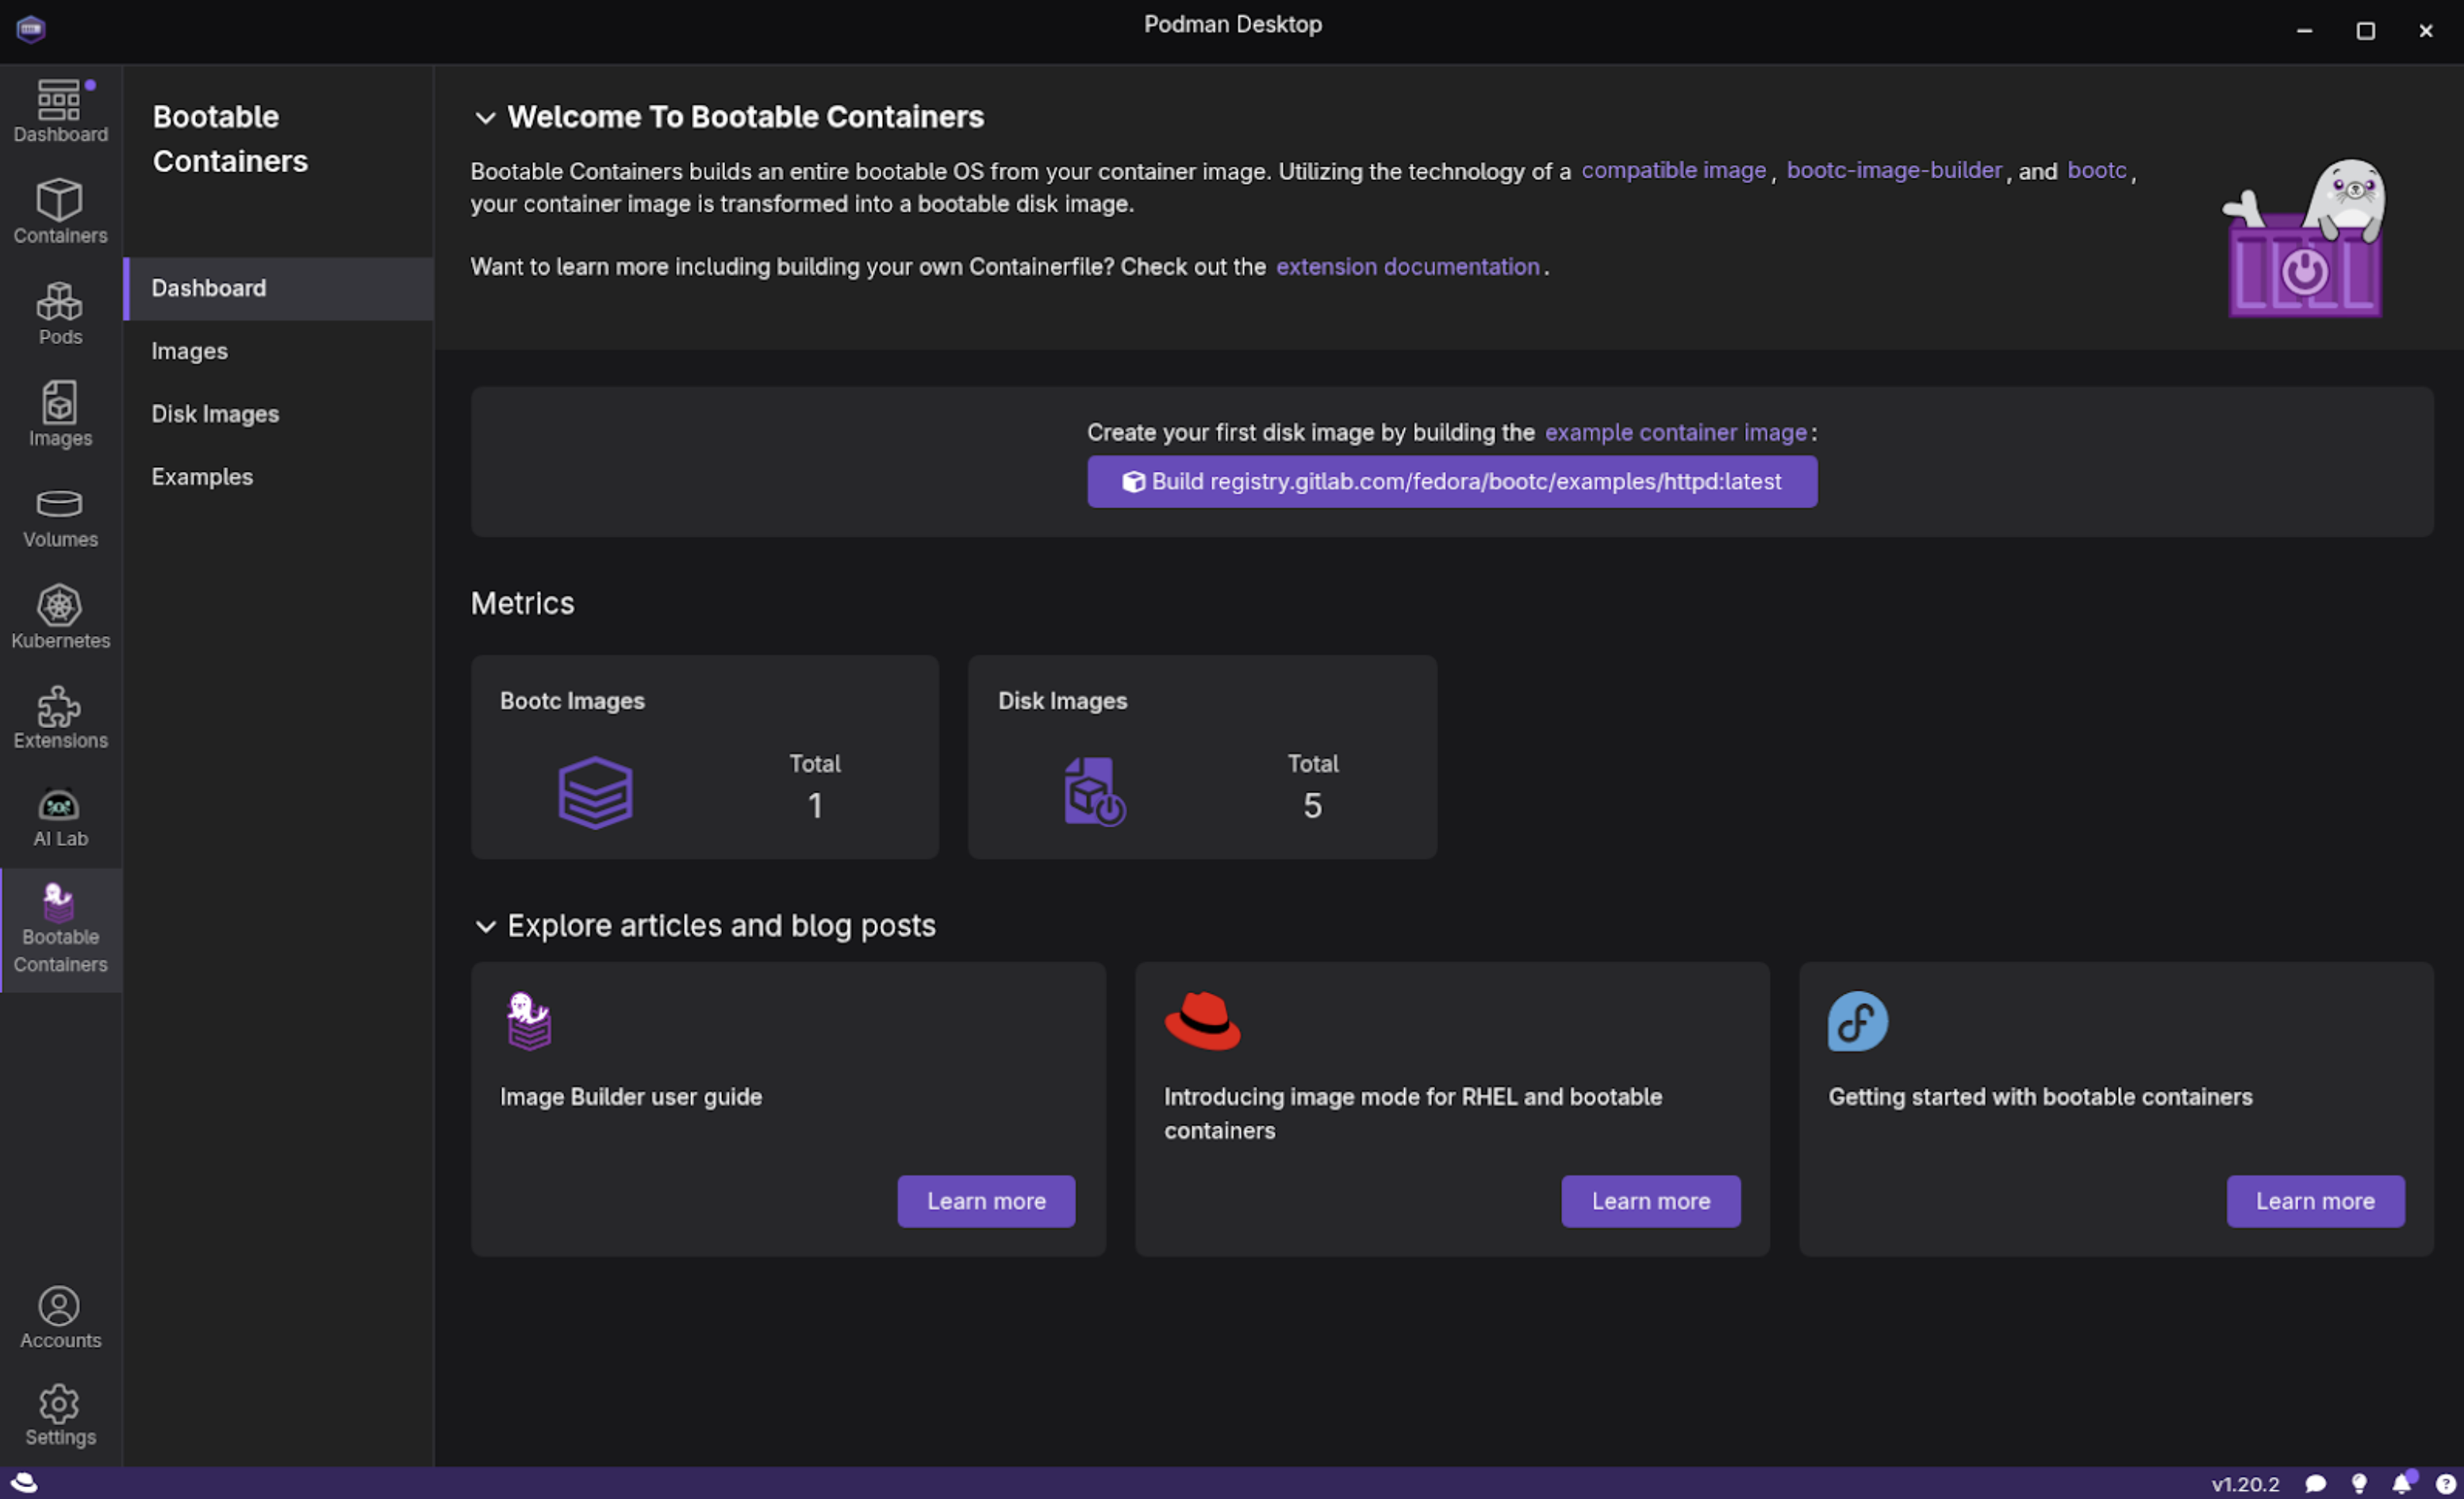
When you complete this, you will see the example image listed.
Note
The file size of the image is over 700MB (compressed) and may take a while to download.
Build an image from the Containerfile
Next, let’s use the Containerfile we created to build an image:
- Open Podman Desktop on your local machine and go to the Images section in the left navigation.
- Select Build to open the Build image from the Containerfile screen.
- Provide the following:
- Containerfile path:
your_home_directory/lamp-dev/bootc/Containerfile - Build directory path:
your_home_directory/lamp-dev/bootc - Image name:
lamp-dev-bootc-image Platform hardware spec: I chose the Intel and AMD x86_64 image option for my desktop environment (Figure 3).
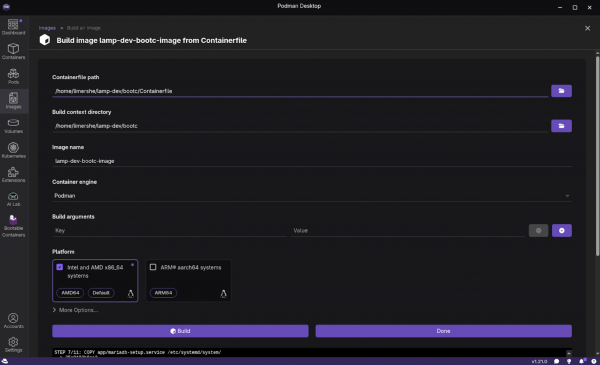
Figure 3: The Build image from Containerfile screen in Podman Desktop.
- Containerfile path:
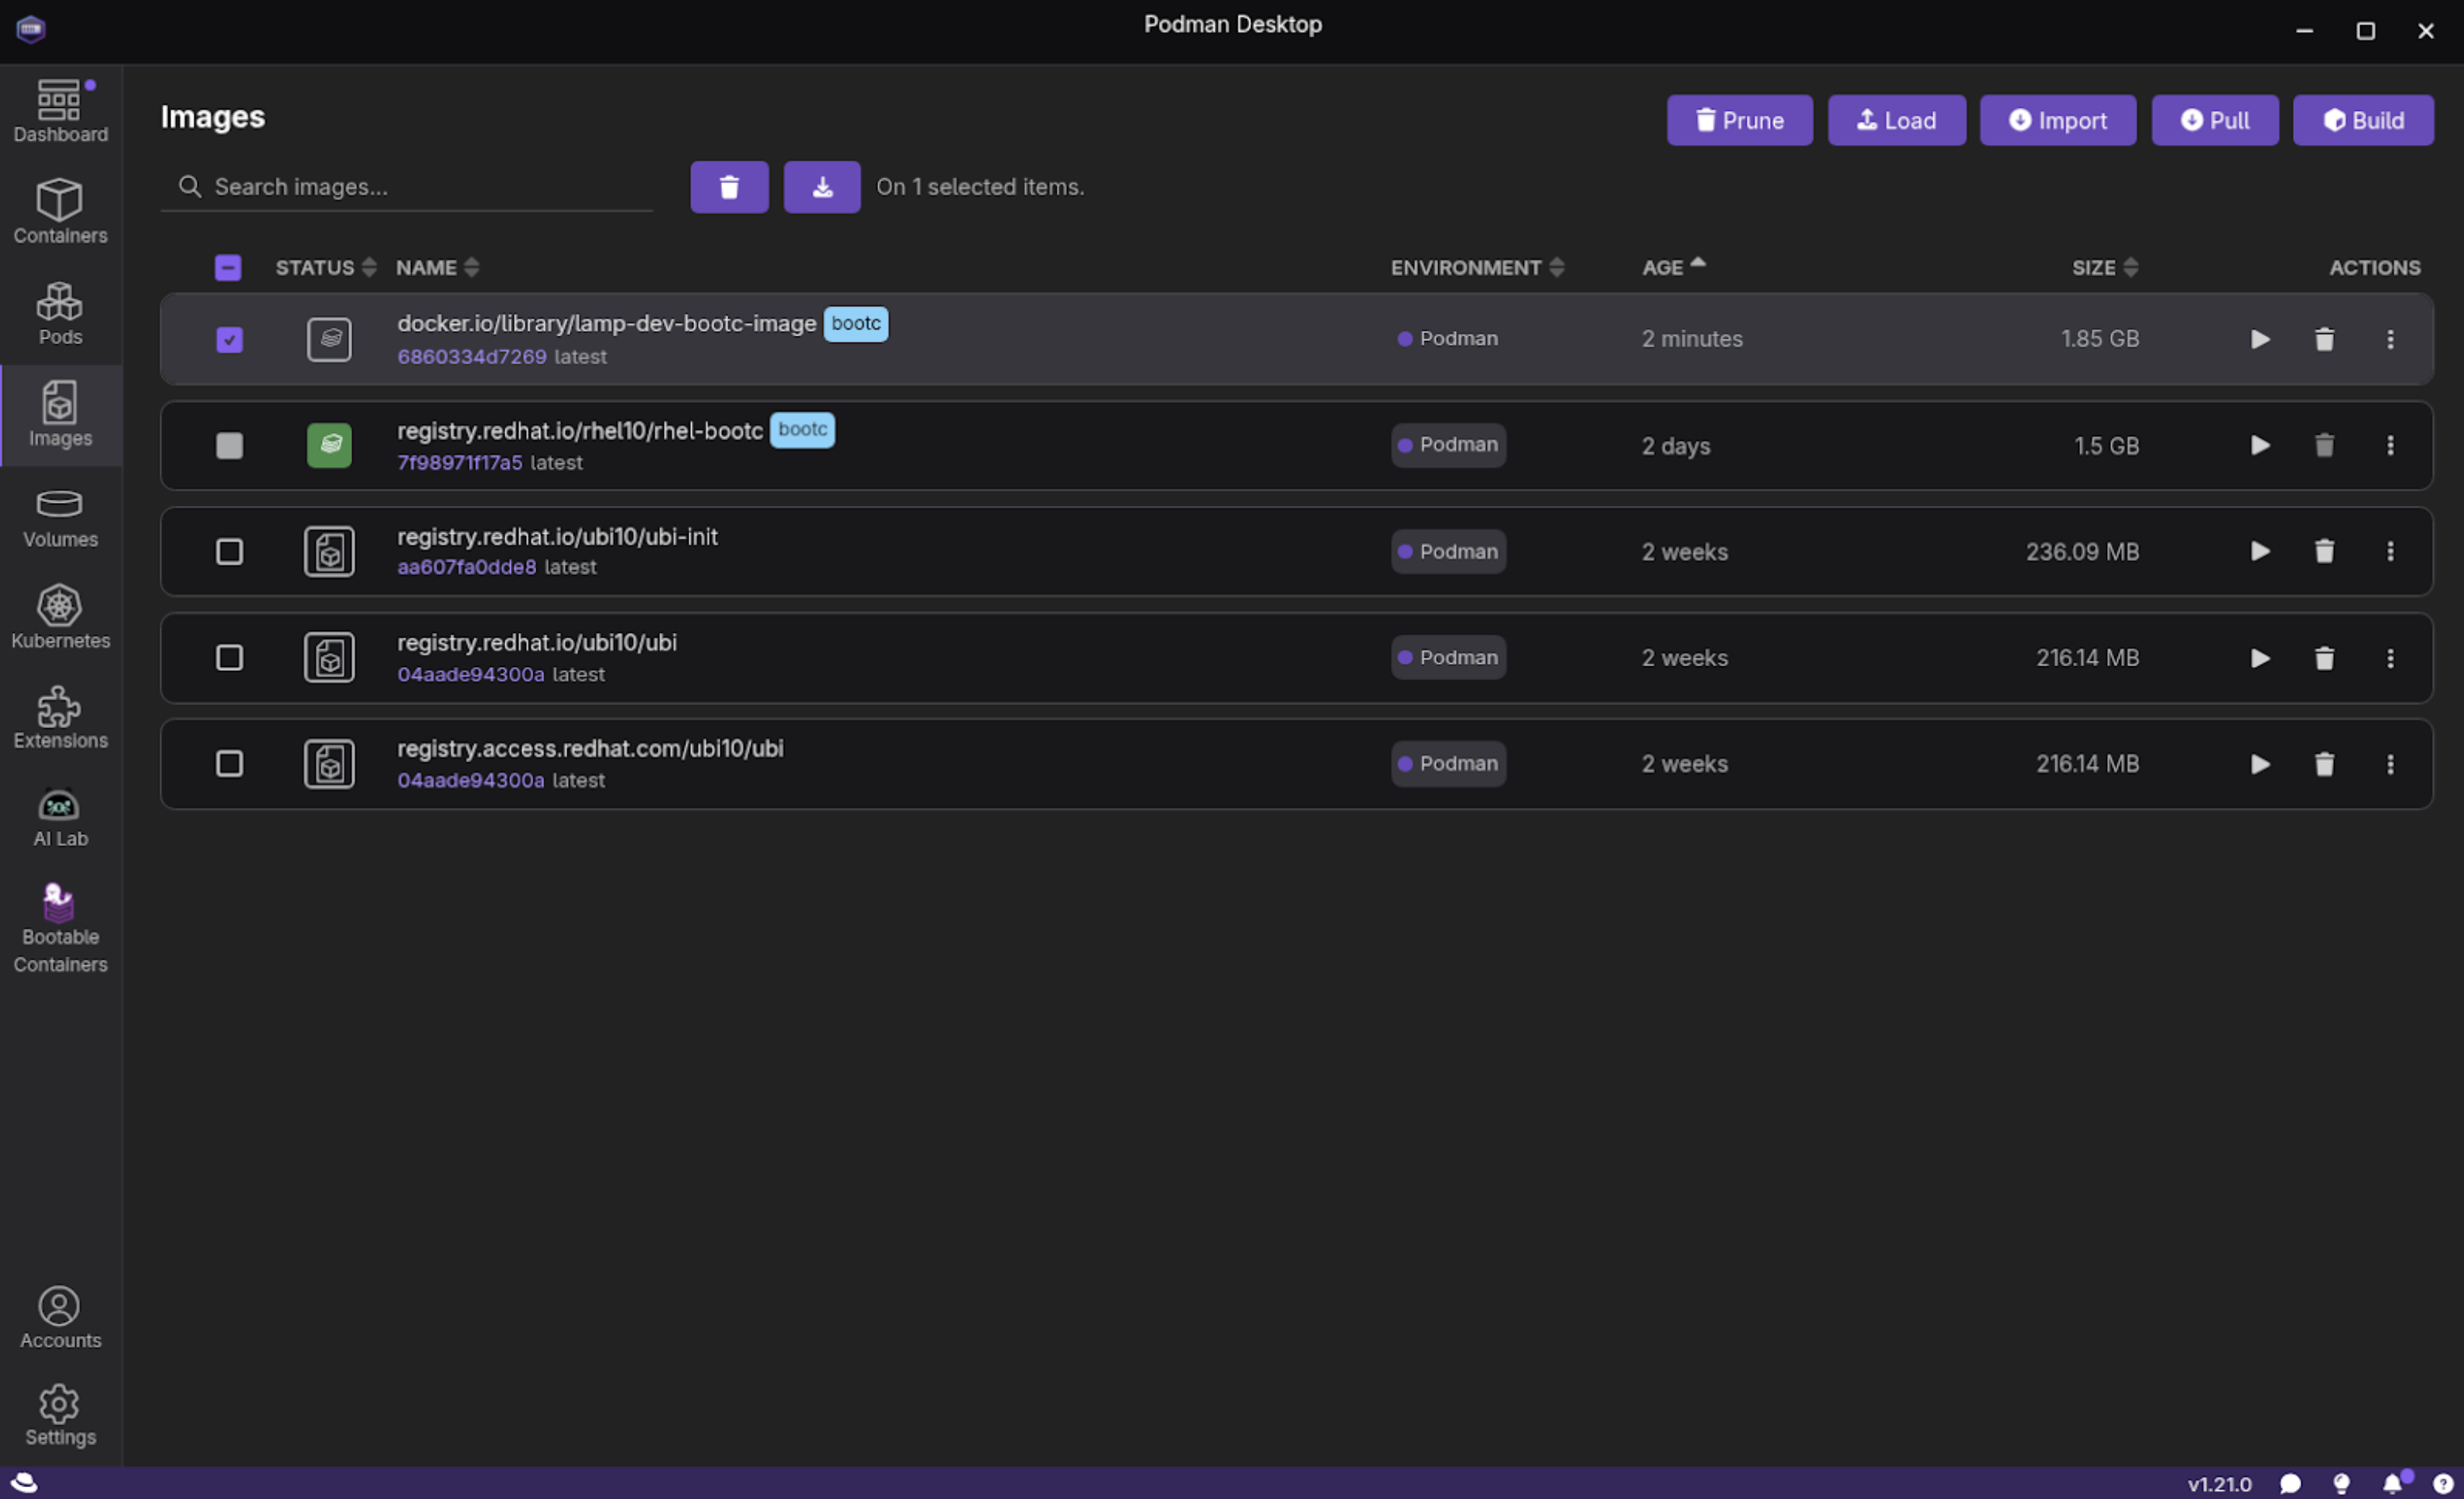
Select Build once you have all of the information entered. Observe if any issues or warnings are displayed while building the image. Once you’ve successfully created the image (Figure 4), it will be listed on the Images dashboard (Figure 5).

Figure 4: Successful Containerfile build output in Podman Desktop. 
Figure 5: The container images listing screen with a new entry for the example image.


At this point, our image can run like any other container with Podman. This can be highly beneficial for basic testing and iterating on your application. In the next step, you will install, or write, your container image as a disk image and run it as a Linux system.
Build a disk image
While a traditional application container image is like a self-contained software package that you install onto an existing OS, image mode uses bootc to deliver a complete, bootable OS installation disk, but managed and versioned like a container image. The magic of bootc is that it can install the contents of the container image to disk or file system and provide any format you need to run on virtually any platform. Podman Desktop makes this process simple, and you can target a wide variety of platforms and image types.
To build an image in Podman Desktop:
- Open Podman Desktop on your local machine and go to the Images section from the left navigation. If you just completed the prior steps, you will already be on this screen.
Select the option to Build Disk Image from the ACTIONS kebab (Figure 6).
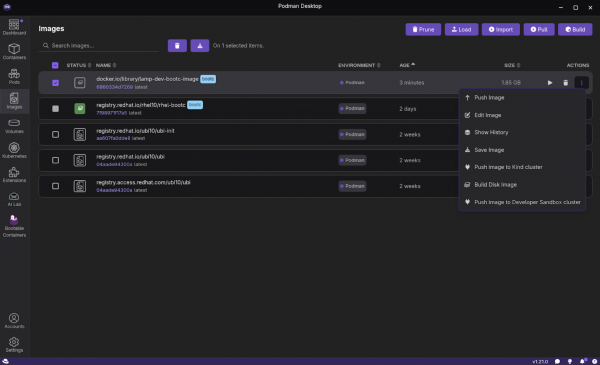
Figure 6: The Podman Desktop container images screen with the expanded menu under the actions kebab. - Select Build on the Disk Images screen.
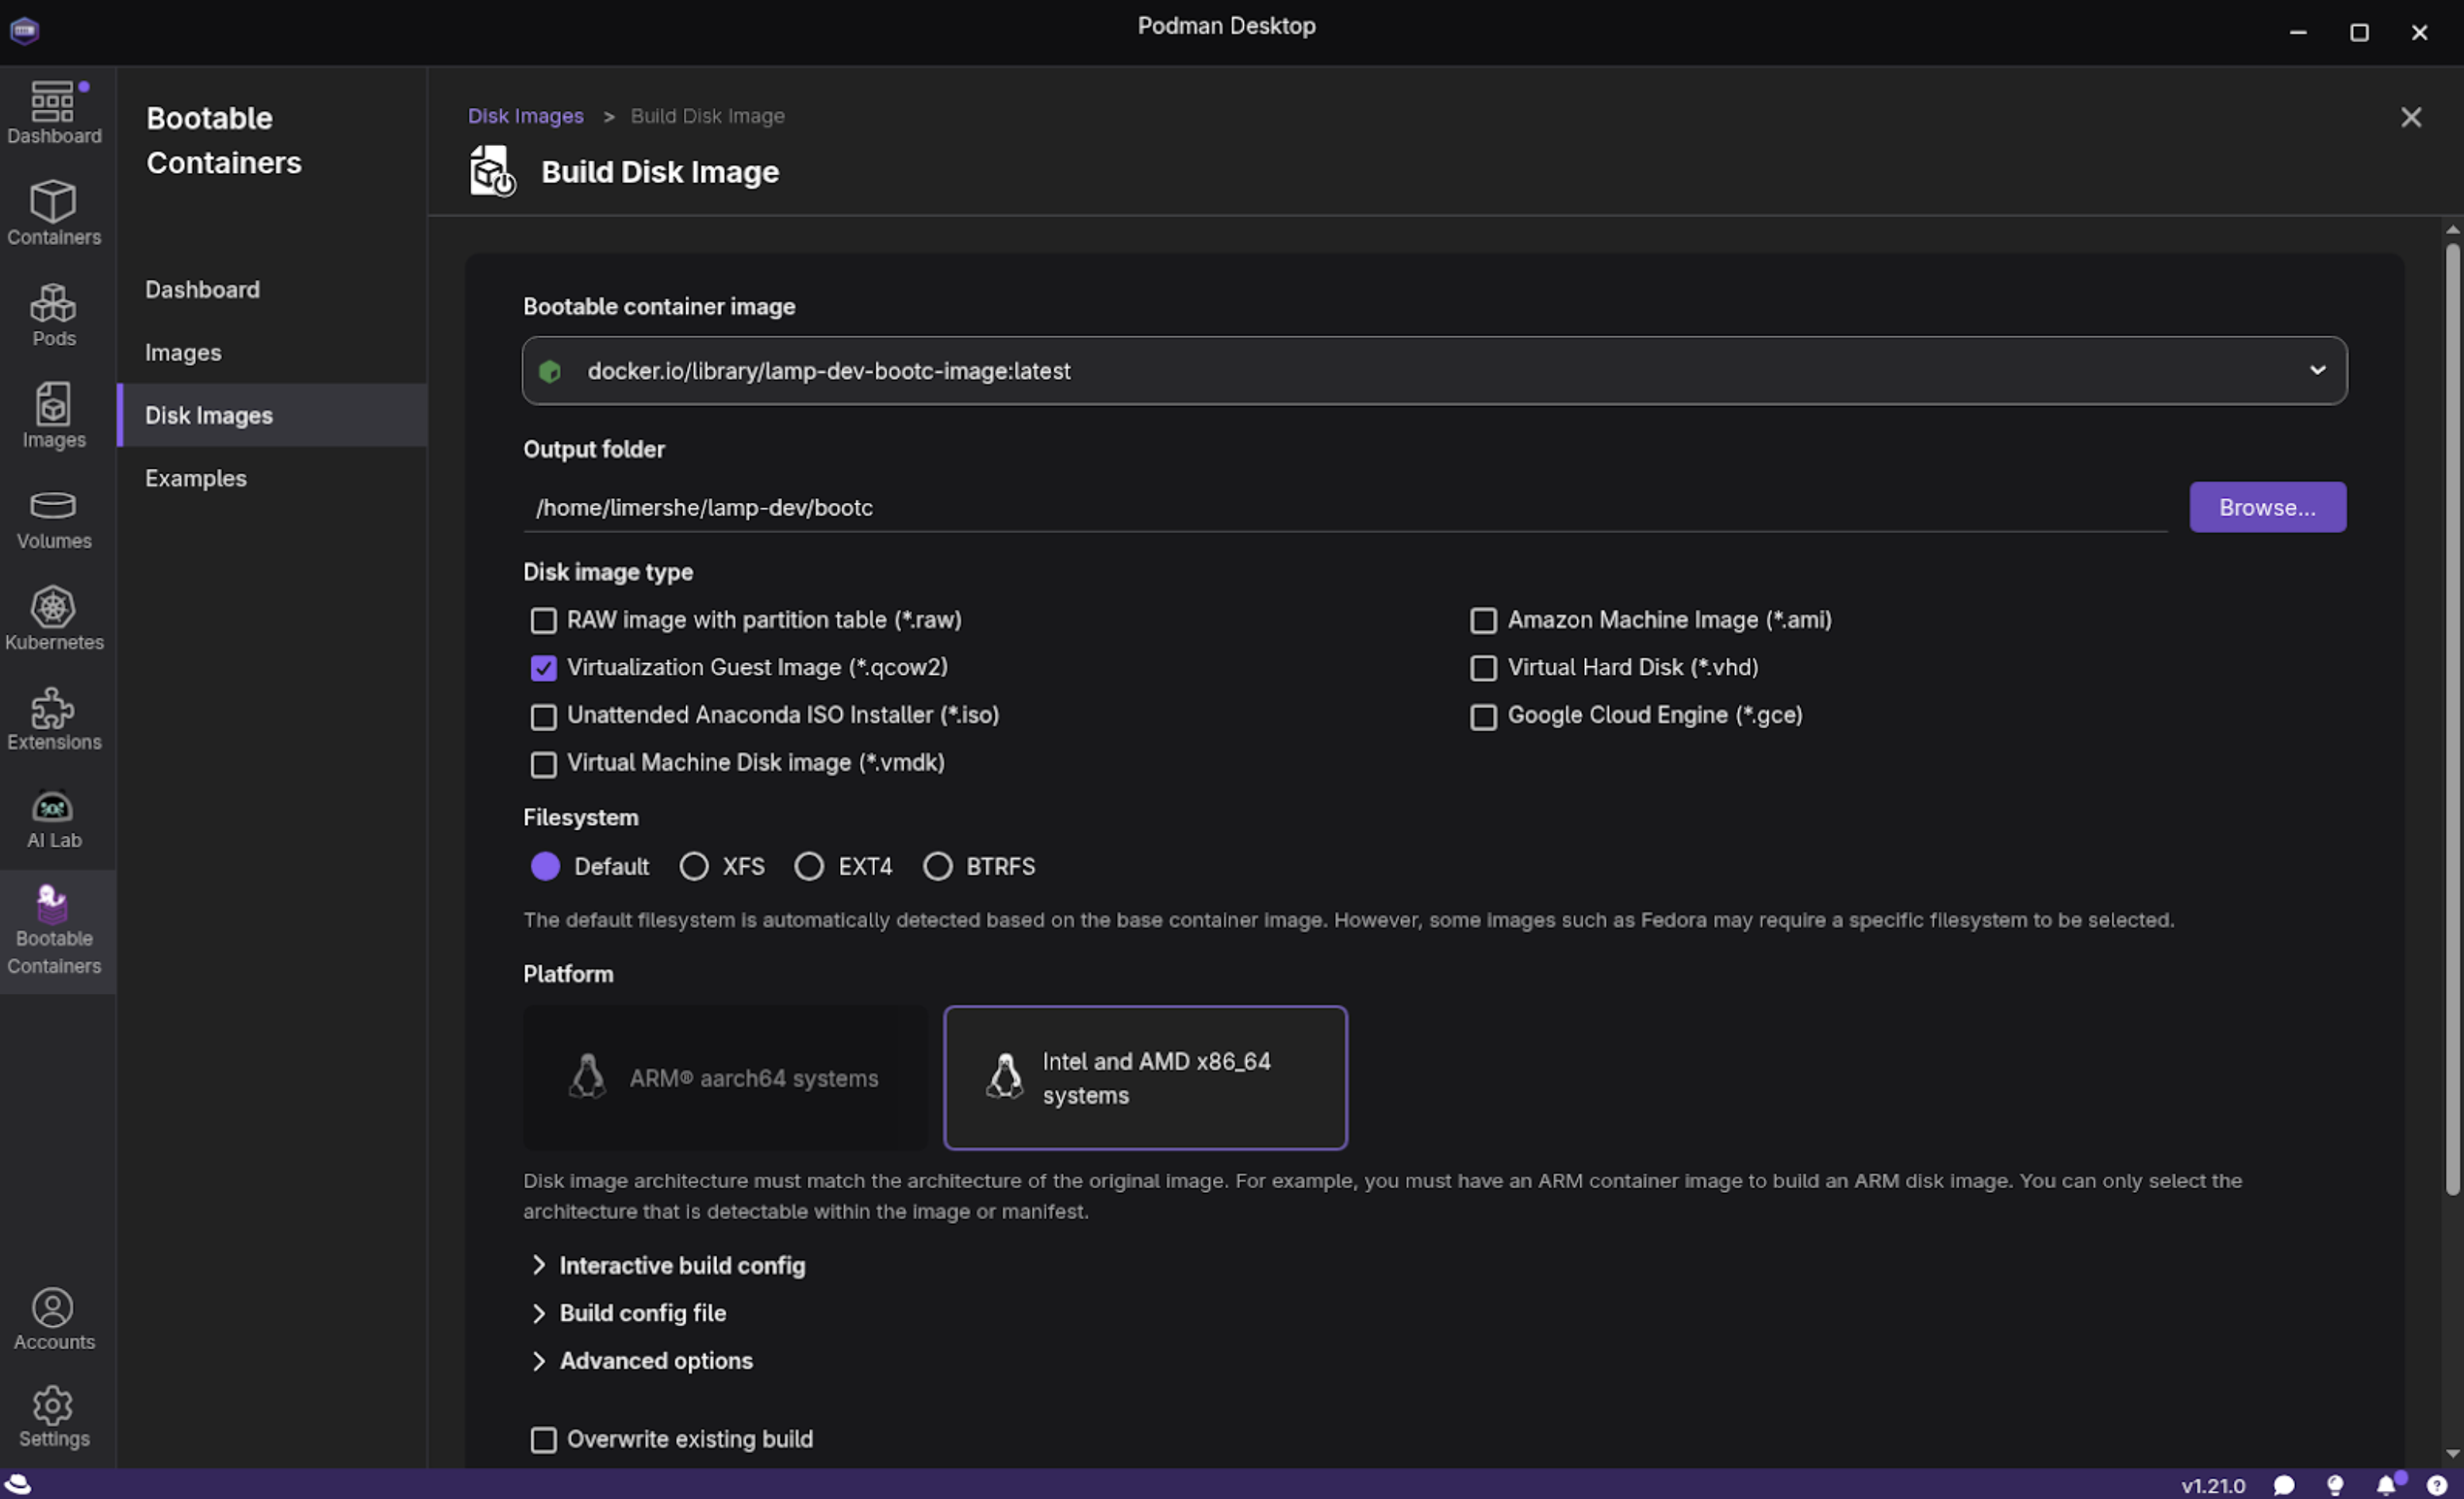
Provide the configuration details. For this lesson, we chose Virtualization Guest Image (qcow2) as the image type and a default filesystem (Figure 7).

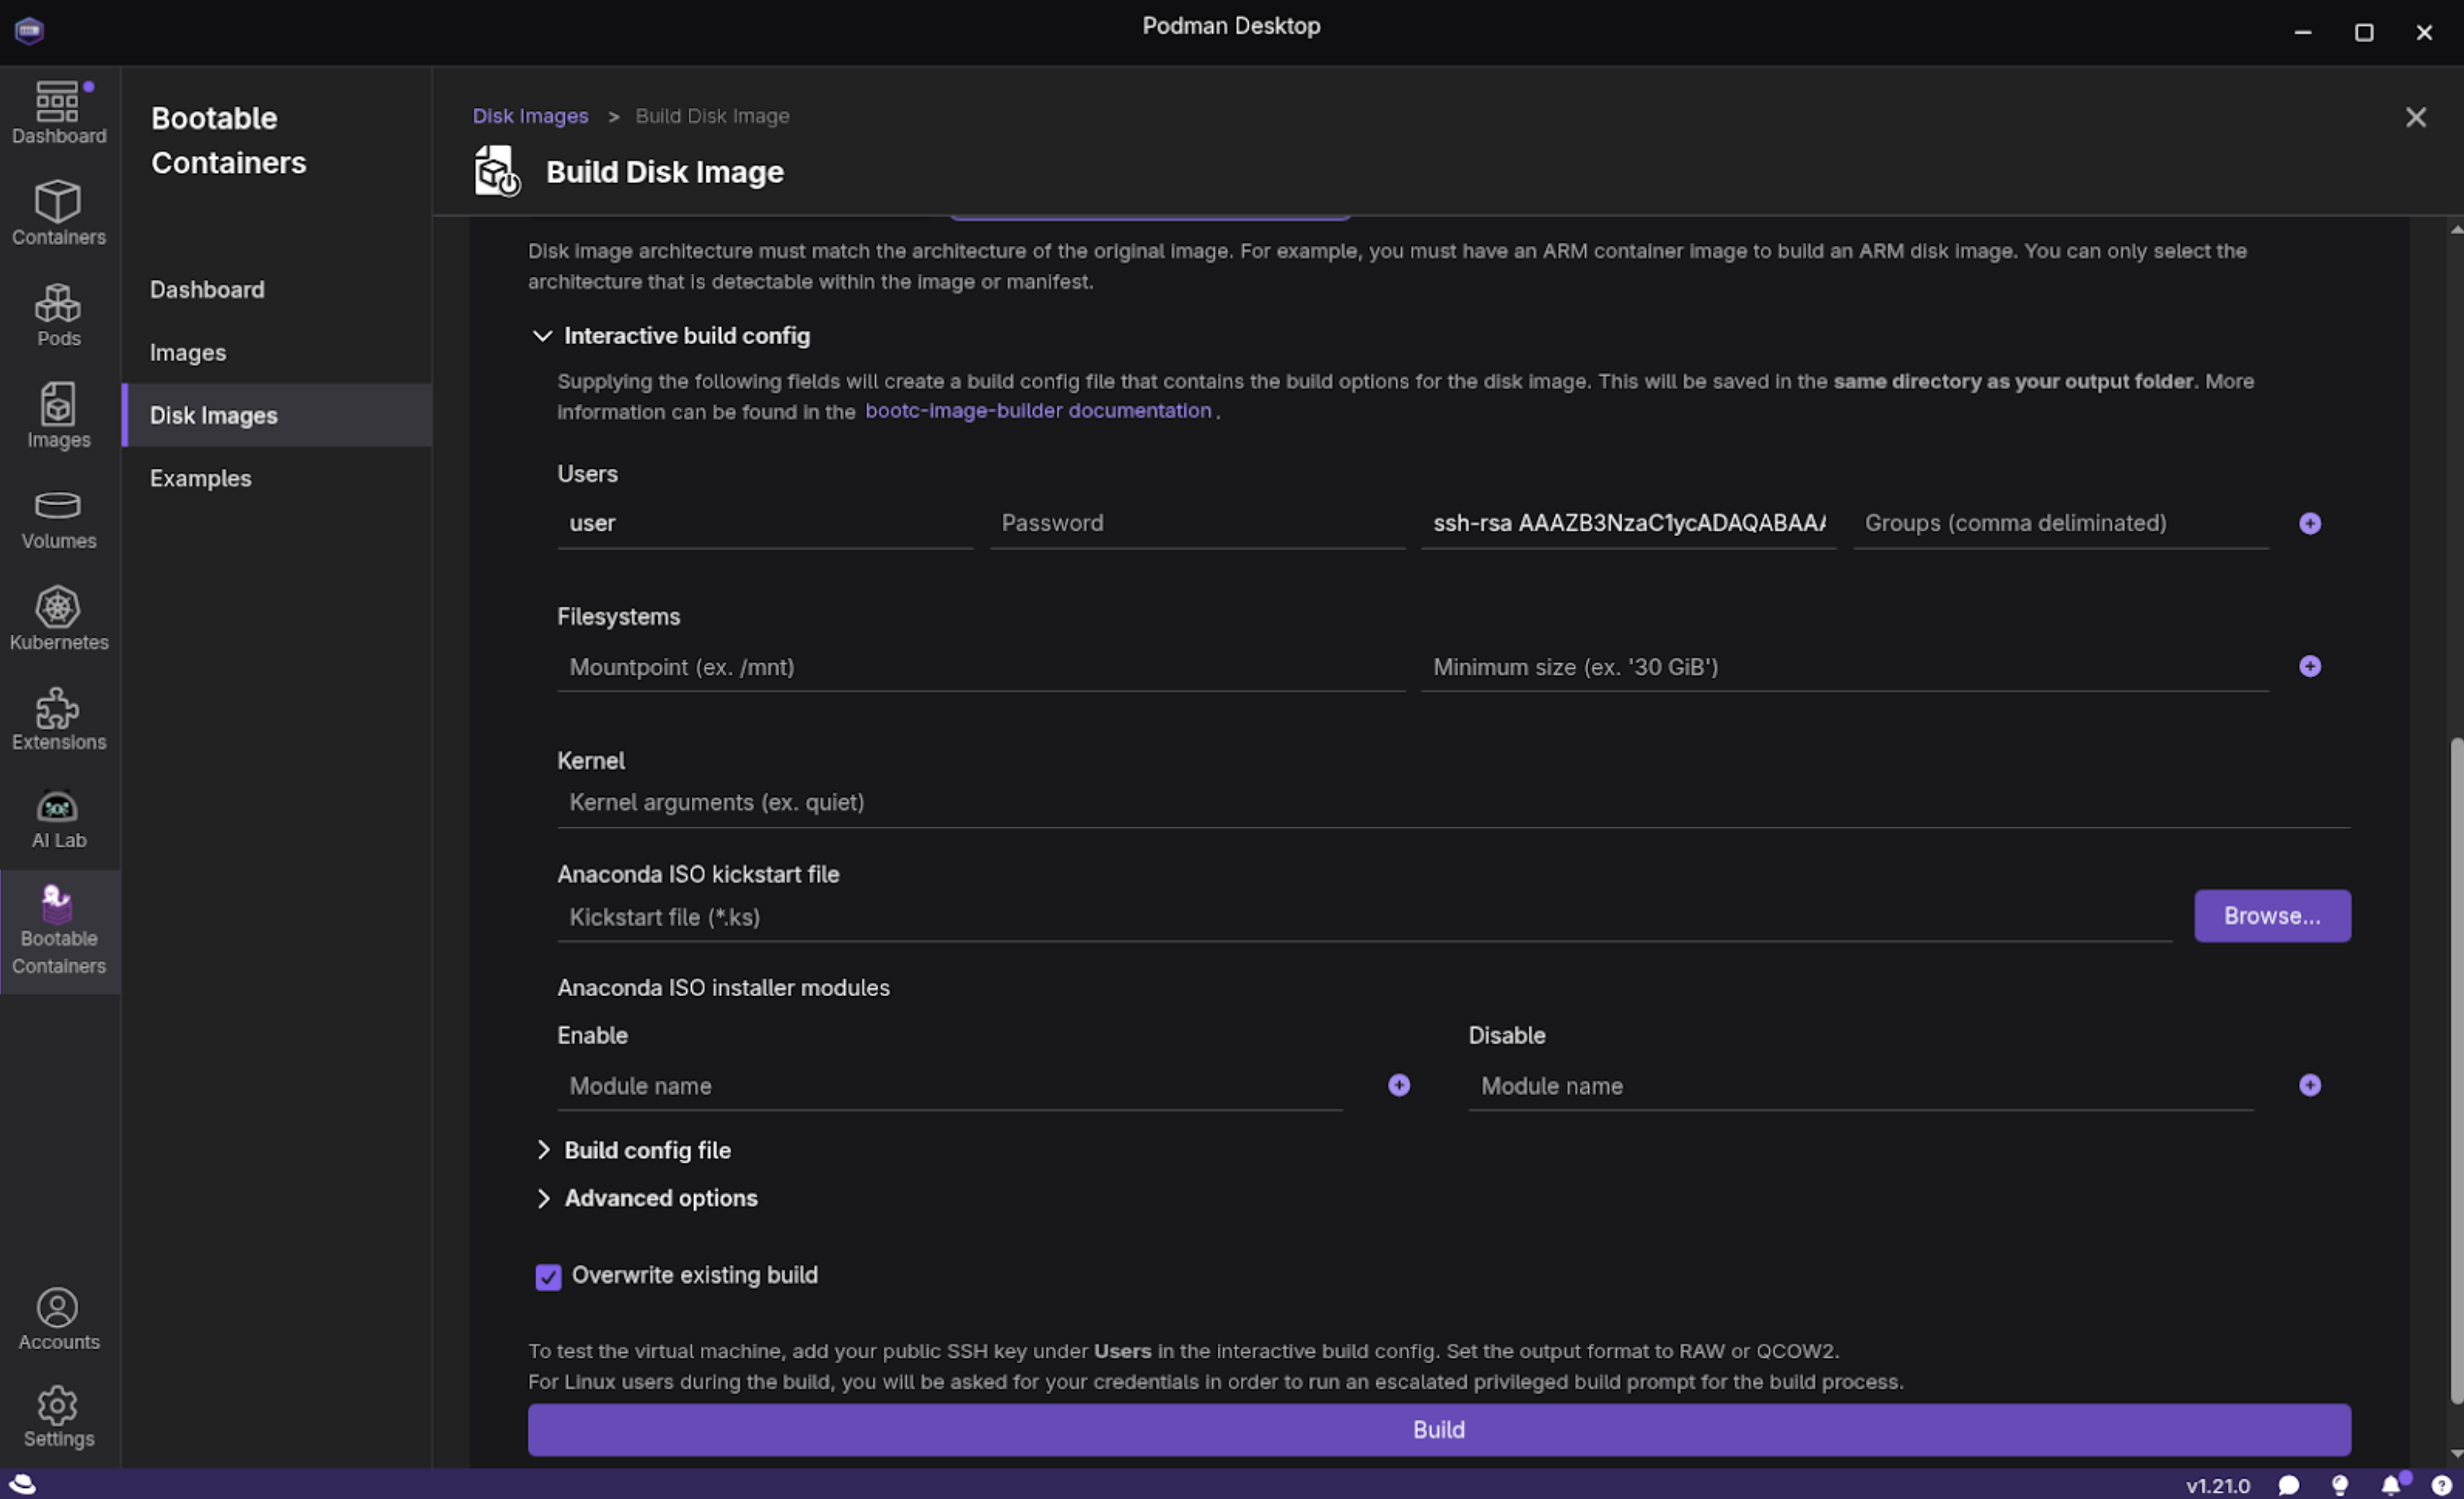
Figure 7: The Build Disk Image configuration. Expand the Interactive build config section towards the bottom of the screen. This is where you will enter your SSH credentials you will need for the next section (Figure 8). We specify a Username, an SSH public key, and add the user to the group wheel, so they have access to root for troubleshooting and debugging.

Figure 8: The expanded interactive build config section for building a disk image in Podman Desktop. - Select Build.
- Depending on which desktop environment you are using (Linux, Mac, or Windows), you may be prompted to provide your user password to proceed with building the image.
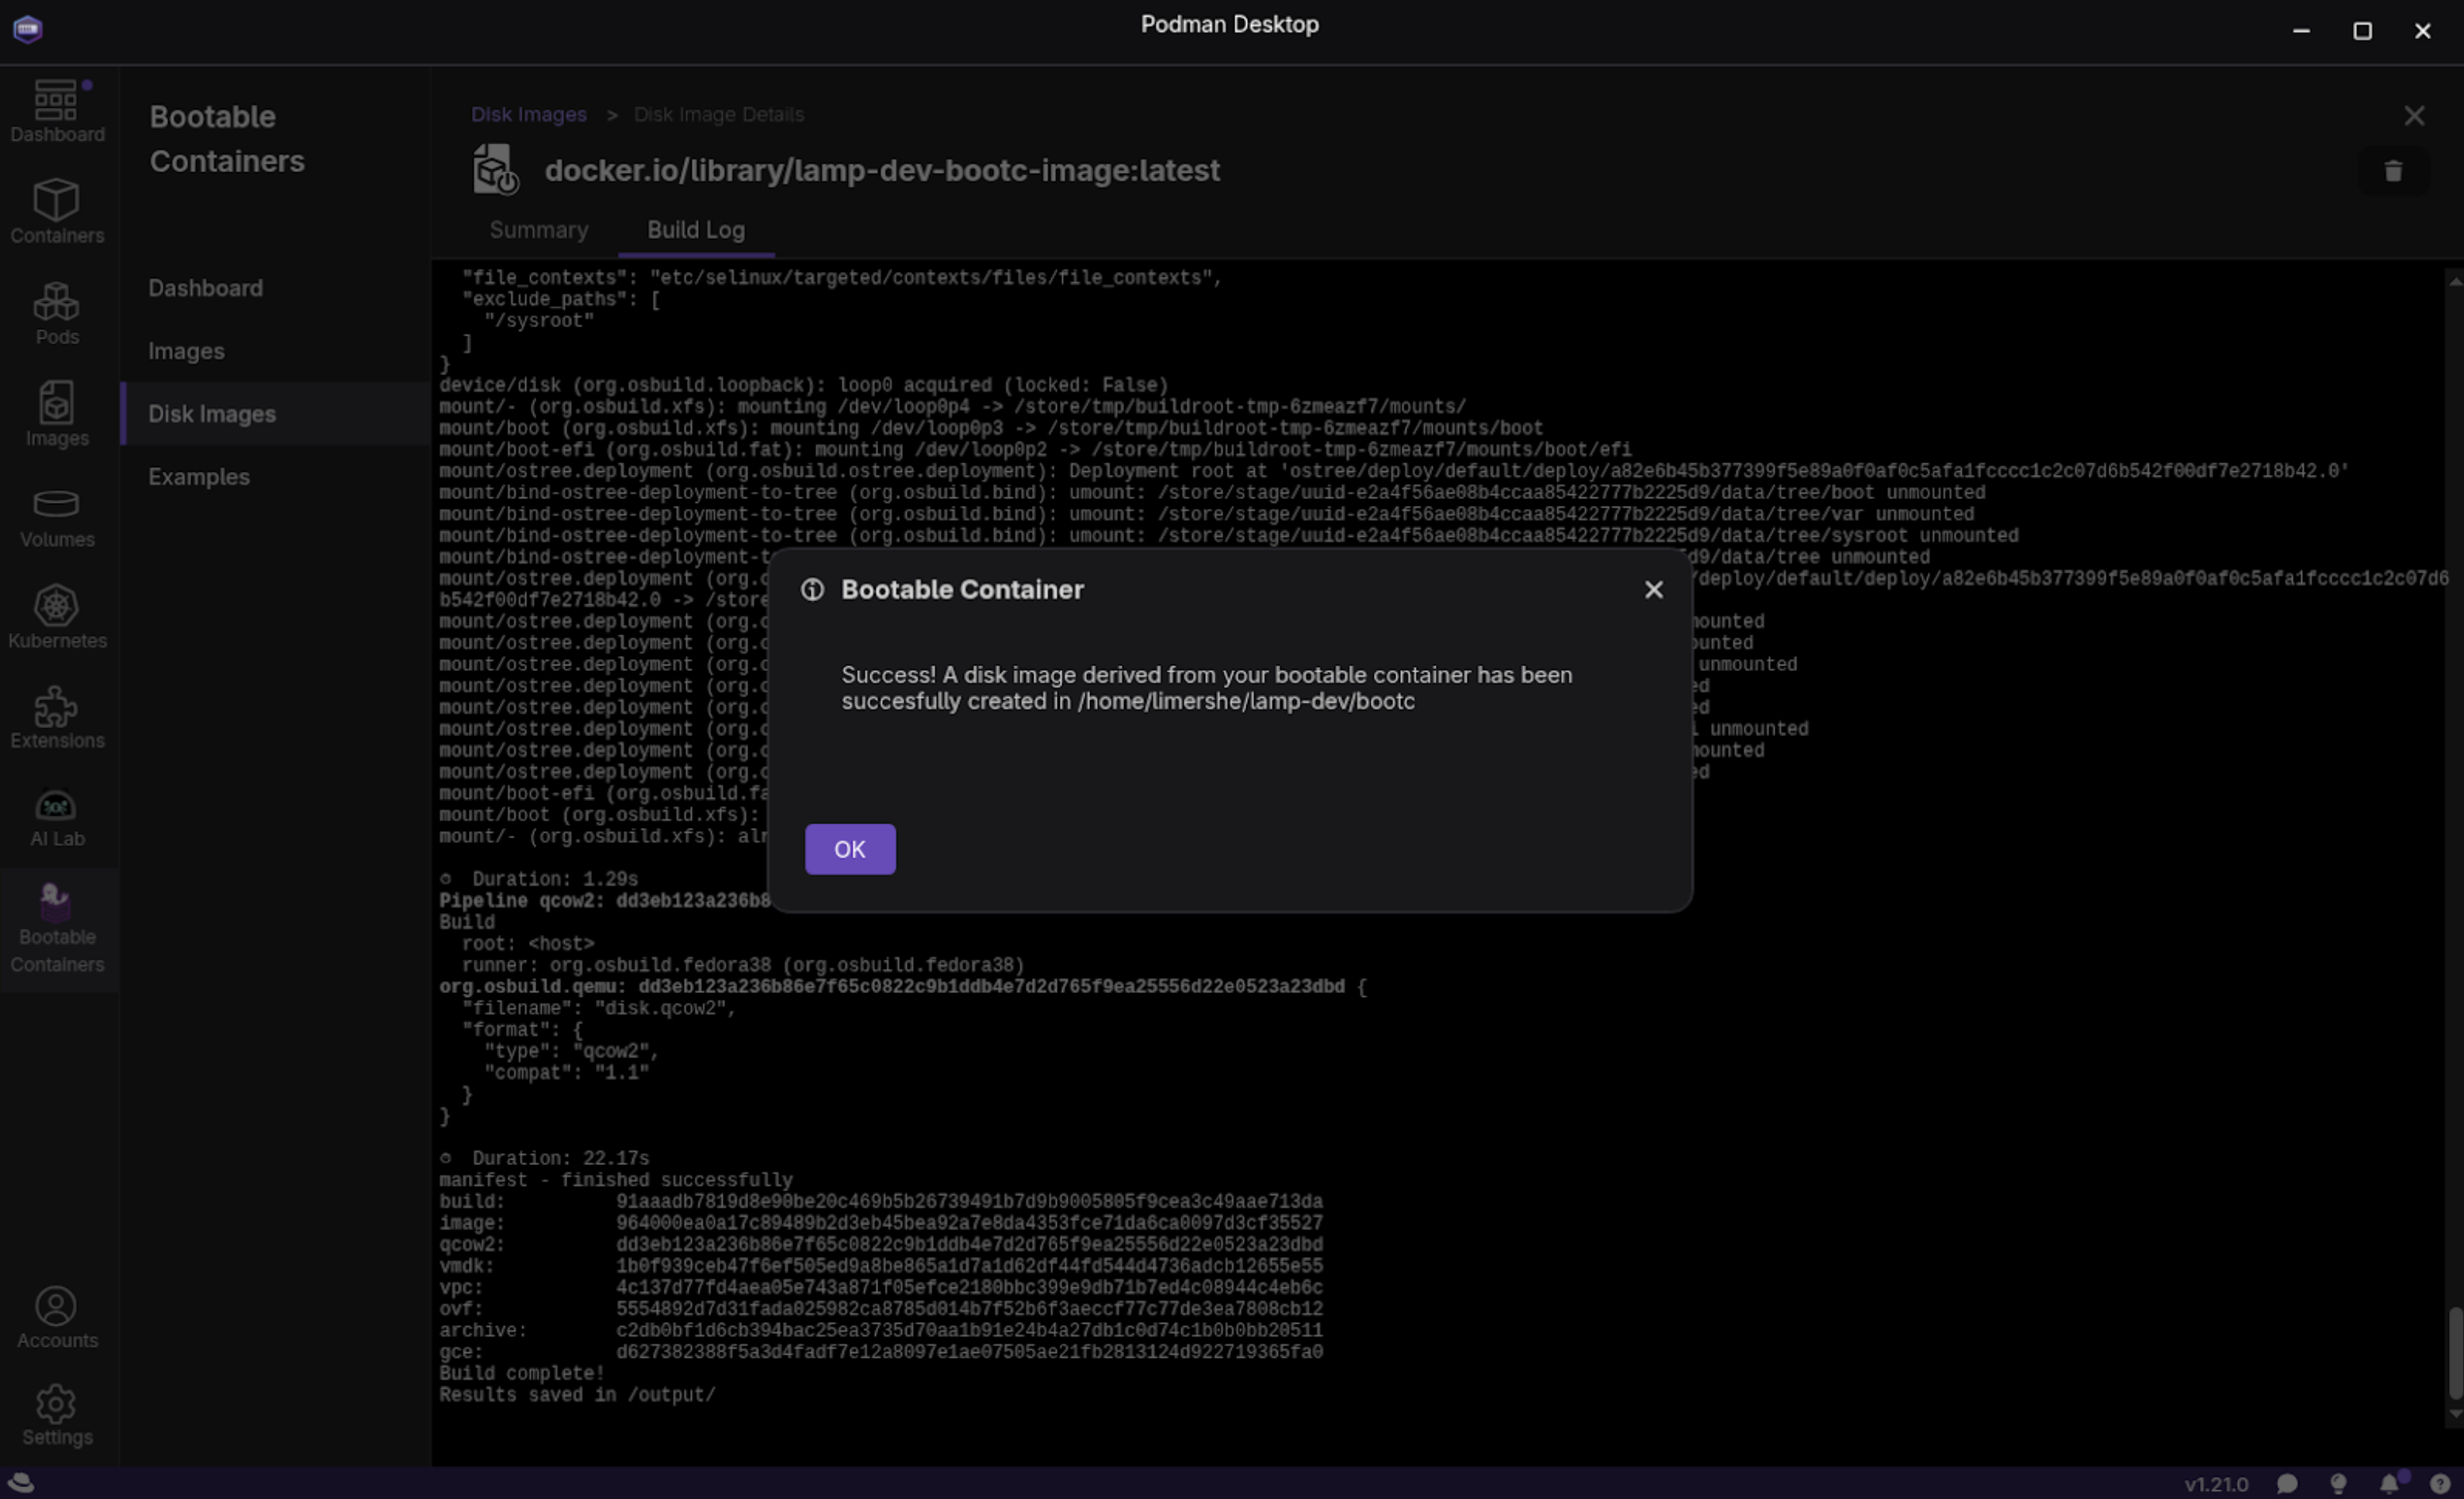
Observe if any issues or warnings are displayed while building the disk image. Once you’ve successfully created the image, you will see a success message (Figure 9) listed in the Bootable Containers > Disk Images section of Podman Desktop.
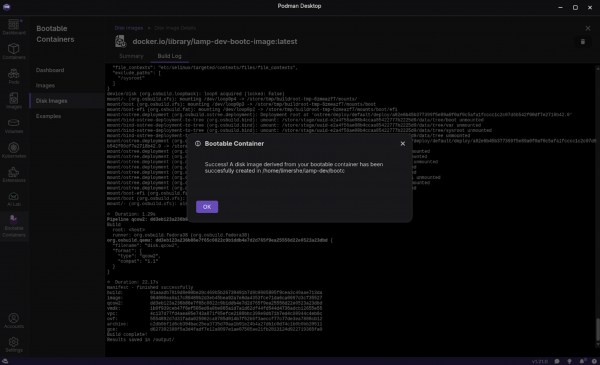
Figure 9: This pop-up shows a successful disk image build.

Set up a virtual machine
Virtual environments provide a quick and convenient way to test your images. You can test modifications and configurations without impacting your primary operating system or incurring cloud expenditures. Once your image has been validated and you’re happy with it, we encourage you to create images for all the platforms you’d like to target.
Podman Desktop version 1.8.0 and later makes it easy to launch your built disk image as a virtual machine. After successfully building your disk image, simply select Virtual Machine (Experimental). Before doing so, please ensure you've met the necessary prerequisites, which may include specific hardware or software requirements.
Summary
This learning path walks you through a simple example showing just how easy it is to build a LAMP application in RHEL on your desktop, then package it as a bootable container and run it as a VM. You can deploy the same VM to any other server, or even build an ISO image. The Containerfile can be modified to extend your LAMP application per your requirements.
As a developer, there are several reasons why you should care about deploying the application in image mode:
- Full stack reproducibility: Image mode allows you to define your app, user space, and the entire OS, ensuring consistency from development to production.
- Simplified OS management: You can now treat OS updates and configurations as image rebuilds, integrating them into your existing container workflows.
- Ideal for appliances and edge: Image mode is perfect for creating specialized software appliances or consistent OS environments for edge devices with tightly coupled OS and application.
- Testing: With image mode, it is easy to spin up VMs on your desktop or in the cloud, running the exact OS and application build for testing.
The next steps you could take in completing your application:
- Extending the application code beyond the Hello World prototype.
- Moving to one-time passwords for Mariadb database authentication.
- Moving the architecture to share a database across multiple instances of the PHP application.
- Configuring keys and infrastructure to improve the security of the Apache server component.
Additional resources
Explore these offerings to learn more about image mode:
- Image mode for Red Hat Enterprise Linux
- How image mode for RHEL simplifies software appliances
- How to create CI/CD pipelines for image mode for RHEL
- Examples for using image mode with GitHub Actions, GitLab CI, Tekton, Ansible Automation Platform, and Jenkins
- Jumpstart GitOps with image mode