Page
Build a sample Linux, Apache, Mariadb, and PHP (LAMP) application in a container used for development
This lesson will demonstrate how to create a Red Hat container for development and use it to develop a basic LAMP Hello World application. The running container will become your main development environment for this application, with the actual application code stored locally on your local desktop, where you can keep it under source control and edit it with your favorite desktop-native development tools.
Prerequisites:
- A no-cost Red Hat Developer subscription.
- Register here if you do not already have a subscription.
- Podman Desktop.
- You can download Podman Desktop for Windows, MacOS, or Linux.
- A basic understanding of how to traverse a Linux file system.
- A basic understanding of how to create and edit Linux text files.
- A basic understanding of PHP.
- A basic understanding of MariaDB.
- A basic understanding of the Apache webserver.
In this lesson, you will:
- Create a basic Hello World application with PHP and Apache.
The core application components
Apache HTTP: The Apache HTTP Server, used in our example, is an open source, cross-platform web server. It is developed and maintained by a community of developers through the Apache Software Foundation.
MariaDB: For this example, we decided to deploy MariaDB as a persistent data store for our application. MariaDB is a popular, open source, relational database system that originated as a community-driven fork of MySQL, created by its original developers. MariaDB combines the familiar SQL interface with the benefits of an open development model.
PHP: In this architecture, we chose to utilize the PHP server-side scripting language, which is primarily used for web development. PHP is notable for its wide adoption and the large ecosystem of frameworks and libraries it supports. From an implementation standpoint, modern PHP is performant and integrates well into containerized, cloud-native workflows for building backend APIs.
Step 1: Build and utilize a LAMP-oriented container-based Red Hat developer environment
Let's start by creating a directory lamp-dev where we’ll store all the files we’ll use for this project. You’ll do this on the computer where you are running Podman Desktop.
We’ll place the following contents in the file Containerfile in our lamp-dev project directory:
# Start from the Red Hat Universal Base Image 10. Since we're using
# this container as a development environment, we'll use ubi-init which
# includes systemd.
FROM registry.redhat.io/ubi10/ubi-init:latest

# Good practice to label your images.
LABEL maintainer="Your Name <youremail@example.com>" \
      description="LAMP development environment based on UBI 10."

# Install Apache, PHP, and the MySQL driver using dnf
RUN dnf install -y \
        httpd \
        php \
        php-mysqlnd \
        mariadb-server \
        ncurses \
        procps \
    && dnf clean all

# Expose port 80 for the web server
EXPOSE 80

# Start services
CMD ["/sbin/init"]
With lamp-dev/containerfile in place, we’re ready to build our app development container.
- Create the sub-directories
lamp-dev/bootc/appon your local desktop using your preferred native desktop tools. We’ll use this directory as the central repository for our application files. You’ll be able to edit files either using the editors in your container or by using your favorite desktop text editor or IDE. Either way, they will be accessible from your container. Open Podman Desktop on your local machine and go to the Images section in the left navigation, as shown in Figure 1.
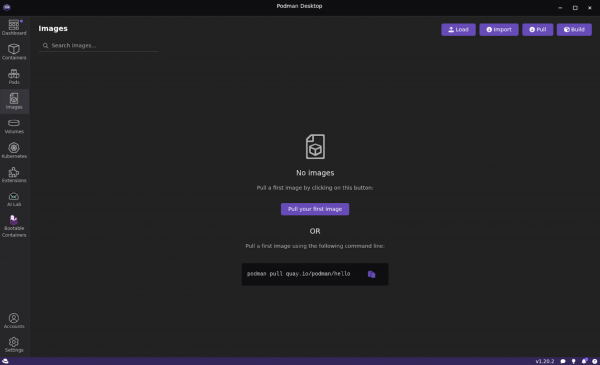
Figure 1: This shows the Podman Desktop Images section. - Select Build in the top right corner.
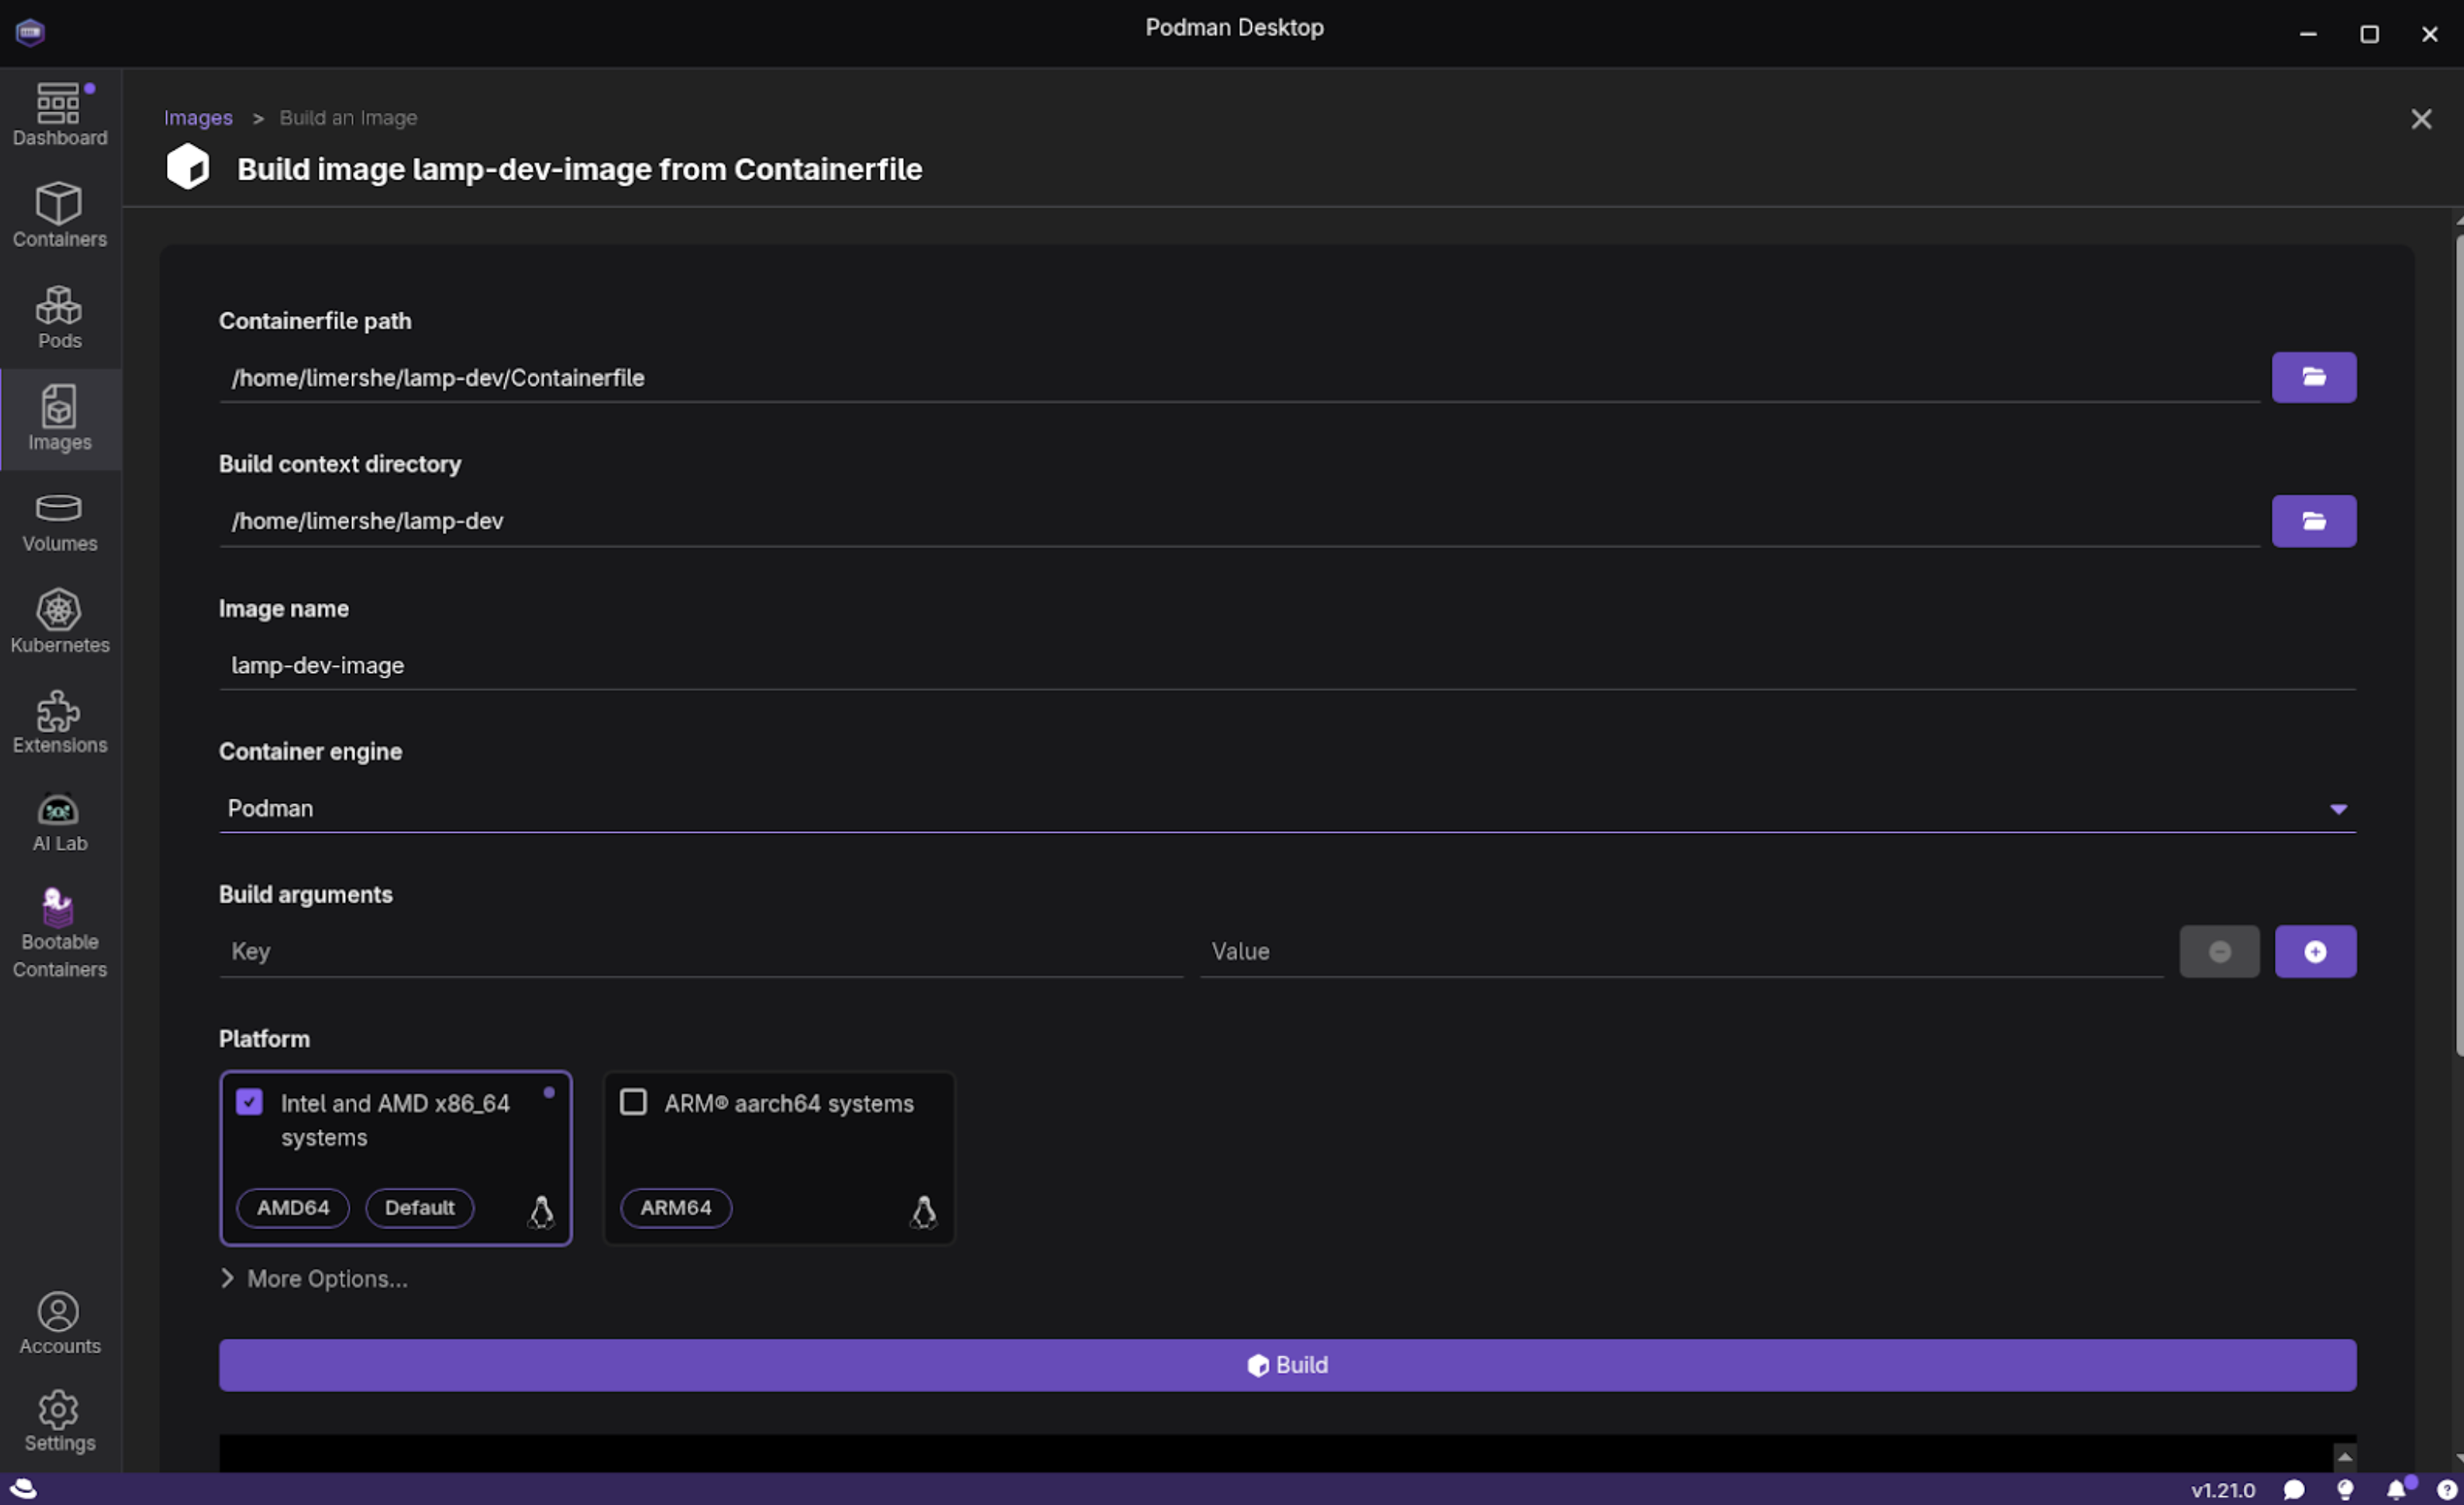
Specify the following: a
Containerfilepath for the file we just created, the image namelamp-dev-image, and a Platform. On my laptop, I chose the Intel and AMD x86_64 image option for my Fedora-based laptop (Figure 2).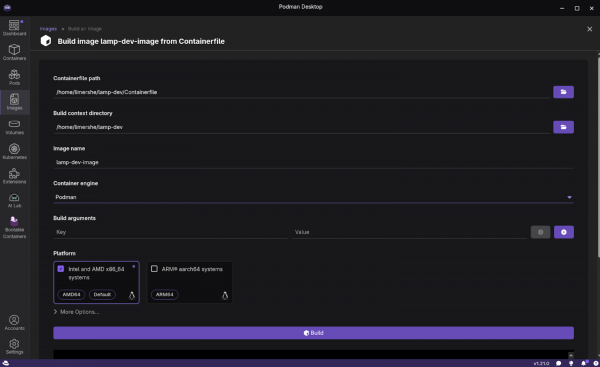
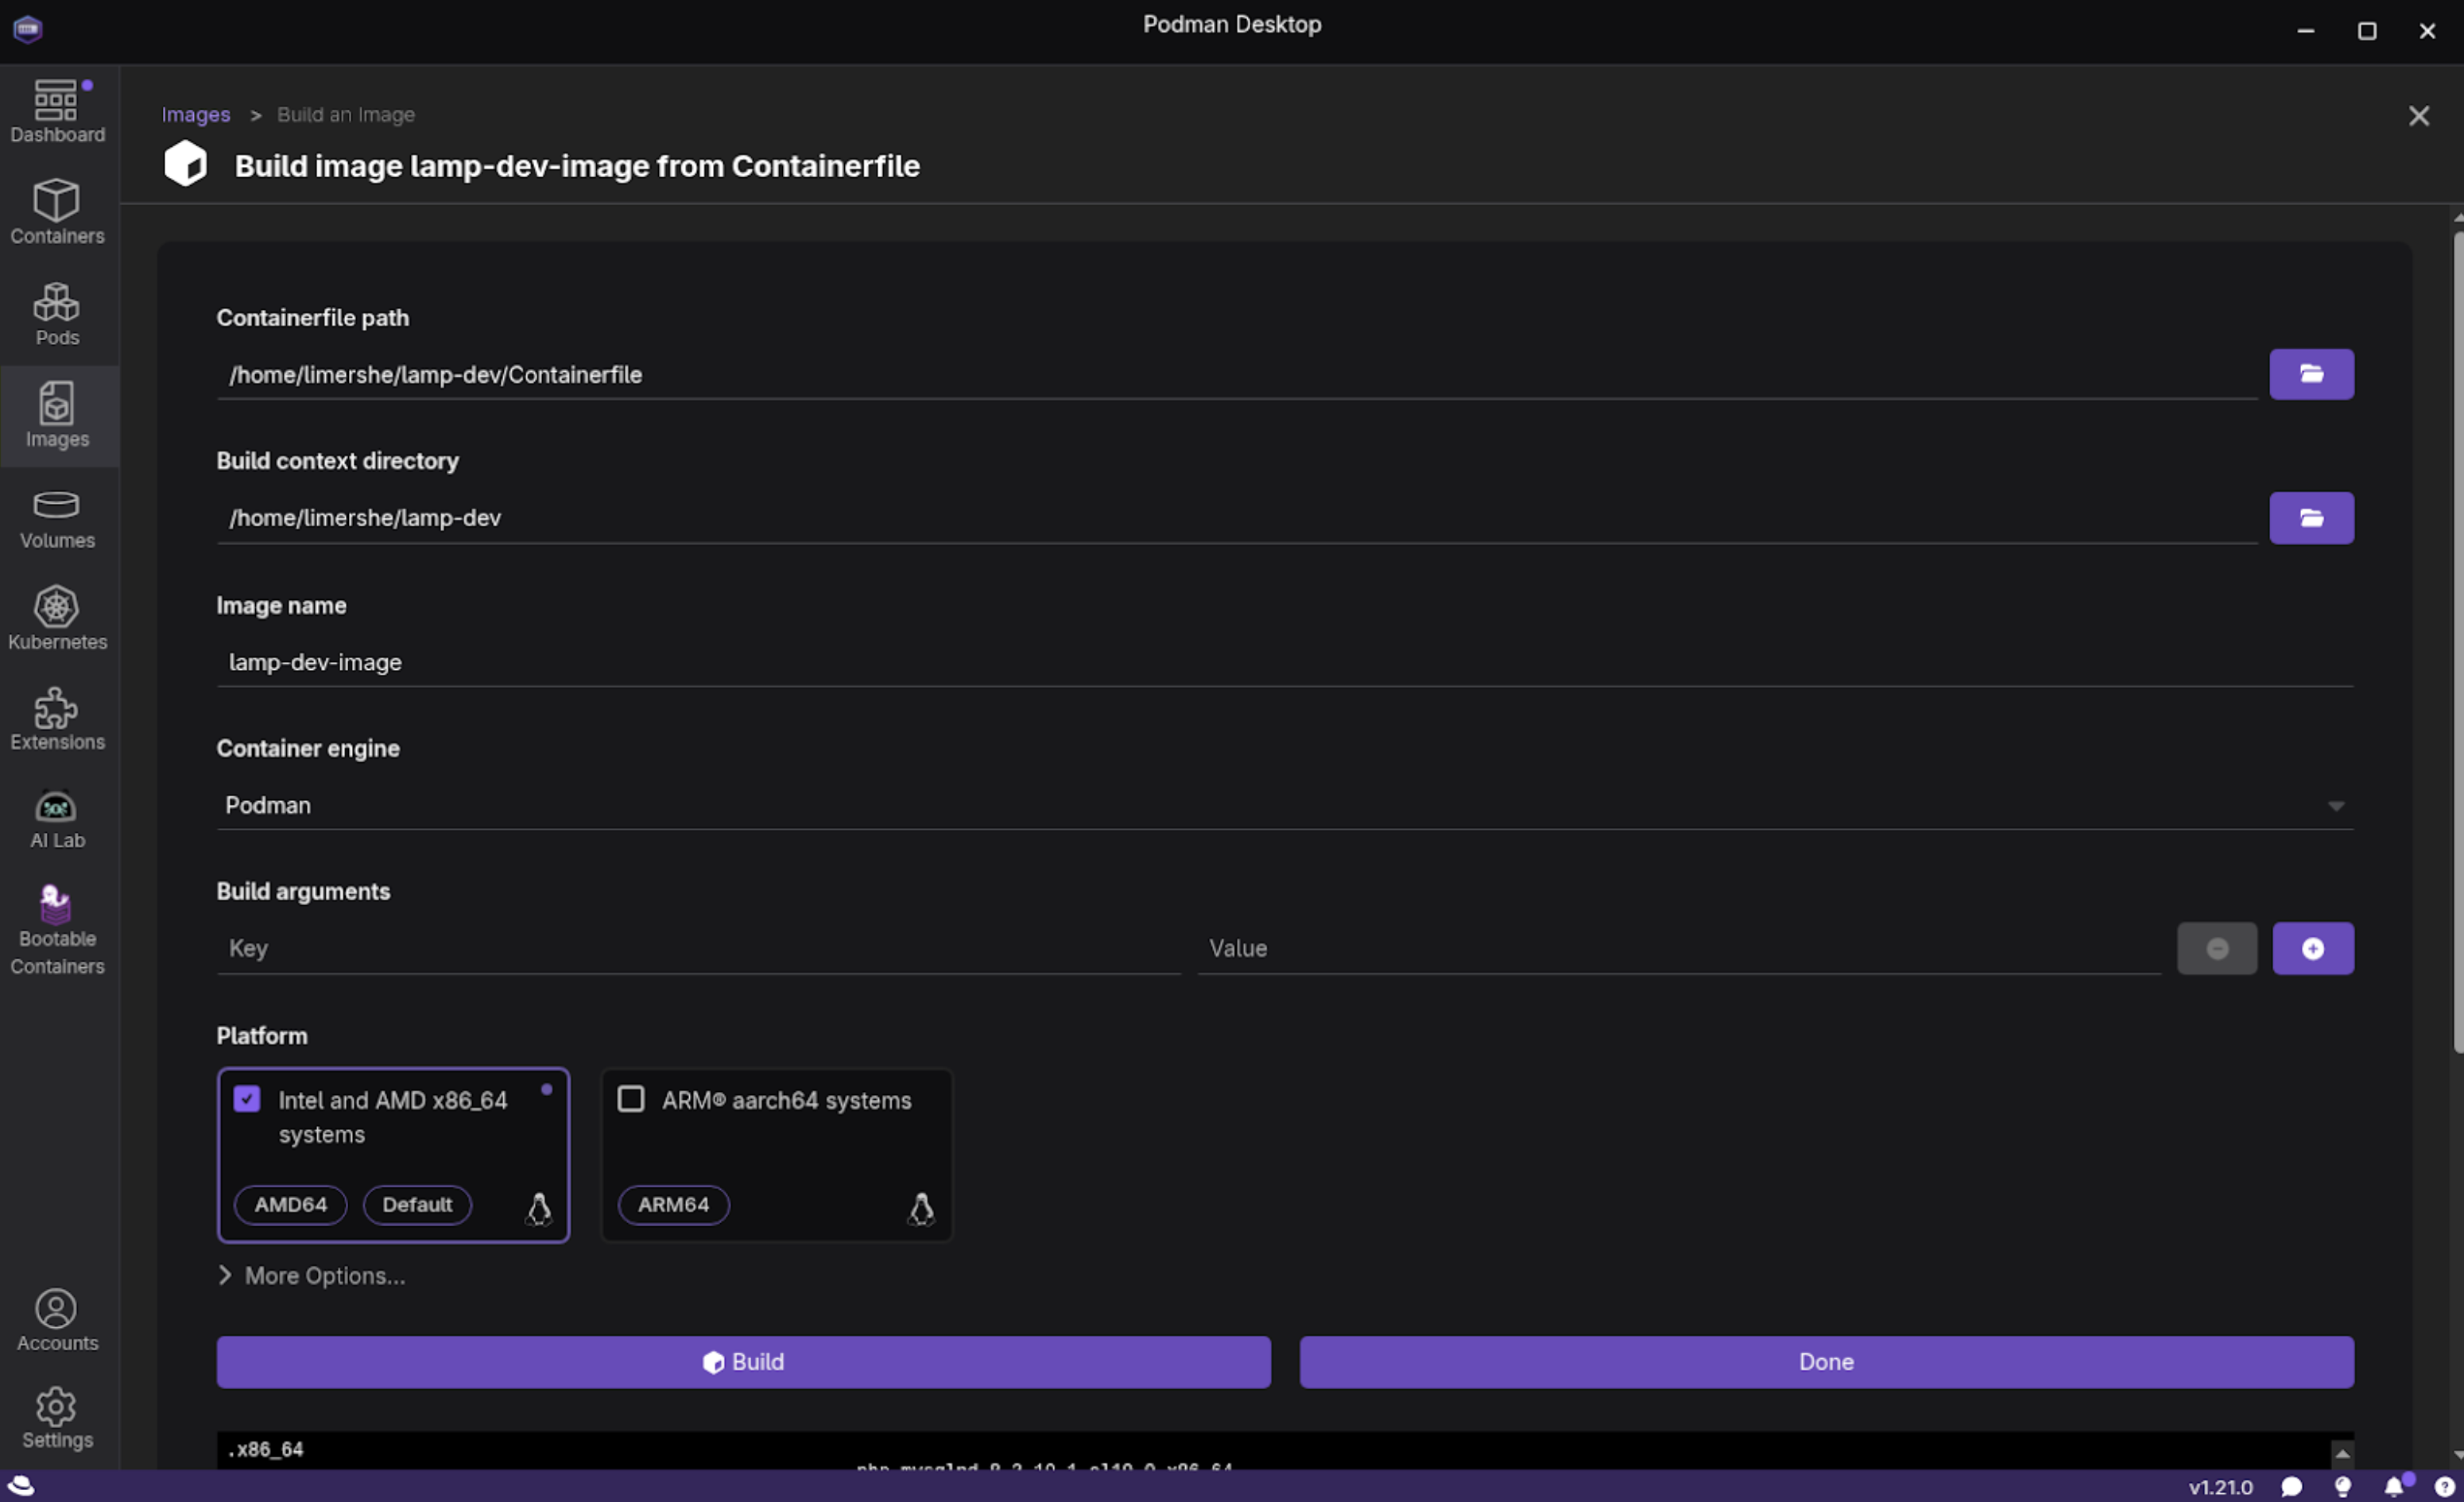
Figure 2: This shows the Podman Desktop build screen with an image name inputted and platform specified. Now select Build at the bottom, and it will build your new image (Figure 3). Select Done.
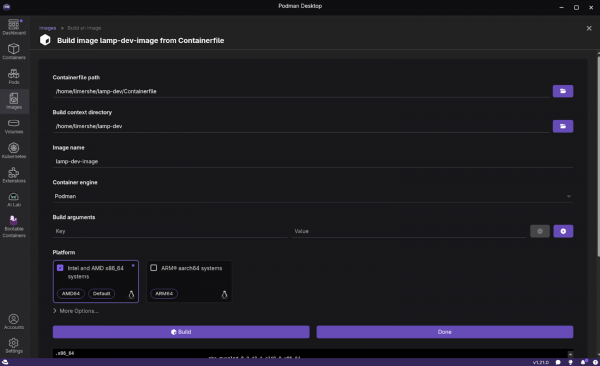
Figure 3: This shows the Podman Desktop Build Process screen where you can click the Build and Done buttons. Back on the main Images section, select the right arrow next to the
lamp-dev-imageto start the image (Figure 4).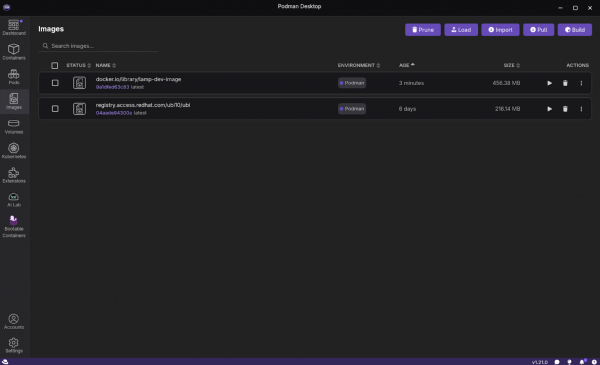
Figure 4: This is the Podman Desktop Images screen with the images listed. Name the container
lamp-dev. Under Volumes, select the subdirectory we created earlier,lamp-dev/bootc/appas the Path on the Host, and specify/app:zas the Path inside the container (Figure 5).
Note that the:zoption will not show up in the actual path in the container. It’s a directive to Podman to allow multiple containers to share the volume content with the local host. In this case, your desktop. This is achieved by relabeling the directory ascontainer_ton SELinux-enabled Linux systems. It is only needed if our desktop is a Linux system, such as RHEL or Fedora. Do not select Start Container as we still have an additional step.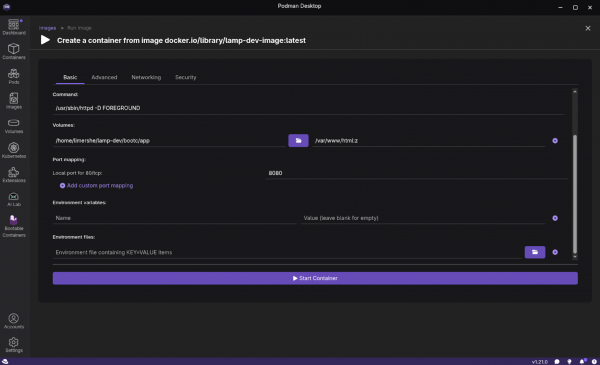
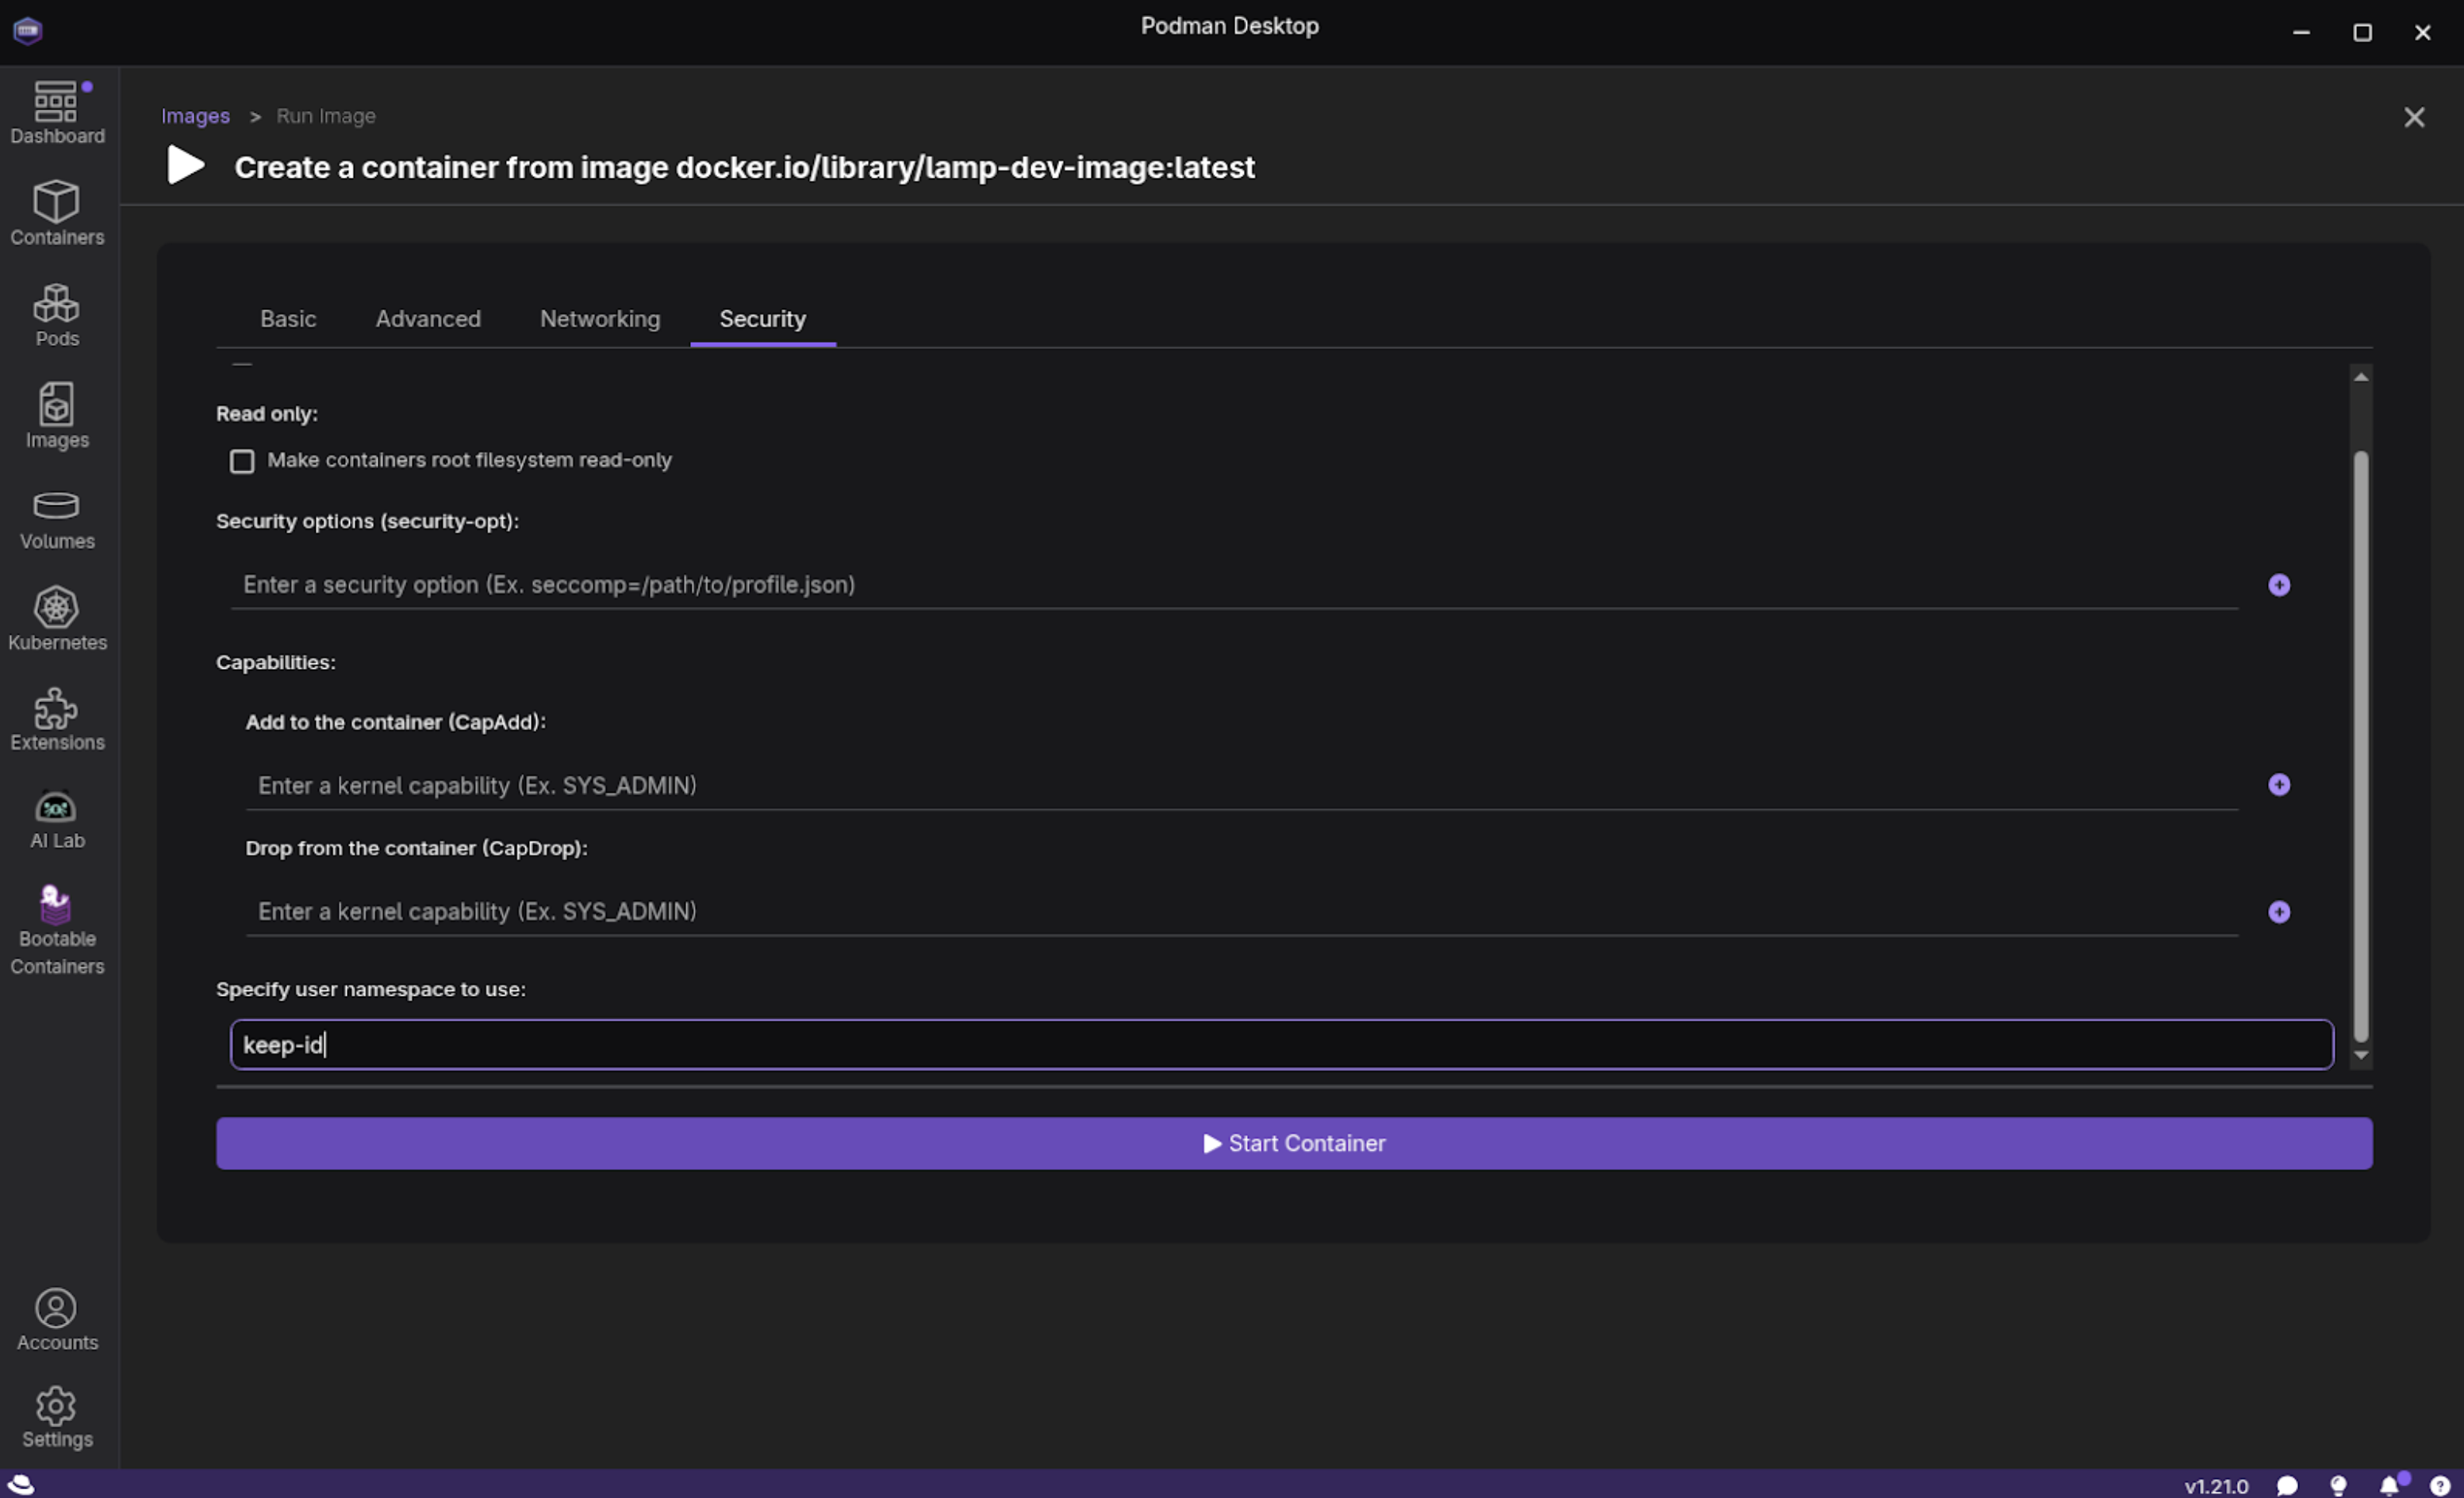
Figure 5: This is the basic tab on the Podman Desktop Create Container screen. Select the Security section at the top right of the form and scroll down to Specify user namespace to use: and enter host. This keyword will map your desktop user account to the user identity (UID) within the container, which allows you to share files between your native desktop environment and your new development container (Figure 6).
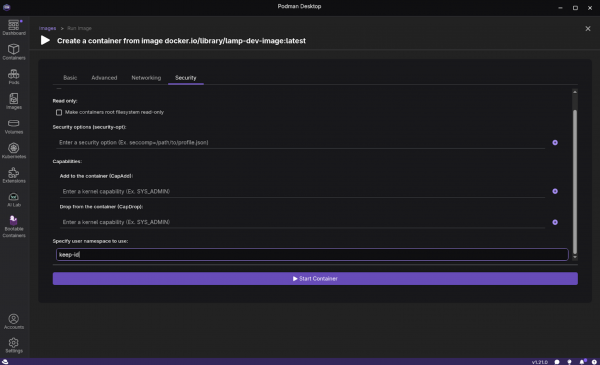
Figure 6: This shows the Security tab on the Podman Desktop Create Container screen. Select Start container at the bottom. We now have a running container named
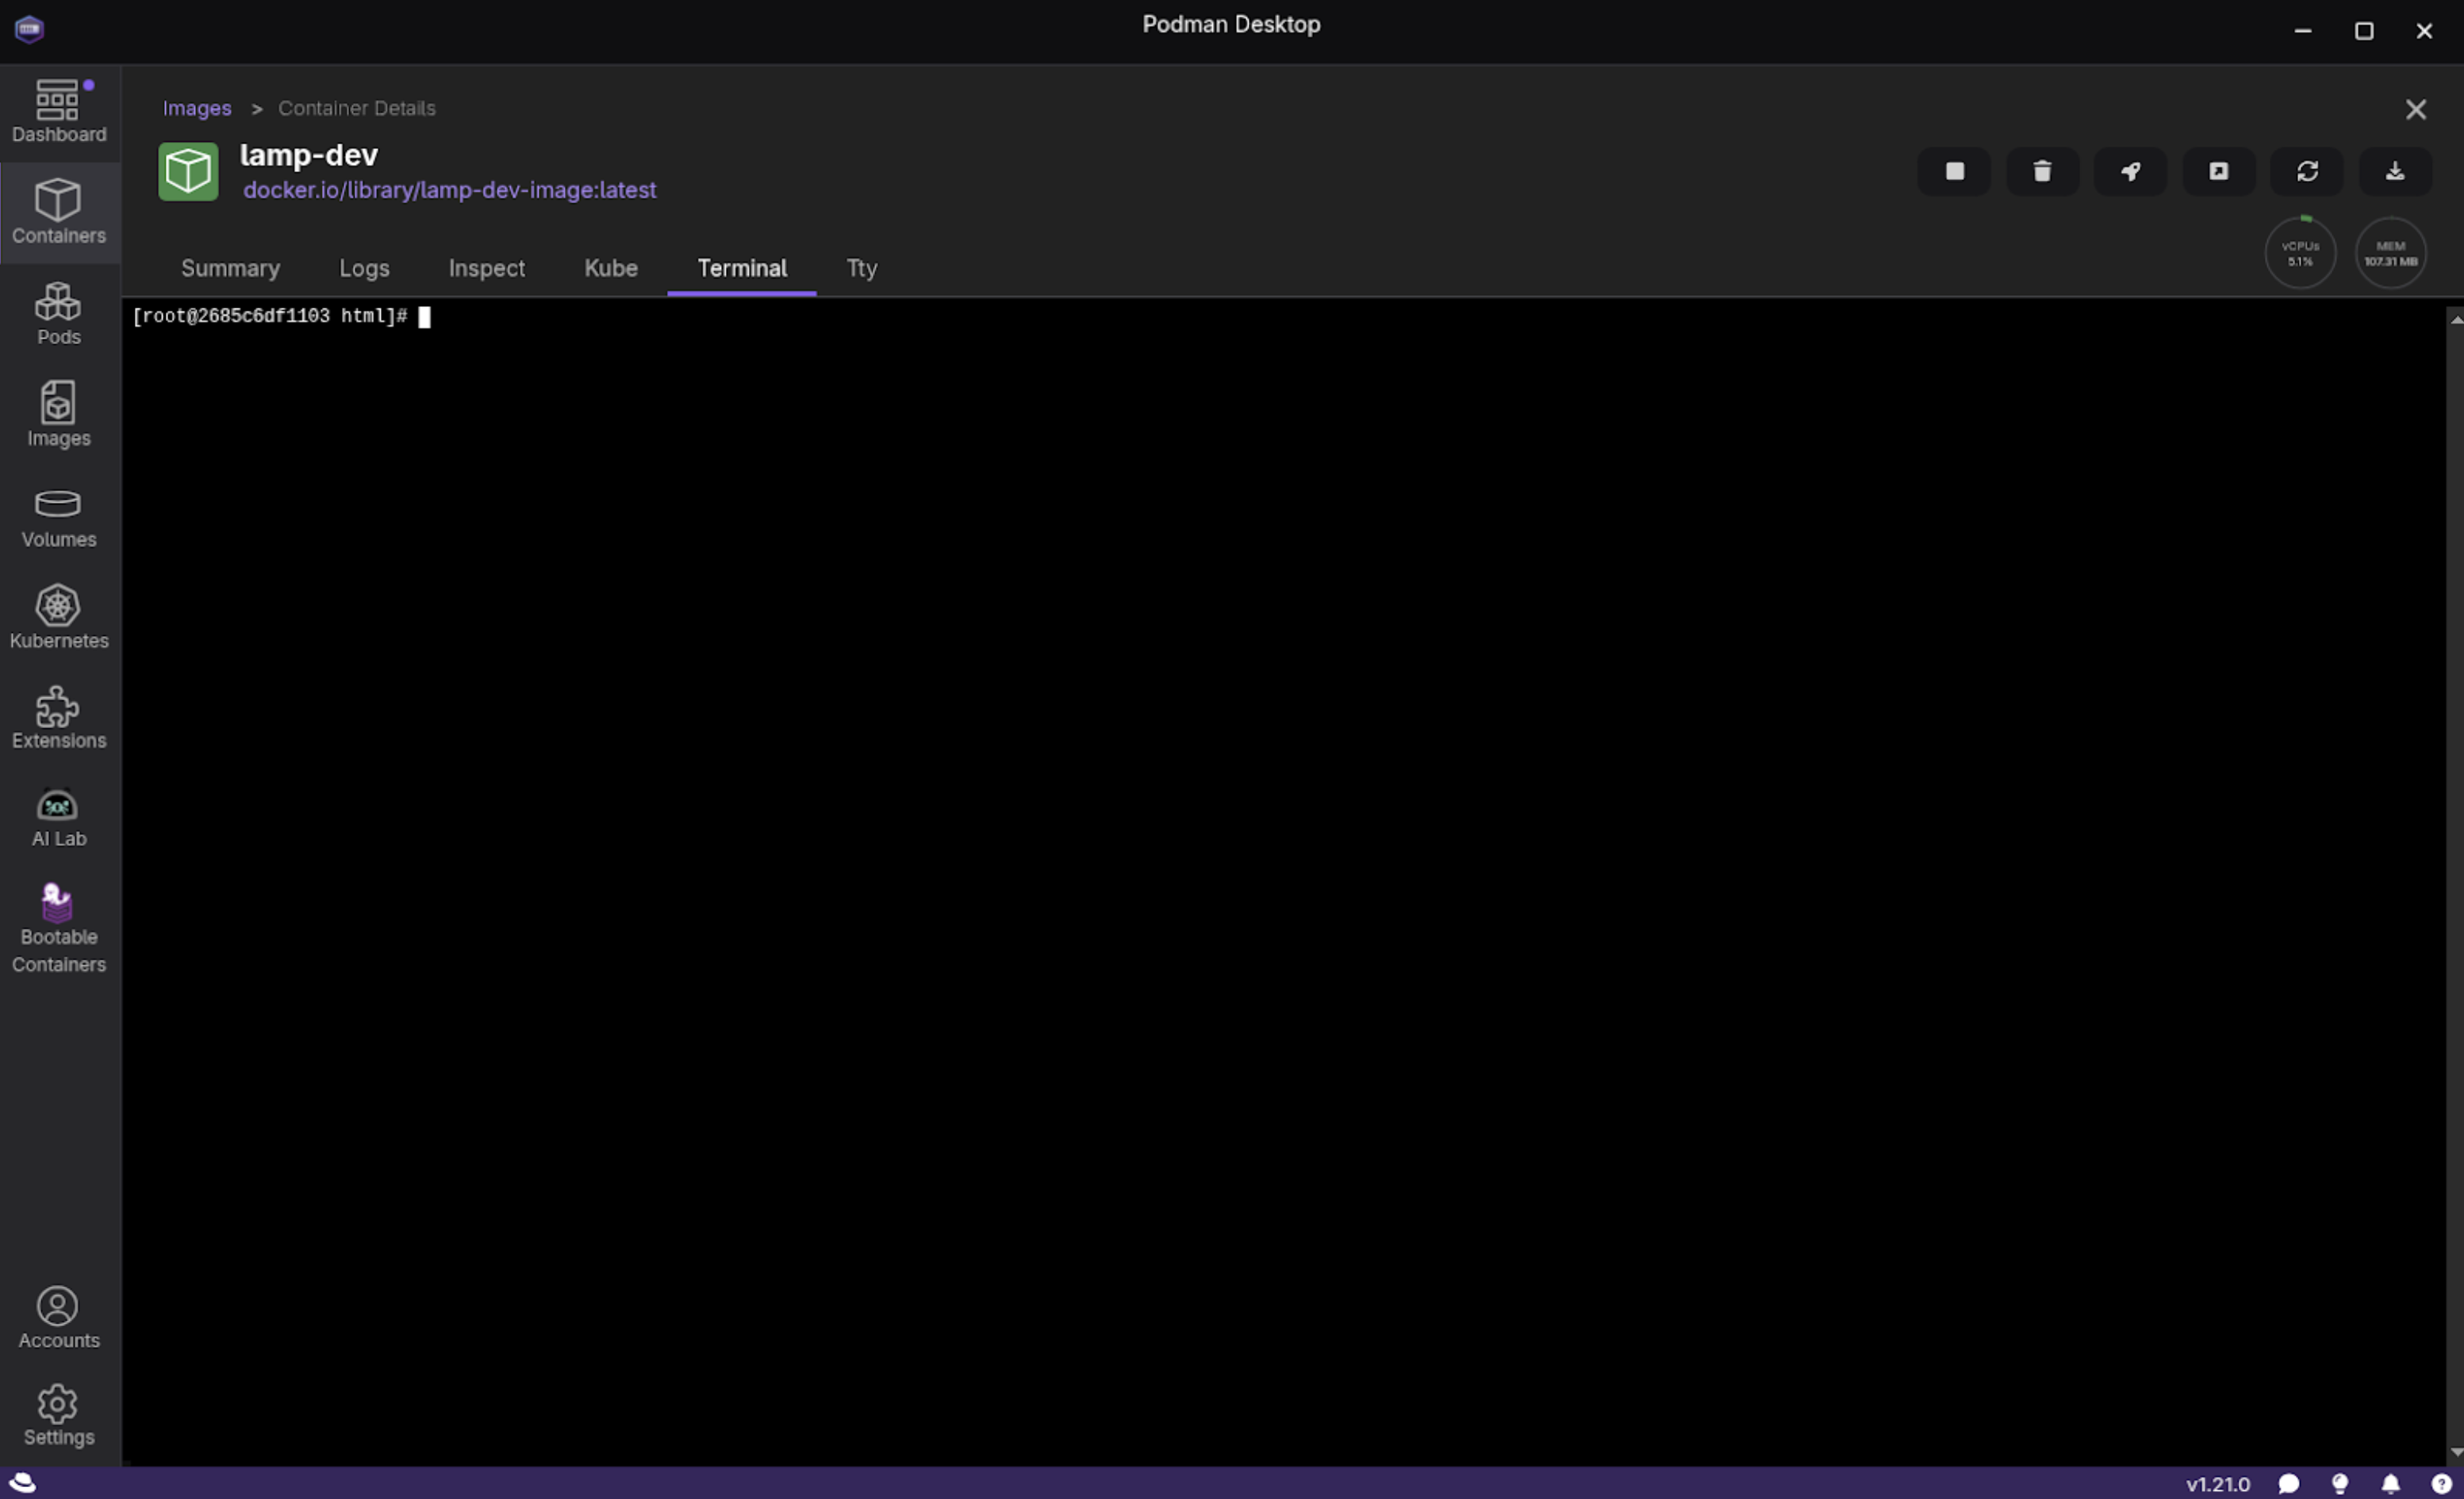
lamp-dev. Go to the Containers section and double-click on the container and select Terminal. For the next part of this learning path, our examples assume we’ll be working from a terminal screen (Figure 7).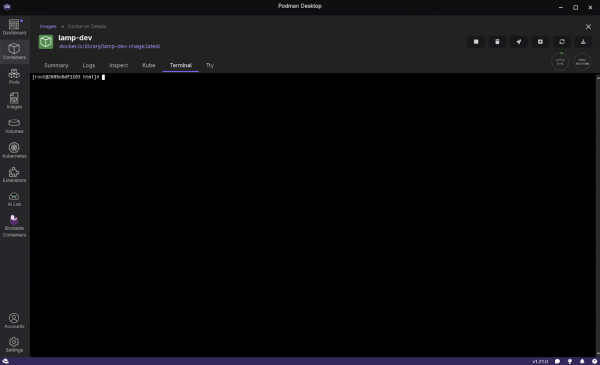
Figure 7: This shows the Terminal tab on the Podman Desktop Container Details screen.


Step 2: Setting up the MariaDB Database
On your native host, we’ll configure a MariaDB database server for our application. Let’s start off by starting the mariadb service with the following command from within our running container:
systemctl enable --now mariadb.serviceNow we’re ready to create the MariaDB database to be used by our PHP application. We’ll do this using the following SQL commands, which we place in the file /app/db-setup.sql.
Note
The name of the database (hellodb), the database user (hellouser) and the password (SecurePassword) will all be used later when we connect through our PHP app.
CREATE DATABASE hellodb;
CREATE USER 'hellouser'@'localhost' IDENTIFIED BY 'SecurePassword';
GRANT ALL PRIVILEGES ON hellodb.* TO 'hellouser'@'localhost';
FLUSH PRIVILEGES;

USE hellodb;

CREATE TABLE greetings (
    id INT AUTO_INCREMENT PRIMARY KEY,
    message VARCHAR(255) NOT NULL
);

INSERT INTO greetings (message) VALUES ('Hello, World!');
Now we are ready to load our database using the following MariaDB command:
/usr/bin/mariadb -u root < db-setup.sqlStep 2: Setting up our PHP app and Apache HTTP Server
We’ve configured our database, but we now need to write our PHP app. For this, we create a file named index.php inside our lamp-dev/bootc/app directory using our favorite editing tool or IDE. This simple script will connect to our local MariaDB database, read a message from a table, and display it. Note that we could have one MariaDB server content to multiple PHP servers. In this case, we would set $host to the name of the shared Mariadb server.
<!DOCTYPE html>
<html>
<head>
    <title>LAMP Stack Hello World</title>
</head>
<body>
    <h1>
        <?php
        $host = '127.0.0.1';
        $db   = 'hellodb';
        $user = 'hellouser';
        $pass = 'SecurePassword';
        $charset = 'utf8mb4';

        $dsn = "mysql:host=$host;dbname=$db;charset=$charset";
        $options = [
            PDO::ATTR_ERRMODE            => PDO::ERRMODE_EXCEPTION,
            PDO::ATTR_DEFAULT_FETCH_MODE => PDO::FETCH_ASSOC,
            PDO::ATTR_EMULATE_PREPARES   => false,
        ];

        try {
             $pdo = new PDO($dsn, $user, $pass, $options);
             $stmt = $pdo->query('SELECT message FROM greetings');
             $row = $stmt->fetch();
             echo htmlspecialchars($row['message']);
        } catch (\PDOException $e) {
             echo "Error: Could not connect to database.";
             // In a real app, you would log this error, not display it.
             // throw new \PDOException($e->getMessage(), (int)$e->getCode());
        }
        ?>
    </h1>
</body>
</html>
Now, within the container, copy this script into the /var/www/html so that we can test it.
cp index.php /var/www/html/Now we can configure and start our Apache HTTP Server used to run the application. To do this, we create a myapp.conf file as follows:
<VirtualHost *:80>
    ServerAdmin webmaster@localhost
    DocumentRoot /var/www/html
    ErrorLog /var/log/httpd/error_log
    CustomLog /var/log/httpd/access_log combined
</VirtualHost>
Now we copy our myapp.conf file to /etc/httpd/conf.d and start our Apache HTTP server as follows:
cp myapp.conf /etc/httpd/conf.d
systemctl start httpd
Finally, we can test that our application is working properly using the following curl command.
curl 127.0.0.1If we’ve done everything correctly, we should see this output:
<!DOCTYPE html>
<html>
<head>
    <title>LAMP Stack Hello World</title>
</head>
<body>
    <h1>
        Hello, World!    </h1>
</body>
</html>