Page
The sample application
In order to demonstrate how the distributed Red Hat Data Grid works, we created an application that is basically an employee CRUD+REST. Below is the REST API implemented by the application:
|
Method |
Name |
Path |
Body |
Description |
|
GET |
Get All Employees |
|
|
Get the list of all employees |
|
POST |
Create Employee |
|
|
Create a new employee |
|
PUT |
Update Employee |
|
|
Update an employee |
|
GET |
Get Employee by ID |
|
|
Get an employee by its identifier |
|
DELETE |
Delete Employee |
|
|
Delete an employee |
|
OPTIONS |
Gets all Employees UUIDS |
|
|
Gets all existing keys in the cache |
|
PUT |
Update Employee from cache |
|
|
Updates an employee in the local database with the latest data in the cache |
|
POST |
Import Employee from cache |
|
|
Creates a new employee in the local database with existing data in the cache for the cache-key |
|
GET |
Get Employee By UUID |
|
|
Get an employee by its uuid |
The basic model
The basic model for an employee is as follows:
{
  "employeeId": "number",
  "uuid": "string",
  "fullName": "string",
  "designation": "string",
  "department": "string",
  "createDate": "date",
  "createBy": "string",
  "updatedDate": "date",
  "updatedBy": "string",
  "version": "number"
Each application will have its own way of controlling the employee ID depending on the persistence strategy adopted. uuid is a unique identifier of the entity. This will be the identifier that we will use to work with an employee between the different instances of the application.
We verify the entity through its version attribute. Each employee created starts at version 1, and every update incrementally increases this value.
The application's workflow can be summarized as:
- Expose a REST API for CRUD operations.
- During the Create Employee operation, the application inserts the employee in the cache.
During the Update Employee operation, the application checks whether it has the most recent version of the employee in its local database. If the version is the same, the application performs the operation normally and updates this information in the cache. If the application verifies that it has a version lower than the last version present in the cache, the application throws an exception.
Note: In a real scenario, it would be extremely important to build a mechanism that would be responsible for replicating or perceiving changes in the respective databases of each instance of the microservice. Some alternatives could be:
- Change Data Capture
- Notifications carried out from the application to a pub-and-sub middleware
- An event listener/notification on Red Hat Data Grid to automatically update local entities
- An internal schedule in the application checking the current version of the database against the cache values and updating when necessary
For the purposes of our example, we will not adopt any of the above alternatives. We will consider that if a certain instance of the application has an employee with a lower version than the cache, this employee must be explicitly updated through a call in the application REST API.
To demonstrate the integration between different technology platforms, we implemented a version of this API in the following technologies:
Note: Red Hat Build of Quarkus and Red Hat Data Grid are part of Red Hat's Application Runtimes offering, now part of Red Hat Application Foundations. Red Hat offers base container images and toolkits for developing and deploying applications on Red Hat OpenShift from a variety of development platforms, including Golang and .NET
Integrate with the Data Grid
Data Grid supports the Hot Rod protocol. Hot Rod is a binary TCP protocol with the following capabilities:
- Load balancing
- Failover
- Efficient data location
Red Hat Data Grid supports Hot Rod clients for many development platforms. However, some platforms do not have stable implementations or take advantage of the latest updates. In our scenario, we adopt integration through the REST API offered by Data Grid.
Although the use of a binary protocol such as Hot Rod has clear advantages over the use of the REST API, in our example we did not observe significant functional or performance losses, since the objects are reduced enough not to generate processing overhead.
It is important to note that although communication between the client application takes place via REST API, data replication between the different instances of the Data Grid in the cluster uses its own mechanisms to replicate data in an extremely agile and performative way. Such speed in data replication, often below the count of seconds, makes data replication through the cache an excellent alternative to maintain a certain level of control between distributed environments, and in a way, to handle concurrency over shared objects.
This characteristic allows heterogeneous applications to collaborate together united only by a common cache.
Run different instances of the application
Let's distribute the applications as follows:
- site-1
- Quarkus
- .NET
- site-2
- Quarkus
- Golang
Note: All of the source code for this post can be found here. In addition, the images mentioned below are published in a public repository. Thus, it is possible to run the images already published instead of recreating them based on the source code of the implementations.
- Clone the repository from GitHub.
-
Access the applications directory.
Publish applications on site-1
We will publish the application developed with Quarkus and the .NET 7 on site-1. Note: Ensure you have an active session using the OpenShift Client and that this session is for site-1. Otherwise, log into site-1, then copy the login command as previously shown.
Publish the Quarkus version
- Access the EmployeeQuarkusApp directory. Generate a native version of the application using Quarkus. More information about Quarkus Native can be found here:
./mvnw package -DskipTests -Pnative -Dquarkus.native.container-build=true - Build an image of the container. Note: Choose a name for your image and then publish it in an image repository:
docker build -f src/main/docker/Dockerfile.native-micro -t marcelodsales/jdg-employee-quarkus . - Publish the image:
docker push docker.io/marcelodsales/jdg-employee-quarkus - Deploy Postgres on OpenShift:
oc new-app --template=postgresql-persistent -p POSTGRESQL_USER=admin -p POSTGRESQL_PASSWORD=password -p POSTGRESQL_DATABASE=employee_db -p POSTGRESQL_VERSION=latest -l app=jdg-employee - The application uses flyway to manage database updates. No intervention is needed to create the database structure. However, if you want to perform an operation, you only need to create a connection between the Postgres POD and the local machine, then use a Postgres database modeling tool, such as PgAdmin, for example:
oc port-forward $(oc get pods -l deploymentconfig=postgresql -o=custom-columns=NAME:.metadata.name --no-headers) 5432:5432 - Deploy the application:
oc new-app --name=jdg-employee-quarkus --image=marcelodsales/jdg-employee-quarkus DATABASE_USER=admin DATABASE_PASS=password DATABASE_URL=postgresql SITE=site-1 DG_HOST=dg DG_PORT=11222 -l app=jdg-employee - Create a route to expose the application's API:
oc expose service/jdg-employee-quarkus
Note: Quarkus offers several ways to publish to OpenShift. More information can be found at this link.
Publish the .NET version
We will use a different strategy to deploy the version implemented in .NET We're going to utilize one of the capabilities of the Red Hat Software Collection, the build strategy Source-to-Image using Docker.
- From the root of the repository, go to the EmployeeNetCoreApp directory.
- First of all, we will need to deploy an instance of SQL Server on OpenShift. For this, we created an OpenShift template to deploy an instance of SQL Server 2022. Create the template with the command:
oc apply -f mssql-2022-ocp-template.json - The SQL Server image needs some privileges to run on OpenShift. For simplicity, we will create a service account and allow the container to run with any user id:
Note: The template is already configured to use a service account named mssql.oc adm policy add-scc-to-user anyuid -z mssql --as system:admin - Deploy the SQL Server instance using the template created earlier:
oc new-app --template=mssql2022 -p ACCEPT_EULA=Y -p SA_PASSWORD='Passw0rd1#' -p MSSQL_PID=Express -p VOLUME_CAPACITY=1Gi -l app=jdg-employee - The database will need to be initialized. For this, we will create a connection between the POD running in OpenShift and the local machine:
oc port-forward $(oc get pods -l name=mssql -o=custom-columns=NAME:.metadata.name --no-headers) 1433:1433 - With a locally available connection, we can use any SQL Server client, such as Azure Data Studio, to execute the necessary commands. Let's use a different alternative. We will make use of the migration functionality provided by the Entity Framework:
cd EmployeeNetCoreApp dotnet ef database update - After executing the above command, return to the root of the Employee .NET App project. The following commands assume you will execute them in the root of the project:
➜ EmployeeNetCoreApp git:(main) ✗ tree -d -L 1 . ├── EmployeeNetCoreApp └── EmployeeNetCoreApp.Tests 3 directories - Import the .NET base images into OpenShift:
oc create -f https://raw.githubusercontent.com/redhat-developer/s2i-dotnetcore/master/dotnet_imagestreams.json - Create a new build for the project:
oc new-build --name jdg-employee-dotnet --strategy=docker -D - < EmployeeNetCoreApp/Dockerfile - Start building the image in OpenShift:
Note: In the previous example, we used a multi-stage Docker strategy.oc start-build jdg-employee-dotnet --from-dir=. --follow --wait - Create the application using the name of the image generated in the previous step:
oc new-app jdg-employee-dotnet - Create a route to expose the application's API:
oc expose svc/jdg-employee-dotnet
Publish applications on site-2
Now that we have finished deploying the applications on site-1, let's proceed with deploying the applications on site-2. We will publish the application developed with Quarkus and Golang on site-2. Note: Ensure you have an active session using the OpenShift Client and that this session is for site-2. Otherwise, log into site-2 and copy the login command, as previously shown.
Publish the Quarkus version
Repeat steps 1, 5, 6, 7, and 8 of the Quarkus version deployment process on site-1.
Publish the Golang version
- From the root of the repository, go to the Employee GolangApp directory.
- We need to deploy an instance of MongoDB Server on OpenShift. We created an OpenShift template to deploy an instance of MongoDB. Create the template with this command:
oc apply -f mongo-4-template.json - Deploy the MongoDB Server instance using the template created earlier:
oc new-app --template=mongo4 -p MONGODB_USER=root -p MONGODB_PASSWORD=password -p MONGODB_DATABASE=employeedb -p VOLUME_CAPACITY=1Gi -l app=jdg-employee - Note: It is not necessary to create a connection to the MongoDB POD running under OpenShift in order to perform initialization. In this example, collections will be created as needed, but if you want to view the contents of the MongoDB database, the connection can be created with the command:
oc port-forward $(oc get pods -l deploymentconfig=mongodb -o=custom-columns=NAME:.metadata.name --no-headers) 27017:27017 - Let's use a Docker image to generate an executable for Golang, then use a minimalist image to package the executable. We can then publish the image to the public repository:
docker build --tag marcelodsales/jdg-employee-golang . docker push docker.io/marcelodsales/jdg-employee-golang - Create the application using the name of the image generated in the previous step:
oc new-app --name=jdg-employee-golang --image=marcelodsales/jdg-employee-golang MONGO_USER=root MONGO_PASSWD=password MONGO_HOST=mongodb MONGO_PORT=27017 SITE=site-1 CACHE_HOST=dg -l app=jdg-employee - Create a route to expose the application's API:
oc expose service/jdg-employee-golang
High-level view of the solution
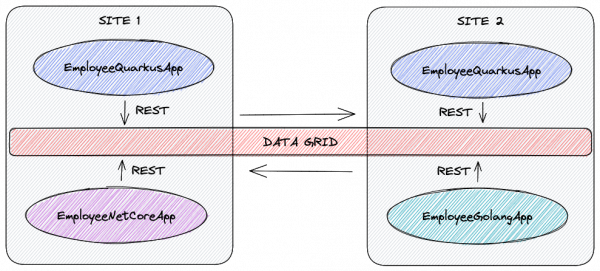
This is what the scenario looks like after deploying the applications and configuring the Data Grid.
