How to secure your API documentation with Red Hat Single Sign-On?
This guide is designed to help you integrate your Red Hat Single Sign-On server with the OpenAPI (OAI)-based ActiveDocs in your 3scale developer portal. Although it has only been implemented with this particular Identity & Access Management solution (IAM), you could in theory make some customizations where necessary to integrate with another OpenID Connect-based solution.
This is the 1st part of a series of posts where each OAuth 2.0 flow will be covered separately. Here we start with the Authorization Code flow.

What is ActiveDocs?
ActiveDocs is the 3scale feature that is based on OAI 2.0 & SwaggerUI. You can host any OAI compliant spec on 3scale & publish it in the Developer Portal for your community's reference & testing. One of the great advantages of 3scale ActiveDocs is that it has its own proxy, which supports Cross-Origin Resource Sharing (CORS) - This is only applicable when using the SaaS platform. Perfect! No need to configure your own API to support CORS for this purpose.
Additionally there are some custom 3scale fields that you can use inside the OAI spec to expose the currently logged in user's credentials for easy use. No copy-pasting of those multiple sets of credentials to files where you're never going to remember them. The ActiveDocs feature doesn't support OAuth 2.0 out-of-the-box. Therefore, this "how to" is intended to provide a means of enabling an OAuth 2.0 flow on the documentation page exposing your API services.
Prerequisites
- A Red Hat Single Sign-On server configured according to our Supported Configurations. Create the realm as documented.
- An HTTPS endpoint to access your server in the format:
https://{my-rhsso-server.com}/auth/realms/{realm-name}. - An OAI compliant spec with an
Authorizationheader field for each operation that requires a token to call the API.
What Will We Cover?
- How to configure Red Hat Single Sign-On server and the test client.
- How to configure 3scale.
- Implementing the custom JavaScript client and Liquid to enable Authorization Code flow.
Configure Red Hat Single Sign-On & Test Client
Once you have configured the server and realm according to the documentation mentioned above, set up the test client following the below steps. You only need to use this client as a verification of the integration. If you are already using the OpenID Connect integration, then simply update an existing client according to the steps below. Otherwise, first create a client as described in Configuring red Hat Single Sign-On 1.4.1 and then follow these 3 steps.
Step 1
Add a redirect_uri equivalent to the developer portal domain, plus the path where the documentation is hosted. This value can also be a wildcard if the ActiveDocs specs are to be hosted on multiple pages in the portal.
Step 2
Enable the Standard Flow enabled switch for the Authorization Code flow.
Step 3
Add the developer portal domain as the Web Origin value. For example: https://{account-name}.example.com. This is necessary for the CORS requests to succeed for each client.
Configure 3scale
If you're using the OpenID Connect integration then the 3scale platform manages the synchronization of clients into your Red Hat Single Sign-On server for you (in which case you can skip step 1). If you are also using the Red Hat Single Sign-On developer portal integration, then skip step 2 as well. Otherwise, follow all the steps below.
Step 1
Create a client in 3scale via the API if you have already created the client in your Red Hat Single Sign-On server. Use the credentials (client_id & client_secret) in the example request as shown here:
curl -v  -X POST "https://{account-name}-admin.3scale.net/admin/api/accounts/{account_id}/applications.xml"\
-d 'access_token={access_token}\
&plan_id={application_plan_id}\
&name={application_name}\
&description={application_description}\
&application_id={client_id}\
&application_key={client_secret}'
This is probably a bit quicker and easier for testing purposes. However, in production it makes much more sense that the synchronization is done from 3scale to Red Hat Single Sign-On, as these are the client and token masters respectively. The clients can be created via API in Red Hat Single Sign-On also.
Step 2
Add the Red Hat Single Sign-On URL to your developer portal SSO integrations if you haven't already done so. Follow the Configuring 3scale section to do this. This will then be reused in the Liquid templates in the developer portal.
Note: This would enable the SSO integration for the developer portal. If you do not want this, you can hardcode the URL in the keycloak-client partial.
Step 3
Import the OAI spec using the ActiveDocs API. The easiest way to manage all your different API specifications is to host them directly on the 3scale platform. An example API call is shown here to import a spec. You can prepend the body of the JSON spec with the following query parameters:
access_token={access_token}&name={spec_friendly_name}&system_name={spec_system_name}&body={
  "swagger": "2.0",
  "info": {
    "version": "1.0.0",
    "title": "Echo API",
    "description": "A sample echo APIII"
  },
  "securityDefinitions": {
  .....
}
You can pass the JSON file as a parameter with the cURL request as so:
curl -v -X POST "https://{account-name}-admin.3scale.net/admin/api/active_docs.json" -d @/path/to/file.json
Ensure that the spec has the following field definition in the parameters array for each operation that requires a token to call the API endpoint:
"parameters": [
          {
            "type": "string",
            "description": "Authorization header\n(format: Bearer [access_token])",
            "name": "Authorization",
            "in": "header",
            "required": true
          },
Add the JavaScript Client & Custom Liquid
First let's add the cookie.js module to the 3scale CMS. In the Developer Portal tab of the admin portal you can choose "New Page" or "New File" from the dropdown button. Configure the relevant attributes whether you add it as a file or page. Choose a Title that is appropriate; Section should be javascripts; Path should be the format /javascripts/cookie.js; Layout must be empty; and finally, the Content Type set to JavaScript.
Upload the partials for the oauth-widget & the keycloak-client to the CMS. The name you choose here will be reused in the main template in the {% include %} Liquid tag. From the same dropdown button choose "New Partial". Now upload the changes required to your documentation template. You can see the necessary Liquid tags in the example docs template. This will work with both SwaggerUI 2.1.3 & 2.2.10. In the older version the Liquid tag to include the ActiveDocs spec would have looked something like: {% active_docs version: '2.0', services: 'spec_system_name' %} the spec_system_name is what you passed in the previous cURL request when importing to 3scale. If you want to upgrade to the latest version supported in the 3scale platform, then follow the upgrade tutorial. You should reference the OAuth widget partial in the first {% include %} and the Keycloak client last.
Everything in the JavaScript and Liquid is fully dynamic, therefore all the account specific attributes like developer portal domain, documentation page URL, application client_id, client_secret etc., do not need to be hardcoded anywhere.*
How the Client Works
The OAuth widget checks if the current page contains a state parameter in the URL and renders the appropriate button to authorize or get_token:
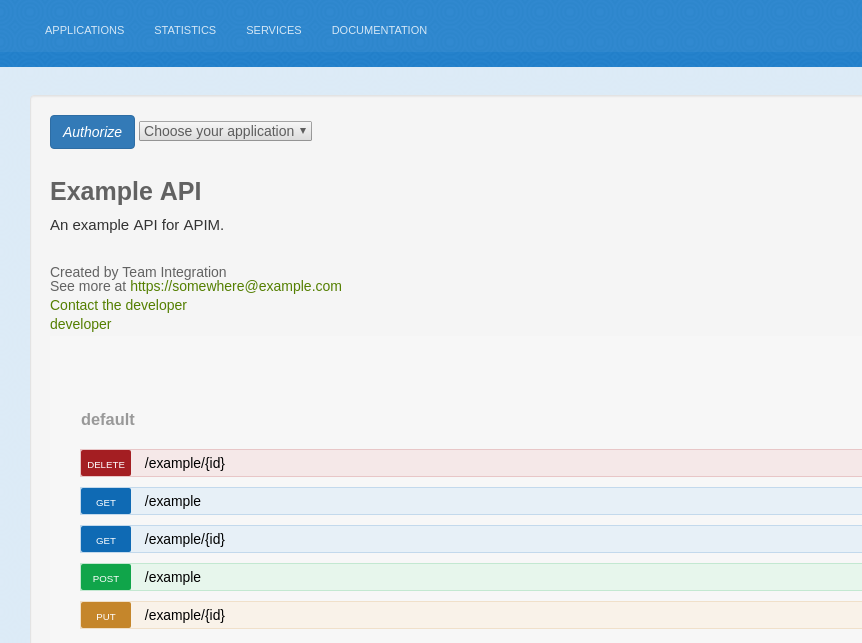
A dropdown of applications becomes available for the logged in user to retrieve a token. The application name and service name are rendered, but this is customizable to meet your needs. The authorize will execute the cookie.js module and it stores a state value in the cookies with a default expiration of 60 seconds. You can configure this expiration time as you wish. The browser then redirects the user to the login page, and upon successful authorization, a success message will be displayed. After the browser has redirected the user to the developer portal a get_token button will be rendered:
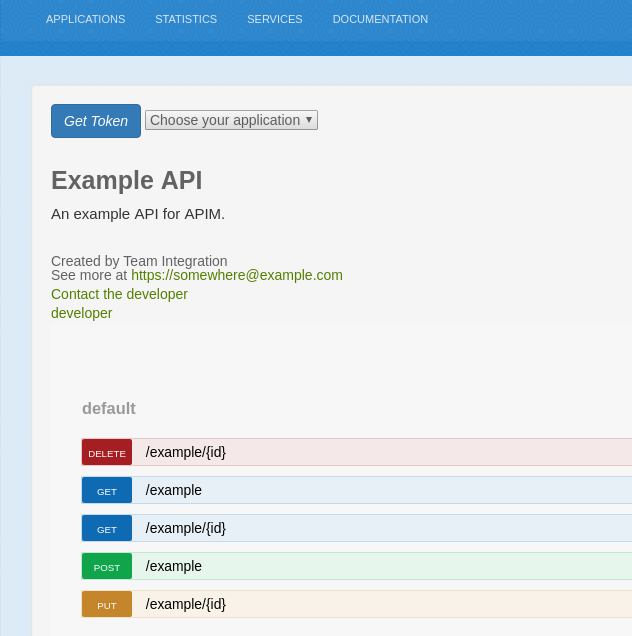
You must select the same application for the next leg of the flow, which will result in a token returned to the browser if successful. The Red Hat Single Sign-On server returns the state parameter during the callback. The client validates this against the original value that it stored in the cookie:

