In enterprise IT, a single physical server often has multiple entry points. There may be a frontend (FE) for production and application traffic, a backend (BE) for storage, database and other connectivity, and a management (ME) interface for administration. Ideally, this would all be in DNS so that it's structured, consistent, and reliable. Unfortunately, we regularly find that this is not the case, which presents reporting challenges that a platform like Red Hat Ansible Automation Platform (AAP) cannot sort out in isolation.
In Ansible Automation Platform, treating these as three separate hosts results in triple managed node counting. By structuring your inventory to treat one fully-qualified domain name (FQDN) as the "identity" and using variable-based "connectivity," you can manage complex networking while maintaining a single host count. This blog explains how to do that, so you can reduce duplication and extraneous node counting.
Identity and connectivity
The inventory_hostname variable is a server's unique identity for automation reporting. The ansible_host variable is the dial-out address used to target an automation endpoint. We can associate various bits of information and metadata to an actual server using these to work smarter.
Inventory file structure
By structuring each interface as a dictionary, you provide a clear source of truth for the server's network profile. In this configuration, we explicitly set ansible_host to target the name attribute of the selected interface, ensuring automation always relies on DNS/hostnames. For example, in a file called aap_inventory.yml:
---
all:
  hosts:
    server1.example.com:
      # These are all host-level variables for server1.example.com
      interfaces:
        frontend:
          name: server1-fe.example.com
          ip: 10.1.0.50
        backend:
          name: server1-be.example.com
          ip: 10.2.0.50
        management:
          name: server1-me
          ip: 10.3.0.50
      ansible_host: "{{ interfaces[target_network ].name }}"
      ansible_connection: local
      ansible_python_interpreter: "{{ ansible_playbook_python }}"
Note that I'm only using ansible_connection: local here so I can test locally.
Leveraging constructed inventories (optional)
Smart Inventories are deprecated, so use constructed inventories to help create groups of hosts you can target with automation. This builds upon the consistency and approach of the above inventory file but provides a great way to approach doing things at greater scale.
The constructed inventories plug-in dynamically groups hosts based on the metadata you defined. Even though automation uses the hostname, the constructed inventory can still "see" the IP addresses for instance to perform grouping logic.
To learn more about how to use constructed inventory, read this blog.
Your constructed inventory source variables:
plugin: constructed
strict: false
groups:
  # Group hosts by management IP subnet OR naming convention
  management: >-
    '10.3.0.' in (interfaces.management.ip | default('')) or
    '-me' in (interfaces.management.name | default(''))

  # Group hosts by frontend IP subnet OR naming convention
  frontend: >-
    '10.1.0.' in (interfaces.frontend.ip | default('')) or
    '-fe' in (interfaces.frontend.name | default(''))

  # Group hosts by backend IP subnet OR naming convention
  backend: >-
    '10.2.0.' in (interfaces.backend.ip | default('')) or
    '-be' in (interfaces.backend.name | default(''))

compose:
  ansible_host: "{{ interfaces[target_network ].name }}"
Now you can target the frontend, backend, and management of your servers in groups.
Integration with automation execution
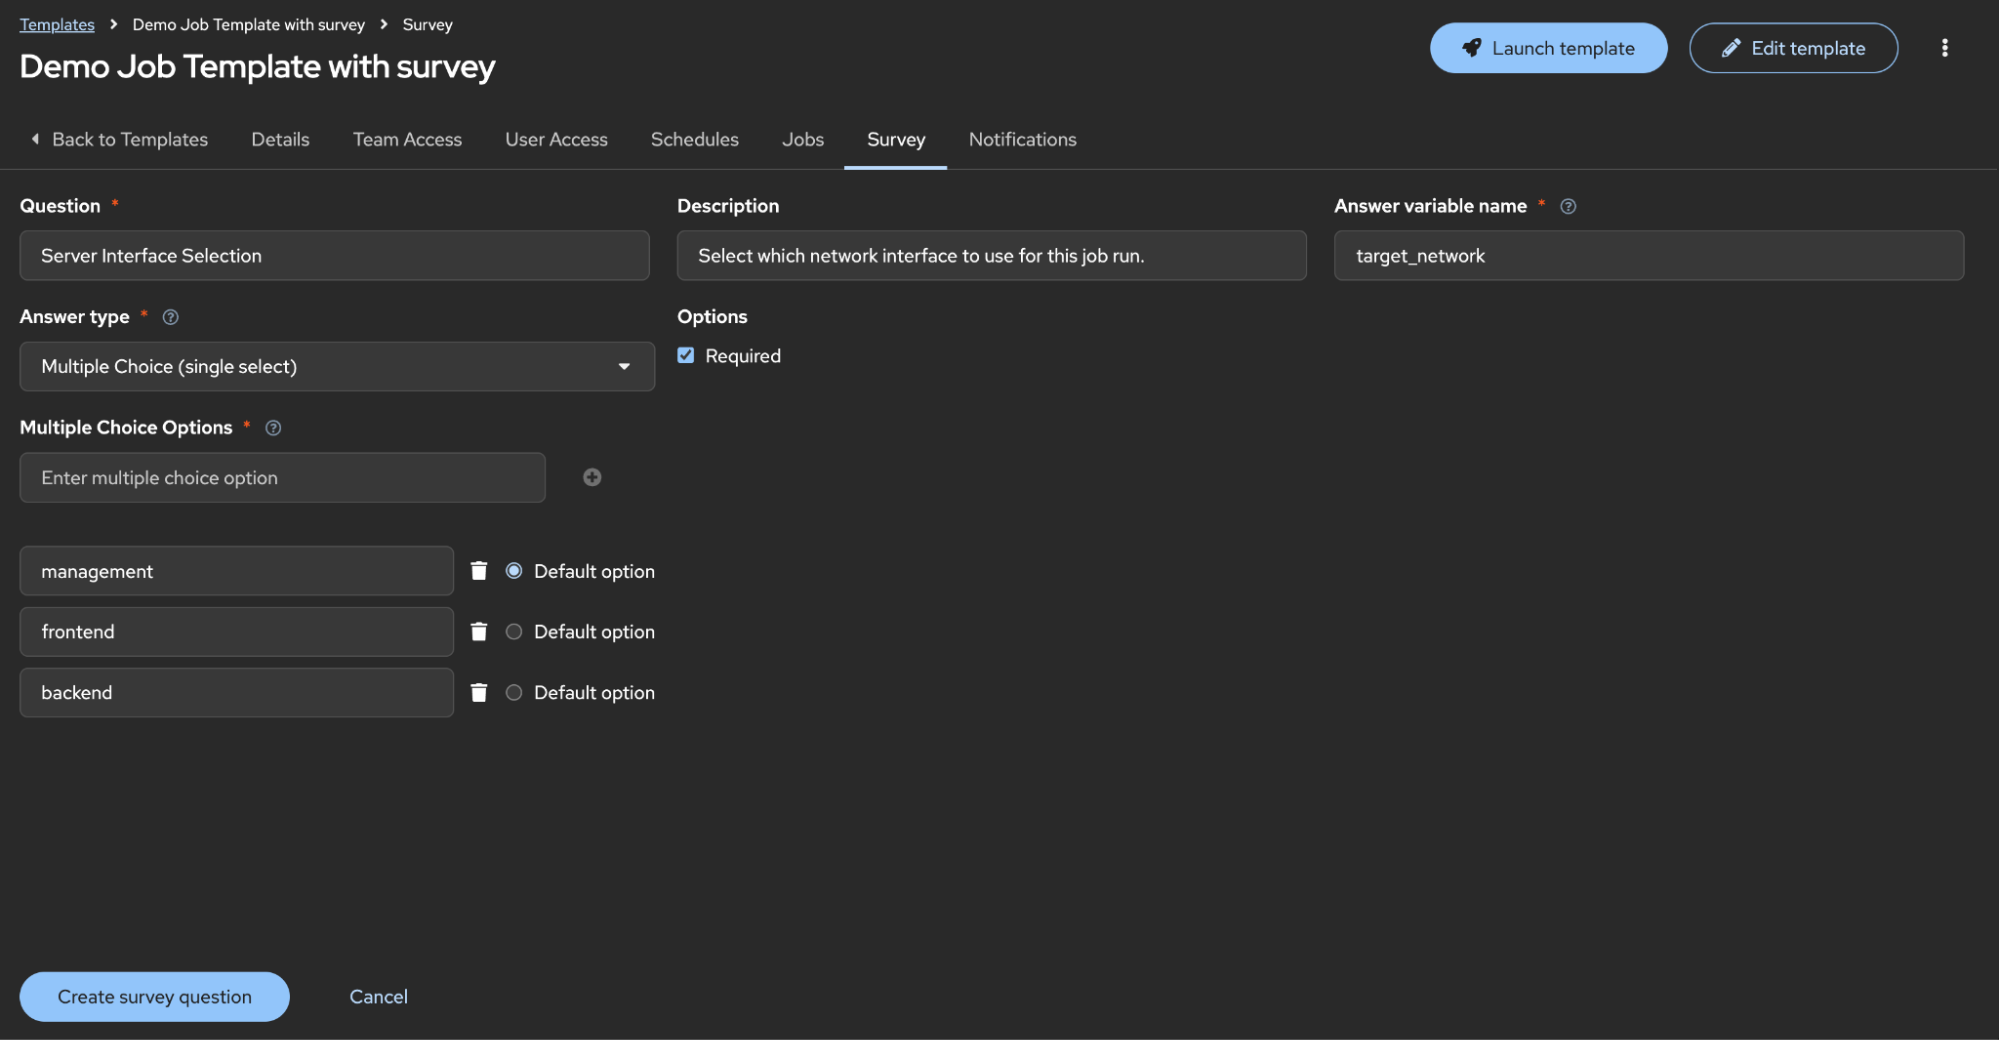
To make this operational in Ansible Automation Platform, you leverage the variable placeholder target_network to drive the logic at runtime. This is best achieved by using a survey on your job template, which allows you to choose the network path without needing to modify inventory files.
Implementation with Ansible Automation Platform surveys
Figure 1 shows a survey question in the UI:
If you want to use a configuration-as-code approach to automate this, you can see the JSON structure with the API such as:
https://aap-host-ui.example.com/api/controller/v2/job_templates/14/survey_spec/
This interacts with your inventory in a few ways:
- Selection: When a user launches a job, they choose an option (for example, the backend)
- Variable injection: Ansible Automation Platform passes
target_network: backendas anextra_var - Jinja resolution: Your inventory's
ansible_hostlogic detects the variable{{ interfaces['backend'].name }}and usessever1-be.example.com - Licensing: Because the job was launched against
server1.example.com, only one host metric is recorded, regardless of the choice made in the drop-down menu
The outcome: Single host counting
Ansible Automation Platform counts unique inventory_hostnames that have been the target of automation. By consolidating interfaces under one host, you ensure that server1.example.com is only counted once, regardless of which network path you take.
You can use the host metrics option in the Ansible Automation Platform UI to verify this.
Why you should use this automation technique
Using this method of network automation, you get several benefits, including:
- Identity: Uses a single host key (
server1.example.com) to ensure only one managed node is consumed in Ansible Automation Platform, regardless of network complexity. - Interface selection: Allows administrators to switch between frontend, backend, or management networks at runtime using simple surveys.
- Enforced naming: Locks connectivity to verified hostnames (
.name), ensuring consistency by preventing the use of raw IP addresses in automation (but they can still be used in inventory definitions). - Dual-match grouping: Leverages constructed inventory logic to organize hosts into logical groups using both naming conventions and hidden IP metadata, allowing you to target multiple groups of hosts across multiple inventories.