If you've ever needed to add a custom driver, deploy a critical hotfix, or install monitoring agents on your OpenShift nodes, you know the challenge: How do you customize Red Hat Enterprise Linux CoreOS without compromising its scalable design? Until now, this meant choosing between the reliability of stock Red Hat Enterprise Linux CoreOS or the flexibility of package mode Red Hat Enterprise Linux (RHEL) workers.
Meet image mode on Red Hat OpenShift, bringing you Red Hat Enterprise Linux CoreOS the way that it should be.
What is "on-cluster" image mode on OpenShift?
Image mode is a cloud-native approach to operating system management that treats your OS exactly like a container image. You define your OS configuration as code, build it as a unified image, deploy it consistently across your entire fleet, and update it directly from an OCI container registry. It's now fully supported in OpenShift 4.19. And we didn't forget our Extended Update Support (EUS) users; it's also fully supported in OpenShift Container Platform 4.18.21 or later.
With image mode now in OpenShift, you can:
- Add non-containerized agents, drivers, or monitoring tools to Red Hat Enterprise Linux CoreOS.
- Deploy hotfixes without waiting for the next OpenShift release.
- Maintain customizations automatically through cluster upgrades.
- Keep the single-click upgrade experience you love about OpenShift.
Conveniently, the entire build process happens on your cluster with no external CI/CD required.
The journey to image mode
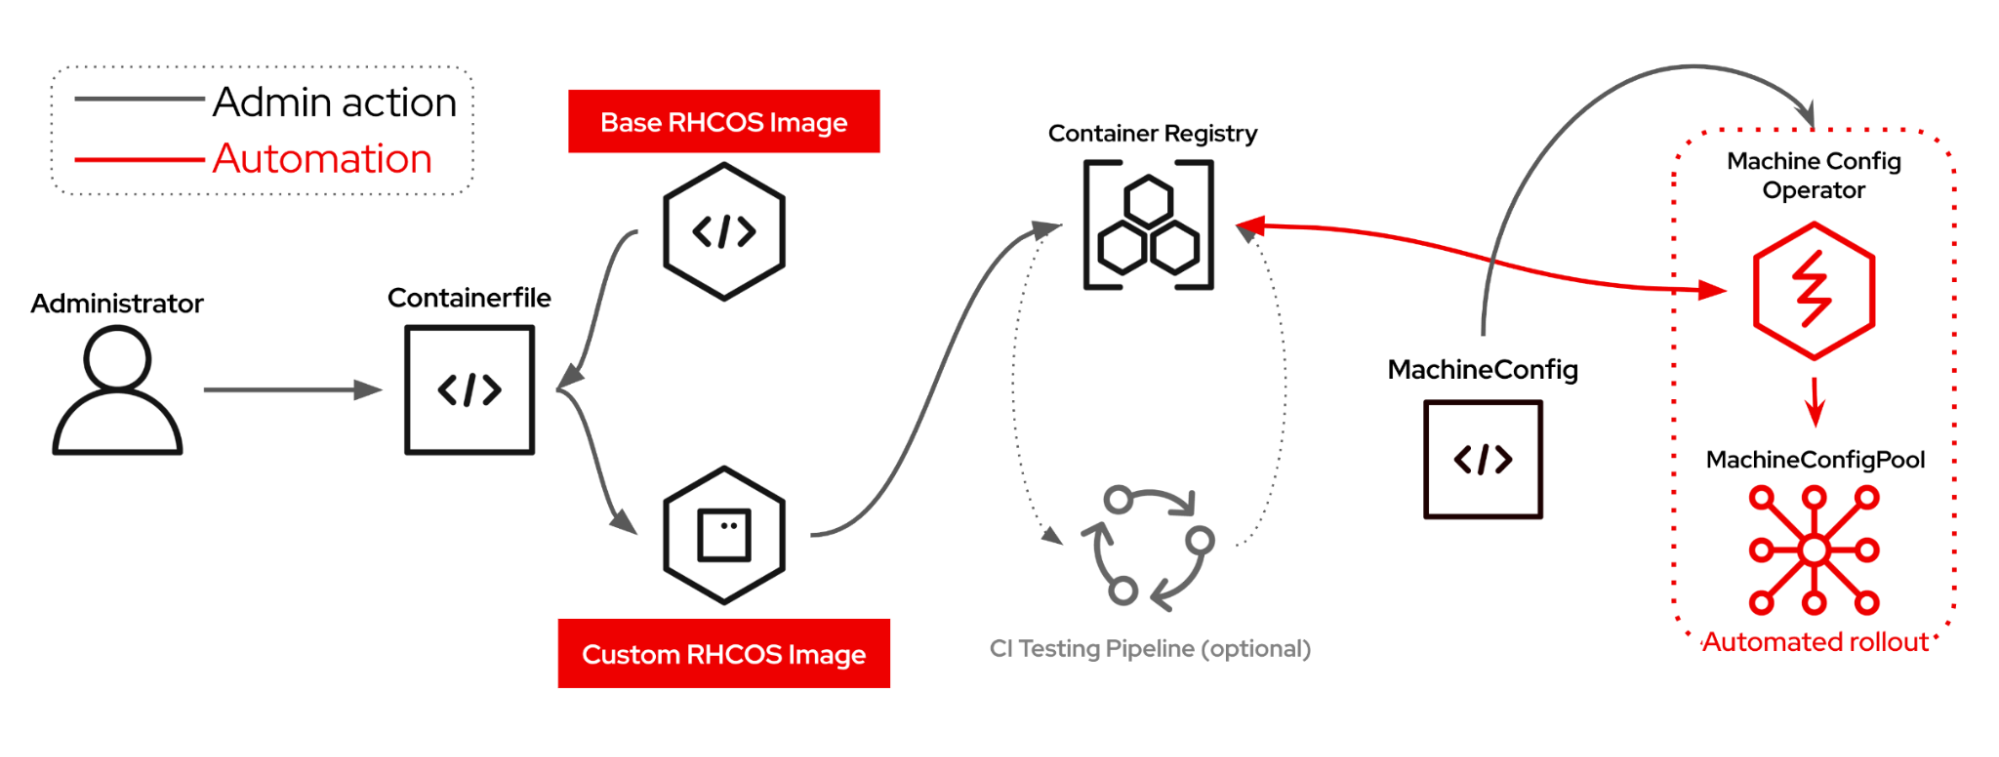
We started this journey in 2023 when we first shipped RHEL CoreOS as a container image. We introduced the "off-cluster layering" approach that lets platform engineers build custom Red Hat Enterprise Linux CoreOS images in their own environments (see Figure 1). That's fantastic for emergency scenarios, but it requires external build infrastructure and some manual integration.

Taking inspiration from how OpenShift uses Kubernetes to manage Kubernetes, we asked: Why not use the same cloud-native tools built into the cluster for the OS itself? On-cluster layering is that natural evolution. Now your customizations are built, tested, and deployed using the same declarative, GitOps-friendly workflows you use for applications.
What about bootc?
If you're familiar with image mode for RHEL and the bootc project, you might be wondering how this relates. While OpenShift will transition to bootc sometime in 2026, this is designed to be a seamless, non-event for users. RHEL CoreOS currently uses RPM-OSTree native containers, a technology that served as the inspiration for bootc. This provides the same user experience and container image capabilities.
OpenShift has specific requirements for Red Hat Enterprise Linux CoreOS that we're still bridging in bootc. Rather than wait, we're delivering image mode capabilities now with a smooth migration to bootc planned. What's important is that everything you learn today—the Containerfile syntax, the workflows, the patterns—will work identically throughout the process. We have your back.
How it works: Architecture overview
The new on-cluster system introduces three key components:
MachineOSConfig: A Kubernetes custom resource that defines registry details and customizations for its targetedMachineConfigPool. OneMachineOSConfigper customizedMachineConfigPool.- Build Controller: This runs inside a pod called MachineOS Builder where it watches for customization requests and orchestrates builds.
- Build Job: This creates the actual image customization and manages failures and retries.
Here's the workflow:
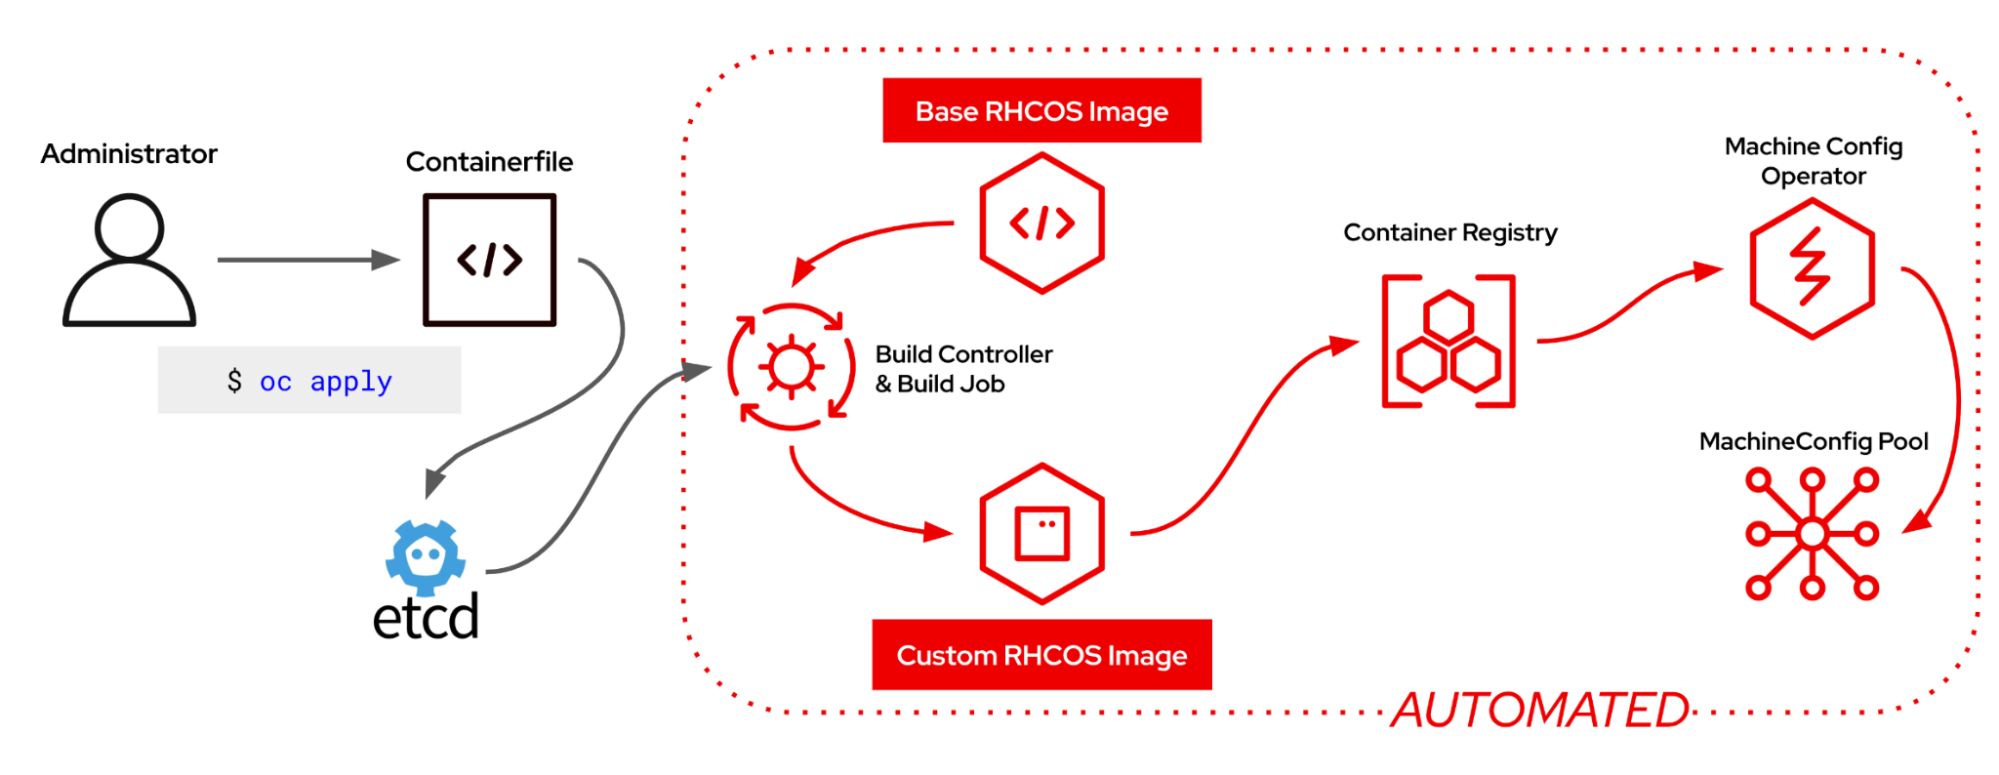
MachineOSConfig Manifest → Build Controller → Job → Custom Image → Node RolloutWhen you apply a customization:
- You define and apply your changes using standard Containerfile directives in a
MachineOSConfigYAML manifest. - The build controller detects the change and dispatches a build job.
- The builder pod pulls the correct Red Hat Enterprise Linux CoreOS base image for your OpenShift version.
- Your customizations are layered on top using Buildah.
- On success, the new image rolls out to the specified machine pools just like a normal OpenShift upgrade.
- On failure, the upgrade halts so you can investigate. No broken nodes!
Once you are happy with your configuration, there's nothing else to do but respond to potential future build failures. Your custom content is now built and rolled out on every OpenShift update. Figure 2 illustrates the on-cluster image mode workflow.

Key concept: The /var limitation
Before diving into examples, there's one critical concept to understand: Red Hat Enterprise Linux CoreOS will not merge changes to /var after the initial cluster install. For the purposes of customization, only consider the /usr directory tree. This is by design. We don't want to overwrite the local machine state. This means that software installing to /opt needs special handling, as /opt is symlink to /var/opt in OSTree and bootc systems. Thankfully, you can often work around this limitation in your build process.
One common approach is to let the install proceed and simply move the results under /usr. You will need to create /var/opt and use /usr/lib/tmpfiles.d functionality to create symlinks so that the binaries work as expected. Take a look at the Containerfile below.
FROM quay.io/fedora/fedora-coreos:stable
# This example is for illustrative purposes only. FCOS is not officially supported by Red Hat or HPE.
RUN mkdir /var/opt && \
    rpm -Uvh https://downloads.linux.hpe.com/repo/stk/rhel/8/x86_64/current/hp-scripting-tools-11.60-7.rhel8.x86_64.rpm && \
    mv /var/opt/hp/ /usr/lib/hp && \
    echo 'L /opt/hp - - - - ../../usr/lib/hp' > /usr/lib/tmpfiles.d/hp.conf && \
   bootc container lint
   # NOTE: on 4.18 use `ostree container commit` in place of
   # `bootc container lint`
For the curious, bootc container lint (and ostree container commit in OpenShift 4.18) verifies certain conditions in /var and cleans up /tmp.
Getting started
Before you begin, ensure you have the necessary prerequisites in place. You will need a registry endpoint and push secret for that registry. Those are the only strict requirements.
Enabling the OpenShift internal registry (optional)
For development and test environments, you might use the OpenShift internal registry. It's disabled by default, but it's just fine for our needs here and the easiest way to get started in your lab without external dependencies. For production, consider using your enterprise registry for better manageability and compliance. Let's get started.
This Red Hat Knowledgebase article will walk you through enabling the OpenShift registry with local persistent storage.
As noted in the article, we'll need to allow the registry to enable default route creation:
oc patch configs.imageregistry.operator.openshift.io/cluster --patch '{"spec":{"defaultRoute":true}}' --type=mergeCheck to see if the default route is live (this can take a few minutes to return without error):
oc get route default-route -n openshift-image-registry --template='{{ .spec.host }}'Since we're using the internal registry, we'll create an image stream to store our images:
oc create imagestream os-images -n openshift-machine-config-operatorNext, let's grab the pushSpec:
oc get imagestream/os-images -n openshift-machine-config-operator -o=jsonpath='{.status.dockerImageRepository}'This should return:
image-registry.openshift-image-registry.svc:5000/openshift-machine-config-operator/os-imagesLastly, we'll need the name of the push secret to write new images:
oc get secrets -o name -n openshift-machine-config-operator -o=jsonpath='{.items[?(@.metadata.annotations.openshift\.io\/internal-registry-auth-token\.service-account=="builder")].metadata.name}'In my case, this returns builder-dockercfg-rfl85. Yours will have a different alphanumeric ending after dockercfg-. We'll save this output for our configuration later.
Your first customization
Let's start with a simple example. Your included RHEL subscription is automatically wired into the build pod, so adding packages from the RHEL BaseOS and AppStream content sets is simple. Say you want to add the tcpdump utility to your nodes. Note that in the case of single node OpenShift, you must target the master pool. First we'll create a MachineOSConfig manifest (we'll call it tcpdump.yaml, but the file name doesn't matter) with the following contents:
apiVersion: machineconfiguration.openshift.io/v1
kind: MachineOSConfig
metadata:
  name: master-image-config
spec:
  machineConfigPool:
    name: master
  containerFile:
  - content: |
      FROM configs AS final
      RUN dnf install -y tcpdump && \
          bootc container lint
          # NOTE: on 4.18 use `ostree container commit` in place of
          # `bootc container lint`
  # Here is where you can select an image builder type. For now, we only
  # support the "Job" type that we maintain ourselves. Future
  # integrations can / will include other build system integrations.
  imageBuilder:
    imageBuilderType: Job
  # Here is where you specify the name of the push secret you use to push
  # your newly-built image to.
  renderedImagePushSecret:
    name: builder-dockercfg-rfl85
  # Here is where you specify the image registry to push your newly-built
  # images to.
  renderedImagePushSpec: image-registry.openshift-image-registry.svc:5000/openshift-machine-config-operator/os-images:latest
Note
Important: Replace the renderedImagePushSecret here (builder-dockercfg-rfl85) with your registry secret and change the renderedImagePushSpec if not using the internal registry.
The inputs are:
name: The name of theMachineOSConfig(e.g.,master-image-config).machineConfigPool: The target machine config pool (e.g.,worker,master).content: The Containerfile content that defines your customizations (here:RUN dnf install -y tcpdump).imageBuilderType: Today, that is alwaysJob(we're using Kubernetes Jobs to take advantage of automatic retries).renderedImagePushSpec: An OCI registry endpoint to push the image.renderedImagePushSecret: The write access secret for your registry.
Apply your new MachineOSConfig:
oc apply -f tcpdump.yamlThe Machine Config Operator (MCO) will start the build controller pod (the name will start with machine-os-builder), which will quickly determine that a build is necessary. To track the build in progress, you should look for a pod in the MCO namespace starting with build, followed by the name of your MachineOSConfig. Let's watch the MCO namespace and wait for the build to appear:
oc get pods -n openshift-machine-config-operator -w
NAME                                                                    READY   STATUS              RESTARTS      AGE
build-master-image-config-41a842710c6d989d331f06a52d6d5e4wzzl7         0/2     ContainerCreating   0             5s
kube-rbac-proxy-crio-hpe-dl365gen10plus-01.khw.eng.rdu2.dc.redhat.com   1/1     Running             3 (19h ago)   19h
machine-config-controller-7d666c9fd6-hvjnc                              2/2     Running             0             18h
machine-config-daemon-fffq7                                             2/2     Running             0             18h
machine-config-operator-797f59db97-jldms                                2/2     Running             0             19h
machine-config-server-mjlzl                                             1/1     Running             0             18h
machine-os-builder-55768c88cf-jqvcj                                     1/1     Running             0             16s
build-master-image-config-41a842710c6d989d331f06a52d6d5e4wzzl7         2/2     Running             0             44s
The last pod is our build. We can now stream the build logs in progress:
oc logs -f -n openshift-machine-config-operator build-master-image-config-41a842710c6d989d331f06a52d6d5e4wzzl7Assuming it completes without error, your newly customized image will start rolling out automatically.
The build environment and third-party software
Since the build job runs in a pod on the cluster and not a local build context, you have several options for bringing in third-party or your own content:
- Inline content: Create config files and run scripts directly using heredoc notation.
- Direct downloads: Use
curlto fetch files from any accessible URL. - Package repositories: Configure accessible YUM/DNF repositories and keep your add-ons up to date on each build.
- Multi-stage builds: Pull content from other container images.
In this Containerfile example using HPE's AMSD tool, we'll use an inline approach to create repository definitions and work around a package that expects to write a text file into /opt.
# On-cluster image mode is a multi-stage build where "configs" is the stock image plus
# machineconfig content and "final" is the final image
FROM configs AS final
RUN rpm --import https://downloads.linux.hpe.com/repo/spp/GPG-KEY-spp
RUN rpm --import https://downloads.linux.hpe.com/repo/spp/GPG-KEY2-spp
# Create repo file for Gen 11 repo
RUN cat <<EOF > /etc/yum.repos.d/hpe-sdr.repo
[spp]
name=Service Pack for ProLiant
baseurl=https://downloads.linux.hpe.com/repo/spp-gen11/redhat/9/x86_64/current
enabled=1
gpgcheck=1
gpgkey=https://downloads.linux.hpe.com/repo/spp/GPG-KEY-spp,https://downloads.linux.hpe.com/repo/spp/GPG-KEY2-spp
EOF
# Create directory to satisfy amsd & install packages
RUN mkdir /var/opt && \
    dnf install -y amsd
# Move the /opt content to the system partition
RUN mkdir /usr/share/amsd && mv /var/opt/amsd/amsd.license /usr/share/amsd/amsd.license && \
    bootc container lint
    # NOTE: on 4.18 use `ostree container commit` in place of
    # `bootc container lint`
Power tip: Use yq to insert your Containerfile content
Use yq to save yourself some YAML indentation pain when working with Containerfiles like the one above. Although not included in RHEL, yq can be found in EPEL and on various platforms such as macOS (via Homebrew), Windows, and Fedora.
Begin by creating your MachineOSConfig. Instead of embedding Containerfile directives directly, we'll use a placeholder in the content section, like so:
apiVersion: machineconfiguration.openshift.io/v1
kind: MachineOSConfig
metadata:
  name: master-image-config
spec:
  machineConfigPool:
    name: master
  containerFile:
  - content: |
      <containerfile contents>
  # Here is where you can select an image builder type. For now, we only
  # support the "Job" type that we maintain ourselves. Future
  # integrations can / will include other build system integrations.
  imageBuilder:
    imageBuilderType: Job
  # Here is where you specify the name of the push secret you use to push
  # your newly-built image to.
  renderedImagePushSecret:
    name: builder-dockercfg-rfl85
  # Here is where you specify the image registry to push your newly-built
  # images to.
  renderedImagePushSpec: image-registry.openshift-image-registry.svc:5000/openshift-machine-config-operator/os-images:latest
We'll save this to machineosconfig.yaml. Keeping our Containerfile in the same directory, we can insert it with the correct indentation by running:
export containerfileContents="$(cat Containerfile)"yq -i e '.spec.containerFile[0].content = strenv(containerfileContents)' ./machineosconfig.yamlImportant considerations
As you begin customizing your nodes, keep the following in mind.
Reboot policies
Currently, machine pools using on-cluster image mode are incompatible with node disruption policies. This means custom and system reboot suppression rules won't work. Nodes will reboot after any and all image and configuration updates. This limitation is targeted for resolution in OpenShift 4.20.
Changing or deleting your configuration
Typically, you would use oc replace to update the in-cluster object from your locally edited manifest. If your customization was only temporarily needed, simply delete the MachineOSConfig for the particular pool and the nodes will be rebooted into the default image.
Power tip 2: Testing your builds with an empty pool
Create an empty machine config pool for testing:
apiVersion: machineconfiguration.openshift.io/v1
kind: MachineConfigPool
metadata:
  name: test-pool
spec:
  machineConfigSelector:
    matchLabels:
      machineconfiguration.openshift.io/role: test-pool
  nodeSelector:
    matchLabels:
      node-role.kubernetes.io/test-pool: ""
  paused: false
After creating the new pool, create a MachineOSConfig that targets it. The build will run even without nodes, letting you validate your content and settings before applying to active pools.
Roadmap: What's next
Today's on-cluster image build pod is just the beginning; the full vision of image mode extends beyond simple customization. We want to bring enterprise-grade CI/CD practices to the operating system layer. Imagine treating your OS images exactly like any other critical application: automated testing that validates your customizations, security scanners that check for vulnerabilities before deployment, approval gates that ensure compliance, and cryptographic signatures that guarantee authenticity. That's where we're heading.
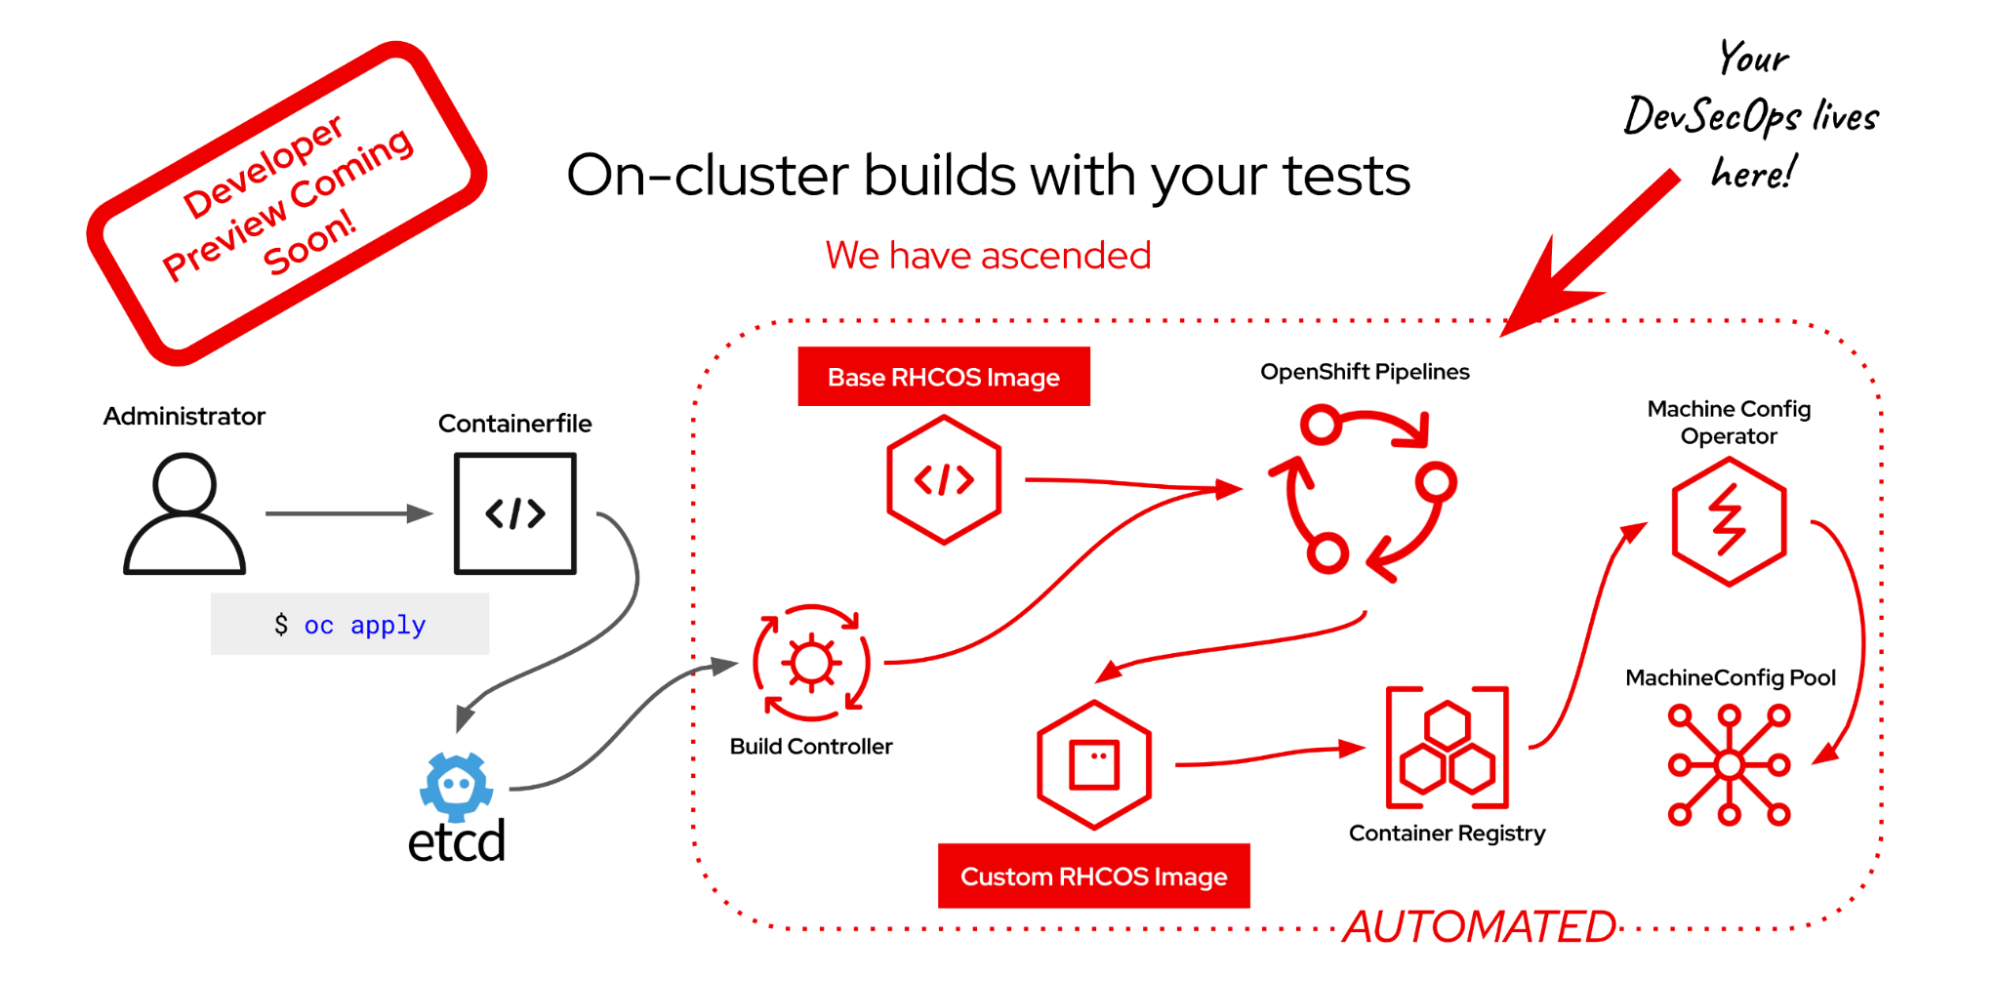
Pipeline integration: Your DevSecOps, your OS
To that end, we plan to integrate OpenShift Pipelines (Tekton) to extend on-cluster image mode. This allows you to build images with complete customization. Our early demos demonstrate that Red Hat Enterprise Linux CoreOS images can be processed through the same pipelines as your applications, enabling the implementation of custom test suites and security controls. See Figure 3.

This builder will be available as an option alongside the default builder, giving you the flexibility to start simply and evolve toward full pipeline automation when you're ready.
What we're working on now
- Node disruption policy compatibility (targeted for OpenShift 4.20)
- Image pruning
- Expanded builder options and customization
- Smooth transition to bootc as the underlying technology
- Install-time support
- Hosted control planes integration
Ready to transform your OpenShift infrastructure?
Image mode for OpenShift is a fundamental change in how to approach node customization at scale.
We're excited to see what you build with this capability. Whether you're adding specialized drivers, deploying critical agents, or creating purpose-built node configurations, we want to hear about your use cases, challenges, and successes. Your real-world experiences will help shape the future of image mode on OpenShift. Please reach out!
Look out for a follow-up post where we'll take a deep dive into managing and troubleshooting the build process, everything you need to know to debug failed builds and get the most out of image mode.
Welcome to the future of OpenShift node management.
