Redhat Developers  Logo
  • AI

    Get started with AI

    • Red Hat AI
      Accelerate the development and deployment of enterprise AI solutions.
    • AI learning hub
      Explore learning materials and tools, organized by task.
    • AI interactive demos
      Click through scenarios with Red Hat AI, including training LLMs and more.
    • AI/ML learning paths
      Expand your OpenShift AI knowledge using these learning resources.
    • AI quickstarts
      Focused AI use cases designed for fast deployment on Red Hat AI platforms.
    • No-cost AI training
      Foundational Red Hat AI training.

    Featured resources

    • OpenShift AI learning
    • Open source AI for developers
    • AI product application development
    • Open source-powered AI/ML for hybrid cloud
    • AI and Node.js cheat sheet

    Red Hat AI Factory with NVIDIA

    • Red Hat AI Factory with NVIDIA is a co-engineered, enterprise-grade AI solution for building, deploying, and managing AI at scale across hybrid cloud environments.
    • Explore the solution
  • Learn

    Self-guided

    • Documentation
      Find answers, get step-by-step guidance, and learn how to use Red Hat products.
    • Learning paths
      Explore curated walkthroughs for common development tasks.
    • Guided learning
      Receive custom learning paths powered by our AI assistant.
    • See all learning

    Hands-on

    • Developer Sandbox
      Spin up Red Hat's products and technologies without setup or configuration.
    • Interactive labs
      Learn by doing in these hands-on, browser-based experiences.
    • Interactive demos
      Click through product features in these guided tours.

    Browse by topic

    • AI/ML
    • Automation
    • Java
    • Kubernetes
    • Linux
    • See all topics

    Training & certifications

    • Courses and exams
    • Certifications
    • Skills assessments
    • Red Hat Academy
    • Learning subscription
    • Explore training
  • Build

    Get started

    • Red Hat build of Podman Desktop
      A downloadable, local development hub to experiment with our products and builds.
    • Developer Sandbox
      Spin up Red Hat's products and technologies without setup or configuration.

    Download products

    • Access product downloads to start building and testing right away.
    • Red Hat Enterprise Linux
    • Red Hat AI
    • Red Hat OpenShift
    • Red Hat Ansible Automation Platform
    • See all products

    Featured

    • Red Hat build of OpenJDK
    • Red Hat JBoss Enterprise Application Platform
    • Red Hat OpenShift Dev Spaces
    • Red Hat Developer Toolset

    References

    • E-books
    • Documentation
    • Cheat sheets
    • Architecture center
  • Community

    Get involved

    • Events
    • Live AI events
    • Red Hat Summit
    • Red Hat Accelerators
    • Community discussions

    Follow along

    • Articles & blogs
    • Developer newsletter
    • Videos
    • Github

    Get help

    • Customer service
    • Customer support
    • Regional contacts
    • Find a partner

    Join the Red Hat Developer program

    • Download Red Hat products and project builds, access support documentation, learning content, and more.
    • Explore the benefits

Biometric authentication with WebAuthn and SSO

November 9, 2021
Philip Hayes
Related topics:
Security
Related products:
Red Hat OpenShift

    Providing users with secure, convenient authentication that doesn't rely solely on passwords is a challenge for many application developers and administrators. Passwords can be compromised through leaks, or cracked by malicious intruders, and strong passwords may be too complex for users to remember.

    WebAuthn support in version 7.5 of Red Hat's single sign-on technology (SSO) makes it possible to use biometric data for user authentication. With WebAuthn, users can authenticate using a fingerprint scanner or face recognition, features available in most modern smartphones and laptops.

    This article shows you how to configure Red Hat's SSO to use WebAuthn for biometric user authentication. Our example is based on a JavaScript application built using the React framework, along with the Google WebAuthn emulator.

    What is WebAuthn?

    The Web Authentication API (WebAuthn) is part of the FIDO2 specification from the FIDO Alliance. The FIDO Alliance was formed in 2012 by tech industry leaders such as PayPal and Lenovo, with the goal of providing open and free authentication standards to help reduce the world's reliance on passwords. FIDO stands for fast identity online.

    User authentication with WebAuthn

    Figure 1 shows the components required to implement a WebAuthn user authentication flow. The main components are the relaying party (in this case, Red Hat's SSO), a client application (in this case, a JavaScript application using the popular React framework), the browser, and a device compatible with the Client to Authenticator Protocol (CTAP).

    Some components of WebAuthn run in SSO and others in the client's browser.
    Figure 1. The WebAuthn authentication flow in SSO and the browser.

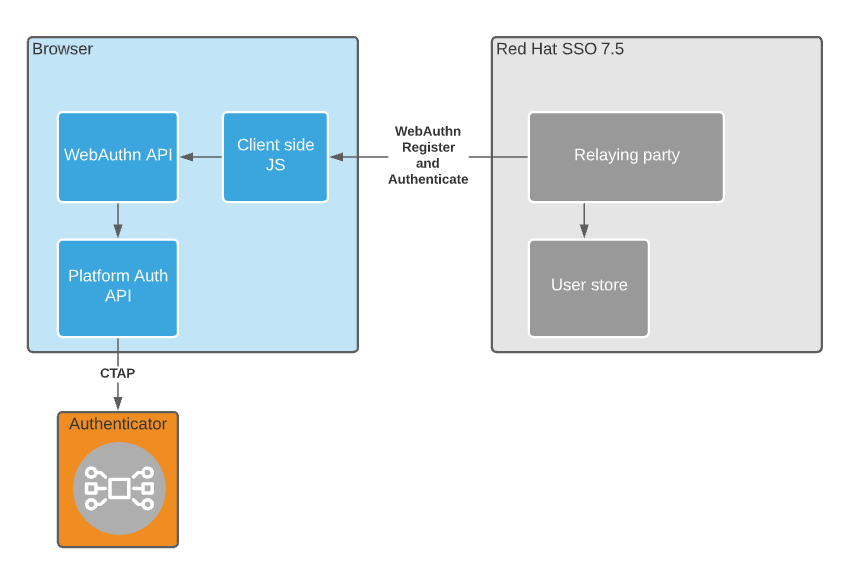
    To test WebAuthn, you can use a biometrics device such as the built-in fingerprint scanner in Apple MacBooks or the WebAuthn emulator in Google Chrome. We'll test WebAuthn using Google's WebAuthn emulator to create a virtual biometrics device. To enable the WebAuthn emulator in your Chrome browser, follow the instructions in the Chrome documentation.

    Configure Red Hat's SSO to use WebAuthn

    The first thing we'll do is configure SSO for WebAuthn. We'll use Red Hat's SSO 7.5, but you can also use version 15 or higher of Keycloak. Follow the steps in this section or import the exported demo from this GitHub page.

    Red Hat's single sign-on technology uses the concept of realms to manage sets of users, credentials, roles, and groups. A user belongs to and logs into a realm. Realms are isolated from one another and can manage and authenticate only the users that they control. For more information about creating realms, refer to the Red Hat documentation.

    We'll create a realm called "Demo" and configure the realm to allow user registration. Figure 2 shows the realm configuration that enables user registration.

    The application's Login tab allows you to configure the realm.
    Figure 2. The application's Login tab allows you to configure the realm.

    Select the Authentication menu on the left-hand panel, click Register, select WebAuthn Register as a required action, and ensure it's enabled. Figure 3 shows WebAuthn added to the list of required actions.

    The WebAuthn Register option is part of the required actions on the Authentication screen.
    Figure 3. WebAuthn Register is one of the required actions on the Authentication screen.

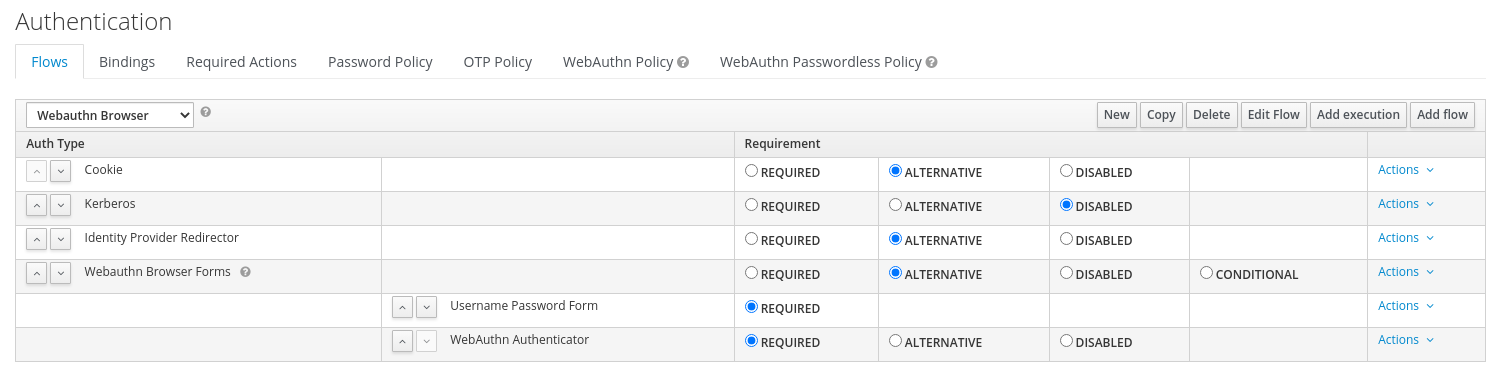
    Create a copy of the browser flow and name it "WebAuthn Browser flow." Configure the flow to require the WebAuthn authenticator execution as shown in Figure 4.

    Several types of authentication are required for the WebAuthn browser flow.
    Figure 4. Several types of authentication are required for the WebAuthn browser flow.

    Create a copy of the registration flow and name it "WebAuthn Registration flow." Configure the flow to require the WebAuthn Authenticator execution flow as shown in Figure 5.

    Several types of authentication are required for WebAuthn registration.
    Figure 5. Several types of authentication are required for WebAuthn registration.

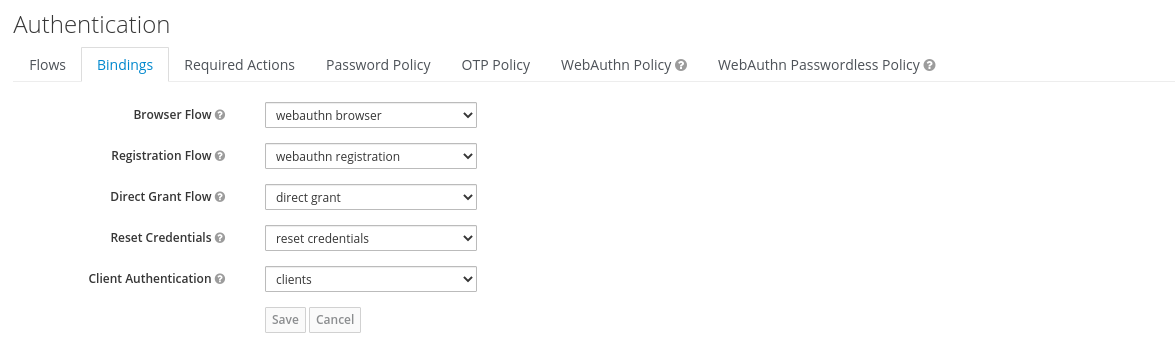
    Click the Bindings tab and set the browser flow and registration flow to use the WebAuthn browser flow and WebAuthn registration flow, respectively. Figure 6 shows the Bindings tab configured with the WebAuthn browser flow and WebAuthn registration flow selected.

    The Bindings tab on the Authentication screen should show the browser flow and the registration flow.
    Figure 6. The Bindings tab on the Authentication screen should show the browser flow and the registration flow.

    Configure a test client for biometric authentication

    Now that you've configured the realm, you need a client to test authentication.

    Clients are entities that can request the use of SSO to authenticate a user. Most often, clients are applications and services that want to use SSO to secure themselves and provide a single sign-on solution. Clients can also be entities that just want to request identity information or an access token so that they can securely invoke other services on the network that are secured by SSO. For more information about creating clients, refer to Red Hat's single sign-on documentation.

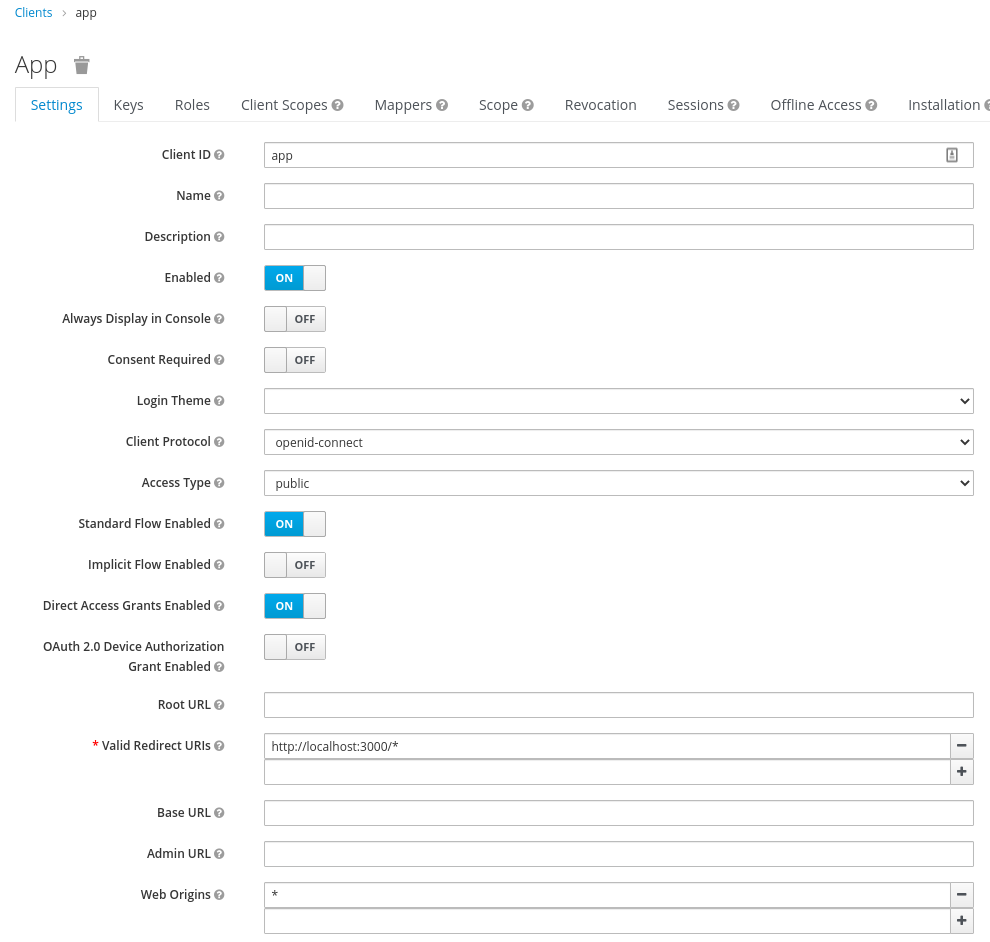
    Create a client called "App" and configure a valid redirect URL and web origins for it. Figure 7 shows the client creation form with the redirect URL and web origins configured for local testing.

    The creation form for an application allows you to configure how clients connect.
    Figure 7. The creation form for an application allows you to configure how clients connect.

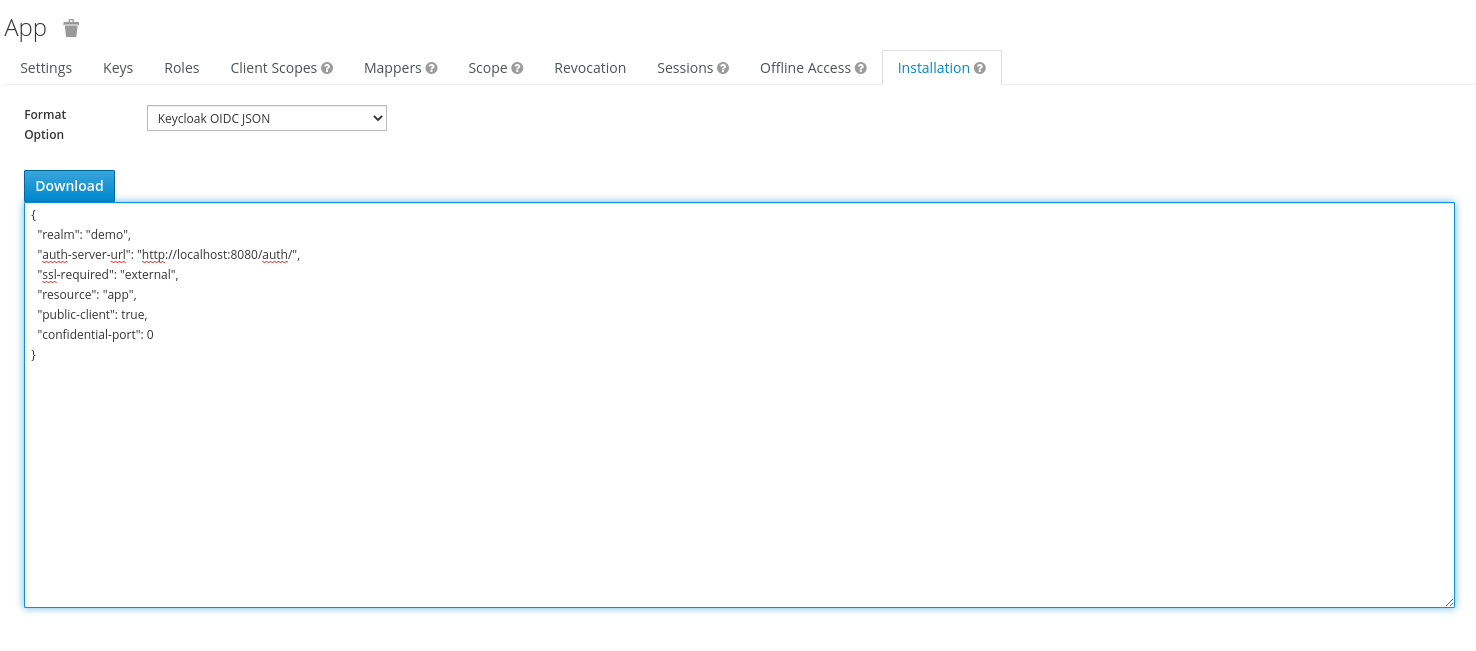
    Click the Installation tab and make a copy of the Keycloak JSON configuration for OpenID Connect (OIDC) authentication. If you're running Keycloak locally, ensure that the auth-server-url field refers to localhost instead of 127.0.0.1. WebAuthn requires a hostname, not an IP address. Figure 8 shows the installation tab with the Keycloak OIDC configuration.

    The Installation tab of the application configuration screen show the Keycloak OIDC configuration.
    Figure 8. The Installation tab of the application configuration screen show the Keycloak OIDC configuration.

    Deploy a React client to test WebAuthn

    Finally, it's time to test your single sign-on setup using a simple JavaScript React client. Download the client from its GitHub repository.

    Open the code in your favorite IDE or editor and replace the contents of the public/keycloak.json file with the JSON copied from the installation tab of your client application. To launch the sample app, run the following commands in your terminal:

    $ npm install
    $ npm start

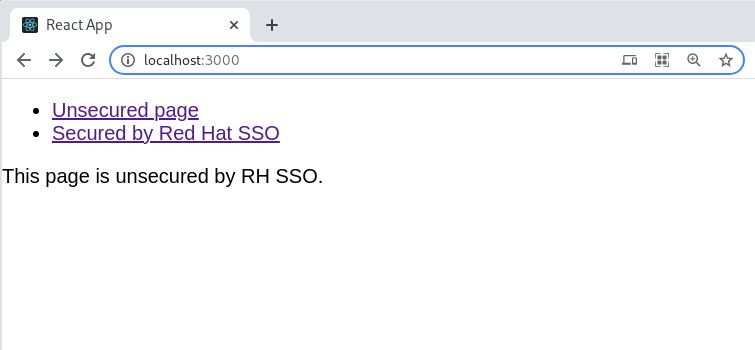
    Once these commands are complete, your browser should launch a test page as shown in Figure 9.

    The default homepage of the demo application shows that the application is currently unsecured.
    Figure 9. The demo application's default homepage shows that the application is currently unsecured.

    Testing SSO and WebAuthn

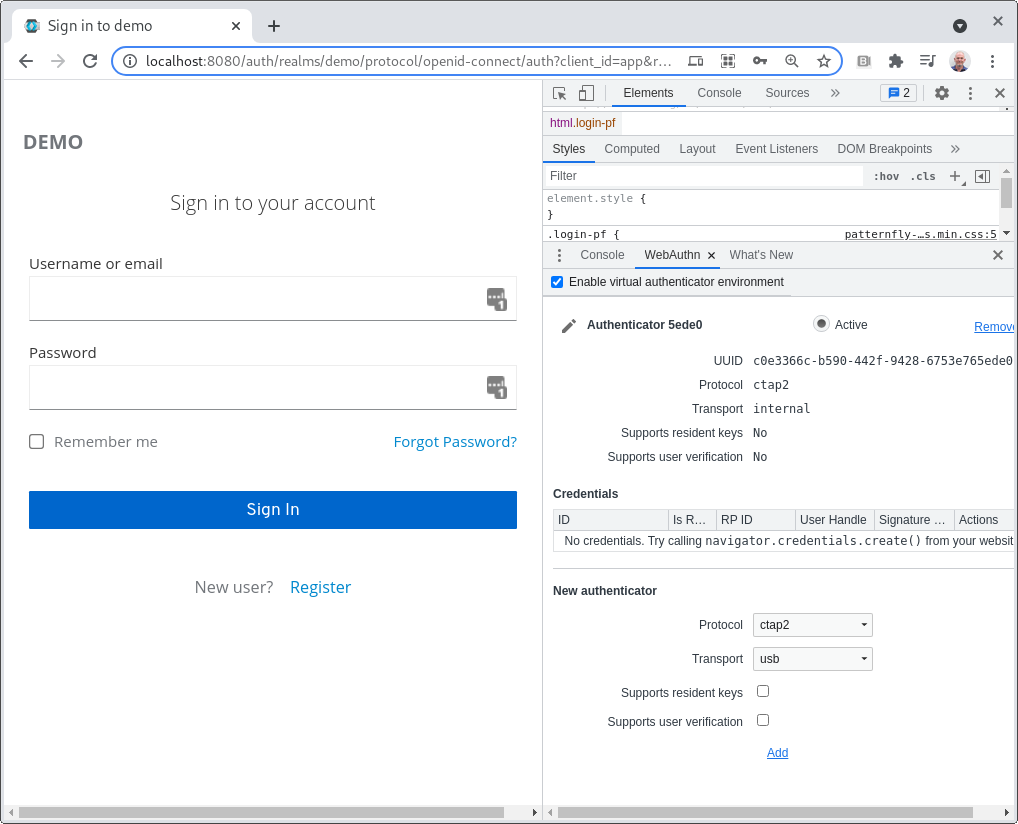
    To test SSO and WebAuthn, enable the Chrome WebAuthn emulator as described earlier, and then click Secured by Red Hat SSO. You should be directed to a login page with an option to register. Figure 10 shows an example login page.

    After you enable SSO, the demo application shows a login screen.
    Figure 10. After you enable SSO, the demo application shows a login screen.

    Click the Register link to create a user account. You will be directed to Red Hat's SSO registration form. Fill in the user details and click Register. Figure 11 shows the completed registration form.

    The visitor fills out the registration form.
    Figure 11. The visitor fills out the registration form.

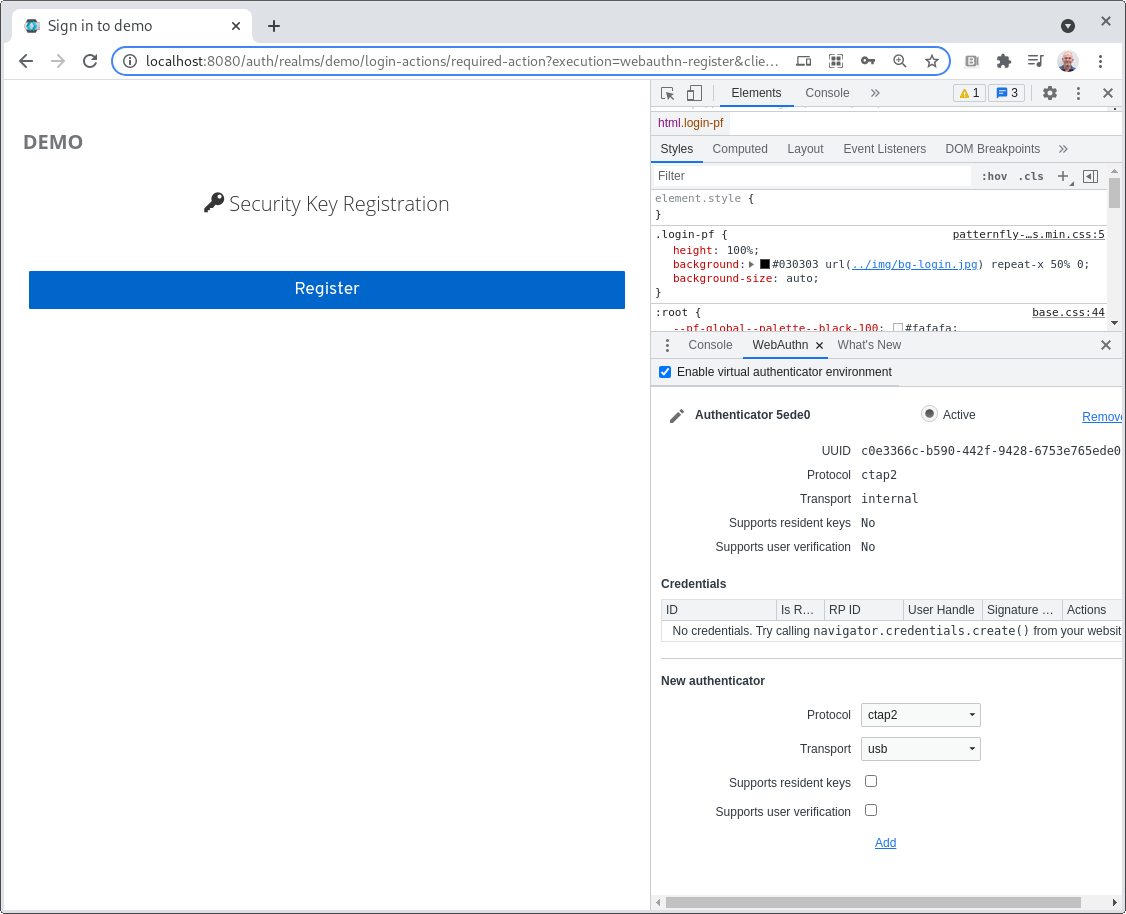
    If WebAuthn is set up correctly, you should see an option to register a security key. Figure 12 shows this registration form.

    WebAuthn allows the application to register a key for the visitor.
    Figure 12. WebAuthn allows the application to register a key for the visitor.

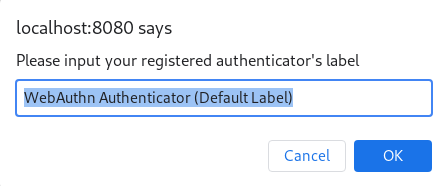
    Click Register and you should be prompted for a label for the authenticator. Figure 13 shows this prompt with the default label.

    The label for the authenticator is "WebAuthn Authenticator (Default Label)."
    Figure 13. The label for the authenticator is "WebAuthn Authenticator (Default Label)."

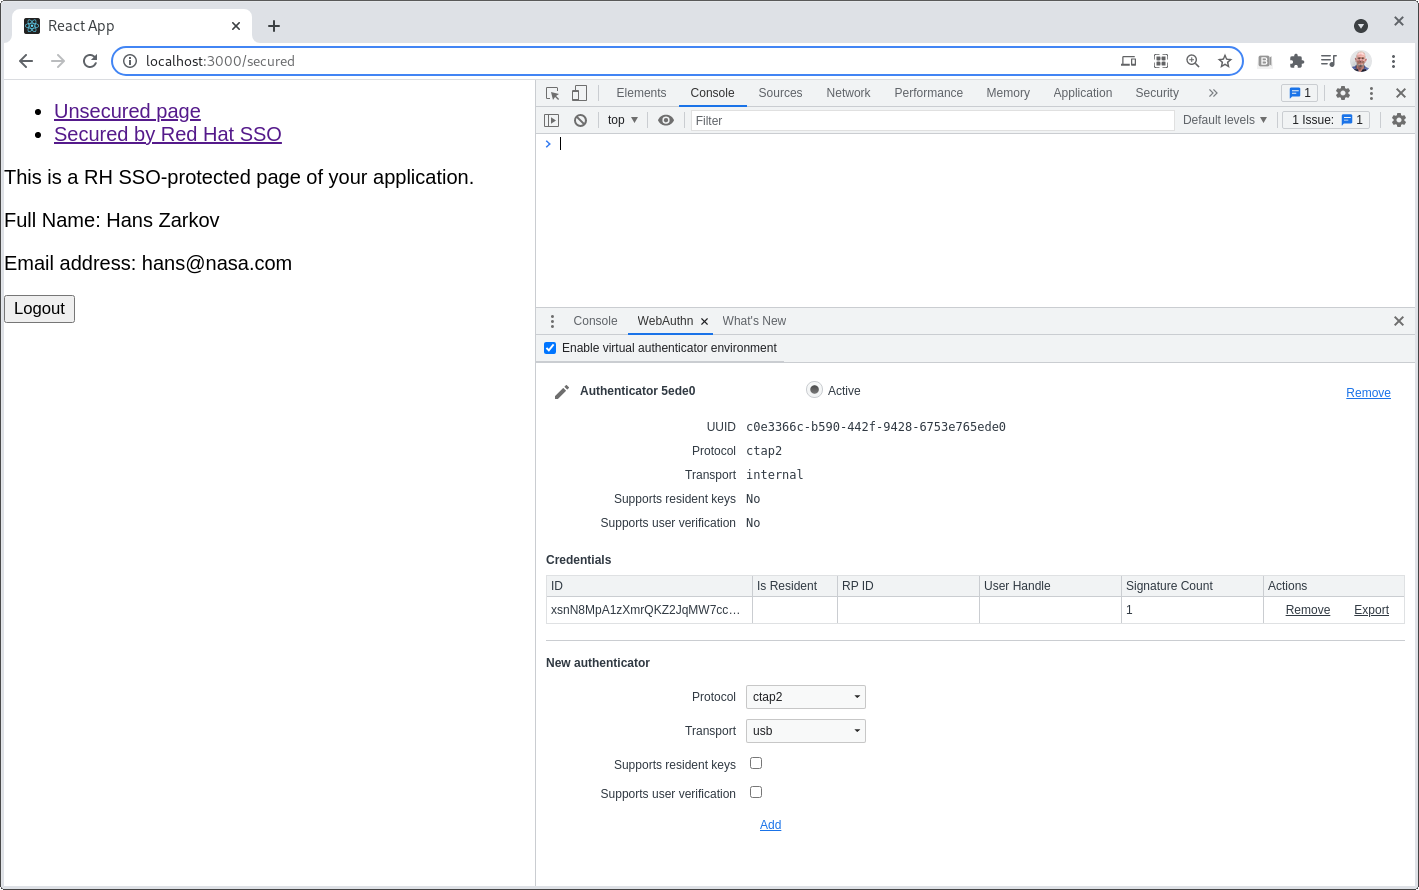
    Once you click OK, you should be redirected to the secured page. This means you have been successfully authenticated by Red Hat's SSO and are allowed to access the protected resource. Figure 14 shows the protected page and the user details pulled from the OIDC token.

    The application shows information from the OIDC token.
    Figure 14. The application shows information from the OIDC token.

    Test your credentials

    You'll notice an entry in the Credentials list on the WebAuthn emulator.

    Try logging out and logging back in again. You will be asked to provide your credentials from the emulator.

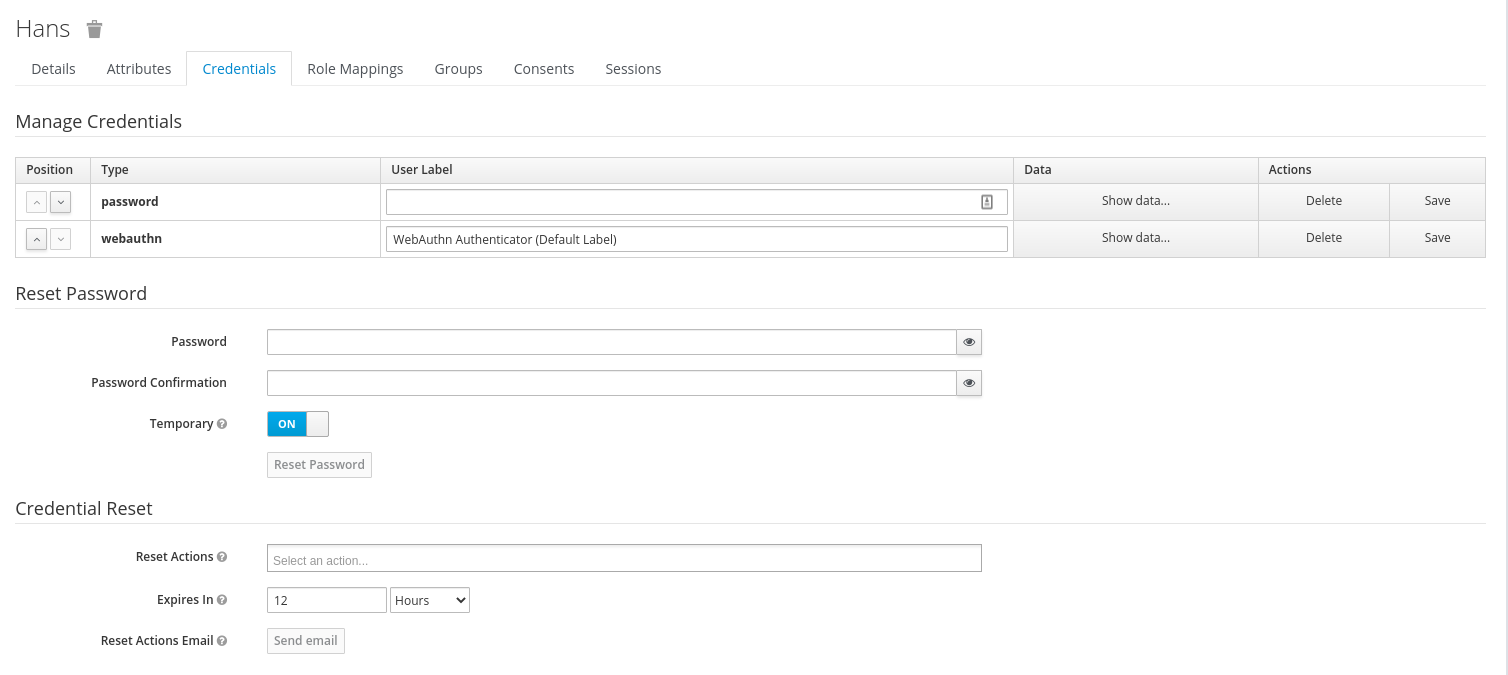
    Finally, in Red Hat's SSO, go to the Users tab and look at the details of the user you created. You'll notice here that the user has two credentials stored: A password and WebAuthn. If you click Show Data on the WebAuthn entry you will see the public key from the authenticator. Figure 15 shows a sample user's credentials from Red Hat's SSO.

    Each registered visitor can display their credentials.
    Figure 15. Each registered visitor can display their credentials.

    Conclusion

    In this article, you've seen how to set up Red Hat's SSO to require biometric authentication and to test user registration using the Google WebAuthn emulator.

    It is critically important for enterprises to protect their applications with strong security that's convenient for users to configure and use. With biometrics devices now standard on most smartphones and laptops, it's feasible to use these interfaces to authenticate users. Red Hat's SSO and WebAuthn provide developers with the tools needed to configure applications to use biometrics for secure user authentication.

    Last updated: September 20, 2023

    Related Posts

    • X.509 user certificate authentication with Red Hat's single sign-on technology

    • Use mobile numbers for user authentication in Keycloak

    • Single Sign-On Made Easy with Keycloak / Red Hat SSO

    • Transitioning Red Hat SSO to a highly-available hybrid cloud deployment

    Recent Posts

    • Red Hat Enterprise Linux 10.2 and 9.8: Top features for developers

    • What GPU kernels mean for your distributed inference

    • Debugging image mode with Red Hat OpenShift 4.20: A practical guide

    • EvalHub: Because "looks good to me" isn't a benchmark

    • SQL Server HA on RHEL: Meet Pacemaker HA Agent v2 (tech preview)

    Red Hat Developers logo LinkedIn YouTube Twitter Facebook

    Platforms

    • Red Hat AI
    • Red Hat Enterprise Linux
    • Red Hat OpenShift
    • Red Hat Ansible Automation Platform
    • See all products

    Build

    • Developer Sandbox
    • Developer tools
    • Interactive tutorials
    • API catalog

    Quicklinks

    • Learning resources
    • E-books
    • Cheat sheets
    • Blog
    • Events
    • Newsletter

    Communicate

    • About us
    • Contact sales
    • Find a partner
    • Report a website issue
    • Site status dashboard
    • Report a security problem

    RED HAT DEVELOPER

    Build here. Go anywhere.

    We serve the builders. The problem solvers who create careers with code.

    Join us if you’re a developer, software engineer, web designer, front-end designer, UX designer, computer scientist, architect, tester, product manager, project manager or team lead.

    Sign me up

    Red Hat legal and privacy links

    • About Red Hat
    • Jobs
    • Events
    • Locations
    • Contact Red Hat
    • Red Hat Blog
    • Inclusion at Red Hat
    • Cool Stuff Store
    • Red Hat Summit
    © 2026 Red Hat

    Red Hat legal and privacy links

    • Privacy statement
    • Terms of use
    • All policies and guidelines
    • Digital accessibility

    Chat Support

    Please log in with your Red Hat account to access chat support.