As part of Red Hat's AMQ offerings, Red Hat offers a Kafka-based event streaming solution both for traditional deployment and microservices-based deployment branded as Red Hat AMQ Streams. The Red Hat OpenShift AMQ Streams deployment option is based on Strimzi, an open source tool that makes Kafka deployment as a container on a Kubernetes platform easy because most of the deployment prerequisites are automated with the OpenShift Operator Framework.
In this article, we look at how to deploy Apache Kafka on Red Hat OpenShift 4, using reasonable sample microservice applications to showcase the endless possibility of innovation brought by OpenShift and Kafka.
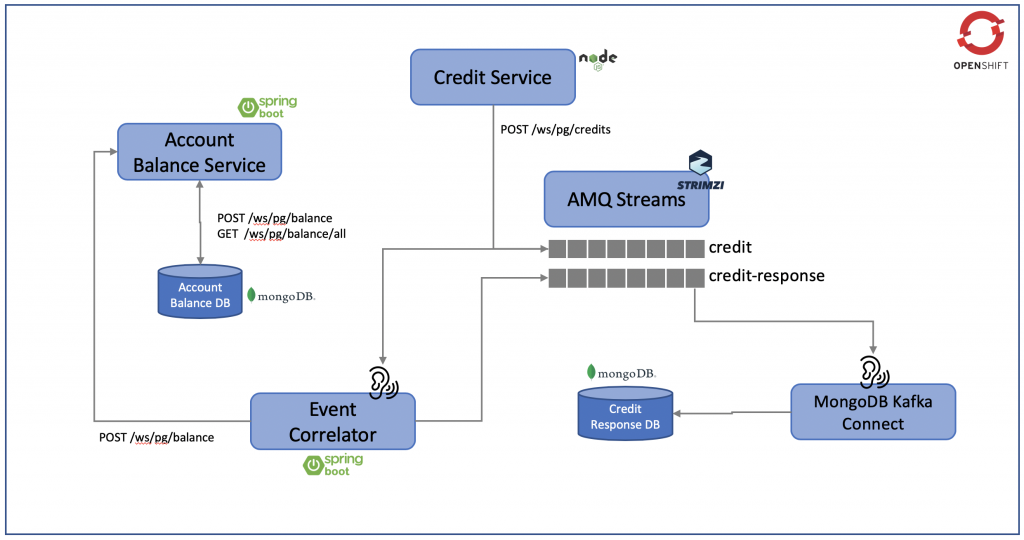
Figure 1: Our deployment environment.
Figure 1 illustrates the environment we will deploy on OpenShift with a number of microservices, including:
- The Account Balance Service provides information on the account balance, which has its own MongoDB database services.
- The Credit Service performs credit transfer between accounts, storing the credit data in the
creditKafka topic. - The Event Correlator listens to the
credittopic, performs the necessary adjustment to the account balance, and updates the changes to the Account Balance Service via the REST API. At the same time, it sends the outcome of this process as a credit response to the Kafka topiccredit-response. - MongoDB Kafka Connect listens to the content in the
credit-responsetopic and streams this information to the Credit Response DB.
Install AMQ Streams on Red Hat OpenShift
AMQ Streams installation is pretty straightforward on Red Hat OpenShift. The only issue I faced was configuring MongoDB Kafka Connect, and that was mostly due to a lack of detailed documentation and a bug in Kafka Connect. All of these issues are now structurally documented as the following:
- Download the YAML installation files from the Red Hat Access website.
Note: We are installing these AMQ Streams using cluster admin. AMQ Streams includes several custom resources. By default, permission to create, edit, and delete these resources is limited to OpenShift cluster administrators. If you want to allow non-cluster administrators to manage AMQ Streams resources, you must assign them the Strimzi Administrator role.
- Deploy the Kafka cluster using the Kafka Operator, which can watch Kafka resources for single and multiple namespaces. In our case, we deploy the Operator to watch for a single namespace. Once you download and unzip the installation files, navigate to the root folder, which contains two folders:
examplesandinstall. - Run the following from the command line to make changes to the provided YAML files for our single OpenShift namespace deployment:
On Linux:
$ sed -i 's/namespace: .*/namespace: my-kafka-example/' install/cluster-operator/*RoleBinding*.yaml
On macOS:
$ sed -i '' 's/namespace: .*/namespace: my-kafka-example/' install/cluster-operator/*RoleBinding*.yaml
- Run the following command to deploy the Operator once the namespace is changed:
$ oc apply -f install/cluster-operator -n my-kafka-example
Note: You can also configure the Kafka Operator to watch for all namespaces. Please refer to the documentation for details.
- Deploy the Kafka cluster once the Kafka Operator is deployed. There are two options: ephemeral and persistent. We will deploy a persistent Kafka cluster. Begin by opening the
examples/kafka/kafka-persistent.yamlfile and changing the Kafka cluster name in theKafka.metadata.nameproperty as follows:
apiVersion: kafka.strimzi.io/v1beta1
kind: Kafka
metadata:
  name: my-kafka-cluster
# ...
- Configure the Topic Operator as the following in the same
kafka-persistent.yamlfile as before, in order to enable auto-creation of the Kafka topics configured in the applications:
entityOperator:
    topicOperator:
      watchedNamespace: my-kafka-example
      reconciliationIntervalSeconds: 90
      zookeeperSessionTimeoutSeconds: 20
      topicMetadataMaxAttempts: 6
      image: registry.redhat.io/amq7/amq-streams-operator:1.3.0
- Run the following command to deploy the Kafka cluster:
oc apply -f examples/kafka/kafka-persistent.yaml
- Deploy and run the following sample Kafka producer:
oc run kafka-producer -ti --image=registry.redhat.io/amq7/amq-streams-kafka-23:1.3.0 --rm=true --restart=Never -- bin/kafka-console-producer.sh --broker-list kafka-cluster-kafka-bootstrap:9092 --topic my-topic
- Deploy and run the following sample Kafka consumer:
oc run kafka-consumer -ti --image=registry.redhat.io/amq7/amq-streams-kafka-23:1.3.0 --rm=true --restart=Never -- bin/kafka-console-consumer.sh --bootstrap-server kafka-cluster-kafka-bootstrap:9092 --topic my-topic --from-beginning
- Verify that the Kafka cluster is working as expected once all of the pods and resources are ready, which means seeing if you can send messages from the producer to the consumer.
Deploy sample application dependencies
Due to AMQ Streams, brokers are not accessible directly outside of the namespace where they are deployed. We will deploy all of our sample applications in the same namespace as the Kafka cluster. This issue is the same for all Kafka brokers deployed as containers, and this is not a limitation of OpenShift. All external connections are handled and routed by the Kafka bootstrap component.
Note: If you wish to access the brokers externally, please refer to this article on how to enable this option.
Deploy MongoDB
oc new-app -f https://raw.githubusercontent.com/chengkuangan/creditresponsemongodb/master/mongodb-deployment-template.yaml
During the time this article was written and due to the hardcoded database authentication source, I received the following error (source='admin') in the Kafka Connect container log when Kafka Connect was trying to send data to MongoDB:
2019-11-07 12:23:07,617 INFO Cluster created with settings {hosts=[creditresponse:27017], mode=SINGLE, requiredClusterType=UNKNOWN, serverSelectionTimeout='30000 ms', maxWaitQueueSize=500} (org.mongodb.driver.cluster) [task-thread-mongodb-sink-0]
2019-11-07 12:23:07,842 INFO Cluster description not yet available. Waiting for 30000 ms before timing out (org.mongodb.driver.cluster) [task-thread-mongodb-sink-0]
2019-11-07 12:23:07,861 INFO Opened connection [connectionId{localValue:1, serverValue:220}] to creditresponse:27017 (org.mongodb.driver.connection) [cluster-ClusterId{value='5dc40cab2efd9074c7742e33', description='null'}-creditresponse:27017]
2019-11-07 12:23:07,863 INFO Monitor thread successfully connected to server with description ServerDescription{address=creditresponse:27017, type=STANDALONE, state=CONNECTED, ok=true, version=ServerVersion{versionList=[3, 2, 10]}, minWireVersion=0, maxWireVersion=4, maxDocumentSize=16777216, logicalSessionTimeoutMinutes=null, roundTripTimeNanos=1014605} (org.mongodb.driver.cluster) [cluster-ClusterId{value='5dc40cab2efd9074c7742e33', description='null'}-creditresponse:27017]
2019-11-07 12:23:07,892 INFO Closed connection [connectionId{localValue:2}] to creditresponse:27017 because there was a socket exception raised by this connection. (org.mongodb.driver.connection) [task-thread-mongodb-sink-0]
2019-11-07 12:23:07,894 ERROR Error on mongodb operation (com.mongodb.kafka.connect.sink.MongoSinkTask) [task-thread-mongodb-sink-0]
com.mongodb.MongoSecurityException: Exception authenticating MongoCredential{mechanism=SCRAM-SHA-1, userName='creditresponse', source='admin', password=<hidden>, mechanismProperties={}}
  at com.mongodb.internal.connection.SaslAuthenticator.wrapException(SaslAuthenticator.java:173)
To work around this problem, perform oc rsh into the MongoDB pod to create a new creditresponse user account with the following details:
mongo --port 27017 -u admin -p creditresponse --authenticationDatabase admin
use admin
db.runCommand({createRole:"listDatabases",privileges:[{resource:{cluster:true}, actions:["listDatabases"]}],roles:[]})
db.createUser({
"user" : "creditresponse",
"pwd" : "creditresponse",
    "roles" : [
        {
            "role" : "listDatabases",
            "db" : "admin"
        },
        {
            "role" : "readWrite",
            "db" : "creditresponse"
        },
        {
            "role" : "read",
            "db" : "local"
        }
    ]
})
Deploy and configure MongoDB Kafka Connect
AMQ Streams Kafka Connect only comes with FileStreamSourceConnector and FileStreamSinkConnector. In order to deploy MongoDB Kafka Connect, we need to build the container image with the MongoDB Kafka Connect JAR file and the Red Hat-supported AMQ Streams base image:
- Proceed to create the necessary Dockerfile with the following content:
[source]
FROM registry.redhat.io/amq7/amq-streams-kafka-23:1.3.0
USER root:root
COPY ./mongo-plugins/ /opt/kafka/plugins/
USER kafka:kafka
- Download the MongoDB Kafka Connect JAR files from the MongoDB website.
- Unzip and copy the JAR file to the
mongo-pluginsfolder. - Make sure you have a valid Red Hat account in order to log in and access
registry.redhat.io. - Build the image:
docker login registry.redhat.io

docker build -t chengkuan/amq-streams-kafka-connect-23:1.3.0
- Change
kafka-connect.yamlwith the followingspec.image,spec.bootstrapServers, andspec.tls.trustedCertificates.secretName. Take note that the port number forspec.bootstrapServersis 9093, which is the defaultclienttlsport:
apiVersion: kafka.strimzi.io/v1beta1
kind: KafkaConnect
metadata:
  name: mongodb-connect-cluster
spec:
  version: 2.3.0
  replicas: 1
  bootstrapServers: kafka-cluster-kafka-bootstrap:9093
  tls:
    trustedCertificates:
      - secretName: kafka-cluster-cluster-ca-cert
        certificate: ca.crt
  image: docker.io/chengkuan/amq-streams-kafka-connect-23:1.3.0
- Deploy Kafka Connect:
oc apply -f examples/kafka-connect/kafka-connect.yaml
- Port forward from a local PC to OpenShift's connect API service because Kafka Connect's pod is not accessible externally:
oc port-forward service/mongodb-connect-cluster-connect-api 8083:8083
- Run the following using
curlor a web browser to verify that the MongoDB Connect plugin loaded successfully:
curl http://localhost:8083/connector-plugins
You will see that the MongoDB Connect plugin is listed:
[{"class":"com.mongodb.kafka.connect.MongoSinkConnector","type":"sink","version":"0.2"},{"class":"com.mongodb.kafka.connect.MongoSourceConnector","type":"source","version":"0.2"},{"class":"org.apache.kafka.connect.file.FileStreamSinkConnector","type":"sink","version":"2.3.0.redhat-00003"},{"class":"org.apache.kafka.connect.file.FileStreamSourceConnector","type":"source","version":"2.3.0.redhat-00003"}]
To configure MongoDB Kafka Connect, download connect-mongodb-sink.json and modify the following accordingly:
{
    "name": "mongodb-sink",
    "config": {
        "connector.class": "com.mongodb.kafka.connect.MongoSinkConnector",
        "tasks.max": 1,
        "topics": "credit-response",
        "connection.uri": "mongodb://creditresponse:creditresponse@creditresponse:27017",
        "database": "creditresponse",
        "collection": "response",
        "key.converter": "org.apache.kafka.connect.json.JsonConverter",
        "key.converter.schemas.enable": false,
        "value.converter": "org.apache.kafka.connect.json.JsonConverter",
        "value.converter.schemas.enable": false,
        "max.num.retries": 3
    }
}
Next, post to the Kafka Connect REST API:
curl -d connect-mongodb-sink.json -H "Content-Type: application/json" -X POST http://localhost:8083/connectors
Note: At the time this was written, I could not POST the content successfully to Kafka Connect using the curl command due to a JSON formatting error. However, I can POST the same content without errors using Postman.
Finally, run the following curl command to verify the configuration:
curl http://localhost:8083/connectors/mongodb-sink
The result:
{
    "name": "mongodb-sink",
    "config": {
        "connector.class": "com.mongodb.kafka.connect.MongoSinkConnector",
        "key.converter.schemas.enable": "false",
        "database": "creditresponse",
        "tasks.max": "1",
        "topics": "credit-response",
        "max.num.retries": "3",
        "connection.uri": "mongodb://creditresponse:creditresponse@creditresponse:27017",
        "value.converter.schemas.enable": "false",
        "name": "mongodb-sink",
        "collection": "response",
        "value.converter": "org.apache.kafka.connect.json.JsonConverter",
        "key.converter": "org.apache.kafka.connect.json.JsonConverter"
    },
    "tasks": [
        {
            "connector": "mongodb-sink",
            "task": 0
        }
    ],
    "type": "sink"
}
Deploy the Account Balance Service application
Run the following command to deploy the pods:
oc new-app https://raw.githubusercontent.com/chengkuangan/accountbalance/master/templates/deployment-templates.yaml
Deploy the Credit Service application
Run the following command to deploy the Credit Service. Ensure that KAFKA_BOOTSTRAP_SERVER points to the correct server:
oc new-app https://raw.githubusercontent.com/chengkuangan/creditservice/master/templates/creditservice.json -p KAFKA_BOOTSTRAP_SERVER=kafka-cluster-kafka-bootstrap:9092
Deploy the Event Correlator Service
KAFKA_BOOTSTRAP_SERVER points to the correct server:oc new-app -f https://raw.githubusercontent.com/chengkuangan/eventcorrelator/master/templates/deployment-templates.yaml -p KAFKA_BOOTSTRAP_SERVER=kafka-cluster-kafka-bootstrap:9092
Watch the application in action
curl -H "Content-Type: application/json" -X POST http://accountbalance-my-kafka-example.apps.demo.ocp.internal/ws/pg/balance -d '{"accountId": "20191108-MY-00000001", "balance": 500.00, "lastUpdatedDate": 1563178274158 }'
curl -H "Content-Type: application/json" -X POST http://accountbalance-my-kafka-example.apps.demo.ocp.internal/ws/pg/balance -d '{"accountId": "20191108-MY-00000002", "balance": 700.00, "lastUpdatedDate": 1563178274158 }'
Query the account balance entries created above:
curl http://accountbalance-my-kafka-example.apps.demo.ocp.internal/ws/pg/balance/all
The result:
[
   {
      "_id":"5dc52069a3c1080001ebd539",
      "accountId":"20191108-MY-00000001",
      "balance":500.0,
      "lastUpdatedDate":1563178274158
   },
   {
      "_id":"5dc52076a3c1080001ebd53a",
      "accountId":"20191108-MY-00000002",
      "balance":700.0,
      "lastUpdatedDate":1563178274158
   }
]
Perform a credit transfer:
curl -H "Content-Type: application/json" -X POST http://creditservice-my-kafka-example.apps.demo.ocp.internal/ws/pg/credits -d '{"amount": 10.50, "sourceAccount": "20191108-MY-00000001", "targetAccount": "20191108-MY-00000002"}'
Query the balance after the credit transfer:
curl http://accountbalance-my-kafka-example.apps.demo.ocp.internal/ws/pg/balance/all
The result:
[
   {
      "_id":"5dc52069a3c1080001ebd539",
      "accountId":"20191108-MY-00000001",
      "balance":489.5,"lastUpdatedDate":1573200543543
   },
   {
      "_id":"5dc52076a3c1080001ebd53a",
      "accountId":"20191108-MY-00000002",
      "balance":710.5,
      "lastUpdatedDate":1573200543543
   }
]
Perform oc rsh into the Credit Response MongoDB. Use db.response.find() to see that the credit response is captured:
mongo --port 27017 -u admin -p creditresponse --authenticationDatabase admin

>use creditresponse
switched to db creditresponse

>show collections
response

>db.response.find()
Result:
{
   "_id" : ObjectId("5dc523f536d41402601d01a4"),
   "sourceAccountRecordId" : "5dc52069a3c1080001ebd539",
   "targetAccountRecordId" : "5dc52076a3c1080001ebd53a",
   "sourceAccountId" : "20191108-MY-00000001",
   "targetAccountId" : "20191108-MY-00000002",
   "sourceAccountBalance" : 489.5,
   "targetAccountBalance" : 710.5,
   "creditRecordId" : "ykvlkqk2puzc5u",
   "creditAmount" : 10.5,
   "transactionDate" : NumberLong("1573200543543")
}
