This article describes in detail how to integrate Red Hat A-MQ 6.3 on Red Hat JBoss Enterprise Application Platform (EAP) 7 and covers in detail the admin-object configuration, especially the pool-name configuration. The attribute pool-name for the admin-object explanation can lead to confusion. In this post, I will try to clarify many of the steps, give an overview of the components, and how they fit together.
The JBoss EAP requires the configuration of a resource adapter as a central component for integration with the A-MQ 6.3. In addition, the MDBs configuration on the EAP is required to enable the JMS consumers. On the A-MQ 6.3, the configuration of the Transport Connectors is required to open the communication channel with the EAP.
All the steps required to configure EAP 7 to use A-MQ 6.3 as an external JMS broker are described here:
- Generic Resource Adapter configuration on JBoss EAP 7
- MDB configuration for EJB subsystem
- A-MQ ports/transport-connectors/security configuration
Overview of JBoss EAP and A-MQ components
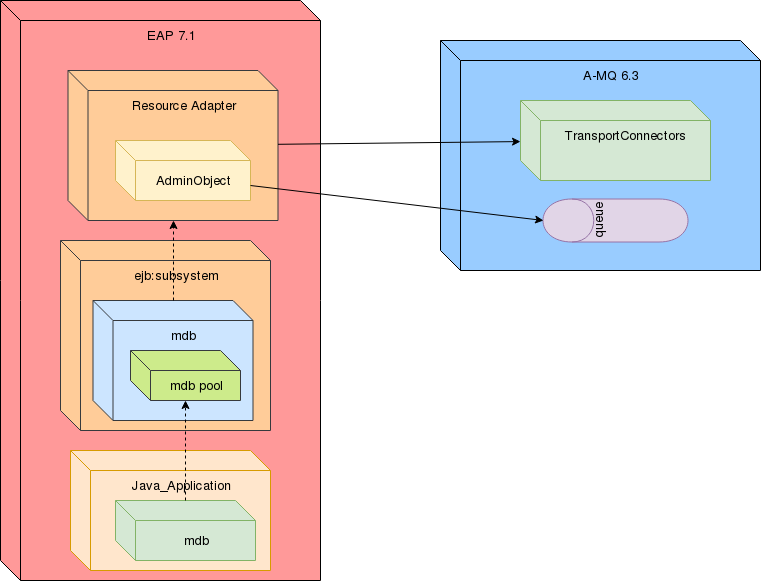
First, is important to understand the components involved in the configuration and the relationship between them.
Resource Adapter
The resource adapter is the central component for the JBoss EAP configuration. It provides the link from the EAP to the A-MQ broker.
In a nutshell, a resource adapter is a deployable Java EE component (usually a .rar file). The resource adapter provides communication between a Java EE application (usually deployed on the JBoss EAP instance) and an Enterprise Information System (EIS) using the Java Connector Architecture (JCA) specification.
A resource adapter is often provided by EIS vendors to allow easy integration of their products with Java EE applications.
On JBoss EAP 7, the resource adapters are defined in the resource-adapter subsystem.
MDB
The MDB configuration in JBoss EAP provides the capability to the Java applications to create a consumer of the A-MQ linked to JBoss EAP. In addition, the MDB pool provides a constraint on the number of instances and sessions available.
Transport Connectors
The Transport Connectors are endpoints defined on the A-MQ broker that allows client-broker communication. The Transport Connectors can be configured using different Transport Protocols (TCP, SSL, HTTP, HTTPS, etc.) and can support different Wire Protocols (Openwire, STOMP, AMQP, etc.)
Components integration overview
The image below depicts in a simple way how the components described above are related.
Generic Resource Adapter configuration on EAP 7
In JBoss EAP 7.1, the recommended messaging broker is AMQ 7, which has an integrated resource adapter in the messaging subsystem. However, is possible to use a different messaging broker or a legacy A-MQ messaging broker.
Extract the resource adapter from the A-MQ 6.3 distribution.
The initial step is to extract the .rar file from the A-MQ 6.3 distribution to a more accessible location. The resource adapter zip container is located in $AMQ_HOME/extras/apache-activemq-5.11.0.redhat-[LATEST_VERSION]-bin.zip.
unzip $AMQ_HOME/extras/apache-activemq-5.11.0.redhat-[LATEST_VERSION]-bin.zip \
-d /tmp
Extract the file to a known location: [AMQ_RAR_DIRECTORY].
Deploy the resource adapter in a standalone/domain JBoss server using the CLI.
Server$ jboss-cli.sh
In a standalone server:
Server$ deploy /tmp/apache-activemq-5.11.0.redhat-[LATEST_VERSION]/lib/optional\
/activemq-rar-5.11.0.redhat-[LATEST_VERSION].rar
In a domain managed server:
Server$ deploy /tmp/apache-activemq-5.11.0.redhat-[LATEST_VERSION]/lib/optional\
/activemq-rar-5.11.0.redhat-[LATEST_VERSION].rar \
–server-groups=[SERVER_GROUP_1],[SERVER_GROUP_2],...
Deploy the resource adapter using the management console.
Is also possible to deploy the resource adapter using the management console
Manual resource adapter deployment in a standalone server using the deployment scanner:
In order to deploy a resource adapter manually to a standalone server, copy the resource adapter archive to the server deployments directory $EAP_HOME/standalone/deployments/. As a result, the scanner will inspect the deployments directory and deploy the resource adapter.
New profiles for domain managed server:
Probably, it is a requirement to have different server groups working with different broker technology or configuration. In order to achieve a better separation of concerns regarding access to JMS services, a new profile that contains the broker configuration can be created.
Resource adapter manual configuration
Add a resource adapter element to the resource-adapters subsystem:
<subsystem xmlns="urn:jboss:domain:resource-adapters:4.0">
  <resource-adapters>
    <resource-adapter id="activemq-rar.rar" statistics-enabled="true">
    </resource-adapter>
  </resource-adapters>
</subsystem>
Definition of the archive of the resource adapter:
<subsystem xmlns="urn:jboss:domain:resource-adapters:4.0">
  <resource-adapters>
    <resource-adapter id="activemq-rar.rar" statistics-enabled="true">
      <archive>
        activemq-rar.rar
      </archive>
    </resource-adapter>
  </resource-adapters>
</subsystem>
Set up different configuration properties:
First, set up the server URL, the access credentials, and the type of transaction support.
<subsystem xmlns="urn:jboss:domain:resource-adapters:4.0">
  <resource-adapters>
    <resource-adapter id="activemq-rar.rar" statistics-enabled="true">
      <archive>
        activemq-rar.rar
      </archive>
      <transaction-support>XATransaction</transaction-support>
      <config-property name="ServerUrl">
        tcp://[BROKER_HOST]:[BROKER_PORT]
      </config-property>
      <config-property name="UserName">
        myusername
      </config-property>
      <config-property name="Password">
        mypassword
      </config-property>
    </resource-adapter>
  </resource-adapters>
</subsystem>
Establish connection definitions:
A possible connection-definition class-name can be: org.apache.activemq.ra.ActiveMQManagedConnectionFactory. The election depends on the type of factory you have to use.
<subsystem xmlns="urn:jboss:domain:resource-adapters:4.0">
  <resource-adapters>
    <resource-adapter id="activemq-rar.rar" statistics-enabled="true">
      <archive>
        activemq-rar.rar
      </archive>
      <transaction-support>XATransaction</transaction-support>
      <config-property name="ServerUrl">
        tcp://[BROKER_HOST]:[BROKER_PORT]
      </config-property>
      <config-property name="UserName">
        myusername
      </config-property>
      <config-property name="Password">
        mypassword
      </config-property>
      <connection-definitions>
        <connection-definition class-name="com.ra.EISManagedConnectionFactory"
             jndi-name="java:/jms/connection/amq/ManagedConnectionFactory"
             enabled="true"
             pool-name="A-MQ">
          <xa-pool>
            <min-pool-size>1</min-pool-size>
            <max-pool-size>50</max-pool-size>
            <prefill>false</prefill>
            <is-same-rm-override>false</is-same-rm-override>
          </xa-pool>
          <validation>
            <use-fast-fail>false</use-fast-fail>
          </validation>
        </connection-definition>
      </connection-definitions>
    </resource-adapter>
  </resource-adapters>
</subsystem>
Configure XA Recovery plugin:
The "XA recovery" is the process that updates or rollback a transaction if one of the participant crash or is unavailable. XA recovery happens without user intervention.
Each XA resource needs to have a recovery module associated with its configuration.
<subsystem xmlns="urn:jboss:domain:resource-adapters:4.0">
  <resource-adapters>
    <resource-adapter id="activemq-rar.rar" statistics-enabled="true">
      <archive>
        activemq-rar.rar
      </archive>
      <transaction-support>XATransaction</transaction-support>
      <config-property name="ServerUrl">
        tcp://[BROKER_HOST]:[BROKER_PORT]
      </config-property>
      <config-property name="UserName">
        myusername
      </config-property>
      <config-property name="Password">
        mypassword
      </config-property>
      <connection-definitions>
        <connection-definition class-name="com.ra.EISManagedConnectionFactory"
             jndi-name="java:/jms/connection/amq/ManagedConnectionFactory"
             enabled="true"
             pool-name="A-MQ">
          <xa-pool>
            <min-pool-size>1</min-pool-size>
            <max-pool-size>50</max-pool-size>
            <prefill>false</prefill>
            <is-same-rm-override>false</is-same-rm-override>
          </xa-pool>
          <validation>
            <use-fast-fail>false</use-fast-fail>
          </validation>
          <recovery>
            <recover-credential>
              <user-name>recoveryuser</user-name>
              <password>recoverypassword</password>
            </recover-credential>
            <recover-plugin
               class-name="org.jboss.jca.core.recovery.ConfigurableRecoveryPlugin">
              <config-property name="enableIsValid">
                false
              </config-property>
              <config-property name="isValidOverride">
                true
              </config-property>
            </recover-plugin>
          </recovery>
        </connection-definition>
      </connection-definitions>
    </resource-adapter>
  </resource-adapters>
</subsystem>
Admin objects setup and configuration:
The admin objects are created in order to provide JNDI lookup of JMS queues for JBoss EAP applications.
The attribute that often causes problems to define an unanswered question is the pool-name attribute of the admin-object. The attribute "pool-name is not implemented in JBoss EAP, that means, this attribute should not be used.
<subsystem xmlns="urn:jboss:domain:resource-adapters:4.0">
  <resource-adapters>
    <resource-adapter id="activemq-rar.rar" statistics-enabled="true">
      <archive>
        activemq-rar.rar
      </archive>
      <transaction-support>XATransaction</transaction-support>
      <config-property name="ServerUrl">
        tcp://[BROKER_HOST]:[BROKER_PORT]
      </config-property>
      <config-property name="UserName">
        myusername
      </config-property>
      <config-property name="Password">
        mypassword
      </config-property>
      <connection-definitions>
        <connection-definition class-name="com.ra.EISManagedConnectionFactory"
             jndi-name="java:/jms/connection/amq/ManagedConnectionFactory"
             enabled="true"
             pool-name="A-MQ">
          <xa-pool>
            <min-pool-size>1</min-pool-size>
            <max-pool-size>50</max-pool-size>
            <prefill>false</prefill>
            <is-same-rm-override>false</is-same-rm-override>
          </xa-pool>
          <validation>
            <use-fast-fail>false</use-fast-fail>
          </validation>
          <recovery>
            <recover-credential>
              <user-name>recoveryuser</user-name>
              <password>recoverypassword</password>
            </recover-credential>
            <recover-plugin
              class-name="org.jboss.jca.core.recovery.ConfigurableRecoveryPlugin">
              <config-property name="enableIsValid">
                false
              </config-property>
              <config-property name="isValidOverride">
                true
              </config-property>
            </recover-plugin>
          </recovery>
        </connection-definition>
      </connection-definitions>
      <admin-objects>
        <admin-object class-name="org.apache.activemq.command.ActiveMQQueue"
             jndi-name="java:/jms/myapp/myqueuename"
             pool-name="MY_POOL_NAME">
          <config-property name="PhysicalName">
            myapp_mycontext_myqueuename
          </config-property>
        </admin-object>
      </admin-objects>
    </resource-adapter>
  </resource-adapters>
</subsystem>
Resource adapter CLI configuration
You can configure resource adapters using the management interfaces. I show below how to configure a resource adapter using the management CLI. If you are using this document as a reference for other resource adapters, it is important to check the vendor’s documentation for supported properties and other important information.
Add a resource adapter element to the resource-adapters subsystem and define the archive of the resource adapter:
/subsystem=resource-adapters/resource-adapter=eis.rar:add(archive=eis.rar, \
transaction-support=XATransaction)
Define different configuration properties:
Add the server configuration property.
/subsystem=resource-adapters/resource-adapter=activemq-rar.rar/\
config-properties=server:add(value=[$AMQ_BROKER_URL])
Add the port configuration property.
/subsystem=resource-adapters/resource-adapter=activemq-rar.rar/\
config-properties=port:add(value=[$AMQ_BROKER_PORT])
Define connection definitions:
Add a connection definition for a managed connection factory.
/subsystem=resource-adapters/resource-adapter=eis.rar/\
connection-definitions=cfName:add(class-name=com.ra.EISManagedConnectionFactory, \
jndi-name=java:/jms/connection/amq/ManagedConnectionFactory)
Configure a managed connection factory configuration property.
/subsystem=resource-adapters/resource-adapter=eis.rar/connection-definitions=cfName/\
config-properties=name:add(value=Acme Inc)
Configure XA Recovery plugin:
In order to correctly define the "recovery-plugin-properties" using the CLI commands, first, add "recovery-plugin-class-name".
/subsystem=datasources/xa-data-source=test-xa-datasource/\
:write-attribute(name=recovery-plugin-class-name,\
value=org.jboss.jca.core.recovery.ConfigurableRecoveryPlugin)
Then add the "recovery-plugin-properties".
/subsystem=datasources/xa-data-source=test-xa-datasource/\
:write-attribute(name=recovery-plugin-properties,\
value={"EnableIsValid" => "false",\
"IsValidOverride" => "true",\
"EnableClose" => "false"})
Admin objects setup and configuration:
Add an admin object.
/subsystem=resource-adapters/resource-adapter=activemq-rar.rar/\
admin-objects=aoName:add(\
class-name=org.apache.activemq.command.ActiveMQQueue, \
jndi-name=java:/jms/myapp/myqueuename)
Configure an admin object configuration property.
/subsystem=resource-adapters/resource-adapter=activemq-rar.rar/\
admin-objects=aoName/config-properties=threshold:add(value=10)
Activate the Resource Adapter:
Activate the resource adapter.
/subsystem=resource-adapters/resource-adapter=activemq-rar.rar:activate
MDB configuration for EJB subsystem
First is important to understand what an MDB is. MDBs are a special kind of stateless session beans and they are the JMS consumer of a specific queue.
They implement a method called onMessage(Message message) executed when a JMS destination on which the MDB is listening receives a message.
The JMS consumer is responsible to trigger a MDBs asynchronously.
By default, the MDBs have 16 sessions to process messages concurrently.
Add the requisite message-driven bean configuration to the urn:jboss:domain:ejb3 subsystem in the JBoss EAP configuration.
<mdb>
  <resource-adapter-ref resource-adapter-name="activemq-rar.rar"/>
  <bean-instance-pool-ref pool-name="mdb-strict-max-pool"/>
</mdb>
In addition, define the MDB pool:
<pools>
	<bean-instance-pools>
		<strict-max-pool name="slsb-strict-max-pool" max-pool-size="20"
             instance-acquisition-timeout="5"
             instance-acquisition-timeout-unit="MINUTES"/>
		<strict-max-pool name="mdb-strict-max-pool"
		     max-pool-size="20"
             instance-acquisition-timeout="5"
             instance-acquisition-timeout-unit="MINUTES"/>
	</bean-instance-pools>
</pools>
The final standalone.xml configuration should look like:
<server ...>
    ...
    <profile>
        ...
        <subsystem xmlns="urn:jboss:domain:ejb3:...">
            ...
            <mdb>
                <resource-adapter-ref resource-adapter-name="activemq-rar.rar"/>
                <bean-instance-pool-ref pool-name="mdb-strict-max-pool"/>
            </mdb>
            <pools>
                <bean-instance-pools>
                    <strict-max-pool name="slsb-strict-max-pool"
                         max-pool-size="20"
                         instance-acquisition-timeout="5"
                         instance-acquisition-timeout-unit="MINUTES"/>
                    <strict-max-pool name="mdb-strict-max-pool"
                         max-pool-size="20"
                         instance-acquisition-timeout="5"
                         instance-acquisition-timeout-unit="MINUTES"/>
                </bean-instance-pools>
            </pools>
            ...
        </subsystem>
        ...
    </profile>
    ...
</server>
A-MQ ports/transport-connectors
First, the A-MQ configuration requires the transport connectors that define the endpoint used by JBoss EAP to integrate the resource adapter.
Implement the following configuration in the activemq.xml:
<transportConnectors>
   <transportConnector name="openwire-client"
        uri="nio://0.0.0.0:[BROKER_PORT]?[TRANSPORT_OPTIONS]"/>
</transportConnectors>
Summary
This article provides a detailed description of Red Hat JBoss EAP 7 integration with A-MQ 6.3 and the admin-object configuration, which is a complex process if the required steps are not clear for the integrator. This article covers the admin-object setup and the pool-name attribute in great detail and provides a good hint regarding the correct configuration.
Last updated: September 3, 2019