This article describes the integration of Red Hat Single Sign-On (SSO) with Red Hat Directory Server 11 (LDAP). It also illustrates how it is possible to perform user synchronization and group synchronization between Red Hat Directory Server and Red Hat's single sign-on tools.
Install Red Hat Directory Server 11
To install Red Hat Directory Server 11, you first need an active Red Hat Directory Server subscription (which you can get using the subscription-manager). Once you have this, do the following.
Install the Red Hat Directory Server 11 package
Install the Red Hat Directory Server 11 package with:
# yum module install redhat-ds:11
For more details, see chapter: 1.1. Installing the Directory Server packages.
Create a Red Hat Directory Server instance
Create a new LDAP instance on port 2389, with the database suffix dc=example,dc=com:
dscreate interactive
Install Directory Server (interactive mode)

Enter system's hostname [host1.remote.csb]:

Enter the instance name [jdoe]: ds2389

Enter port number []: 2389

Create self-signed certificate database [yes]:

Enter secure port number []: 2636

Enter Directory Manager DN [cn=Directory Manager]:

Enter the Directory Manager password:
Confirm the Directory Manager Password:

Enter the database suffix (or enter "none" to skip) [dc=jdoe,dc=remote,dc=csb]: dc=example,dc=com

Create sample entries in the suffix [no]: yes
Do you want to start the instance after the installation? [yes]:

Are you ready to install? [no]: yes
Starting installation...
Completed installation for ds2389
Populate the ds2389 instance
Populate the new instance ds2389 with the-existing example Example.ldif using the command ldif2db. To do so:
- Stop the ds2389 instance:
# dsctl ds2389 stop
Instance "ds2389" has been stopped
- Import the ldif example:
# dsctl ds2389 ldif2db userroot /usr/share/dirsrv/data/Example.ldif
ldif2db successful
- Restart the instance:
# dsctl ds2389 start
Instance "ds2389" has been started
- Set the instance to start automatically when the machine boots:
# systemctl enable dirsrv@ds2389
Note: For more information, see the Red Hat Directory Server documentation: 1.5. STARTING AND STOPPING A DIRECTORY SERVER INSTANCE.
Connect to the LDAP instance
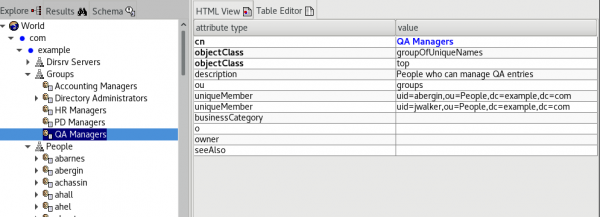
Connect to the LDAP instance with an LDAP browser, such as JXplorer.
The information to connect are:
Connection URL: ldap://localhost:2389
Username: cn=Directory Manager
password: <ds28389-password>

Install and deploy a Red Hat SSO instance
Now it's time to install and deploy your Red Hat Single Sign-On instance.
Install Red Hat SSO
To install Red Hat SSO:
- Download the
rh-ssozip distribution. - Unzip
rh-ssowith:
unzip rh-sso-<release-number>.zip
For further details about installation, see Getting Guide Started Guide, section 2.1. Installing the Server.
Red Hat SSO instance deployment
To boot the Red Hat Single Sign-On server, go to the bin directory of the server distribution and run the standalone boot script:
cd bin
./standalone.sh
- Open http://localhost:8080/auth in your web browser. The welcome page will indicate that the server is running.
- Enter a username and password to create an initial admin user.
- Create an LDAP Realm as shown in Figure 2.

Integrate Red Hat's single sign-on tools and Red Hat Directory Server
Now that you have Red Hat's single sign-on tools installed, you have a dedicated realm for your LDAP test. Do the following to set up the integration.
Federate LDAP users
In order to connect to the running Red Hat Directory Server ds2389 instance, select the User Federation tab, and select ldap provider. In addition, you have to provide the following information:
- Vendor:
Red Hat Directory Server - Username LDAP attribute:
uid - RDN LDAP attribute:
cn - UUID LDAP attribute:
nsuniqueid - User Object Classes:
InetOrgPerson, organizatioalPerson - Connection URL:
ldap://localhost:2389 - Users DN:
ou=people,dc=example,dc=com - Bind Type:
simple - Bind DN:
cn=Directory Manager - Search Scope:
Subtree
For the other fields, pick the default purpose value, as shown in Figure 3.

Synchronize single sign-on and LDAP users
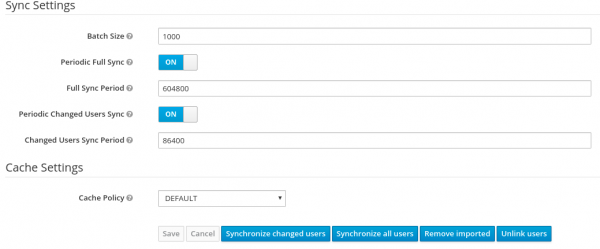
Once all of the settings are entered, you can synchronize users either manually or automatically using the Sync Settings, as shown in Figure 4.

To synchronize users:
- Manually: Select either Synchronize all users or Synchronized changed users. The command Synchronize all users can be quite lengthy if you have a large number of LDAP users.
- Automatically: Select either Periodic Full Sync or Periodic Changed Users Sync, based on the delta. The most efficient and less time-consuming option is to use a Periodic Changed Users Sync.
Once the sync finishes, your LDAP users become visible at the SSO level as shown in Figure 5. When synchronization is active, newly created LDAP users will also be synchronized and created at this level (upon the next synchronization).

Synchronize Red Hat Single Sign On and Red Hat Directory Server via groups
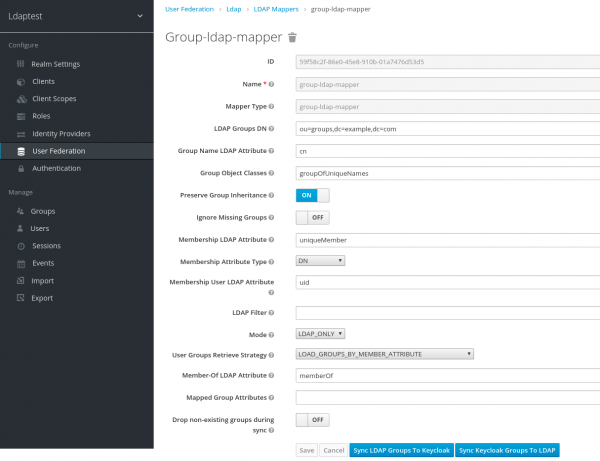
It is also possible to perform group synchronization between Red Hat Directory Server and Red Hat's single sign-on tools. In order to achieve this, you have to create a mapper of type group-ldap-mapper.
Configure a group LDAP mapper
In the Group-ldap-mapper section, provide the following fields:
- Mapper Type:
group-ldap-mapper - LDAP Groups DN:
ou=groups,dc=example,dc=com - Group Name LDAP Attribute:
cn - Group Object Classes:
groupOfUniqueNames - Membership LDAP Attribute:
uniqueMember - Membership User LDAP Attribute:
uid - Member-Of LDAP Attribute:
memberOf
For all the other fields, pick the default value as shown in Figure 6.

3.2 Synchronize your groups
It is only possible to perform group synchronization manually. You can perform group synchronization from Red Hat's single sign-on tools to LDAP with the Sync Ldap Group to Keycloak button, and also from LDAP to Red Hat's single sign-on tools with the Sync Keycloak Groups to LDAP button.
After group synchronization, all of the groups have been imported into SSO with their corresponding members, as shown in Figure 7.


