This article series explains how Apache Kafka and its clients work and how Strimzi makes it accessible for clients running outside of Kubernetes. In the first article, we provided an introduction to the topic, and here we will look at exposing an Apache Kafka cluster managed by Strimzi using node ports.
Specifically, in this article, we'll look at how node ports work and how they can be used with Kafka. We also will cover the different configuration options available to users and the pros and cons of using node ports.
Note: Productized and supported versions of the Strimzi and Apache Kafka projects are available as part of the Red Hat AMQ product.
Node ports
A NodePort is a special type of Kubernetes service. When such a service is created, Kubernetes will allocate a port on all nodes of the Kubernetes cluster and make sure that all traffic to this port is routed to the service and eventually to the pods behind this service.
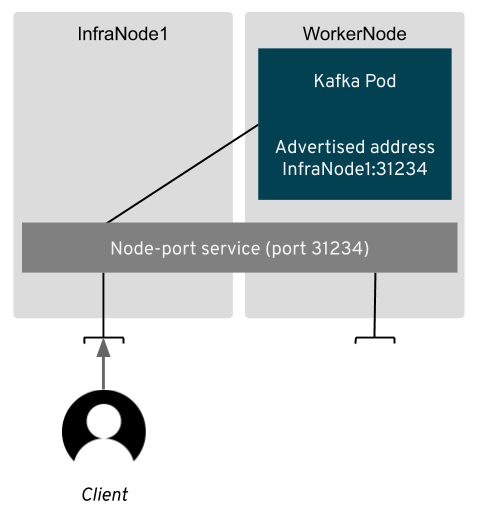
The routing of the traffic is done by the kube-proxy Kubernetes component. It doesn't matter which node your pod is running on. The node ports will be open on all nodes, and the traffic will always reach your pod. So, your clients need to connect to the node port on any of the nodes of the Kubernetes cluster and let Kubernetes handle the rest.
The node port is selected from the port range 30000-32767 by default, but this range can be changed in Kubernetes configuration (see Kubernetes docs for more details about configuring the node port range).
How do we use NodePort services in Strimzi to expose Apache Kafka?
Exposing Kafka using node ports
As a user, you can easily expose Kafka using node ports. All you need to do is to configure it in the Kafka custom resource.
apiVersion: kafka.strimzi.io/v1beta1
kind: Kafka
metadata:
  name: my-cluster
spec:
  kafka:
    # ...
    listeners:
      # ...
      external:
        type: nodeport
        tls: false
    # ...
What happens after you configure it, however, is a bit more complicated.
The first thing we need to address is how the clients will access individual brokers. As explained in the previous article, having a service that will round-robin across all brokers in the cluster will not work with Kafka. The clients need to be able to reach each of the brokers directly.
Inside the Kubernetes cluster, we addressed this by using the pod DNS names as the advertised addresses. The pod hostnames or IP addresses are not recognized outside of Kubernetes, however, so we cannot use them. How does Strimzi solve this?
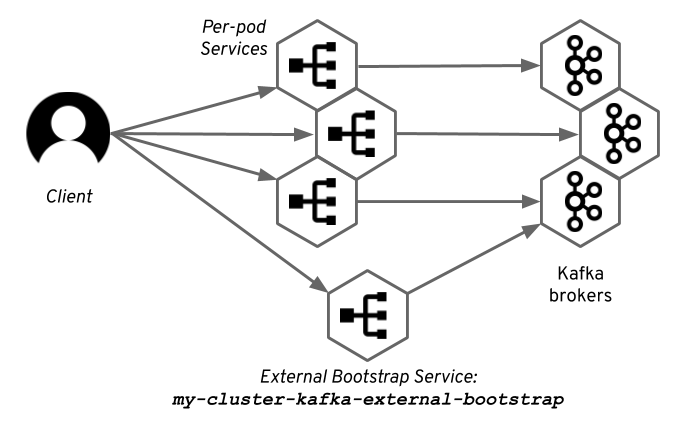
Instead, of using the pod hostnames or IP addresses, we create additional services—one for each Kafka broker. So, in a Kafka cluster with N brokers, we will have N+1 node port services:
- One can be used by the Kafka clients as the bootstrap service for the initial connection and for receiving the metadata about the Kafka cluster.
- Another N services—one for each broker—can address the brokers directly.
All of these services are created with the type NodePort. Each of these services will be assigned different node port so that the traffic for the different brokers can be distinguished.
Since Kubernetes 1.9, every pod in a stateful set is automatically labeled with statefulset.kubernetes.io/pod-name, which contains the name of the pod. Using this label in the pod selector inside the Kubernetes service definition allows us to target only the individual Kafka brokers and not the whole Kafka cluster.
The following YAML snippet shows how the service created by Strimzi targets just one pod from the stateful set by using the statefulset.kubernetes.io/pod-name label in the selector:
apiVersion: v1
kind: Service
metadata:
  name: my-cluster-kafka-0
  # ...
spec:
  # ...
  selector:
    statefulset.kubernetes.io/pod-name: my-cluster-kafka-0
    strimzi.io/cluster: my-cluster
    strimzi.io/kind: Kafka
    strimzi.io/name: my-cluster-kafka
  type: NodePort
  # ...
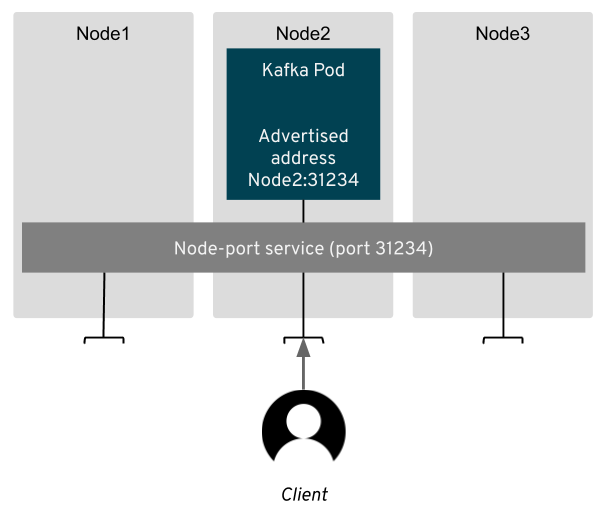
The node port services are just the infrastructure that can route the traffic to the brokers. We still need to configure the Kafka brokers to advertise the right address, so that the clients use this infrastructure. With node ports, the client connecting to the broker needs to connect to:
- the address of one of the Kubernetes nodes
- the node port assigned to the service
Strimzi needs to gather these and configure these as the advertised addresses in the broker configuration. Strimzi uses separate listeners for external and internal access. That means any applications running inside the Kubernetes or Red Hat OpenShift cluster will still use the old services and DNS names as described in the first article.
Although node port services can route the traffic to the broker from all Kubernetes nodes, we can use only a single address, which will be advertised to the clients. Using the address of the actual node where the broker is running will mean less forwarding, but every time the broker restarts, the node might change. Therefore, Strimzi uses an init container, which is run every time the Kafka broker pod starts. It collects the address of the node and uses it to configure the advertised address.
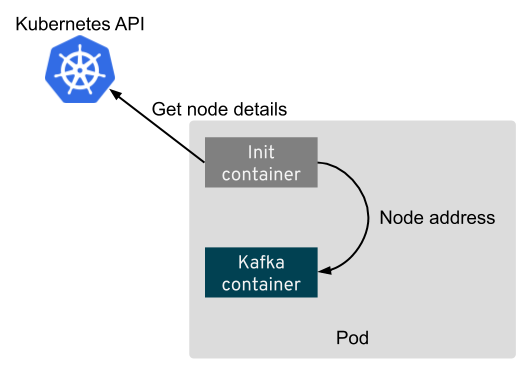
To get the node address, the init container must talk with the Kubernetes API and get the node resource. In the status of the node resource, the address is normally listed as one of the following:
- External DNS
- External IP
- Internal DNS
- Internal IP
- Hostname
Sometimes, only some of these are listed in the status. The init container will try to get one of them in the same order as they are listed above and will use the first one it finds.
Once the address is configured, the client can use the bootstrap node port service to make the initial connection. From there, the client will get the metadata containing the addresses of the individual brokers and start sending and receiving messages.
After Strimzi configures everything inside the Kubernetes and Kafka clusters, you need to do just two things:
- Get the node port number of the external bootstrap service (replace
my-clusterwith the name of your cluster):
kubectl get service my-cluster-kafka-external-bootstrap -o=jsonpath='{.spec.ports[0].nodePort}{"\n"}'
- Get the address of one of the nodes in your Kubernetes cluster (replace
node-namewith the name of one of your nodes - usekubectl get nodesto list all nodes):
kubectl get node node-name -o=jsonpath='{range .status.addresses[*]}{.type}{"\t"}{.address}{"\n"}'
The node address and node port number give you all that is needed to connect to your cluster. The following example uses the kafka-console-producer.sh utility, which is part of Apache Kafka:
bin/kafka-console-producer.sh --broker-list : --topic
For more details, see the Strimzi documentation.
Troubleshooting node ports
Node ports are fairly complex to configure. There are many things which can go wrong.
A common problem is that the address presented to Strimzi by the Kubernetes API in the node resource is not accessible from outside. This can happen, for example, because the DNS name or IP address used is only internal and cannot be reached by the client. This problem can happen with production-grade clusters as well as local development tools, such as Minikube or Minishift. In such cases, you might get the following errors from your client:
[2019-04-22 21:04:11,976] WARN [Consumer clientId=consumer-1, groupId=console-consumer-42133] Connection to node 1 (/10.0.2.15:31301) could not be established. Broker may not be available. (org.apache.kafka.clients.NetworkClient)
or
[2019-04-22 21:11:37,295] WARN [Producer clientId=console-producer] Connection to node -1 (/10.0.2.15:31488) could not be established. Broker may not be available. (org.apache.kafka.clients.NetworkClient)
When you see one of these errors, you can compare the following addresses:
- The address under which you expect your nodes to be reachable by your Kafka clients (with Minikube, that should be the IP address returned by the
minikube ipcommand). - The address of the nodes where the Kafka pods are running
kubectl get node <node-name> -o=jsonpath='{range .status.addresses[*]}{.type}{"\t"}{.address}{"\n"}'
- The address advertised by the Kafka broker
kubectl exec my-cluster-kafka-0 -c kafka -it -- cat /tmp/strimzi.properties | grep advertised
If these addresses are different, they are probably causing the problem, but Strimzi can help. You can use the override options to change the addresses advertised by the Kafka pods. Instead of reading the address from the Kubernetes API from the node resources, you can configure them in the Kafka custom resource. For example:
# ...
listeners:
  external:
    type: nodeport
    tls: false
    overrides:
      brokers:
      - broker: 0
        advertisedHost: XXX.XXX.XXX.XXX
      - broker: 1
        advertisedHost: XXX.XXX.XXX.XXX
      - broker: 2
        advertisedHost: XXX.XXX.XXX.XXX
# ...
The overrides can specify either DNS names or IP addresses. This solution is not ideal, because you need to maintain the addresses in the custom resource and remember to update them every time you are, for example, scaling up your Kafka cluster. In many cases, however, you might not be able to change the addresses reported by the Kubernetes APIs. So, this approach at least gives you a way to get it working.
Another thing which might make using node ports complicated is the presence of a firewall. If your client cannot connect, you should check whether Kubernetes node and the port are reachable using simple tools such as telnet or ping. In public clouds, such as Amazon AWS, you will also need to enable access to the nodes/node ports in the security groups.
TLS support
Strimzi supports TLS when exposing Kafka using node ports. For historical reasons, TLS encryption is enabled by default, but you can disable it if you want.
# ...
listeners:
  external:
    type: nodeport
    tls: false
# ...
When exposing Kafka using node ports with TLS, Strimzi currently doesn't support TLS hostname verification. The main reason is that, with node ports, it is hard to pin down the addresses that will be used and add them to the TLS certificates. This is mainly because:
- The node where the broker runs may change every time the pod or node is restarted.
- The nodes in the cluster might sometimes change frequently, and we would need to refresh the TLS certificates every time nodes are added or removed and addresses change.
Customizations
Strimzi aims to make node ports work out of the box, but there are several options you can use to customize the Kafka cluster and its node port services.
Preconfigured node port numbers
By default, the node port numbers are generated/assigned by the Kubernetes controllers. That means that every time you delete your Kafka cluster and deploy a new one, a new set of node ports will be assigned to the Kubernetes services created by Strimzi. So, after every redeployment, you have to reconfigure all your applications using the node ports with the new node port of the bootstrap service.
Strimzi allows you to customize the node ports in the Kafka custom resource:
# ...
listeners:
  external:
    type: nodeport
    tls: true
    authentication:
      type: tls
    overrides:
      bootstrap:
        nodePort: 32100
      brokers:
      - broker: 0
        nodePort: 32000
      - broker: 1
        nodePort: 32001
      - broker: 2
        nodePort: 32002
# ...
The example above requests node port 32100 for the bootstrap service and ports 32000, 32001, and 32002 for the per-broker services. This allows you to redeploy your cluster without changing the node ports numbers in all your applications.
Note that Strimzi doesn't do any validation of the requested port numbers, so you have to make sure that they are:
- within the range assigned for node ports in the configuration of your Kubernetes cluster, and
- not used by any other service.
You do not have to configure all the node ports. You can decide to configure only some of them, for example, only the one for the external bootstrap service.
Configuring advertised hosts and ports
Strimzi also allows you to customize the advertised hostname and port that will be used in the configuration of the Kafka pods:
# ...
listeners:
  external:
    type: nodeport
    authentication:
      type: tls
    overrides:
      brokers:
      - broker: 0
        advertisedHost: example.hostname.0
        advertisedPort: 12340
      - broker: 1
        advertisedHost: example.hostname.1
        advertisedPort: 12341
      - broker: 2
        advertisedHost: example.hostname.2
        advertisedPort: 12342
# ...
The advertisedHost field can contain either DNS name or an IP address. You can, of course, also decide to customize just one of these.
Changing the advertised port will only change the advertised port in the Kafka broker configuration. It will have no impact on the node port that is assigned by Kubernetes. To configure the node port numbers used by the Kubernetes services, use the nodePort option described above.
Overriding the advertised hosts is something we used in the troubleshooting section above when the node address provided by the Kubernetes API was not the correct one. It can be useful in other situations as well, such as when your network does some network address translation:
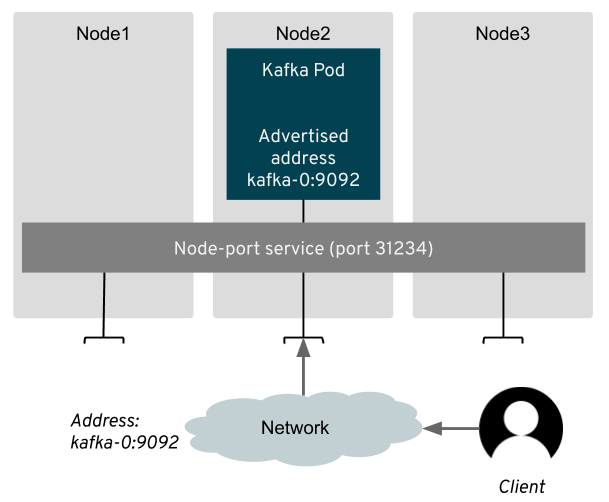
Another example might be when you don't want the clients to connect directly to the nodes where the Kafka pods are running. You can have only selected Kubernetes nodes exposed to the clients and use the advertisedHost option to configure the Kafka brokers to use these nodes.
Pros and cons
Exposing your Kafka cluster to the outside using node ports can give you a lot of flexibility. It can also deliver very good performance. Compared to other solutions, such as load balancers, routes, or ingress, there is no middleman to be a bottleneck or add latency. Your client connections will go to your Kafka broker in the most direct way possible; however, there is also a price to pay for this. Node ports are a very low-level solution. Often, you will run into problems with the detection of the advertised addresses as described in the sections above. Additionally, node ports may expect you to expose your Kubernetes nodes to the clients, which is often seen as security risk by the administrators.
