Page
Build a sample Python Django application in a container used for development
This lesson will walk you through how to create a Red Hat container for development and use it to develop a basic Python Django Hello World application. The running container will become your main development environment for this application, though actual application code will be stored locally on your local desktop, where you can keep it under source control and edit it with your favorite desktop-native development tools.
Prerequisites:
- A basic understanding of how to traverse a Linux file system.
- An understanding of how to create and edit Linux text files.
- A basic understanding of Python.
- A basic understanding of Django.
In this lesson, you will:
- Develop a foundational understanding of Django.
- Build and utilize a Python-oriented, container-based Red Hat developer environment.
- Create a basic Hello World application using Python and Django.
The core application components
Django: In this architecture, we chose Django as our Python-based application framework because of its ability to deliver complex, data-driven web applications. Django combines an object-relational mapper (ORM) with its own Django REST Framework to provide a foundation that can be used to build sophisticated, secure, and scalable APIs. Both Django's mature ecosystem and adherence to convention can help reduce bug counts, and, when used correctly, Django applications have been shown to provide predictable, maintainable code for production use cases.
Step 1: Build and utilize a Python-oriented, container-based Red Hat developer environment
Let's start by creating a directory django-dev where we’ll store all the files we’ll use for this project. You’ll do this on the computer where you are running Podman Desktop.
We’ll place the following contents in the file containerfile in our django-dev project directory:
# Python Application Developer Container
# Use the official Red Hat Universal Base Image 10 as the foundation.
# Note that this image includes Python 3.12
FROM registry.access.redhat.com/ubi10/ubi:latest

# Good practice to label your images.
LABEL maintainer="Your Name <youremail@example.com>" \
      description="Python 3.12 development environment based on UBI 10."

# Install core development tools and Python's package manager (pip).
# - python3.12-pip: For managing Python packages.
# - git: For version control.
# We clean up the dnf cache to keep the image size down.
RUN dnf install -y python3.12-pip git && \
    dnf clean all

# Set the working directory to the new user's home.
WORKDIR /app

# Expose port 8000. This makes the port available for mapping to the host,
# which is necessary for testing web applications (e.g., Django, Flask).
EXPOSE 8000

# Set the default command. When the container starts, it will drop you into a Bash shell.
CMD ["/bin/bash"]
With django-dev/containerfile in place, we’re ready to build our app development container.
- Create the sub-directory
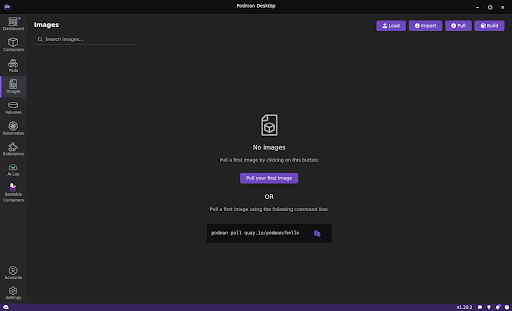
django-dev/bootc/appon your local desktop using your preferred native desktop tools. We’ll use this directory as the central repository for our application files. You’ll be able to edit files by using the editors in your container or your favorite desktop text editor or individual development environment (IDE). Either way, they will be accessible from your container. Open Podman Desktop on your local machine and go to the Images section in the left navigation (Figure 1):

Figure 1: Podman Desktop Images section. - Select Build in the top right corner.
Specify the Containerfile path for the file we just created, specify the image name django-dev-image, and specify a Platform. On my laptop, I chose the Intel and AMD x86_64 image option for my Fedora-based laptop (Figure 2):

Figure 2: Podman Desktop Build screen. Now select Build at the bottom. It will build your new image. Select Done, as shown in Figure 3.
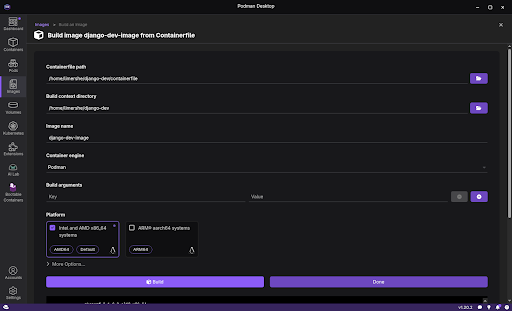
Figure 3: Podman Desktop Build Process screen. Back on the main Images section, select the right arrow next to the
django-devimage to start the image (Figure 4).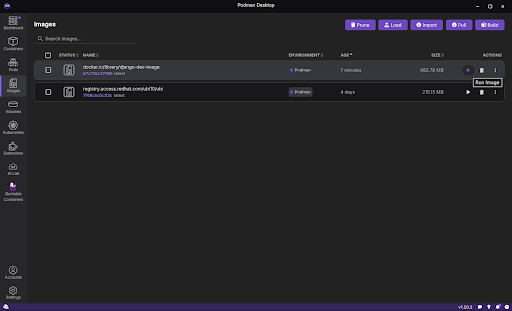
Figure 4: Podman Desktop Images screen with images listed. Give the container the name
django-devand, under Volumes, select the subdirectory we created earlierdjango-dev/bootc/appas the Path on the Host and specify/app:zas the Path inside the container (Figure 5).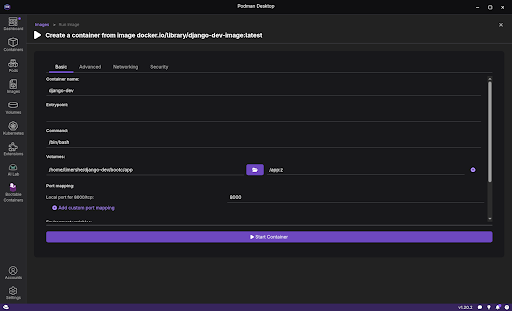
Figure 5: Podman Desktop Create Container screen (basic tab).


Note
Note that the :z option will not show up in the actual path in the container. It’s a directive to podman to allow multiple containers to share the volume content with the local host (in this case your desktop). This is achieved by relabeling the directory to "container_t" on SELinux-enabled Linux systems. It is only needed if our desktop is a Linux system such as RHEL or Fedora. Do not select Start Container as we still have an additional step to take.
Select the Security section at the top of the top right of the form and scroll down to Specify user namespace to
use:and enterkeep-id. This keyword will map your desktop user account to the same user identity (UID) within the container, which allows you to share files between your native desktop environment and your new development container. Figure 6 is an example:
Figure 6: Podman Desktop Create Container screen (Security tab). - Select Start container at the bottom. We now have a running container named
django-dev. Go to the Containers section and double-click on the container. Select Terminal. For the next part of this learning path, our examples assume we’ll be working from a terminal screen like Figure 7:

Figure 7: Podman Desktop Container Details screen (Terminal tab).


Step 2: Create and activate a virtual environment
A great best practice is to create a separate virtual environment for each of your Python projects.
In our next step, we’ll create a separate virtual environment for this Python project. This keeps dependencies for different projects isolated. We’ll start by creating a django-dev directory and creating our project there, which we’ll name django-venv.
python3 -m venv django-venvActivate the environment
You need to activate the environment before you can use it. The command differs based on your operating system.
source django-venv/bin/activateOnce activated, you'll see the name of our virtual environment (django-venv) will appear in parentheses at the beginning of our command prompt.
Install Django
Now that our virtual environment is active, we can install Django. This installation will be contained entirely within the virtual environment we created. Run the following command to install Django.
pip install djangoStep 3: Create a Django project
A Django project is a collection of settings for an entire web application. To create one, run this command in the same directory:
django-admin startproject myprojectThis creates a myproject directory with the following structure:
myproject/
├── manage.py
└── myproject/
    ├── __init__.py
    ├── settings.py
    ├── urls.py
    ├── asgi.py
    └── wsgi.py
Step 4: Create a Django App
In Django, a project is made up of one or more apps. An app is a self-contained module that does something. For example, a blog app, a user authentication app, or, in our case, an app to say hello.
Navigate into your new project directory:
cd myprojectTo create a new app, which we’ll call myapp, use the following command:
python manage.py startapp myappThis creates a myapp directory with its own set of files. Our project structure now looks like this:
myproject/
├── manage.py
├── myproject/
│   └── ...
└── myapp/
    ├── __init__.py
    ├── admin.py
    ├── apps.py
    ├── migrations/
    ├── models.py
    ├── tests.py
    └── views.py
Step 5: Create a view
A view is a function that takes a web request and returns a web response. We'll create a simple view that returns our Hello, World! message. To do this, we edit the file myapp/views.py and add the following Python code:
from django.http import HttpResponse

def hello_world_view(request):
    return HttpResponse("<h1>Hello, World!</h1>")
Step 6: Create a URL for the app
With our view in place, we now need to create a URL pattern that points to it. We need to create the file myapp/urls.py and insert the following contents into it.
from django.urls import path
from . import views

urlpatterns = [
    path('', views.hello_world_view, name='hello'),
]
Note that the empty string indicates that we want this view to be the root URL of our app.
Step 7: Connect your app's URLs to the project
The final step is to tell the main project about the URLs for our myapp.
Open myproject/urls.py (the existing file in the myproject subdirectory) and modify it to include the URLs from myapp:
from django.contrib import admin
from django.urls import path, include # Add 'include' here

urlpatterns = [
    path('admin/', admin.site.urls),
    path('', include('myapp.urls')), # And add this line
]
The changes tell Django that any request to the root URL ('') should be handled by the URL patterns defined in myapp/urls.py.
Step 8: Test our application
It’s time to run our simple myapp application using Django's built-in development server to see our application in action. From the main myproject directory (the one with the manage.py file in it), run:
python manage.py runserver 0.0.0.0:8000Your output in the Podman Desktop terminal screen will look like this:
Watching for file changes with StatReloader
Performing system checks...

System check identified no issues (0 silenced).

You have 18 unapplied migration(s). Your project may not work properly until you apply the migrations for app(s): admin, auth, contenttypes, sessions.
Run 'python manage.py migrate' to apply them.
August 01, 2025 - 21:46:03
Django version 5.2.4, using settings 'myproject.settings'
Starting development server at http://0.0.0.0:8000/
Quit the server with CONTROL-C.

WARNING: This is a development server. Do not use it in a production setting. Use a production WSGI or ASGI server instead.
For more information on production servers see: https://docs.djangoproject.com/en/5.2/howto/deployment/

Quit the server with CTRL-BREAK (on Windows) or CONTROL-C (on Mac/Linux).
Note
Don't worry about the "unapplied migration(s)" message for now; it's not relevant for this simple app.
Step 9: View your app in the browser
Open your web browser and navigate to the address shown in the terminal:
http://server_name:8000/You should see a page with the text, Hello, World! (Figure 1).
Quit the server as instructed in the output.
Congratulations! You've just built and run your first Django application.
Step 10: Ready the application for production
To make our Django application ready for production, we need to make a small change to our project's settings. In the file myproject/settings.py:
Find the
DEBUGsetting and change it to False.DEBUG = FalseSet
ALLOWED_HOSTSto allow your server's IP address or domain name. You can specify a comma-separated list of hosts.ALLOWED_HOSTS = [‘your_server_ip_or_domain.com’]Add a
STATIC_ROOTsetting, which will tell Django where to collect all your static files into a single directory for NGINX to use.STATIC_ROOT = BASE_DIR / 'staticfiles'Run the command to collect all static files from the admin app into the
staticfilesdirectory we just defined:python manage.py collectstatic
These will live in the directory myproject/staticfiles/.
Step 11: Install and configure gunicorn
Using pip, install gunicorn with the command:
pip install gunicornNow we can test using gnuicorn to access our Django application with the command:
gunicorn --bind 0.0.0.0:8000 myproject.wsgi As before, connect using your browser to http://127.0.0.1:8000 to confirm that you haven’t made any mistakes in your configuration. You should see a page with the text, Hello, World! (Figure 1).

As with our earlier test server, you quit the gunicorn server with CTRL-BREAK (on Windows) or CONTROL-C (on Mac/Linux).
Step 12: Package your Python package dependencies
As a final step, let's package up our Python dependencies for later use on our new container.
The following command maintains a list of packages that we can then use to install in our bootable Django container:
cd /app; pip freeze > requirements.txt