Page
Create a VM to join the Service Mesh
With all the prerequisites—the ISO, the tokens, and the WorkloadGroup—in place, we are ready to deploy the VM using the template we prepared. This is the final step in the deployment process.
Prerequisites:
- Red Hat OpenShift Container Platform (OCP) 4.16 or higher
- Red Hat OpenShift Service Mesh (OSSM) 3.x
- Red Hat OpenShift Virtualization
In this lesson, you will:
- Create and access a newly created VM.
Create a VM
Next, we will create the VM itself within the OpenShift console. Please proceed with the following steps to get it created.
- In the OpenShift web console, use the left-hand navigation menu to select the Virtualization dropdown.
- Within the Virtualization menu, click Catalog.
- Ensure the Template Catalog tab is active to view the available VM templates.
In the User templates search field, type
Mesh(or the specific identifier you gave your template). This will limit the selection to our custom template configured for service mesh joining. (Figure 1).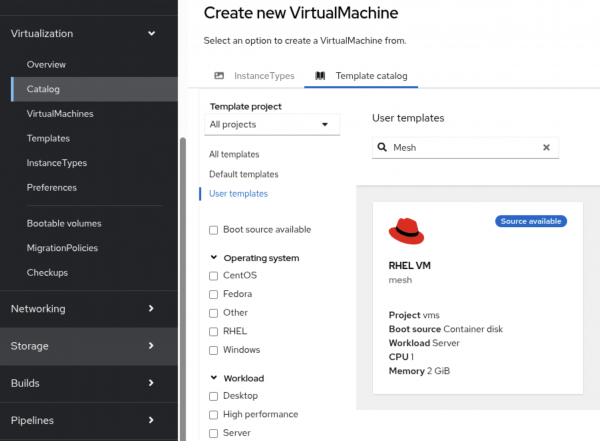
Figure 1: Template search within OpenShift console. After filtering the Template Catalog and selecting your custom Service Mesh VM Template, you will be prompted to fill in the template parameters (Figure 2).
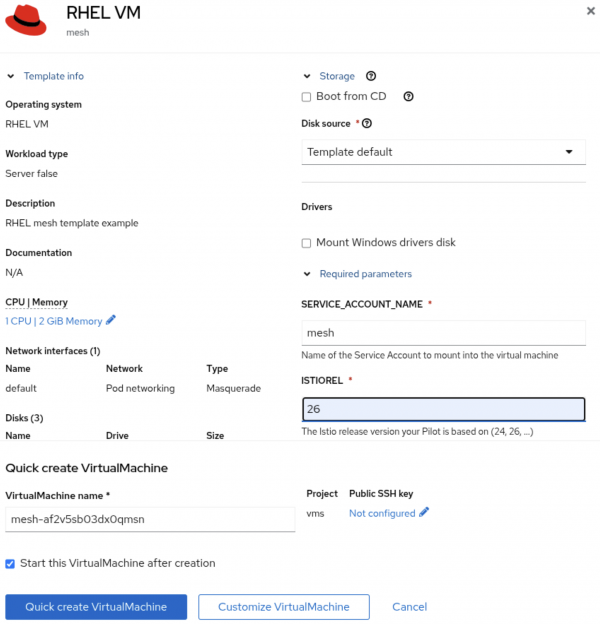
Figure 2: Fields in the VM creation screen filled with the above defined information. To ensure successful authentication and integration with the Istio Pilot, configure the following fields:


Field name | Description | Value to Enter |
| The name of the ServiceAccount used to generate the Istio-specific token. |
|
| Specifies the Istio version the VM should align with, corresponding to the RPMs included on your ISO. | 1.26 (or 1.24, depending on your target OSSM version) |
Once all relevant fields are filled out, click Create and allow the system to boot the VM.
Access the VM: SSH via virtctl proxy
Now that your virtual machine (VM) is deployed and booting, you'll need a secure and convenient way to access its operating system. Rather than exposing the VM service or assigning an external IP, you can use the virtctl console --proxy capability to tunnel your standard SSH connection.
This method is highly secure as it leverages your existing OpenShift permissions and cluster network to establish the connection. To enable this seamless connection, you need to add the following specific configuration block to your local SSH configuration file (typically ~/.ssh/config).
Host vmi/*
   ProxyCommand virtctl port-forward --stdio=true %h %p
   StrictHostKeyChecking no
   AddressFamily inet
   UserKnownHostsFile /dev/null
Host vm/*
   ProxyCommand virtctl port-forward --stdio=true %h %p
   StrictHostKeyChecking no
   AddressFamily inet
   UserKnownHostsFile /dev/null
This configuration provides a highly secure and convenient method for accessing your new virtual machine.
Input:
ssh cloud-user@vm/mesh.vms
Warning: Permanently added 'vm/mesh.vms' (ED25519) to the list of known hosts.
Register this system with Red Hat Insights: rhc connect
Output:
Example:
# rhc connect --activation-key <key> --organization <org>
The rhc client and Red Hat Insights will enable analytics and additional management capabilities on your system.
View your connected systems at https://console.redhat.com/insights
You can learn more about how to register your system
using rhc at https://red.ht/registration
Last login: Fri Aug 22 13:39:54 2025 from 10.135.5.137
Configure the Istio bootstrap
Now that you have secure SSH access to the virtual machine (VM), the final step in the bootstrapping process is to configure and start the Envoy proxy. This involves providing it with the necessary configuration details to contact the Istio Pilot and register the VM's services within the mesh.
The setup scripts on your custom ISO should handle much of this, but you must first gain the necessary privileges to execute those setup commands and manage system services. This can be accomplished by inputting the sudo -i command, then creating or modifying the /etc/istio/config/mesh file. From there, you must adjust the parameters to match your environment's specifics.
Use the following command to modify your configuration to set up Envoy and make sure it connects correctly to your service mesh control plane.
cat <<'EOF' > /etc/istio/config/mesh
defaultConfig:
  discoveryAddress: istiod.istio-system.svc:15012
  meshId: corporate
  proxyMetadata:
    CANONICAL_REVISION: latest
    CANONICAL_SERVICE: mesh
    ISTIO_META_CLUSTER_ID: corporate
    ISTIO_META_DNS_AUTO_ALLOCATE: "true"
    ISTIO_META_DNS_CAPTURE: "true"
    ISTIO_META_MESH_ID: corporate
    ISTIO_META_NETWORK: corporate
    ISTIO_META_WORKLOAD_NAME: mesh
    ISTIO_METAJSON_LABELS: '{"service.istio.io/canonical-name":"mesh","service.istio.io/canonical-revision":"latest","vm.kubevirt.io/name":"mesh"}'
    POD_NAMESPACE: vms
    SERVICE_ACCOUNT: mesh
    TRUST_DOMAIN: cluster.local
EOF
To ensure the Envoy proxy starts correctly and communicates the VM's identity to the Istio Pilot, you must configure the /var/lib/istio/envoy/cluster.env environment file as follows:
cat <<'EOF' > /var/lib/istio/envoy/cluster.env
CANONICAL_REVISION='latest'
CANONICAL_SERVICE='mesh'
CA_ADDR='istiod.istio-system.svc:15012'
ISTIO_INBOUND_PORTS='*'
ISTIO_LOCAL_EXCLUDE_PORTS='22,15090,15021,15020'
ISTIO_METAJSON_LABELS='{"service.istio.io/canonical-name":"mesh","service.istio.io/canonical-revision":"latest","vm.kubevirt.io/name":"mesh"}'
ISTIO_META_CLUSTER_ID='corporate'
ISTIO_META_DNS_AUTO_ALLOCATE='true'
ISTIO_META_DNS_CAPTURE='true'
ISTIO_META_MESH_ID='corporate'
ISTIO_META_NETWORK='corporate'
ISTIO_META_WORKLOAD_NAME='mesh'
ISTIO_NAMESPACE='vms'
ISTIO_SERVICE='mesh.vms'
ISTIO_SERVICE_CIDR='*'
POD_NAMESPACE='vms'
SERVICE_ACCOUNT='mesh'
TRUST_DOMAIN='cluster.local'
EOF
Final VM configuration: Ensure pilot reachability
The final crucial step to complete the VM's integration into the Service Mesh is ensuring the Envoy proxy can resolve and communicate with the Istio Pilot discovery service.
Since we are emulating an external, non-Kubernetes workload, the VM cannot automatically resolve the Kubernetes Service DNS name (e.g., istiod.istio-system.svc.cluster.local). We must manually provide this mapping by editing the VM's local hosts file.
From the OpenShift console, input the following command:
oc -n istio-system get service -l app.kubernetes.io/name=istiodExample output:
NAME     TYPE        CLUSTER-IP       EXTERNAL-IP   PORT(S)                                 AGE
istiod   ClusterIP   172.31.118.166   <none>        15010/TCP,15012/TCP,443/TCP,15014/TCP   5d
Log into the VM and execute on a shell the following command by substituting the ClusterIP as listed from your environment.
echo "172.31.118.166 istiod.istio-system.svc" >> /etc/hostsThe remaining steps should be handled automatically by the cloud-init script embedded within your virtual machine template. This script executes during the VM's initial boot sequence, ensuring the workload is mesh-ready without manual intervention.
That being said, we should verify these actions took place. This can be accomplished by inputting the following commands in the console.
To create a list of existing files and directories:
ls -l /etc/certs/root-cert.pem /var/run/secrets/tokens/istio-tokenTo install the
istio-sidecarpackage:rpm -q istio-sidecarWith the Istio RPMs installed, the /
etc/istio/config/meshcreated, the/var/lib/istio/envoy/cluster.envconfigured, and the /etc/hostsupdated, you are ready to launch the Envoy proxy and formally connect the VM to the Service Mesh.Use the following command to start the Istio service:
systemctl enable --now istio
Our virtual machine is now fully integrated with a service mesh!