One of Eclipse Che's most powerful features is its ability to build factories, which are custom, shared environments that give everyone on your team has the same level of tools and libraries. After creating a workspace, you'll build a factory based on that workspace. Once the factory is created, you can share the URL of the factory with a new teammate, giving them a development environment that's identical to yours. In this scenario, we're discussing onboarding, but factories are useful anytime you want someone else to look at code in the same environment you’re using.
This tutorial is provided as a video and a how-to article below:
A program note: The screen captures in this article are from an instance of Che running on minishift on my laptop, but all the screens (and all the techniques) are the same no matter how or where you’re running Che.
Creating a workspace
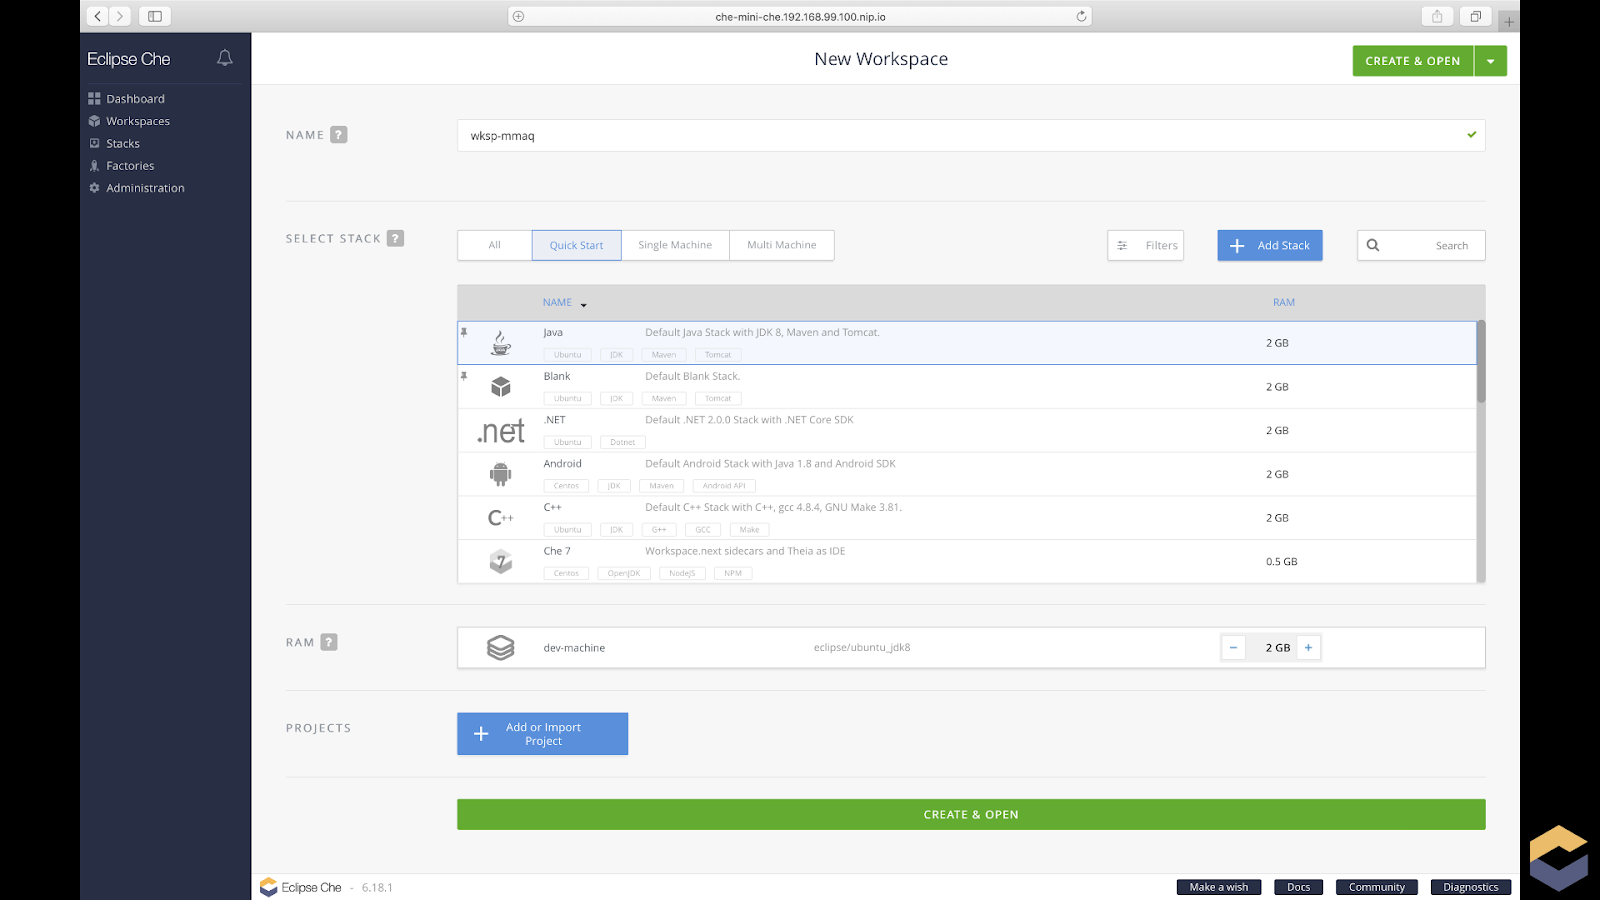
Our scenario here is that we're onboarding a new teammate, so we’ll first create a workspace for them. When you go to the Che URL, you'll see this page if you don’t have any workspaces defined:
If you do have workspaces already, click the Workspaces tab on the left, then click the Add Workspace button. Either way, you'll end up on the page above.
Give the workspace a name; I called mine PetClinic:
Select a Java stack that includes Tomcat and Maven. We'll use both of those as we work with the Pet Clinic app. Each installation of Che has a number of stacks defined, so you may have to scroll through the list to find what you want. In my installation of Che, though, the Java stack I needed was first in the list:
Now click the Add or Import Project button. Select the Git tab (not the GitHub tab). Type in the URL https://github.com/che-samples/web-java-spring-petclinicand click the Add button:
(Be sure to include the https:// part.)
That's all we need to get started. Click the green Create and Open button at the bottom of the page. Your workspace will start shortly. On my machine, starting the workspace in the browser and cloning the git repo took about 45 seconds. Startup times will vary depending on your Che environment, of course. When the workspace is loaded, the Pet Clinic sample app has been imported.
Using the workspace
To make life simpler going forward, go to the Project menu and select Update Project Configuration:
Tell Che that this is a Maven project and click Save:
Now expand the project in the file explorer, then src, main, java, the package name, and model:
Double-click on Pet.java to open the source code for that object:
This is a good a starting point as any for someone wanting to learn the code. Later, we'll configure the factory to make sure this file is opened when the workspace starts, but we've got other work to do first.
Look at the Manage Commands view. (Above the Project Explorer, click the icon that looks like a greater than sign and a cursor in the image below.) Because we told Che this is a Maven project, it has already created a command called build. As you would expect, it's in the Build section:
The command itself does a mvn clean installusing the ${current.project.path} macro:
Click the slider to tell Che this command is applicable to the Pet Clinic project, then click Save. Now click the green Run button to build the project. This creates the WAR file for the Pet Clinic app in the target directory.
Creating commands in the workspace
At this point, we could go to the Terminal and copy the WAR file to Tomcat's webappsdirectory, but it would be nice to build and deploy the code with a single command. We'll create a command to do that now. Click the plus icon (+) next to the Run tab. Double-click on Maven as the command type:
Name this command Build and Run:
You can actually name, spell, or capitalize this however you like, but you'll need to remember exactly what you typed later.
Because we said this is a Maven command, the clean and install goals are defined already. Edit the code by adding another couple of lines. After Maven builds the WAR file, the next step is to take that file and copy it to the Tomcat webapps directory. Type cp, then click the Macros link above the text area. Double-click ${current.project.path} to insert that into the command:
Now add /target/*.war $TOMCAT_HOME/webapps/ROOT.war, spelled and capitalized exactly that way. Copying the file as ROOT.war makes the WAR file we just built the default application for our Tomcat server.
Finally, on a new line add $TOMCAT_HOME/bin/catalina.sh run 2>&1. That starts the Tomcat server and suppress any output from the server. The command should look exactly like this:
The last thing we want to do for this command is define a preview URL. This is based on the name of the Che server. The URL gives us a link to see the Tomcat server up and running, so we can make sure that our code works correctly. Clear the text that's there already, then click the Macros link at the bottom of the view.
Scroll down and select the ${server.tomcat8} macro:
That's all we need here because the default application is the WAR file created from the Pet Clinic project. You could have multiple projects and deploy them as separate webapps if you wanted, but we'll keep it simple for now. The preview URL should look like this:
Building and running code in the workspace
To run your new command, click the Save button, then click the green Run button. This builds and deploys the code and starts Tomcat. When you see the server startup message, click the blue preview link at the top of the view:
In this image, the server startup message is at the bottom of the screen. The preview URL is http://routenjoait10-mini-che.192.168.99.100.nip.io. Using the ${server.tomcat8} macro saves us from having to figure out the URL and type it correctly.
As you can see here, everything built and deployed successfully, the webapp is running on Tomcat, and the world's cutest puppy and kitten are now on our screen:
Che does have a nice shortcut you can use as you're working with the code. Because the Build and Run command we created is in the Run menu, it is associated with the run button at the top of the screen:
Whenever you want to see the effects of any changes you've made in your code, you can use the run button to execute the command you just defined.
Creating a factory
Before we create the factory, make a note of the complete path of the Pet.java file. We'll set up the factory so that the workspace starts with that file open. Che puts all of the projects in your workspace in the /projects directory, so the path we’ll give to Che is /web-java-spring-petclinic/src/main/java/org/springframework/samples/petclinic/model/Pet.java.
Now that we have our workspace configured just the way we want it, let's create the factory. Go to the Workspace menu and click Create Factory:
Give the factory a name, then click Create. The URL of the factory appears in the lower entry field, along with a button to copy the URL to the clipboard:
Because Che is browser-based, the factory URL works on any platform with a full-featured browser. You can try it now if you want, but we'll add a few more things to the factory before we're done.
Wrap up this part of the process by going to the Workspace menu and clicking Stop:
Customizing a factory
Now go to the left-hand side of the window and click the Factories tab. Click the name of the factory you just created to edit its properties. Scroll down to the Configure Actions section. Everything you define in this section happens once the workspace is up and running. What we'll do is tell Che to run a command and open a file when the workspace loads. Next to RunCommand, type the name of the command you defined and click the Add button:
Click the down arrow next to RunCommand. Select openFile as the next action. Paste in the complete path to the Pet.java file. Be sure the path starts with a slash. Click the Add button again, and you have two commands that are executed anytime someone uses the factory to open the workspace:
You can also add to the workspace's commands menu. Let's add a command called Start Tomcat to, well, start Tomcat. Give the command a name, then enter the command and click the Add button:
If you need to create a command with multiple lines, use a double ampersand between them. For example, if you wanted your command to do a mvn clean install and then print the working directory, the command would be mvn clean install -f ${current.project.path} && pwd. If you wanted to add the three-line Build and Run command you defined earlier, use double ampersands in place of the newline characters.
Now scroll to the top of the window and copy the URL of the factory. There are two versions of the URL. One includes your username, the other does not, but they both go to the same place:
If you simply want to test the factory, click the Open button in the upper right-hand corner and the configured workspace will open.
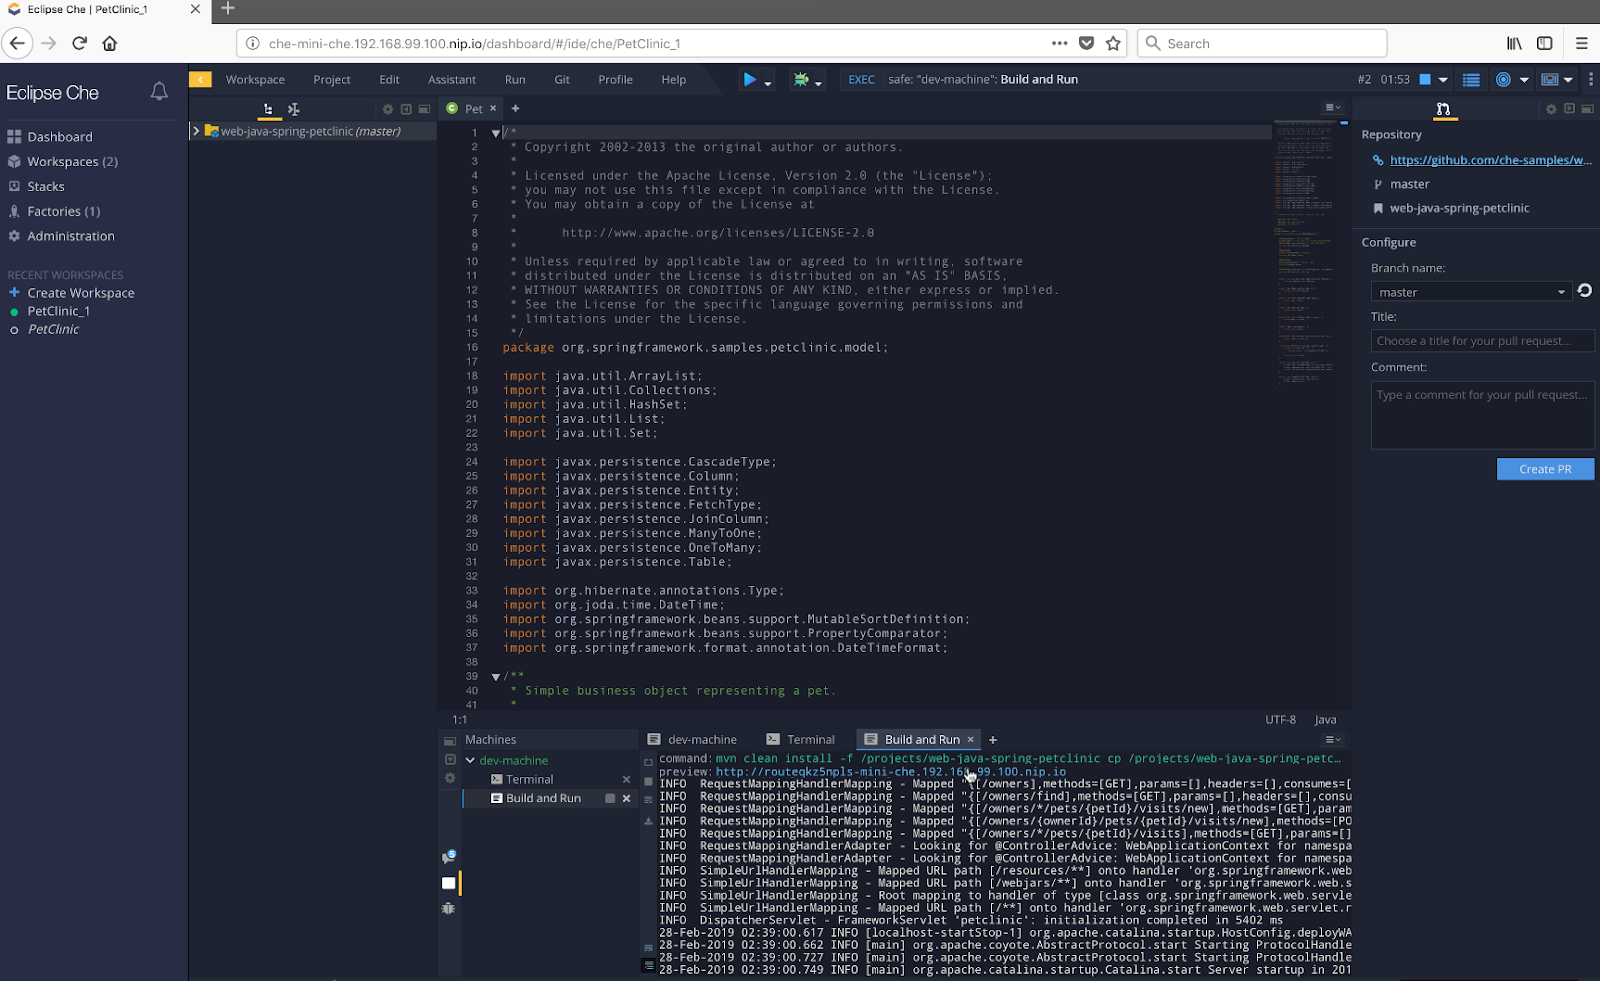
Or you can switch to a different browser and paste in the URL of the factory. You can even switch to a different machine, as long as that machine is authorized to access the Che server. In a couple of minutes, you’ll have the exact same workspace:
This is the workspace URL loaded in Firefox; all of the other screenshots here are from Safari. As you can see, the file Pet.java is open and the code is built and deployed. When the deployment finishes, clicking the preview URL in the Build and Run window takes you to the Pet Clinic application.
Summary
That's a quick tour of how factories work in Che. Factories make onboarding incredibly easy. If someone joins your team, they can use a factory to create a new workspace. And using factories eliminates the "It works on my machine" syndrome. Your machine is just like everyone else's, so it works, or doesn't, the same way everywhere. We hope this article helps you make the most of Che across your team.
Last updated: April 21, 2021


